Creating a section Recovery HD on Hakintosh Yosemite. Creating a Recovery HD manual section. Change the type of section
This note is designed primarily to owners. MacBook Air. With SSD drives. These users are interested in removing all extra, in order to maximize liberation disk space on their laptops.
One of these applicants for removing is the hidden section. Recovery HD.which is created when installing OS X Lion.. In principle, without this section you can do, it is especially no risking. Moreover, we already know how to create OS X Lion..
So, if you really need to get about 650 MB of additional disk space, we do the following. Run Terminal.app and enter the team:
In the result, we find the partition identifier Recovery HD.:

In my case (and most likely in your), this / dev / disk0s3. And the previous section / dev / disk0s2 contains actually OS X Lion.. Its identifier will also need it.
Clean section Recovery HD. From all content:
sudo diskutil erasevolume hfs + blank / dev / disk0s3
And then combine the cleared partition with the section OS X Lion.. In other words / dev / disk0s3 we combine with / dev / disk0s2:
sudo Diskutil MergePartitions HFS + "HD" / dev / disk0s2 / dev / disk0s3
A warning!
In this team, the first section goes with OS X Lion. (/ dev / disk0s2), and the second - purified by us Recovery HD. (/ dev / disk0s3). If you swap them in this team, you will get the combined, but the section cleared on all data!
Exposure from MAN Diskutil on this:
Merge Two or More Partitions on a Disk. All Data on Merged Partitions Other Thant The First Will Be Lost.
Do not confuse! Be careful!
Actually everything. 🙂
Hello everyone. We all know that if some problems arise with the system, it can be reinstalled. A section Recovery helps us. For clean installation Systems, it is created automatically. But it happens that you install MacOS after Windows (which is wrong), or section with Windows already There is, or you accidentally / intentionally deleted the section Recovery HD. What to do in such cases, if the system is already installed, and it is not possible to demolish it and re-install?Small prehistory.
I have installed MacOS 10.13.1 Developer Beta on APFS. Since the work of this file System I was not satisfied, I wanted to octate on HFS + by clean reinstallation. The trouble was that Windows already installed, and after deleting the APFS container, the Recovery section disappeared. System 10.13 For some reason, I refused to be installed on the cut, so I restored on empty section Bacup 10.12.6 From Time Machine. After recovery, the Recovery section did not appear. I calmly from 10.12.6 updated to 10.13. The recovery of the section was still not.A couple of days ago, I decided to upgrade from 10.13 to 10.13.1, and what was my surprise that the installation of the system at the final third stage simply does not reach the end and throws onto your desktop with an error.
After a couple of days, yesterday, I also tried to put the system, and knocked out on the same error.
Just thinking, I immediately realized that the mistake in the absence section Recovery. HD. Accordingly, began to google how to restore it. There were a lot of methods, they were all written in Tsar Pea, and they did not fit.I decided to do it simply: but what if you cut off the system from manually, from the system backup to get files from the Recovery section, and assign the type of Apple_Boot partition? I will describe it in the following steps.
1. Separate a new section.
How about my disk markup in the team looked diskutil List../ Dev / disk0 (internal, physical): #: TYPE NAME SIZE IDENTIFIER 0: GUID_partition_scheme * 120.0 GB disk0 1: EFI EFI 209.7 MB disk0s1 2: Apple_HFS Macintosh HD 78.9 GB disk0s2 3: Microsoft Reserved 134.2 MB disk0s3 4: Microsoft Basic Data Windows 40.0 GB Disk0s4
As we know perfectly, Recovery HD section After Macintosh HD is missing.
In the disk utility, I separated the section size 650 MB from the main one.
After that, the markup looked like this:/ Dev / disk0 (internal, physical): #: TYPE NAME SIZE IDENTIFIER 0: GUID_partition_scheme * 120.0 GB disk0 1: EFI EFI 209.7 MB disk0s1 2: Apple_HFS Macintosh HD 78.9 GB disk0s2 3: Apple_HFS Recovery HD 650.0 MB disk0s3 4: Microsoft Reserved 134.2 MB Disk0s4 5: Microsoft Basic Data Windows 40.0 GB Disk0s5
2. Change the type of section.
It seems to be all right, but there is one thing. Type Recovery section should be Apple_Boot.and not apple_hfs. What we will change. We open the terminal and enter the team:Diskutil UNMOUNT / DISK0S3 Sudo ASR ADJUST --Target / DeV / Disk0s3 --Settype "Apple_Boot"
Attention: figures / dev / disk0s3 may differ from you!Check the output of the team diskutil List.. We are convinced that everything is true.
/ Dev / disk0 (internal, physical): #: TYPE NAME SIZE IDENTIFIER 0: GUID_partition_scheme * 120.0 GB disk0 1: EFI EFI 209.7 MB disk0s1 2: Apple_HFS Macintosh HD 78.9 GB disk0s2 3: Apple_Boot Recovery HD 650.0 MB disk0s3 4: Microsoft Reserved 134.2 MB Disk0s4 5: Microsoft Basic Data Windows 40.0 GB Disk0s5
3. Transfer content.
Now we have to throw off the recovery files from the backup.
I share with you my backup , It is from the system 10.13.1, performance from 10.12.6 has not checked.
You can also manually pull out the contents of this section from the backup. On the section with Time Machine we turn on the display hidden files, go to the /backups.backupdb/.recoverysets/1/ and see the cherished folder. But if you get from your backup, you will have to replace the path in the com.apple.boot.plist file.You need to throw the folder com.apple.recovery.Boot To the root of the Recovery HD section, before this it needs to be installed as a command:
Diskutil Mount / dev / disk0s3
This will look like the content recovery of the section:
After all the operations done, updating the system from App Store. should earn normally and in settings icloud. The item to find Mac will appear.

Apple's specialists have developed the most advanced system recovery mechanism in which this feature Practically not in demand - IMAC is well protected and working uninterrupted. But even experienced users may fail. You can restore iMac in several ways.
If an error is found in the iMac, the Mac OS X utility menu opens automatically. You have the opportunity to run it yourself. Before this, check out the health of the Internet and the ability to access the App Store. Restart the IMAC and hold the COMMAND and R buttons at the same time. In the Mac OS X utilities menu, open the section "Disk Utility". Then open the item "First Aid" and "Correct Disk". The program itself will find a problem and will quickly eliminate it. If the application failed to detect and eliminate the error, you will have to reinstall the system completely. In the menu "Mac OS X" Utilities "have it item" Restore from backup Time Machine. " This option allows you to restore all the data of a certain date of the past time. The system will prompt you to choose a disk on which there is a saved copy. Do it and perform all subsequent tips. A backup can be transferred only to that IMAC from which it was created. If you want to install files to a new device, use "Migration Assistant". There is another way to restore iMac. Log in to the "Mac OS X utilities" panel. This time, select "Reinstall Mac OS X". The system will ask you to select the desired disk. Most likely it will be the only proposed option. You may first clear it or reinstall with data saving. Make a choice. If you want to configure other programs, select "Customize" and follow further prompts. You can restore standard iMAC settings. To do this, you will have to delete all the information. Therefore, before this procedure, save the necessary data on external storage. Go to the Mac OS X Utilities menu. Go to the "disk utility" section and open "erase". A new menu will be displayed. Open the "Mac OS Extended" option. Specify the name of the list and select "Erase". After this procedure, in the "Disc utility" tab, specify "complete the disk utility". Then in the Mac OS X utilities menu, open the "Reinstall Mac OS X". Perform all further prompts. After this procedure, you can copy all data from the saved copy of Time Machine.

Now you know what to restore iMac is very easy. Additional information You can read on the system recovery in the Mac OS X utilities in the "Help online" section.
He refused to load. Cmd + R. Does not help. How to be?
The beginning of the working day did not foretell anything bad. A cup of coffee, a good mood, the Power and MacBook key displays the following sad picture:

In the head immediately flashed a restless idea of \u200b\u200bthe preservation of data, actual version Backup Timemachine. (which was not at hand) and the possible loss of information.
Attempt number 1. Loading in recovery mode
Being interested in the user and avid "makovod", I immediately tried to run MacBook in recovery mode by holding keys Cmd + R.. Instead of the familiar disk utility, the system met me by an attempt network recovery.

Choosing a household wi-Fi networkI began to wait for the further development of events. A few minutes later the progress of Recovery OS X interrupted error -4403F..

Attempts to start the process re-led exactly to the same result. Reloading the router confirmed that with network connection everything is fine.
About trying to spend mAC diagnostics, poinik off possible mistakes Winchester or trite reinstall the system now it could not go and speech. Section S. Recovery HD., in which the toolkit for recovery is stored, ordered to live long.
Attempt number 2. PRAM and NVRAM reset
Mac computers were created by high-class engineers, so proper organization The entire system and the presence of "hidden hardware reserves" avoids a number of interruptions in its operation. One of these reserves are memory sections. PRAM. and NVRAM. It stores these settings that are not reset even after disconnecting the computer from the power supply. To revive the fallen system, it was decided reset PRAM and NVRAM settings.
1. Turn on Mac.
2. After the white screen appears, quickly clamp the key combination Cmd + Option + P + R.
3. Hold to reboot and the MAC greeting sound.

PRAM and NVRAM reset completed.
Although they say that hope is dying the latter, she, lifeless and barely lively continued to fade in my mind. Reset PRAM and NVRAM on the error when loading the system did not affect. MacBook continued to test my nerves.
Attempt number 3. Reset SMS.
Getting used to keeping all the necessary data "in the cloud" or on removable carrier, the most simple decision global problems There was always a reinstallation of the system "from scratch". This case was special. I needed data stored in memory, and I needed a working Mac today.
In Mac, there is a so-called sMC System Controller. The stability of the entire system depends on the reliability of his work. Reset SMC settings can cure a number of problems, like:
- - constantly high speed of the cooler even with minimal load;
- freezing during system departure in CNA mode;
- errors associated with the operation of additional periphery or external monitors, as well as correcting the system loading problems.
To reset the SMC, follow these steps:
- Laptops with built-in batteries
1. Turn off the MacBook and connect the power adapter.
2. At the same time hold the keys Shit + Control + Option + Power And hold before changing the color of the magsafe adapter indicator.
3. Release all keys and press the key. Power.
- Laptops with removable batteries (old models)
1. Turn off the MacBook and disconnect the power adapter.
2. Remove the battery from the laptop.
3. Hold the key Power and hold at least 5 seconds.
4. Release POWER, insert the battery and connect the power adapter. Turn on the laptop.
- Desktops (IMAC, Mac Mini, Mac Pro)
1. Fully disconnect the computer from the power supply.
2. Wait at least 30 seconds.
3. Connect the power and expect another 5-10 seconds after that turn on the computer.
The above actions may become really productive and the system will start. In my case, the miracle did not happen.
Attempt number 4. Recovery using the boot flash drive
An attempt to revitalize the system through the above actions was not crowned with success. The only option remained - reinstalling OS X using boot flash drive. For this step, it will be necessary:
- another computer running operating system OS X;
- uSB flash drive, not less than 8 GB.
Preparation of flash drive
1. In the application store Mac App. Store will need to download the OS X Yosemite distribution system.
2. To create a boot flash drive, download the DiskMaker X utility (distributed free of charge). It will be needed to deploy the distribution.
3. Format the flash drive using Disc utility in Mac Os Extended (magazine).

4. After the distribution is downloaded, deselect the installed and run the utility Diskmaker X..
5. Select the system Yosemite (10.10). The utility will detect the distribution in the folder Apps. Click Use This Copy. (Use this copy).

6. Select the drive installed in the USB port and agree with the warning full removal All data present on the flash drive.

7. The process of mounting the distribution with OS X Yosemite on the drive will begin.

The copying process takes about 10-20 minutes and depends on the speed of the USB flash drive. During mounting on the screen, it can be opened periodically dialog boxes and folders. Do not pay attention.

After successfully deploying an OS X Yosemite image, remove the drive.
System installation
1. Install the USB flash drive to the "Problem Mac" port, press the key. Power and clamp the key Alt..
2. In the list of available partitions to download, select OS X Base System. Pay attention to the lack of section Recovery..
.

3. Mac will boot in recovery mode. After selecting the main system, the installation menu will open. In the top menu you will find the standard list of utilities.
Take advantage of the disk utility and try to check the access rights to system section and correct possible errors. If after rebooting the system is still refusing to load, it will be necessary to separate the partition, the size of which will be at least 20 GB for the installation new system. Detailed instructions By separating the disk you will find.
From the same menu it is possible to start the process of installing the system to the newly created section, and restore the system using the TimeMachine backup (see).
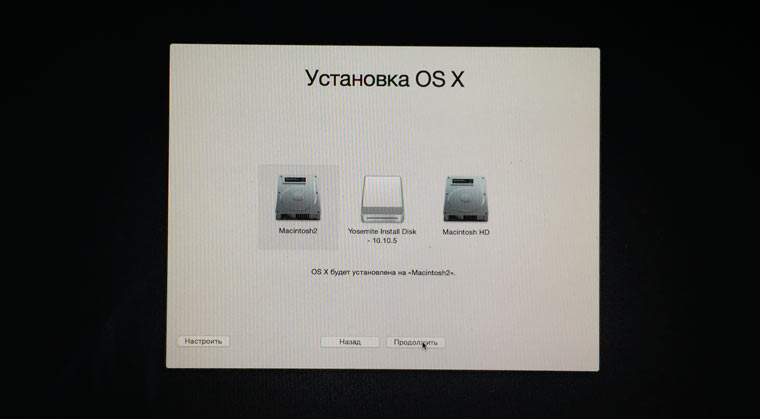
CAUTION! Be careful when the installation section is selected. Installation is required not on top of the old partition, but on the newly created.
After the installation is completed, you will get access to all data posted on the "spoiled" section with old version Systems.
Hello everyone.
We all know that if some problems arise with the system, it can be reinstalled. A section Recovery helps us. With a clean system, it is created automatically, but it happens that you install MacOS after Windows (which is wrong) or you accidentally / intentionally deleted the Recovery HD section. What to do in this case, if the system is already installed, and it is not possible to demolish it and re-install?
Perhaps on the Internet Walking such a solutionBut I will describe, as I did.
Small prehistory.
I have installed MacOS 10.13.1 Developer Beta on APFS. Since the work of this file system did not suit me, I wanted to octate on HFS + by clean reinstalling. The trouble was that Windows already installed, and after deleting the APFS container, the Recovery section disappeared. System 10.13 For some reason, I refused to be installed on the cut, so I restored the backup 10.12.6 on the empty section from Time Machine. After recovery, the Recovery section did not appear. I calmly from 10.12.6 updated to 10.13. The recovery of the section was still not.
A couple of days ago, I decided to upgrade from 10.13 to 10.13.1, and what was my surprise that the installation of the system at the final third stage simply does not reach the end and throws onto your desktop with an error.

After a couple of days, yesterday, I also tried to put the system, and knocked out on the same error.
Just thinking, I immediately realized that the error in the lack of section Recovery HD. Accordingly, began to google how to restore it. There were a lot of methods, they were all written in Tsar Pea, and they did not fit.
I decided to do it simply: but what if you cut off the system from manually, from the system backup to get files from the Recovery section, and assign the type of Apple_Boot partition? I will describe it in the following steps.
Creating a recovery section.
1. Separate a new section.
How about my disk markup in the Diskutil List team.
╭─[Email Protected] ~ ╰─➤ diskutil list / dev / disk0: #: Type Name Size Identifier 0: guid_partition_scheme * 120.0 GB Disk0 1: EFI EFI 209.7 MB Disk0s1 2: Apple_HFS Macintosh HD 78.9 GB Disk0s2 3: Microsoft Reserved 134.2 MB Disk0s3 4: Microsoft Basic Data Windows 40.0 GB Disk0s4 / Dev / Disk1 (Internal, Physical): #: Type Name Size Identifier 0: Guid_Partition_Scheme * 500.1 GB Disk1 1: Microsoft Basic Data Files 151.3 GB Disk1s1 2: Apple_HFS Time Capsule. 348.7 GB Disk1s2.
As we know perfectly, Recovery HD section After Macintosh HD is missing.
In the disk utility, I separated a section of 650 MB from the main one.
After that, the markup looked like this:
╭─[Email Protected] ~ ╰─➤ diskutil list / dev / disk0 (Internal, Physical): #: Type Name Size Identifier 0: guid_partition_scheme * 120.0 GB Disk0 1: EFI EFI 209.7 MB Disk0s1 2: Apple_HFS Macintosh HD 78.9 GB Disk0s2 3: Apple_HFS Recovery HD 650.0 MB Disk0s3 4: Microsoft Reserved 134.2 MB Disk0s4 5: Microsoft Basic Data Windows 40.0 GB Disk0s5 / DeV / Disk1 (Internal, Physical): #: Type Name Size Identifier 0: Guid_Partition_Scheme * 500.1 GB Disk1 1: Microsoft Basic Data Files 151.3 GB Disk1s1 2: Apple_HFS Time Capsule 348.7 GB Disk1s2
2. Change the type of section.
It seems to be all right, but there is one thing. The section Recovery section should be apple_boot, not Apple_HFS. What we will change. We open the terminal and enter the team:
Diskutil UNMOUNT / DISK0S3 Sudo ASR ADJUST --Target / DeV / Disk0s3 --Settype "Apple_Boot"
Attention: Figures / dev / disk0s3 may differ from you!
Check out the diskutil list command. We are convinced that everything is true.
╭─[Email Protected] ~ ╰─➤ diskutil list / dev / disk0 (Internal, Physical): #: Type Name Size Identifier 0: guid_partition_scheme * 120.0 GB Disk0 1: EFI EFI 209.7 MB Disk0s1 2: Apple_HFS Macintosh HD 78.9 GB Disk0s2 3: Apple_Boot Recovery HD 650.0 MB Disk0s3 4: Microsoft Reserved 134.2 MB Disk0s4 5: Microsoft Basic Data Windows 40.0 GB Disk0s5 / DeV / Disk1 (Internal, Physical): #: Type Name Size Identifier 0: Guid_Partition_Scheme * 500.1 GB Disk1 1: Microsoft Basic Data Files 151.3 GB Disk1s1 2: Apple_HFS Time Capsule 348.7 GB Disk1s2
3. Transfer content.
Now we have to throw off the recovery files from the backup.
I share with you my backup , It is from the system 10.13.1, performance from 10.12.6 has not checked.
You need to throw the folder com.apple.recovery.boot to the root of the Recovery HD section, before it needs to be mounted as a command:
Diskutil Mount / dev / disk0s3
This will look like the content recovery of the section:

 Causes of why Flash Player does not work, and troubleshooting
 The laptop itself turns off, what to do?
 HP Pavilion DV6: Characteristics and Reviews
 Format representation of a floating point numbers How negative numbers are stored in the computer's memory
 Computer fries and does not turn on what to do?
 Why does not work mouse on a laptop or mouse?
 How to increase or decrease the scale of the page (font) in classmates?