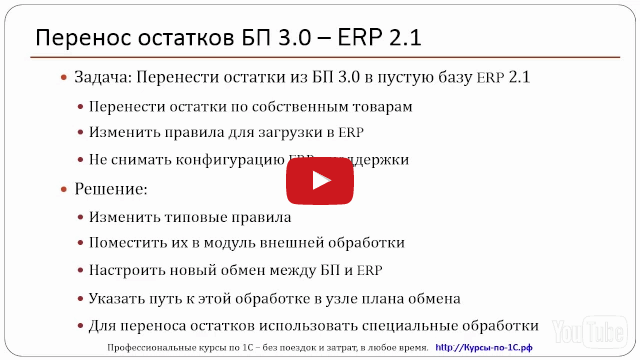
An example of an object conversion rule. Example of object conversion rule Additional differences from typical rules
Migrating data between different configurations is not a trivial task. As always, there are several solutions, but not all of them are optimal. Let's try to understand the nuances of data transfer and choose a universal strategy for solving such issues.
The problem of data migration (this is purely about 1C company products) from one solution to another did not arise yesterday. The 1C company is well aware of the difficulties developers face when creating migrations, so it tries its best to help with tools.
During the development of the platform, the company introduced a number of universal tools, as well as technologies that simplify data transfer. They are built into everything. standard solutions and the problem of migrations between identical configurations generally resolved. The victory is once again confirmed by the close integration of standard solutions.
With migrations between non-standard solutions, the situation is somewhat more complicated. A wide range of technologies allows developers to independently choose the best way to solve a problem from their point of view.
Let's consider some of them:
- exchange via text files;
- use of exchange plans;
- etc.
Each of them has its pros and cons. To summarize, the main disadvantage will be verbosity. Independent implementation of migration algorithms is fraught with significant time costs, as well as a long debugging process. About further support similar decisions I don't even want to talk.
The complexity and high cost of maintenance prompted the 1C company to create a universal solution. Technology that allows you to simplify the development and support of migrations as much as possible. As a result, the idea was implemented in the form of a separate configuration - "Data Conversion".

Data conversion - standard solution, self-configuration. Any user with an ITS:Prof subscription can download this package completely free of charge from the user support site or the ITS disk. Installation in progress in a standard way- like all other standard solutions from 1C.
Now a little about the pros of the solution. Let's start with the most important - versatility. The solution is not tailored to certain platform configurations/versions. It works equally well with both standard configurations and self-written ones. Developers get a universal technology and a standardized approach to creating new migrations. The versatility of the solution allows you to prepare migrations even for platforms other than 1C:Enterprise.
The second bold plus is visual aids. Simple migrations are created without programming. Yes, yes, without a single line of code! For this alone, it is worth spending time learning the technology once, and then using invaluable skills repeatedly.
The third advantage I would note is the absence of restrictions on data distribution. The developer himself chooses the method of delivering data to the receiver configuration. Two options are available out of the box: uploading to an xml file and direct connection to the infobase (COM/OLE).
Learning architecture
We already know that data conversion can work wonders, but it is not yet clear what the technical advantages are. The first thing to learn is that any data migration (conversion) is based on exchange rules. Exchange rules - a regular xml file with a description of the structure into which data will be uploaded from IB. The service processing that performs data upload/download analyzes the exchange rules and performs the upload based on them. During the download, the reverse process occurs.
The “KD” configuration is a kind of visual constructor with which the developer creates exchange rules. It does not know how to upload data. Additional external service processing included in the CD distribution kit is responsible for this. There are several of them (XX in the file name is the platform version number):
- MDXXExp.epf- processing allows you to upload a description of the structure information base to xml file. The description of the structure is loaded into the CD for further analysis and creation of exchange rules.
- V8ExchanXX.epf- uploads/downloads data from the infobase in accordance with the exchange rules. In most typical configurations, processing is available out of the box (see the “Service” menu item). Processing is universal and is not tied to any specific configurations/rules.
Okay, now based on all of the above, let's define the stages of developing a new conversion:
- Task definition. It is necessary to clearly understand what data needs to be transferred (from which configuration objects) and, most importantly, where to transfer.
- Preparation of a description of configuration structures (Source/Receiver) for subsequent loading into the CD. The task is solved by service processing MDXXExp.epf.
- Loading prepared descriptions of structures in IS.
- Creating exchange rules using visual means of CD.
- Uploading/downloading according to the created data conversion rules by using V8ExchanXX.epf processing.
- Debugging exchange rules (if necessary).

The simplest conversion
For the demonstration, we need two deployed configurations. I decided to stop at the option: “Trade Management” 10th edition and a small self-written solution. The task will be to transfer data from the typical UT configuration. For brevity, we will call the self-written solution “Receiver”, and trade management “Source”. Let's start solving the problem by transferring the elements of the "Nomenclature" directory.
First of all, let's take a look at the data conversion scheme and reread the list of actions that need to be done. Then we launch the “Source” configuration and open the service processing MD82Exp.epf in it.

The processing interface does not shine with an abundance of settings. The user only needs to specify the types of metadata objects that will not fall into the description of the structure. In most cases, these settings do not need to be changed, because there is no particular point in unloading movements in accumulation registers (as an example).
It is more correct to form the movement during the holding of documents in the receiver. All movements will be made by the document itself after the transfer. The second argument in defense of the default settings is to reduce the size of the uploaded file.
Some documents (especially in typical configurations) form movements in multiple registers. Unloading all this farming will make the resulting XML file too big. This can make subsequent transportation and loading into the receiver base difficult. The larger the data file, the more random access memory for its processing. During my practice, I happened to encounter indecent big files unloading. Such files completely refused to be parsed by standard means.
So, we leave all the default settings and upload the configuration description to a file. We repeat the same procedure for the second base.

Open the CD and select from the main menu “Directories” -> “Configurations”. The directory stores descriptions of the structures of all configurations that can be used to create conversions. We load the configuration description once, and then we can use it repeatedly to create different conversions.

In the directory window, press the button “ Add” and in the window that appears, select a file with a description of the configuration. Check the box "Upload to new configuration” and click on the “Download” button. Similar actions we do with the description of the structure of the second configuration.

Now everything is ready to create the exchange rules. In the main CD menu, select “References” -> “Conversions”. Adding a new element. In the window for creating a new conversion, you need to specify: the source configuration (select UT) and the receiver configuration (select "Receiver"). Next, open the “Advanced” tab and fill in the following fields:
- exchange rules file name - created exchange rules will be saved under this name. The file name can be changed at any time, but it's best to set it now. This will save time in the future. I named the rules for the demo: "rules-ut-to-priemnik.xml".
- name - the name of the conversion. The name can be absolutely anything, I limited myself to “Demo. UT to the Receiver”.

That's it, click "Ok". Immediately, a window appears in front of us asking us to create all the rules automatically. Agreeing to such a tempting offer will give the master the command to automatically analyze the description of the selected configurations and independently generate exchange rules.

Let's dot the "and" right away. The master will not be able to generate anything serious. However, this possibility should not be discounted. If you need to establish an exchange between identical configurations, then the services of a wizard will be very helpful. For our example, manual mode is preferable.

Let's take a closer look at the "Exchange rules settings" window. The interface may seem slightly confusing - a large number of tabs stuffed with controls. In fact, everything is not so difficult, you start to get used to this madness after a few hours of working with the application.
At this stage, we are interested in two tabs: “Object conversion rules” and “Data upload rules”. On the first one, we have to set up matching rules, i.e. compare objects of two configurations. On the second one, determine the possible objects that will be available to the user for unloading.
In the second half of the “Object conversion rules” tab there is an additional panel with two tabs: “Property conversion” and “ Value conversion". The first one will select the properties (details) of the selected object, and the second one is necessary for working with predefined values (for example, predefined dictionary elements or enumeration elements).
Great, now let's create conversion rules for directories. You can perform this action in two ways: use the object synchronization wizard (click “”) or add matches for each object manually.
To save space, we will use the first option. In the wizard window, uncheck the box “ The documents” (we are only interested in directories) and expand the group “ Reference books". We carefully scroll through the list and look at the names of directories that can be compared.

In my case, there are three such directories: Nomenclature, Organizations and Warehouses. There is also a Clients directory that performs the same semantic load as “ Counterparties” from configuration “ UT". True, the master could not compare them due to their excellent names.
We can fix this defect ourselves. Find in the window Object Mappings» handbook « Clients”, and in the column “Source” select the reference book “Counterparties”. Then check the box in the "Type" column and click the "Ok" button.
The Object Synchronization Wizard will prompt you to automatically create rules for converting the properties of all selected objects. Properties will be matched by name, and for our demonstration this will be quite enough, we agree. The next question will be a proposal to create upload rules. Let's agree to it.

The basis for the exchange rules is ready. We chose the objects for synchronization, and the rules for converting properties and uploading rules were created automatically. Let's save the exchange rules to a file, then open the IB “Source” (in my case, it is UT) and start service processing in it V8Exchan82.epf.

First of all, in the processing window, select the exchange rules we created. We answer the question of loading the rules in the affirmative. Processing will analyze the exchange rules and build a tree of the same name for objects available for unloading. For this tree, we can set all sorts of filters or exchange nodes, by changing which we need to select data. We want to upload absolutely all the data, so there is no need to install filters.
After the process of uploading data to a file is completed, go to IB " Receiver". We also open processing in it V8Exchan82.epf, only this time we go to the “Loading data” tab. Select the data file and click the "Upload" button. Everything, the data was successfully transferred.
Tasks from the real world
The first demo could be misleading. Everything looks quite simple and logical. Actually this is not true. In real work, tasks arise that are difficult or completely impossible to solve using visual means alone (without programming).
In order not to be disappointed in technology, I have prepared some real tasks. You will definitely come across them at work. They do not look so trivial and make you look at data conversion from a new angle. Carefully consider the examples presented, and feel free to use them as snippets when solving real problems.
Task number 1. Fill in the missing details
Suppose we need to transfer the directory “ Counterparties". The receiver has a similar reference book “Clients” for this. It is completely suitable for data storage, but it has props “ Organization”, allowing you to separate counterparties by belonging to the organization. By default, all counterparties must belong to the current organization (it can be obtained from the constant of the same name).
There are several solutions to the problem. We will consider the option of filling in the props “ Organization” right in the base “ Receiver”, i.e. at the time of data loading. The current organization is stored in a constant, so there is no barrier to getting this value. Let's open the object conversion rule (hereinafter referred to as FRP) “ Clients” (double click on the object) and in the rules setup wizard, go to the “Event handlers” section. In the list of handlers we find “ After loading”.
Let's describe the code for getting the current organization with subsequent assignment to the attribute. At the moment the “After loading” handler is triggered, the object will be fully formed, but not yet written to the database. No one forbids us to change it at our discretion:
If NOT Object.ThisGroup Then Object.Organization = Constants.CurrentOrganization.Get(); EndIf;
Before filling in the props " Organization» it is necessary to check the value of the attribute « This group". For the guide " Clients» the hierarchical flag is set, so checking for a group is necessary. Similarly, filling in any details is performed. Be sure to read the help for other handler options " AfterLoading". For example, among them there is a parameter " Refusal". If it is assigned the value "True", then the object will not be written to the database. Thus, it becomes possible to limit objects for writing at the time of loading.
Task number 2. Details in the information register
In the handbook " Counterparties"UT configuration, there are details" Buyer" And " The supplier". Both props are of type “ boolean” and are used to determine the type of counterparty. In IB " Receiver”, at the reference book “ Clients“There are no similar details, but there is a register of information” Types of Clients". It performs a similar function and can store multiple tags for a single client. Our task is to transfer the values of the details to separate records of the information register.
Unfortunately, visual means alone cannot cope here either. Let's start small, create a new PCO for the information register " Types of Clients". Don't list anything as a source. From automatic creation Refuse the unloading rules.
The next step is to create the upload rules. Go to the appropriate tab and click the " Add". In the window for adding upload rules, fill in:
- sampling method. Change to “Arbitrary algorithm”;
- conversion rule. Select the information register “Customer Types”;
- Code (name) of the rule. We write it as “Uploading Client Species”;

Now you need to write the code for selecting data for uploading. This is where the parameter “ Data sampling". In it, we can place a collection with a prepared data set. Parameter " Data sampling” can take different values - query result, selection, collections of values, etc. We initialize it as a table of values with two columns: client and client type.
Below is the event handler code “ Before processing". It initializes the parameter “ Data sampling” followed by filling in data from the directory “ Counterparties". Here it is worth paying attention to filling in the column “ Client Type". In “UT”, we have signs of the “Boolean” type, and in the recipient, an enumeration.
At this stage, we cannot bring them to the desired type (it is not in the UT), so for now we will leave it in the form of strings. You don't have to do this, but I immediately want to show how to cast to a missing type in the source.
DataFetch = NewValueTable(); Data Selection.Columns.Add("Client"); Data Selection.Columns.Add("ClientType"); Selecting DataFrom the Directory = Directories.Contractors.Select(); While Selecting DataFromCatalog.Next() Loop If SelectingDataFromDirectory.ThisGroup Then Continue; EndIf; If DataFetchFromCatalog.Buyer Then NewString = DataFetch.Add(); NewString.Client = SamplingDataFromCatalog.Reference; NewString.ClientType = "Buyer"; EndIf; If DataFetchFromCatalog.Provider Then NewString = DataFetch.Add(); NewString.Client = SamplingDataFromCatalog.Reference; NewString.ClientType = "Supplier"; EndIf; EndCycle;
Save the data upload rule and return to the “ Object Conversion Rules". Let's add for the information register “ Types of Clients” property conversion rules: client and client type. We leave the source empty, and in the “Before unloading” event handler we write:
//For the "Client" property Value = Source.Client; //For the “CustomerType” property If Source.Customer = "Buyer" Then Expression = "Enumerations.CustomerTypes.Buyer" ElseIf Source.Customer = "Supplier" Then Expression = "Enumerations.CustomerTypes.Supplier"; EndIf;
In the listing, the details are filled in based on the data selection made. We pass the client simply as a link, and write the type of client in the parameter " Expression". The data of this parameter will be interpreted in the receiver, and when executed, the attribute will be filled in with the correct value from the enumeration.
That's it, the exchange rules are ready. The considered example turned out to be quite universal. A similar approach is often used when migrating data from configurations created on the 7.7 platform. A striking example of this is the transfer of periodic details.

Task number 3. Tabular Tricks
Often there are tasks that require posting rows of one tabular part into several. For example, in the initial configuration, services and goods are registered in one tabular section, while the storage of these entities is separated in the receiver. Again, the problem cannot be solved by visual means. Here it is convenient to take the solution of the second problem as a basis.
We make a data upload rule, specify an arbitrary algorithm, and write a query in the “Before upload” handler to get data from the tabular section.
To save space, I will not give the code (you can always refer to the source code) of the request - there is nothing unusual in it. We sort through the resulting sample, and place the sorted results in the already familiar parameter “ Data sampling". Again, it is convenient to use a table of values as a collection:
DataFetch = NewValueTable(); //Here there will be one more tabular section Data Selection.Columns.Add("Products"); //Here there will also be a tabular section Data Selection.Columns.Add("Services"); Selecting Data from.Columns.Add(“Link”);
Task number 4. Transferring data to an operation
If an organization uses several accounting systems, then sooner or later there will be a need for data migration with the subsequent formation of postings.
In the configuration " BP"there is a universal document" Operation” and it is ideal for shaping more postings. Here's just one problem - the document is made cunningly, and it's not so easy to transfer data into it.
An example of such a conversion can be found in the source code for the article. The amount of code turned out to be quite large, so there is no point in publishing it for the article. Let me just say that the upload again uses an arbitrary algorithm in the rules for uploading data.
Task number 5. Synchronizing data across multiple attributes
We've already covered a few examples, but so far we haven't talked about object synchronization during migration. Let's imagine that we need to transfer counterparties and some of them are probably in the receiver database. How to transfer data and prevent duplicates? In this regard, CD offers several ways to synchronize transferred objects.
The first one is by unique identifier. Many objects have a unique identifier that guarantees uniqueness within a table. For example, in the handbook " Counterparties” cannot have two elements with the same ID. The CD makes a calculation for this, and for all created PSPs, search by identifier is immediately enabled by default. During the creation of the PSP, you should have noticed the magnifying glass icon next to the object name.
Synchronize by a unique identifier is a reliable method, but it is far from always appropriate. When merging directories “ Counterparties” (out of several different systems) is of little help.
In such cases, it is more correct to synchronize objects according to several criteria. It is more correct to search for counterparties by TIN, KPP, Name or split the search into several stages.
Data conversion does not limit the developer in defining the search criteria. Let's consider an abstract example. Suppose we need to synchronize directories “ Counterparties” from different information bases. Let's prepare a PCP and in the settings of the rules for converting an object, check the box “ Continue searching the search fields if the receiver object is not found by ID". With this action, we immediately defined two search criteria - by a unique identifier and arbitrary fields.
We have the right to choose the fields ourselves. Having noted the TIN, KPP, Name, we will immediately indicate several search criteria. Conveniently? Quite, but again, this is not enough. And what if we want to change the search criteria? For example, first we search for a bunch of TIN + KPP, and if we don’t find anything, then we start trying our luck with the name.
It is quite possible to implement such an algorithm. In the event handler Search fields” we can specify up to 10 search criteria and for each of them define its own composition of the search fields:
If SearchOptionNumber = 1 then SearchPropertyNameString = “TIN, KPP”; ElseIfSearchVariantNumber = 2 ThenSearchPropertyNameString = “Name”; EndIf;
There are always multiple solutions.
Any task has several solutions, and transferring data between different configurations is no exception. Each developer has the right to choose his own solution path, but if you constantly have to develop complex data migrations, then I strongly recommend paying attention to the "" configuration. Let at first you have to invest resources (time) in training, but they will more than pay off on the first more or less serious project.
In my opinion, the 1C company undeservedly bypasses the topic of using data conversion. For the entire time of the existence of the technology, only one book has been published on it: “1C: Enterprise 8. Data conversion: exchange between application solutions”. The book is quite old (2008), but it is still desirable to familiarize yourself with it.
Platform knowledge is still required
» is a universal tool, but if you plan to use it to create data migrations from configurations developed for the 1C:Enterprise 7.7 platform, then you will have to spend time getting to know the built-in language. The syntax and ideology of the language is very different, so you have to spend time learning. The rest of the principle remains the same.
And we show how with its help STRONGLY simplify the solution of your tasks
Today we will analyze how to set up and make a simple transfer of directories and initial balances in literally 10-15 minutes.
And this is bulk and regular task, which is almost inevitable for most new configurations being launched.
Therefore, call your colleagues, it will also be very useful for them.
Especially if they have already seen CD 3 and got scared :)
Yes, when you see her for the first time, it’s not clear at all.
But in fact - everything is VERY simple. So simple that you will even get bored later :)
What exactly is in today's videos
These are 4 videos on sharing data via universal EnterpriseData exchange format.
In addition, we will show an example refinement of standard exchange rules in 1C: Data Conversion 3.0
Total duration - 34 minutes. Content:
- Setting up an exchange using the example of 1C: Accounting 8 and 1C: ERP
- How to download model rules and universal format exchange in Data Conversion 3.0
- Transferring the metadata structure to CD 3.0
- How to perform the first exchange of data
- Refinement of the rules conversions
- How to load new rules without changing configuration ( without withdrawal from support)
note that when solving this problem, the loading rules change only in the receiver configuration. And the source configuration works according to standard rules.
If such a task were solved in Data Conversion 2.0, then changes would have to be made in the rules of both the source and the destination.
These video tutorials are relevant for BSP revision 2.3.2(for any build older than 2.3.2.43).
If you are using an older version of BSP,0 make a "correction" for the changed interface and extended functionality. To do this, repeat the example from the video yourself.
Video 1:
Loading exchange rules between typical configurations in Data Conversion 3.0
In this lesson, we will perform preparatory actions when making changes to the exchange rules between typical configurations:
- Loading the structure of the exchange format into the CD (
- Creating a conversion
- Uploading rules files from a typical configuration
- Unloading the exchange manager module
Video 2:
Refinement of exchange rules in CD 3.0
In this tutorial, we'll show you how to fill in the details of objects when loading data.
The task will be solved - when loading objects from the source configuration, set the comment “Loaded from BP 3.0”.
To solve the problem, you need to make changes in object conversion rules, in the event “Before writing received data”.
The developed rules will be saved as external processing for future use.
Video 3:
Setting up a universal exchange between typical configurations
In this tutorial, we'll show you how to set up a new type exchange.
The settings will be made in the source configuration and then loaded into the destination configuration.
Also in this video we'll show you how without changing the configuration upload new exchange rules.

Video 4:
Transferring opening balances using exchange rules
In the lesson, we will show a typical functional for transferring initial balances.
P.S.
Yes, exchanges via txt / dbf / ole etc. have the right to exist. In some special cases, such as docking with a web server or transferring from a ready-made external application format.
However, for standard exchanges - standard methods both faster and much easier.
And if someone reinvents the wheel when there is a ready-made universal solution - it’s like writing on your forehead “I don’t own an instrument, I don’t want to learn, I will build crutches for your money” .
P.P.S.
We want to show that Data Conversion 3.0 is not difficult.
Unusual - yes. Not everything is immediately clear - yes. There are very ambiguous moments - yes.
But with the help of ready-made instructions and videos, it can be mastered in just 1-2 weeks.
Currently, the transition from 1C: Enterprise 7.7 to 8.3 (similarly to 8.2) has become a headache for accountants. Preferably as soon as possible and without errors. If you are a 1C: Accounting programmer and you need to convert these documents from the seventh version to the eighth, then this article is for you.
Take just a few steps and your data transfer problems will be solved. Read up this manual to the end, and you will find a way how to do it. To begin, you must prepare workplace on your computer for the necessary manipulations. First, your HDD must be at least 100 GB in size. This is necessary because the transfer of balances is multilevel. And you will need to work with several 7.7 configurations.
If you need a quick and high-quality transition from 1C Accounting 7.7 to 1C 8.3, please contact us! The average cost of a turnkey transition is 6,600 rubles.
Data transfer from 1C 7.7 to 1C 8.3 accounting 3.0
So, before you work with transferring data to version 1C 8.3, you need to prepare this data in version 7.7. To do this, you must do the following. Let's say you have a working database "Accounting for the enterprise" on your computer, with which your accountants work. Using Export77 processing, upload all the necessary documents to a text file and from that moment on, no longer return to the main working base. Your further manipulations will occur with other configurations.
Install the fresh Release 1C:Enterprise 7.7 into the new directory. (the package includes a standard empty (without data) and a demo version). We will work with the standard version. Now run this database and using Import 77 processing, load from text file data from your main database.
When converting data, some documents may not be posted. It's not scary. The trick is that you can easily fix this after the transfer, since in the standard database you work with the main standard chart of accounts. Therefore, no matter how sophisticated the sub-accounts are, in your working database it is easy to fix it in about 3 hours by going into each unposted document and changing the accounts that you have in your configuration in the account fields.
Naturally, in advance, before the transfer, you bring the chart of accounts of the standard configuration in line with the chart of accounts of your main working base. Options are purely individual, depending on the specifics of your organization. By doing this, you get standard configuration, filled with data from your working database.
Now we need to do another data transfer. To do this, install the standard zero configuration again in a new directory. And already there transfer the data from the standard configuration with your data. As a result, you will get an ideal version 7 database, ready for transfer to version 8.2.
The fact is that data is transferred directly to the eighth version exclusively from the “untouched” standard version 7.7. And you just also have such configuration now. But now it is not empty, but with your working data.
Everything! We launch 1C:Enterprise 8.2. Select "Data transfer from version 7.7." and enjoy how the program itself transfers data from your processed 7.7., transfers documents and displays a comparative table of the balance sheet of versions 7.7 and 8.3.
Of course, 100% result will not be. But at 70-80 percent you will get compliance. And then your work will be done only in version 8.3.
Possible inaccuracies are easily corrected. It's still 3-4 hours. You go to the document journal and either adjust accounts or fields (for example, "Agreement" or "Main cash desk"). It depends on the degree of difference of your base 7.7. from standard. As a result of all these actions, your version 8.3 working configuration will be able to issue accounting data through the balance sheet in an ideal form.
After the transition, it will be useful for you to learn how to work in new program. To do this, we have prepared the section Training 1C Accounting 8.3.
By the way! If you need to finalize 1C programs, you can contact us!
Transferring the database 1C 7.7 to 8.3, how to do?
Many generic (and some industry-specific) octal solutions already have either built-in migration tools from 7.7 or as additional files in the template's installation directory.
If you transfer it yourself, then on the ITS disk (as well as in many places on the Internet - Google to help) there is a processing "Download from spreadsheet document”, which allows you to load arbitrary tabular data into directories / documents / registers. When enough high level qualifications, you can use combat artillery - a special configuration "Data Conversion 2" (not to be confused with 3.).

Can you tell me why such an error occurs? In the documentation for 1C, everyone writes too confusingly - after all, you need to receive a salary, so you can’t understand their manuscripts at all, war and peace come in easier than their tutorials on operating their far from complex system.
Maxim Kravchenko, well, everything is written in Russian 🙂
In my experience, the most common reasons are:
1) The wrong path is specified in the exchange settings from 7.7 There are either just typos or the path to the wrong directory is specified. Either a local path is specified on your computer, and the exchange takes place on the server side of the 1C enterprise and this server naturally does not see anything along your path (a common problem).
2) On the side of the computer that is trying to exchange with 7.7 (local or server), there is no fully installed 7.7 platform. Those. there is no registered COM object, and base 7.7 was traditionally connected using a directory with a compromised platform that does not need a key or any system data.
3) There are no access rights to the 7.7 base directory (especially important when working on a server where the rphost workflow runs under a service user, and the 7.7 base directory is open to specific people).
Maxim Kravchenko, why not through IRC or chats in the people's "devil's backyards"? 🙂
No, I will not step on the same rake again. Already one ungrateful gave his skype and he sat on his neck.
If you have general questions, the answers to which can help others - ask. Let's do a good deed together. No secret negotiations.
P.S. So that people don't lose the desire to give answers on this resource, it would be a good idea to mark solutions or click the "like" button on the most relevant answers, even if they did not directly help.
Maxim Kravchenko, FAQ is impossible because pure 7.7 does not exist in nature. There is a whole palette of standard / industry solutions, there are different versions of the same specific configuration, but none of this set covers the needs of companies out of the box, and all 7.7 sold after installation have been finished for years. Taking into account the fact that mass sales of 7.7 were stopped more than ten years ago, in your particular database, there could be nothing left of the typical functionality.
It's one thing if you take the standard transfer mechanisms, which I wrote about in my answer, and transfer, realizing that you are responsible for the jambs and you put all the inconsistencies to fix the "girls". And it is quite another to attract a specialist for work for money. You need to describe all the references for transfer, the amount of information to transfer (articles, barcodes, TIN, etc.), where to get the missing information from, and so on. I'm not ready to take on your project right now. I propose to register this task on freelancer sites and hold a tender between them.
Transfer rules 1s 8
Data transfer from programs "1C: Accounting 8 rev. 2.0" to "1C: Accounting 8 rev. 3.0"
Designed primarily for advanced configurations 1C: Accounting 8 ed.2.0(possible names on the Internet BP 2.0 or BP 8.2) as a basis for developing original rules for transferring to a configuration 1C: Accounting 8 ed.3.0(possible names on the Internet BP 3.0 or BP 8.3), of course, it is also suitable for transferring data between typical configurations.
Possible migration strategies from 2.0 to 3.0 can be found here.
Transition from 1C: Accounting 8 ed.2.0 on the 1C: Accounting 8 ed.3.0 it is recommended to perform at the beginning of a new period (year, quarter, month) after the completion of the scheduled operations of the previous period.
Data transfer is performed using universal processing that unloads data from the infobase 1C: Accounting 8 ed.2.0 to an XML file. The resulting file is uploaded to the infobase 1C: Accounting 8 ed.3.0 using universal data loading processing.
The following files are required for data transfer:
ACC20_30.xml - data conversion rules.
From the infobase BP 2.0 in BP 3.0 transferred:
information on current balances on the accounting accounts of the information base "1C: Accounting 8 rev. 2.0" as of the date of conversion of the information base
infobase documents BP 2.0 for the selected period
necessary reference Information from the information base "1C: Accounting 8 rev.2.0"
- data from the 1C infobase BP 8.2 unloaded in separate file(data file);
- the received file is loaded into the 1C infobase BP 8.3.
Installation is not required, since the processing built into the typical configurations is used, in 1C: Accounting 8 ed.2.0 And 1C: Accounting 8 ed.3.0.
(On the possibility of using specialized processing, read below)
In a programme 1C: Accounting 8 ed.2.0 you need to open the processing (menu: Service — Other data exchanges), select the folder containing the transfer rules (see Fig. 1) and load the exchange rules. I recommend loading the exchange rules forcibly every time, even if they are automatically loaded at the start of processing. To do this, either reselect the rules file or click the button Reread the exchange rules. You do not need to include all transport rules. You should use only those that are necessary for the transfer of balances and (or) documents. All directories are transferred by links, as needed, i.e. only those that are involved in the balances and documents. This ensures that there is no "garbage" in the new infobase.
If you need to unload balances at the end of the year, for example, at the end of the day on December 31, 2014, i.e. it is more correct to say at the beginning of 2015, then the unloading period should be 01/01/2015 - XX.XX.XXXX. Documents for entering balances in BP 3.0 will be dated December 31, 2014. From 01.01.2015 to BP 3.0 you need to create documents reflecting current operations. If you need only leftovers, then you need to enable the rules for uploading data from the section Incoming balances(see fig. 1). Rules for uploading data from a section The documents in this case it should be disabled (see fig. 3). The unloading period, for example, 01/01/2015 - 01/31/2015 means that the documents of January 2015 will be transferred. Rules for uploading data from a section The documents in this case must be included.

Rice. one . Data upload processing
First of all, we recommend transferring the accounting policy of the organization (reference Organizations carried over by reference). When transferring data, you can additionally set parameters (see Fig. 2). To return to the default values, you must reload the exchange rules.

Fig.2 Setting parameters
Parameter Ignore the register of VAT batches determines first of all whether it will be filled in BP 3.0 when entering balances TMC table Data on invoices received. It also affects how the subconto will be filled. parties: according to BOO or by the remainder of the register VAT on purchased assets.
Setting the parameter allows you to manage the unloading of balances for organizations using USN. When accounting is running, when the register data does not match Expenses under the simplified tax system it may be more useful for the accounting register to unload balances according to accounting data only, case-insensitively USN, which can add a lot of errors. In this case, in the documents for entering opening balances in BP 3.0 requisites Reflection in USN And Consumption status filled with default values.
When setting the parameter to Yes simultaneously with the documents, the register sets associated with these documents will be transferred. Otherwise, the contents of the documents are transferred, and in order to receive the movements, the documents should be posted in the database BP 3.0 after the transfer. It must be understood that not for all movements of documents existing in BP 8.3, there are matches in BP 8.2. Therefore, even if you choose to transfer documents with movements, some types of documents may need to be posted in order to create all the necessary ledger sets.

Fig.3 List of documents that are transferred to BP 3.0
The list of directories and registers of information for transfer is shown in Fig. 4. If anyone is interested in expanding this list, please contact the author. There are rules for transferring objects for many directories. It is understandable, because a variety of directories are present in many documents and, accordingly, are downloaded via links. Making unloading rules out of them is not difficult, you can do it yourself. The directory unloading rule is needed if there is a desire to transfer the entire directory, and not just by links.

Rice. 4 List of directories and registers of information to be transferred
Features of the transfer of balances on accounts 76.AB and 76.BA
When set to Yes parameter Correct regrading for settlements with counterparties accounting errors can be corrected. What is resorting is clear from Fig.5.1: for the counterparty, the balance is zero, but for the second subconto, the amounts are not zero. Such balances will not be carried over.

Fig.5.1 Regrading in residues
If set to Yes parameter Messages in detail, then explanatory messages will be displayed during unloading (see Fig.5.2).

Fig.5.2 Messages during regrading in residues
Features of the transfer of balances on accounting accounts for goods and materials
The algorithm for correcting errors such as resorting in the balances by TMC. This algorithm works when setting the parameter Fix regrading on the remnants of goods and materials into meaning Yes. An example is shown in Figure 5.3. Accounting for account 10.03 is conducted in the context of the nomenclature, warehouses and batches. The rest of the nomenclature Gasoline AI-92 on the warehouse №4 is zero, but if you expand the balances by batches, there will be a lot of them. The algebraic sum of the balances over the batches is equal to zero, this is the sorting. Such residues should not be transferred, because this is a clear mistake. They will not be transferred when the parameter is set.

Fig.5.3 Regrading in residues TMC in the source database BP 2.0
The situation is worse with the remaining warehouse №6. The remainder is non-zero, so the resort correction algorithm will not work, the remainder will be transferred. And how they will be transferred, let's consider. Sum -155,29 will not fall into the transfer, because such a remainder in BP 3.0 it is impossible to enter, it is impossible to enter a zero quantity and a non-zero amount, the document for entering balances will not be posted, therefore we do not upload. As a result, in BP 3.0 the remaining two sums will fall (see Fig. 5.4). The rest was transferred as if with an error. In fact, of course, there is no transfer error here, but there are accounting errors.

Fig.5.4 Result of transfer to BP 3.0
Whether or not to use the described regrading correction algorithm is up to the user. You just need to remember that zero-quantity balances are never transferred. According to the author, this is the most correct behavior, at least it allows you to enter the balance entry document and start reconciliation. For more quick search divergence positions of residuals between BP 2.0 And BP 3.0 based on the results of the transfer, it can be recommended to select such problematic positions in the source by setting up the balance sheet accordingly. See Figure 5.5 for how to do this.

Fig.5.5 Selection of positions with zero quantity
After the unloading is completed you need to run the program 1C: Accounting 8 ed.3.0. Loading both initially and during repeated data migrations or additional migrations should be performed using type processing universal exchange data in XML format(see fig. 8.1). You can open it through the menu: All functions - Processing - Universal data exchange in XML format. If there is no menu item All features, then you need to go to Service -Parameters and check the box Show command All functions.

After loading the data into the 1C: Accounting 8 edition 3.0 database, it is necessary to carry out documents for entering the initial balances to obtain all the necessary movements. You can use processing Group reposting of documents(see Fig.8.2) or post documents in the journal (menu: All functions - Documents - Entering balances). If documents were transferred without movements (option Upload document movements set to value Not), then in order to receive postings and entries in the registers, it is also necessary to post documents.

Data conversion technique.
Conversion, if necessary, can be performed in several stages, for example, first directories, then documents for entering balances, then other documents. Re-transfer of information is possible. Between transfers, you should not make corrections to the transferred data in 1C: Accounting 8 ed.3.0, otherwise these fixes may be lost during repeated transfers.
Balances are transferred through documents Entering opening balances.
More details on the methodology for entering balances can be found in the article on the ITS website of 1C.
Important! Before entering the opening balances, the accounting policy parameters must be set. The organization's accounting policy settings are read on the date following the date the balances are entered. For example, if the balance entry date is 12/31/2013, then the accounting policy parameters set on the date of 01/01/2014 are taken into account. This allows you to take into account the parameters of the current accounting policy (for example: if in 2013 the organization applied the simplified taxation system, and since 2014 switched to common system- then when entering balances as of December 31, 2013, the accounting policy parameters of 2014 will be taken into account). That is why, as mentioned above, we first of all recommend transferring the accounting policy of the organization.
Important! If you decide to start working in 1C: Accounting 8 ed.3.0 before the remnants were transferred there, it is necessary beforehand before starting work in 1C: Accounting 8 ed.3.0 transfer directories. Otherwise, when transferring residues to a non-empty database, errors are possible.
Important: there is a possibility of solving the problem of synchronization when loading into a non-empty database - matching objects.
How to work with specialized data transfer processing.
Processing is used only in the mode file. Processing Data Transfer_from_BP20_to_BP30.epf should be launched in the infobase where the data is transferred, i.e. in 1C Enterprise accounting rev.3.0. In the first window (see Fig. 9), you should specify the option for loading data from the infobase on the 1C:Enterprise platform:
Load data directly from the infobase

Fig.9 Start window for data transfer processing
In the next window (see Fig. 10), you need to configure the transfer:
- When the seniority is interrupted after dismissal From January 01, 2007, a slightly different procedure for determining the continuity of a citizen's seniority is in force. Prior to this, if 3 weeks did not pass during the transition from one place of work to another, then the experience was not interrupted. Since 2007 […]
- ANKO Tambov Center for Forensic Examinations and Investigations, ANO ANKO Tambov Center for Forensic Examinations and Researches, ANO is registered at Tambov, Rabochaya St., 37, office 40, 392008.
- Order on the working time schedule Sample order on the working time schedule On the working time schedule In accordance with Articles 100, 103, 104, 73 of the Labor Code of the Russian Federation and the Internal Labor Regulations of PJSC "Organization", in order to optimize the operation of the enterprise and increase […]
- In the Central City Clinical Hospital No. 20 of Yekaterinburg, where the head physician was fired, an acting company was appointed | Sverdlovsk region | Ural Federal District Alena Tunis has been appointed Acting Chief Physician of the Central City Hospital No. 20 of Yekaterinburg. According to a reporter […]
- Ohm's law for parallel multimedia 8 cells. multimedia grade 9 multimedia 10-11 cells. astronomy tests grade 7 tests 8 cells. tests 9 cells. demonstration tables of the exam […]
- Law of the RSFSR "On Competition and Restriction of Monopolistic Activities in Commodity Markets" March 22, 1991 N 948-1 federal laws dated 05/25/1995 N 83-FZ, dated 05/06/1998 N 70-FZ, dated 01/02/2000 N 3-FZ, dated […]
Select an infobase from the list (the list is the same as when starting the application 1C Enterprise).
Specify username and password
Specify what information to transfer
Additionally, you can check the data in the source for the correctness of the transfer
When migrating dictionaries, data will be transferred from the dictionaries of the selected infobase for which there are upload rules. Directories in this case are transferred entirely. If the checkbox is not checked, but any other transfer option is selected, then directories will also be transferred, but only to the extent necessary to fill in the data in the transferred transactions and documents. When transferring data, you can transfer directories, documents and balances to the beginning of the year. Transfer options can be selected in any combination. When transferring balances, data on balances on accounting accounts as of January 1 of the selected year will be transferred according to the rules indicated in Fig. 1. In 1C: Accounting 8, documents “Entering initial balances” will be created on December 31 of the year preceding the selected one.

Fig.10 Transfer options window
If the data verification option is selected, then such a verification will be performed before loading and the verification result will be displayed on the screen (see Fig. 11). If errors are found during the verification process, the migration process will be paused to allow the errors to be corrected. If you want to upload and download data despite errors, uncheck Check data before downloading or click Proceed. The list of check rules is constantly updated.

Fig.11 Result of data validation before uploading
In the process of transferring data from the source to the receiver, a picture will be updated on the screen that indicates the current stage: connecting to the infobase, uploading data, loading data, etc. In addition, more detailed information is displayed below as a string, for example, "Data upload: Documents(3 /3)". Upon completion of the data upload, the process of posting the uploaded documents and then checking the uploaded data starts. If errors occur during document posting or data verification, messages about this will appear in the message window at the end. Error messages can also be viewed in a separate window by clicking on the hyperlink Error Information(See Fig.12).

Fig.12 Data transfer progress indication
A fragment of the table containing error records is shown in Fig.13. First, the table displays error messages that occurred while posting documents, then errors during verification. Checking the uploaded data consists in comparing the balance sheets generated on the date of entering the balances in the source and destination. In case of a balance mismatch on some account, a record is created about this. By double-clicking on an entry in the error table, you can open the problematic document for correction and manual execution. The same can be done in the message window.

Fig.13 Fragment of a table containing error records
After making corrections in the destination database, it does not make sense to transfer the same information from the source database again, because during the second transfer, this data will again be written with errors. Therefore, try to make corrections at the source, not at the destination, or avoid repeating the transmission of the same information. For example, after transferring initial balances and correcting all documents for entering initial balances in the receiver, do not set the flag for further transfers Balance at the beginning of the year.
Updates are free for 6 months after purchase. At the end of the period free updates, You can receive updates for a fee (see below for the cost). However, if you have purchased several software products, as part of sets or separately, then you have the right to count on a discount. You can learn more about the discount system.
Rules created by technology Data conversions: easy to edit.
Fully open, there are no licensing restrictions other than a ban on replication.
File TransferDemo20_30.xml is an unloading from the database obtained by transferring the BP 2.0 demo database distributed by 1C to the BP 3.0 database. Create an empty BP 3.0.44.94 database, you can use the 1C template or use the 1Cv8.cf configuration file. Set in accounting settings to Chart of accounts setup accounting for stocks by warehouses and batches. Download the demo file TransferDemo20_30.xml with processing Universal data exchange in XML format. The demo database shows the transfer of balances as of 01/01/2009 and documents for the period from 01/01/2009 to 12/31/2009.
The rules are regularly updated for new releases, suitable for BP releases 2.0.64.23 and later. No need to search and select the desired version of the porting rules, they are suitable for any SOURCE release in the specified range. If you need rules for earlier releases, please contact the author. The RECEIVER release must be just like that as in the rules.
08/29/2018 The unloading of balances under the section is separated into a separate rule Loans(accounts 66, 67), previously it was part of Other accounting accounts
08/20/2018 Update to 2.0.66.59 and 3.0.64.48
06/03/2018 Added transfer of documents Reflection of salary in regulated accounting
05/18/2018 Update to 2.0.66.54 and 3.0.61.37
02/23/2018 Update to 2.0.66.48 and 3.0.58.41
01/18/2018 Update to 2.0.66.46 and 3.0.57.17
12/22/2017 Update to 2.0.66.42 and 3.0.56.22
11/03/2017 Update to 2.0.66.37 and 3.0.53.38
09/26/2017 Update to 2.0.66.37 and 3.0.52.35
06/14/2017 Update to 2.0.66.29 and 3.0.50.18
05/05/2017 Update to 2.0.66.25 and 3.0.49.27
04/04/2017 - added the creation of invoices received when BP 2.0 has only a number and date. Need to set parameter Perform invoice conversion(create new ones if the source contains only the number and date)
02/06/2017 Update to BP 3.0.47.23
01/26/2017 Added transfer of documents Reflection of VAT accrual And Reflection of VAT deductible
01/11/2017 Update to BP 2.0.66.8 and BP 3.0.46.16. Register transfer excluded VAT according to OSiNMA. In more early versions, where it is in the configuration, it will not be transferred.
12/14/2016 Update to BP 3.0.44.203
12/07/2016 Added transfer of documents Debt Adjustment
12/01/2016 Parameter added Do not take into account the register Expenses for the simplified tax system, which allows you to manage the unloading of balances for organizations using the simplified tax system
11/21/2016 Directory download added Users a separate rule with the creation of IS users in the receiver (details here). Added transfer of balances by RS Organization employees(personnel data). When transferring balances on accounts 76.AB and 76.BA, it is possible to check and correct the sorting by the second subconto.
11/08/2016 The list of documents has been expanded.
10/28/2016 Added transfer of documents. Added a demonstration of the transfer, this is the result of the transfer of the BP 2.0 demo database.
10/26/2016 Fixed creation of empty documents for entering balances when there are account balances on 10.07
09/09/2016 Update to BP 3.0.44.102
03/23/2016 Improved transfer of data on invoices received (when transferring inventory balances)
01/11/2016 Added transfer of contact information of individuals, citizenship, passport data, disability information, statuses of individuals. Added rules for transferring bank accounts and item accounting accounts.
12/23/2015 Update to BP 3.0.43.29. Added transfer of contact information of counterparties and their contact persons.
12/14/2015 Created rules for BP 3.0.42
Package Includes: Transfer Rules "ACC20_30" and processing Data transfer_from_BP20_to_BP30. If your organization does not have a full-time programmer for work, we are ready to offer the services of our specialist (the programmer will connect to your computer via the Internet, via special program for remote work and perform the necessary work). If it is possible to provide a working base "1C: Accounting 8 rev.2.0", we can transfer the data ourselves and transfer the file " 1C: Accounting 8 ed.3.0» with carried over balances. The cost of this service is not included in the total cost of the package.
Important. Not all documents are migrated (for compatibility with older BP 2.0 releases). Before buying, carefully read the list in Fig. 3.
Data transfer from the programs "1C: Accounting 7.7" and "1C: USN 7.7" to "1C: Accounting 8"
A few words about how data is transferred from a typical configuration " Accounting”, edition 4.5 for 1C: Enterprise 7.7 or configuration “” (hereinafter referred to as Source Configurations) into the standard configuration “ Enterprise accounting”, edition 3.0 for 1C: Enterprise 8 (version 3.0.52), hereinafter referred to as the “Destination Configuration”.
IMPORTANT! Data transfer possible from configuration Accounting edition 4.5 for 1C:Enterprise 7.7 version 7.70.569 and later or from the configuration " Simplified taxation system, ed. 1.3» versions 7.70.219 and higher.
It is recommended to switch from the Source Configuration to the Destination Configuration at the beginning of a new period (year, quarter, month) after the completion of the scheduled operations of the previous period.
Data transfer is performed using specialized processing that unloads data from the source Configuration infobase into a file in XML format. The resulting file is uploaded to the infobase of the recipient Configuration using universal data upload processing.
ACC_ACC8 .ert - external processing of uploading data to an external file from the configuration " Accounting, rev.4.5»;
USN_ACC8 .ert - external processing of uploading data to an external file from the configuration " Simplified taxation system, ed. 1.3»;
ACC_ACC8 .xml - data conversion rules.
USN_ACC8 .xml - data conversion rules.
The following are transferred from the infobase of the Source Configuration to the Destination Configuration:
— information on current balances on the accounting accounts of the Source Configuration infobase as of the infobase conversion date;
— current documents with a date greater than the infobase conversion date.
The conversion is performed in two stages:
— data from the Source Configuration infobase is uploaded to a separate file (data file);
— the received file is loaded into the infobase of the recipient Configuration.
Use the setup.exe installer to install data migration processing. After starting the program (if the number of 1C:Enterprise infobases is large, then after some time) a dialog box will appear in which you need to mark those infobases where data transfer processing will be installed. The window looks like in Fig.1. If the number of infobases is more than seven, then use the up and down buttons to navigate. If several infobases are selected, then only the location of the last selected infobase is displayed in the "path" line. This information is of an auxiliary nature and is used at will for additional control by the user over the result of the installation program, do not pay much attention to it, the program will determine by itself where the infobases you have selected are installed.

Fig.1 Infobase selection window during installation
Additionally, you can specify the folder where the data transfer processing will also be installed, for this you should use the folder selection window (by clicking the button with three dots). The full path for the selected folder will be reflected in the selection bar. After clicking on the "Install" button, the installation will be performed necessary files to the selected infobases and (or) to the selected folder. After completion, you can click the "details" button and see a detailed installation log, which files and which folders were written. As a result, approximately the following picture should appear in the selected folder, see Fig.2.

Fig.2 Files installed in the selected folder
To a subdirectory ExtForms processing and transfer rules are set. Please note that upload processing ACC_ACC8.ert and data upload rules supersede generic processing and rules. If you want to keep the typical transition mechanism, install the new processing in a separate directory, not in the infobase.
The installation process is described in more detail using the example of installing the report " Express check of accounting for the configuration "1C: Accounting 7.7«.
In a programme " 1C: Accounting 7.7» to be opened from additional features processing " Transition to 1C: Accounting 8, ed. 3.0«, select the folder containing the transfer rules (see Fig. 3) and download the exchange rules. You do not need to include all transport rules. You should use only those that are necessary, for example, to transfer balances, or balances and documents. For example, in the dictionaries group, no rules can be included, because all dictionaries are transferred by links, as needed, i.e. only those that are involved either in the balances or in the documents. This ensures that there is no "garbage" in the new infobase. You don't need to include all documents either. For example, if there are no documents in your database, or you do not want to transfer them, you do not need to enable this rule.

Fig.3. Data upload processing
I recommend setting the data file name to “C:\v77_v8\Exp77_80.xml”, this folder is often used by default in the program “ 1C: Accounting 8» when downloading data from programs on the platform « 1C:Enterprise 7.7". Set options on the page if necessary. Parameters«.
In the process of unloading data from the configuration " Accounting 7.7» Various errors may occur. The transfer rules presented here differ from the typical ones in that at the stage of unloading data, a search is performed common mistakes. Consider those of them about which messages are displayed.
Zero quantity and non-zero amount of goods and materials. Entering a balance in the Destination Configuration so that the quantity of the material is equal to zero, and the cost estimate of the material is not equal to zero, is impossible, and it makes no sense, because this is a mistake. Therefore, when balances are transferred, such items (with a zero quantity) will not be available in the balance entry documents. Therefore, if the errors are not corrected before the data transfer, then the amounts in the data source and destination will not match when the balances are transferred, which will cause additional reconciliation difficulties. Therefore, in the process of unloading data from the configuration " Accounting 7.7» messages about encountered errors are displayed (see fig. 4). Additionally, to search for errors, we can recommend using the processing "Express check of accounting", namely the rule "No non-zero amount with zero quantity for materials".

Fig.4.1 Error messages
Non-zero balance on subaccount of the second (third) level, while the balance at the first (second) level is zero. This is a fairly common situation of erroneous accounting. A typical example is shown in Figure 4.2. There is such a state as a result of "resorting" in analytical accounting. For example, in traffic documents Money the contract is indicated, but there is no contract in the documents for posting goods and materials, or vice versa, or there are contracts, but they are different. In all these cases, there is a non-zero balance on contracts, despite the fact that the balance on the counterparty is zero. A similar picture can develop in the accounting of materials, nomenclature (when total accounting by storage locations is enabled): sorting between warehouses, especially if the warehouses are materially responsible persons.

Fig.4.2 An example of errors in accounting
It is clear that this is a mistake, and it is clear that it does not make sense to carry over such residues. In order to exclude the transfer of this kind of balances, there is a parameter "Do not unload balances if there is a zero balance on top level". If this parameter is set to one, then the messages shown in fig. 4.3 (compare with fig. 4.2), and the balances for such positions will not be unloaded. You can use various combinations of this parameter with the rules for the transfer of various balances. If you transfer not all balances at once, but by accounting sections, then you can transfer balances for different accounting sections with a different parameter value.

Fig.4.3. Error messages
Empty contract values or other people's contracts. The problem is similar to the one described above, the reason is the same - regrading in analytical accounting for contracts (see Fig. 4.4). But the balance of the counterparty is not equal to zero, so the verification rule described above will not work. When transferring data, an error will occur when posting the balance entry document, because an empty contract value is not allowed.

Fig.4.4 Report showing error
To eliminate such errors before the transfer, error messages are displayed at the data upload stage (see Fig. 4.5). The same figure shows that another error was also encountered: the contract does not correspond to the counterparty, i.e. the owner of the contract is another counterparty. Such errors are often found in modified, i.e. non-standard configurations or in long-established databases, when standard configurations did not yet have a sufficiently strict check for compliance with contracts when filling out documents.

Fig.4.5 Accounting error messages
Checking for empty values of contracts and other people's contracts is performed if the parameter " Check contracts for an empty value and compliance with the counterparty". Additionally, to search for errors, we can recommend using the processing "Express check of accounting", namely the rules "No blank analytics for contracts" and "Correspondence of counterparties and contracts".
There are other checks for errors, for clarification, contact us (contacts at the bottom of the page).
We will show how you can transfer data in parts, and not entirely, using the example of unloading documents of a separate type or even individual instances of documents of a selected type. Let's mark only one rule for unloading data " Payment order» (see fig. 5). This will allow you to upload documents only of the form " Payment order". If you click on the " unload“, then all documents of the form “ Payment order", located in the time interval with " the date of the beginning" on " expiration date". Press the button " Install PVD“, after that the inscription “ Data selection for Payment order«.

Fig.5 How to set a rule for uploading data of a certain type
Next, click the “Add condition” button, you will be able to select the selection attribute (see Fig. 6.1), most often it is “ CurrentDocument«, which allows you to select a single document from the list of documents of this type. You can, using other selection details, get a selection by a group of documents, for example, select documents by date. In all cases, the selection of documents is made within the time interval, parameterized « the date of the beginning" And " expiration date«.

Fig.6.1 How to select a single document
Important! "1C"), which in some configurations does not allow selection of documents when unloading by selection details. This is due to the fact that in model rules documents are selected by request without specifying a period. Such requests do not always work.
Similarly, directories can be uploaded, not the entire directory, but by selecting by some attribute. First, select the desired data upload rule, then sequentially press the buttons « Install PVD" And " Add condition". For example, Figure 6.2 shows how you can unload only those employees with whom at the time of the transition from the program " 1C: Simplified taxation system, ed. 1.3" on the " 1C: Enterprise Accounting, edition 3.0” (or, as users often say, the transition from accounting 7.7 to 3.0) an employment relationship has been established.

Fig.6.2 How to select a group of directory elements
Important! In the proposed rules for data migration, an error in standard rules has been corrected (from the company "1C"), which leads to incorrect selection of elements of the directory when unloading by periodic details of the directory, i.e. those that have different values for different dates. This is due to the fact that in the model rules, the selection of directory elements is made by a query without specifying a period.
The selection by periodic details of the directory is made on the date of the parameter " expiration date«.
You can use a combination of data upload rules and filters. Rules for which selections have been set will be marked with ” [ FILTER ] “. In order to see or edit the selection of a specific data upload rule, you need to double-click on this rule in the list of rules or, after selecting it, click the " Install PVD«.
Important! If the unloading of objects turns out to be empty or incomplete, you need to check whether the synchronization mode with 1C: Accounting 8 is set. If this is the case, then only objects that have been changed after the transfer has been completed will be unloaded (Reference. Synchronous Accounting Parameters stores the Position of the Last Unloaded Document parameter, which is checked during unloading by the function CheckOn the Possibility of Unloading) . full work in sync mode becomes impossible. The synchronization mode is checked after the exchange rules are loaded. If the mode is set, a warning window will be generated (see Fig.6.5) and it will be proposed to disable the synchronization mode.
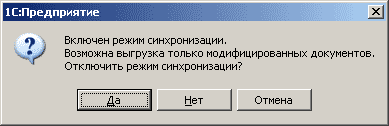
Rice. 6.5 Synchronization mode warning window
Additional differences from the model rules
Fixed transfer of P&L with old receipt types: if in the Goods and Services receipt documents the receipt type is 2 (obsolete value) and there is no supplier invoice, an erroneous conversion of this document in BP 3.0 into a return document from the buyer occurs.
An error has been fixed when transferring manual operations that have a Subdivision subaccount to the BP PROF version. Such an operation is not recorded in the BP, an error occurs: "The Department field must be empty." This is due to the fact that the rules are designed to work with CORP versions, however, in PROF, the DivisionDt and DivisionKt dimensions of the accounting register must be empty.
Fixed a bug that caused duplicate groups of the directory Treaties and, as a result, to duplication of the elements of this directory (because the search during loading is performed taking into account the parent). This is illustrated in Figure 6.6.

Fig.6.6 Directory transfer result Treaties model rules
Here in the column Parent(directory group) with the name 2015 there are two different groups of the directory with the same name (there is one group in the source), therefore, the contracts are duplicated.
Fixed the error of transferring bank documents when transferring money from one current account to another. IN BP 3.0 in this case the document is created Write-off from current account with type of operation Transfer to another account of the organization, which is not carried out due to the fact that the props are not filled Beneficiary's account. In addition, the details are filled in incorrectly accounting account And Debit account. This will manifest itself if they are different, for example 55 and 51, then they need to be swapped. Fixed bug with missing details Type of obligation in tax documents. All of the above applies to release 3.0.43.215.
Props are being transferred main contract directory Counterparties.
Manual unloading rule changed Nomenclature, now the data selection method is a standard selection, which allows you to select elements of the reference book by details (in the standard rules of the USN 7.7 - BP 3.0 this is not possible). When transferring a directory Nomenclature, are transferred and Item prices by links, i.e. prices of only transferred items of the item. To enable this feature, you need to set the value of the parameter to one. Upload prices when unloading an item.
Fixed a bug in the standard rules "USN 7.7 - BP 3.0" when transferring balances for settlements with counterparties: the type of contract was always set to Other. Now - depending on the type of balance, according to the accounting section " Settlements with suppliers and contractors» contract type = « Supplier", according to the accounting section" Settlements with buyers and customers» contract type = « with the buyer", in other cases, the type of contract = " Other«.
Fixed a bug in the standard rules "USN 7.7 - BP 3.0" when transferring balances for settlements with counterparties: the amount of mutual settlements was recorded in two details of the document for entering initial balances Sum And AmountKt. As a result, no opening balance entry document was posted.
Checkwith the buyer"(in the model rules" Other"). The value of the attribute " Payment State"It's important for right choice invoices for payment to the buyer in bank payment documents in the recipient Configuration.
When transferring documents of the form " Payment order» contract type is set to « Supplier"(in the model rules" Other«).
Fixed a bug in the standard rules "USN 7.7 - BP 3.0" when transferring storage locations: the attribute " Warehouse type«.
Added parameter " Exchange with regulatory authorities included": if its value is 1, then props Type of Exchange with Supervisory Authorities directory element " Organizations' is set to ' ExchangeInUniversalFormat", otherwise in " ExchangeDisabled» as in the standard rules. This is important for repeated (regular) transfers so as not to spoil the EDI setup.
Changed the search rule for downloaded elements for the directory " Counterparties": first, the search is performed on TIN And checkpoint(if these values are filled), then only by TIN and finally on name. In all three cases, the search involves the attribute of the group (ThisGroup) and the group itself (Parent). This is important for repeated (regular) transfers, so as not to create duplicates for counterparties with names changed AFTER uploading.
When transferring counterparties, the details are filled in CountryRegistration meaning "Russia". This is necessary so that after loading the directory of counterparties into the program "1C Accounting 8" did not have to manually fill in the required details CountryRegistration. If it is not filled in, then in the form of a reference element " Counterparties» details will be available « Tax number" And " Reg. room", and details " TIN" And " checkpoint» will be hidden.
In the transfer rules "USN 7.7 - BP 3.0", a data upload rule for transferring the "Employees" directory has been added (in the standard rules, only the directory of individuals is transferred).
In the rules for transferring "USN 7.7 - BP 3.0", the rule for transferring the information register Current Pay Rate of Employees has been corrected.
Features of the transfer of payment orders for the payment of taxes
For payment orders with operation type Tax transfer additional details must be filled in: BCC - budget classification code, compiler status, etc. The structures of these details in Boom 7.7 (USN 7.7) and in BP 3.0 do not match. Particularly in BP 3.0 some of these details are placed in a separate directory, a link to which is contained in the payment order. Directory Types of taxes and payments to the budget contains a number of supplied elements that appear in the infobase, for example, when editing an accounting policy. When migrating data, these elements will also appear when loading the accounting policy. When uploading/downloading payment orders, the directory element Types of taxes and payments to the budget searched by CCC for substitution in the details of the payment order Tax. Therefore, it is recommended that after the transfer of the accounting policy, check whether all the necessary taxes have appeared in the directory, if necessary, supplement. When comparing (synchronizing) CCC in payment orders in the source and receiver, four digits of the CCC, digits 14-17, income subtype code: tax, penalties, fines, etc. are not taken into account. In the directory Types of taxes and payments to the budget these bits are filled with zeros. When adding new elements to the directory, digits 14-17 should also be filled with zeros.
Transfer of information bases of the big size.
First of all, when migrating large infobases, the process of unloading data can take a very long time. This happens if there are a large number of balances in one accounting section, for example, balances of goods. To reduce the unloading time, you can apply the method of splitting one document " Entering opening balances" for a few. If you set the value of the parameter " Number of lines in the balance entry document» non-zero (see Fig.6.3), then uploading data to one document will be limited to the specified value. This can significantly (several times) reduce the unloading time.

Fig.6.3 Setting parameters when transferring data with a document size limit « Entering opening balances»
Note: the parameter value limits the number of lines of the posting table uploaded into one document " Entering opening balances”, and does not set the number of lines of the document itself. Therefore, the number of document lines will differ from the parameter value, this is not an error. When splitting a document Entering opening balances” to several documents, a postfix will be added to the comments of each document at the end of the line: “-1”, “-2”, etc.
IMPORTANT! The described algorithm for splitting one document " Entering opening balances» for several is used only to reduce the time of uploading data, all documents are uploaded to one file, i.e. data transfer occurs in one step, comments (postfixes) are generated automatically, only one parameter is set. But this technique does not solve the problem of lack of memory, which will be discussed below.
When migrating large infobases, the problem of lack of RAM may arise: when trying to unload the program, the program will terminate with the corresponding error message or without a message. Trying to replace the computer with a more powerful one is useless. In this case, you should unload the data in parts, breaking them into portions. This requires migration rules that support the specified mode. Let's see how to unload. First, data transfer should be performed using only one upload rule (see Figure 6.4). If, according to one rule, the transfer is impossible, then we break it into parts, indicating the number of portions, the initial and final ones. Each portion will contain information on a given number of first-level analytics values, for example, product balances, i.e. the specified number of values of balances on the account "41". Knowing the total number of analytics in the account, it is easy to calculate the number of servings. How much data is transferred without problems at a time (into one piece of information) must be determined empirically, as a rule, when unloading account balances, transfer problems appear when the number of balances is several thousand or more. Although, in order to save the time of uploading data, it is possible to recommend splitting into parts even if it is possible to upload all the balances of the accounting section at a time. The unloading time does not depend on the size of the data portion proportionally, not linearly. Therefore, by breaking, for example, ten thousand balances of goods into ten parts of a thousand, you can reduce the unloading time by several times. If we transfer the first portion, the number of the initial portion can be omitted, if the last portion, then the number of the final portion can be omitted.
IMPORTANT! When transferring data in parts, it is necessary to specify in the parameters the postfix, which is involved in the formation of the document comment " Entering opening balances". When changing the numbers of the range of portions, you must not forget to change the postfix, otherwise, when loading into the recipient Configuration, documents with the same comments (postfixes) will be overwritten. The name of the data file does not matter much. You can apply sequential transfer tactics: upload - download, upload - download, etc. The name of the data file in this case can be left unchanged. You can choose tactics: first unload everything, then download everything. In the latter case, the name of the data file will have to be changed on each upload. Once again an example. If the number of balances in the accounting section (for example, goods) is, say, 10,000, we divide it into parts by a thousand, then we get 10 servings. Each part must have a unique postfix: "-1", "-2", "-3", "-4". If we unload all the rest of the goods, and then load everything, then the data files must also be unique, for example: "41_1", "41_2", "41_3", "41_4". The parameters "Portion number start" and "Portion number end" must take the following values: 0, 1000; 1001, 2000; 2001, 3000; 3001, 4000.
Now users of "1C: Accounting 7.7" do not have to wait until the end of the year to switch to "1C: Accounting 8". The transition can be made at the end of any month of the tax period. The technology for transferring balances has already been tested at operating enterprises, one of which is described by specialists from Automated Accounting Systems LLC. The article contains a description of the transfer technique and general recommendations for input and output control of transferred data.
Before moving to Laima LLC (Miass, Chelyabinsk region), the program "1C: Accounting 7.7. standard version". The program is installed on a laptop. Work is carried out in the home office.
The release by 1C of a new methodology for transferring data and a small amount of information base made it possible to transfer data for 2006 directly at the time of installation of 1C: Accounting 8.
Data Transfer Methodology
Included in release 1.5.8.5, a new methodology for switching from "1C: Accounting 7.7" to "1C: Accounting 8" provides for the transfer of data from the "1C: Accounting 7.7" infobase, which would ensure the correct execution in "1C: Accounting 8" of the following actions:
- holding documents issued after the transition to "1C: Accounting 8";
- formation of accounting registers for the current reporting period (balance sheet, general ledger, etc.);
- formation of tax accounting registers for the current reporting period, containing indicators determined on an accrual basis from the beginning of the year;
- formation of regulated reporting for the current reporting period.
The transition from "1C: Accounting 7.7" to "1C: Accounting 8" according to this method is recommended to be performed at the beginning of a new tax period (year) or, if a new period is already open, then at the end of the next month of the current reporting period. In the process of transferring data to "1C: Accounting 8", the following information is loaded:
- balances on accounting and tax accounts at the beginning of the current reporting period (as of January 1 of the current year);
- turnovers on accounting and tax accounts for the current reporting period by consolidated monthly entries;
- temporary differences reflected in the relevant tax accounts (for organizations applying PBU 18/02);
- documents for entering initial balances for fixed assets and intangible assets;
- tax bases for personal income tax and payroll taxes for the current reporting period;
- arrears in payment of received and issued invoices at the end of the last closed month of the current reporting period;
- information about the objects of analytical accounting.
Preparatory operations in "1C: Accounting 7.7"
Data transfer from "1C: Accounting 7.7" is possible starting from release 7.70.477. Therefore, it was necessary to update the configuration to this release before the migration.
It is also necessary to make sure that regular accounting and tax accounting operations have been carried out for the last month of the year (including balance sheet reformation).
All files required for data transfer are contained in the Convert folder in the template directory of release 1.5.8.5 "1C:Accounting 8". It is better to copy the contents of this folder to the ExtForms directory of the "1C:Accounting 7.7" infobase.
The transfer technique provides for the only preparatory operation - checking reference codes, which may become non-unique when transferring data to "1C: Accounting 8". For verification, external processing ChkCode.ert is used.
However, in order to verify the correctness of accounting and tax accounting in the 1C: Accounting 7.7 database and not to transfer deliberately erroneous entries to the G8, it is useful to perform a technological analysis of accounting (Menu "Reports -> Technological analysis of accounting" ), as well as analysis of the state of tax accounting ("Tax accounting -> Analysis of the state of tax accounting").
As a rule, problems are caused by "manual" postings, which are made without control of the opening balance, quantity accounting, etc. The new methodology transfers even such postings correctly, however, incoming control allows you to immediately identify problems and issue recommendations for correcting them.
In our case, the control revealed discrepancies in accounting in terms of writing off depreciation of fixed assets for losses from previous periods, which it was decided to correct already in "1C: Accounting 8" after the transition.
Data transfer
The data transfer itself is performed using external processing V77Exp.ert (menu "File -> Open"). The processing dialog states:
- data conversion rules file - Acc77_80.xml ("Rules file name" field);
- the file to which the data will be uploaded (field "Data file name");
- start date of the current reporting period - January 1, 2006 ("Start date" field);
- end date of the last closed month in the current period ("End date" field). In our case - May 31, 2006.
After clicking the "Load exchange rules" button in the processing dialog, the list of data upload rules will be filled. The loaded list is a list of accounts, the results of which can be downloaded, and directories that can be transferred to the "Enterprise Accounting" configuration. In the table on the right, you can set filters for most data upload rules by attribute values (for example, for selective uploading of items).
Since we are transferring data from the "seven", the first time you start "1C: Accounting 8", you must abandon the initial filling of the database. After that, using the processing of data loading (menu "Service -> Data exchange -> Universal data exchange in XML format"), we load the transfer file into the eight.
Examination
The whole procedure of data transfer took no more than half an hour. It remains only to make sure that all the data was transferred correctly. Here it is best to start with the balance sheet for the data transfer period. For balance accounts, statements generated in "1C: Accounting 7.7" and "1C: Accounting 8" must match. If the turnovers for any account do not match, it is necessary to generate more detailed reports (balance sheet or card) for this account in order to determine which turnovers have not been transferred. Thus, you can check all the data, with the exception of the balances of fixed assets and intangible assets, tax bases for personal income tax and payroll taxes for the current reporting period and debts on payment of received and issued invoices at the end of the last closed month of the current reporting period.
In our case, in "1C: Accounting 7.7" the data on the fixed assets were not completely entered, and in the "eight" the documents "Entering the initial balances on the fixed assets" simply did not post, respectively, and the balance at the beginning of the period on account 01 did not arise. These documents have been manually corrected.
The VAT accounting subsystem is implemented in "1C: Accounting 8" on registers, to check the correctness of the transfer, you should use the universal report "Balances and turnovers" (Reports -> Balances and turnovers) without limiting the period for the accounting sections "VAT presented", "VAT from advances "to analyze the correctness of the transfer of accounts of the ZPK and ZPR.
1. Introduction.
2. What you need: 1C configuration: Data conversion 2. * and processing from the package. For an example of tasks, we take the configurations 1C: Trade Management 11 and 1C: BP 3.*.
So, to develop rules for uploading data to 1C, you will need the 1C configuration: Object Conversion 2, as well as the processing included in the package.
For example, we have already deployed the conversion base and launched it.
We will write the development of exchange rules between the configuration 1C: Trade Management 11 and 1C: Enterprise Accounting 3 (UT / BUH exchange rules).
3. We will need Processing to unload the metadata structure and exchange.
The first thing you need to get for development is files with a metadata structure. This is done using metadata structure unloading processing included in the object conversion package.

Actually, in the unpacked configuration directory for configurations on managed forms we are interested in processing MD83Exp.epf. If the unloading needs to be done from the configurations on regular forms, then MD82Exp.epf processing is used. This is if, for example, you need to get a structure from such configurations as 1C: UT 10, 1C: Manufacturing Enterprise Management 1.3, 1C: Integrated Automation 1.1, 1C: Zup 2.5 and so on.
Further, to upload and download data in 1C using our rules, you will need the processing of "Universal data exchange in XML format" V8Exchan83.epf for configurations on managed forms such as 1C: Trade Management 11. *, 1C BP 3, 1C: ERP 2. * and the like. And accordingly V8Exchan83.epf - for configurations on regular forms.
4. Uploading the configuration metadata structure 1C: Trade Management 11.3 and 1C: Enterprise Accounting 3.0. *
Let's start by unloading the metadata structure from the 1C configuration: Enterprise Accounting 3.
Open processing MD83Exp.epf

In the form of processing there are additional settings, where we can enable or disable the option to unload registers and movements in 1C. There is also a choice where the unloading will take place: on the 1C server or “on the client.” Specify the name of the file where the data structure will be unloaded. Similarly, we unload the configuration metadata structure Trade Management 11.
Now you need to load the configuration into the conversion database. This item can be reached both from the list of configurations and from the list of conversions. Let's just boot from the desktop:

In the dialog box, load the BP structure: 
And similarly - the structure of the Department of Trade. 
When the download is complete, a dialog box will appear where you can specify a name convenient for you. 

6. Creating rules for converting to 1C on specific example tasks.
Next, go to "Setting object rules", where we create a new setting.
In the dialog box for creating a conversion, select the "source" configuration and the "destination" configuration (which you have previously loaded) and click OK.

Since in this article I planned to show the creation “from scratch” and “without garbage”, I remind you that we do not automatically create anything. No prototypes.

We will not do anything in this dialog box, just click - "Close".
Let's create rules for unloading not one document into one, but one type into another, for example, the document Sales of Goods and Services from UT 11 with the necessary directories to the document Receipt of Goods and Services in BP 3.
So, we create a new PKO (the rule for converting objects into 1C)

Select the source Realization of Goods of Services and the receiver of Receipt of Goods of Services and click OK.
In this case, a dialog box will appear, where we again refuse the automatic creation of the PKC (Property Conversion Rules). Next, we select only the necessary ones.

But to the proposal to create a PVD (data upload rules), we answer “Yes”.


VDPs are created, which will be reflected in the processing of the universal XML exchange for selection:

Data conversion rules with empty property conversion rules will also be created.

Moreover, it is clear that by default it is proposed to search for the FSP by the internal identifier of the object. This is indicated by a magnifying glass near the PKO. We will do our own search, and we will do it by the document number and date at the beginning of the day.
Removing the search for UIO:

Now let's start matching the necessary properties (requisites) of the object. To do this, click "Property Synchronization" (label "1" on the screen). We remove the recursive creation of rules ("2"). We remove all the marked details ("3"). And we will choose for ourselves what we need.

For example, choose what you need:

I draw your attention to the fact that we will make the PKS of the counterparty into the organization, and the organization into the counterparty, and we will also compare some details that do not match in name, for example, “Currency” and “Document currency”.


Where we see that there are no conversion rules yet.
Let's start by details to go through and describe. First, we set up the search for the document as I wrote earlier, we unload and search for the document at the beginning of the date, and we will change the numbering. We will replace the first three characters with our prefix "UTB". And since in BP and UT the numbering is 11 characters each, we make a composite number: our prefix and 8 characters from the source. Screenshot example below.

We always unload documents that have not been carried out and without movement. We assume that the documents will be held in the receiver after checking by the user.
To do this, the PCS, having set how not held, 0 or 1, is used as a boolean.

Using the currency as an example, we create a rule for converting an object for the PCS. At the same time, we consider that there are currencies in both bases, and they must be synchronized by code. Therefore, we will not create all the PCSs in the CSP of currencies, but only add the Code for the search. Those. from the proposal to create a PCS for the object - we refuse.

The created Conversion Rule was substituted in the document's PQS for the SCS. And the default rule itself is offered by a unique identifier. We fix it, do a search in the code and set the property so as not to create a new object.
As a result, we get the option:

Further, by analogy, we create for the rest of the details of the PKO and PKS. Moreover, we set the search for an organization by counterparty and vice versa by TIN. This is what it looks like with minimal details (you can add if necessary).

For PKO Agreements of counterparties, we search for PKS Counterparty, name and owner.

Let's see how to specify the desired value in the enumeration type in the PCS. For example, the attribute "Operation Type". Here you can use various conditions and substitute values. For example, we need the “type of operation” to always be unloaded “Goods”, in this case it is enough to write the desired value in the “forehead” as a string.

The following shows how to set without difficulty and in most cases PKS for Settlement Multiplicity, Settlement Rate, Accounts.

For PKO Nomenclature, we leave the search by internal unique identifier. But I will pay attention to how you can redefine your group. For example, we agree that a new nomenclature will be unloaded from the configuration 1C: Trade Management 11, but it is necessary that the nomenclature be collected in a specific group “OurGroup”.

To implement this task, we create another PKO. Let's call it "Nomenclature Parent", which we will indicate in the parent's PDN in the conversion rule.
We set two searches: by name, where the name of our group is hardcoded, and the mandatory property of the attribute "ThisGroup" to true.

Since we have decided that all the nomenclature falls into our group, there is no need to unload groups from UT 11 when unloading. To do this, in the Nomenclature PKO, in the “Before Unloading” event handler, we will put a filter that it is not necessary to unload the groups “Failure = Source. This group;".

In the DRP (data upload rules) Implementation of Goods and Services, we will add a filter so that documents marked for deletion are not uploaded. To do this, in the PDP in the event handlers "BeforeUnloading" we will write the filter "Rejection = Object.DeletionMark;".

Save the developed rules to a file.

7. Summing up: Data upload and download using the developed data exchange rules.
We open in 1C: Trade Management 11 the processing "Universal data exchange in XML format" V8Exchan83.epf. 
The unloading has passed, now with the same processing we are loading into 1C: Enterprise Accounting 3.


Download completed. Let's check that it's loaded. So, the document is loaded, as we wanted - we have the Organization loaded into the counterparty, and the counterparty into the organization. Accounts are all downloaded and installed. We got the document number with our prefix and at the beginning of the day. All the details that have been registered have been filled in.

We check the loading of the nomenclature. We see that everything turned out as we planned.


We have created and filled in the details as we intended. There are many subtleties in the conversion and some simple but necessary things that help to accurately write the conversion. And this allows you to minimize errors, not spoil existing data and get rid of unnecessary garbage. This is one of the most simple examples. You can also do the conversion of one object into many, or vice versa, many - into one.
Now there is data conversion 3, it solves other problems. Therefore, conversion 2 is also needed. Good luck to everyone in learning and mastering.
Of course, if you are a programmer and this is your main job, you can try to write the conversion yourself. But if not, then you should value your time in your field of activity, and ask professionals to complete this task.
 Eraser dream works trolls - "trolls erasers in five
 How to get troll erasers for purchases at Pyaterochka Erasers trolls barcodes
 Do-it-yourself group and reception room decoration in kindergarten
 Payment system RBK Money Multilevel security system
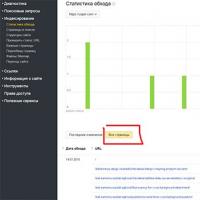 A quick way to check page indexing in Yandex and Google
 The main ways to protect against spam How spammers clean the databases from inactive email addresses
 How to turn on "Ok Google on Android" - launch the voice assistant from the digital giant Ok google, what are insects for?