Creating a new Apple ID may take several. How to fix errors related to the input to the Apple ID account. The most typical errors when creating an Apple ID
Greetings! Today, immediately after updating the iPhone (when you try to log in with your account), I ran into an unusual mistake. The phone joyfully informed me that it was not possible, and wrote about the following - "crash failure, failed to log in. An Error connecting to the Apple ID server has occurred. The most interesting thing is that because of this, the phone is actually turning into an ordinary "dialer", because it is impossible to use all Apple services - in the App Store do not go, the game or the application does not download, ICloud also do not activate, well, etc.
I successfully overcome this attack, which I wish you very much. And this instruction will tell you what exactly needs to be taken in this case and how can the problem be defeated. Let's go!
To begin with, I advise you to check whether the Apple ID identifier is correct and valid, that is currently functioning at the moment. To do this, go to the link to the official website and enter the data of your account. If it does not open, then. In the case when all "OK", we will look for other causes of failure.
Error occurs on the iPhone and iPad
The connection problem to Apple servers can wait for you already on. And there are only two options that can be taken:
- Try to activate through a computer using iTunes. Although it may be difficult to arise, but about it is slightly lower.
- Just skipping the creation of an Apple ID and do it later, after turning on the device.
In the case when the device cannot log in to your Apple ID or, on the contrary, the input is made, but the App Store and other services do not work because of servers fails, you should pay attention to:

By the way, Jailbreak can also cause such problems. Therefore, if the previous methods do not help, and the entrance to Apple ID is still not accomplished, get rid of Jail. Let me remind you that you can do it correctly only through.
On the computer when using iTunes
In rare cases, errors connecting to the server and various failures with the Apple ID or App Store may occur during operation with iTunes. However, it is easy to get rid of them. For this:
- We are convinced that the computer is connected to the Internet (stupid of course, but everything can be).
- Antiviruses, firewall and other defenders can block access to Apple servers. Turn off them for a while.
- ITunes must be installed.
- If your Apple ID account has already been used on the computer, then we try to "dance" it from the program. To do this, open iTunes - in the upper left corner we click on the "Store" - deavodilize this computer. Restart PC.

We try to go again and, most likely, you will succeed!
Here is actually all the actions that you can perform to combat the connection error to the Apple ID servers. Yes, they are not much, but most importantly - they really work!
P.S. Put "Like" if the article turned out to be useful, and also write in the comments - what helped, and what not! Or do you have any other ways to cope with this failure? Tell us about them - other readers will be very grateful!
Provisions and terms of sale and return (hereinafter - "Conditions")
Thank you for purchases in Apple. We appreciate what you buy our popular products. We also want that when studying, evaluating and buying our products, be it when you visit the online store or in a telephone conversation with Apple Contact Center employees, you received valuable experience for you. (To facilitate the perception of this material, then in these Rules we will call ourselves "Apple Store"). Apple's store operator is Apple Limited Liability Company, which was created in accordance with Russian legislation and is located at: 125009, Russian Federation, Moscow, Romanov Per., 4, p. 2., Main State Registration Number 5117746070019 (hereinafter: "Apple").
As in any business, purchase and sale operations in Apple Store are regulated by a number of provisions and conditions. By placing an order or shopping in Apple's store, the buyer agrees with the conditions below, as well as. To place orders in Apple Store you should be 18 years old.
Standard Return Policy
You have legal right to cancel the order, return the product or terminate the contract for the provision of services for any reason. To return the product acquired in the Apple Store store, or cancel the service contract, let us know about this intention at any time before the expiration of 14 days from the date when you or the person you specified entered into the physical possession of the product (products) or from the date Conclusions to the contract for the provision of services. If you have purchased several products within a single order, let us know about the intention to return the product at any time before the expiration of 14 days from the date when you or the person you specified entered into physical possession of the latest product in the order. To take advantage of these rights, you only need to explicitly inform us about your intention to return the product, cancel the order or the contract for the provision of services.
Notifying us about return, simply return the product in the original packaging, with the check and the accessories attached to the product. After you inform us about the return of the product or terminate a contract for the provision of services, you will have 14 days to return the products or agree on their transfer to the courier. We will return your funds with the same way that payment was made, within 14 days from the moment they take the product, or if you transferred it to the communication operator, we will get the product itself or notification of its dispatch.
Please note that you do not have the right to refund the following goods, except for cases of defect or inconsistencies.
- Uploaded software, if you gave an explicit preliminary agreement before loading and recognized that you lose the right to refuse.
- Subscriptions for software updates, iTunes gift cards, Apple Store Gift Cards and any Apple Developer products.
- Services, such as packaging products, after their fulfillment, if before starting execution you gave an explicit preliminary agreement and recognized that you lose the right to refuse after a full implementation of the service. If the services were not fully fulfilled and you were asked to start their implementation within 14 days from the date of conclusion of a service agreement, you will be held with the cost, proportional value of the services rendered before you informed us about your intention to cancel the contract for the provision of services .
- Software in a sealed box, which was opened after delivery.
If the product is damaged, we have the right to reduce the amount of your compensation for the amount of reducing the cost of the product.
We will reimburse all the amounts paid by you in connection with the product or service, except for the explicit payment of delivery (if you have not chosen the standard delivery).
Full information about the return of products purchased from the Apple Store store, you can get in the "Return and Compensation and Reimbursement" section on the Help page at the address.
Buying iPhone
The acquisition and use of the iPhone is regulated by the provisions and conditions that are shown on sites and. In addition, purchasing an iPhone, the buyer directly recognizes that the introduction of any unauthorized modifications in the IPhone product software is a violation of the license agreement on the iPhone software. Warranty repair is not performed if the use of the iPhone product has become impossible due to unauthorized software change.
Mobile services
Some Apple products use mobile services that provide for additional costs and are governed by the terms of individual agreements between the buyer and the mobile service provider chosen. For more information, refer to your wireless operator.
Pricing, decrease and price adjustment
Apple reserves the right at any time to change prices for products offered in Apple Store and correct mistakes allowed by negligence. In case of an error in the price of Apple notifies the buyer about this and finds out whether it intends to make a purchase at the adjusted price. In the event of a buyer's refusal from shopping at the adjusted price, Apple cancels the order at the request of the buyer and returns the amount paid. Additional information on pricing and sales tax is available on the payment page and pricing.
If within 14 calendar days from the date of receipt of the goods by the Buyer, Apple reduces the price of any product released under the Apple brand, the buyer can contact the Apple Contact Center 8-800-333-51-73 asking for compensation between the difference paid and the current prices or about enrolling this difference in the buyer's account loan. The buyer will have the right to compensation or enrollment on credit, subject to apple circulation within 14 calendar days from the date of price changes. It should be borne in mind that the above does not apply to time-limited prices during the period of special shares for the sale.
Users, first start using iPhone or iPad, must be faced with such a term as an Apple ID. Applications regularly require to enter some apple ID and in case of refusal almost cease to work. Such a situation is annoying and confusing inexperienced users who do not understand what is an Apple ID, for which it is needed and how to get it.
Apple ID is a unified account that is used by Apple to identify users of its products. This account is created once, after which it can be used to enter all Apple products. In particular, Apple ID is used to enter such services as App Store Application Store, Media Store Store Store, ICLOUD Cloud Storage, IMESSAGE / ICHAT / FACETIME.
If you have accounts on sites like Google or Yandex, then you are probably familiar with a similar system. For example, registering mail on Google, you receive an account you can use to enter all Google products. You do not need to register a separate Google mail account, a separate account for YouTube and so on. Similarly, with Apple ID, register once and then use the same account.
What do you need apple id
Now a little more about what Apple ID is used. As you already know, Apple uses Apple products and services. And this provides you with the following features:
- Buy or rent media content in the iTunes Store store;
- Buy applications and games for iPhone or iPad at App Store Application Store;
- Use video calls using the FaceTime application;
- Buy applications and games for iMac, Mac Pro, MacBook, Mac Mini at Mac App Store App Store;
- Receive test Beta versions of IOS and OS X operating systems;
- Acquire gadgets and accessories in the Apple Online Store online store;
- Communicate with friends using iChat and iMessage applications;
- Use ICloud and iTunes Match cloud storage facilities;
- Listen online radio using the iTunes Radio service;
- Use free educational materials on the iTunes U service;
- Create and manage your own collection of media content in Apple TV;
- Use the "Find iPhone" function, which allows you to find a stolen or lost gadget;
- Buy e-books in the book online store IBooks Store;
- Contact Apple Support Service;
- And much more;
As you can see a list of features that Apple ID, wide enough. Therefore, if you purchased an iPhone, iPad or Mac computer, you should not refuse to use Apple ID. So you just limit the capabilities of your mobile device.
How to get an apple id
The easiest way to get an Apple ID is to create it when you first start the new Apple device. After turning on the new iPhone or iPad, you will be offered to choose your country, connect to Wi-Fi network, configure access to fingerprint or face, etc. At one of the steps of configuring the new Apple device, you will be offered logging in using Apple ID. Here you need to click on the link "No Apple ID" and go through the registration procedure.

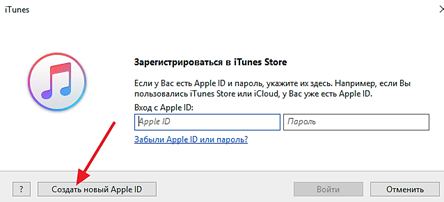
If you missed this stage or want to get another Apple ID, then you can register it, for example, using the iTunes program on your computer. To do this, run the iTunes program, open the "Account" menu and select the "Login" option.

After that, click on the "Create New Apple ID" button and go through the registration procedure of a new account.
To register an Apple Id account, you will need to enter your name, the e-mail address address (it will be used as a username), password, date of birth, backup email address, as well as three control questions and answers to them.
What else needs to know about apple id
In conclusion, we give several important facts about Apple ID. This information will help you not to be deliberately and myths about Apple IDs that often apply to different sites on the network.
- To receive Apple ID it is not necessary to enter the payment card data. When ordinary registration, Apple IDs will require you to enter information about your payment card and skip this stage will not work. But if you are firmly intended to buy anything, you can chalit a little and register an Apple id without a card. To do this, run the AppStore on your device and try to install a free application. In this case, at the payment information, you will have the ability to not enter your card data.
- Access to Apple ID can be restored.Do not panic if you have lost the password and cannot enter Apple ID. Like any other password, the password to Apple ID can be restored. You can read more about restoring the password.
- You can change the email address used in Apple ID.To do this, go on, enter it using the Apple ID and go to the settings.
Creating an account on the iPhone is one of the most important manipulations for each owner of the smartphone from the EPL. Only if you have your own ID, you can enjoy the full set of functions of this device. In addition, conducting such important operations as security configuration or synchronization with ICloud will need confirmation from Apple ID. Thanks to its EPL AIDI, you can make purchases, download content and use the "Find Iphon" feature.
Usually, Apple ID on the phone is created when the gadget is first used. If you change your model to a newer one, you can bind a new iPhone to an existing account. But if you use gadgets from the American company for the first time, you will need to go through full registration. Before changing Apple ID to a new one, you must start the mailbox. Best of all, if you need to create an Apple Id account, you will use a separate, just created, email address.
Data, in primary authorization on the official website, you need to enter real so that if necessary, you have the opportunity to restore access. In addition, truthful information about you will be required upon subsequent account setting. Therefore, be extremely attentive and try not to allow errors when entering the accounting information.
Creating an account using iPhone
Apple company accounts can be started directly from their iPhone. To do this, there are two options for action - to undergo a standard registration in which you need to specify information from your bank cards to make payments, or create an Apple ID without a credit card. Current payment information will be required if you acquire any software at the AppStore store. If you do not plan to make purchases and do not want to do it by chance, for example, by mistake. We recommend using the second, more sophisticated, method.

The standard procedure is carried out as follows: You must open the iTunes Store tab, the App Store and find there item "Create a new EPL ID".
If you want to register an Apple ID without payment cards and free, act as follows:
- Go to the App Store.
- Select the game or the application that is offered for free.
- Download and wait for it to your iPhone.
- The next step is to enter an existing entry or to start a completely new one. When requesting, select "Creating a new ID".
After that, the actions are similar in both options:
- If you do not want to bind a map for one reason or another, as a country, it is better to put Russia as a country, even if you live in another state - it will give a wider selection of applications, programs and other things.
- After that, you need to carefully read and accept the standard user agreement.
- Then personal data are introduced. Pointing an existing email address and password Be careful - for security reasons, the password must consist of at least eight characters, have letters in both registers.
- Pointing age, note that less than 13 years can not specify, and if you specify less than 18, access to content will be limited.
- Answers that you will enter security questions are best saved in a text file or write on paper and hide. This is done that, if necessary, quickly and safely restore access to your account.
- If you register the first way, you will need to make information about payment data.
- The procedure is completed.

After that, you need to go to the mailbox that was used to create an account. A letter from technical support should come to him, confirming the creation of an EPL ID. To first register Apple ID quickly and correctly, just click on the selected link with the text of the letter.
iTunes to help
As an option, an account to iPhone or Apada can be issued using the official iTunes program. With this scenario, you can choose, specify information about your cards or not. Before changing the ID, you need to go to the menu and find there ITunes Store. If you want to know how to create an Apple ID without payment data, as in the first case, you need to download any free app and go to this menu with it.

After this, the actions are standard in both cases:
- The system will propose to log in to the newly created, already existing account or to issue a new one.
- Choosing a new option, enter your data. As mentioned earlier, they must correspond to the reality so that you can confirm their accuracy.
- After that, you have to answer security questions (answers to write better) and enter the data of the card or refuse it, if you want to create an clip ID without a credit card.
- After completing the registration, be sure to go into the mailbox and immediately confirm the creation in the mail, with the help of a highlighted link in the body of the letter.
If the letter is from those. Support does not come for a long time, check the folders with spam and filtered letters to other categories - often letters by mistake come there.
What errors can you allow?
To find out how to register ID on iPhone correctly, how to change the ID on the device, you need to know which errors should be avoided. Most often, the following difficulties arise in the process:
- You do not want to make purchases in the App Store. To not even accidentally buy any paid content without specifying bank card data.
- Age is best to indicate real, but only in the case when it is more than 13, and better - more than 18 years. If you put an age of 12 years or less, the system simply will not give you to create your Apple Iidi. And when you specify the age of less than 18, you will not access all content.
- If you have managed to get mail with the address on @ icloud.com or @ me.com, you will have to make a new box for registration for iPhone. These addresses for the creation of accomes are not suitable.
- If the name you entered contains invalid characters, note that there were no Russian letters in the mail address, and in the name and surname of unnecessary characters, points, numbers, etc.
- The password must be difficult. With too simple password, the system will not allow completing the process to the end. Figures, letters are large and small, symbols - the more they will be in the password, the better.
- An obstacle to creating ID on the iPhone can be a server failure. In this case, it is best to wait and continue after half an hour - an hour when the server work will be set.
In general, the registration of the new EPL Aidi takes not so much time. Even an inexperienced user will be able to carry out this operation if you act according to the instructions.
How to configure and manage Apple IDs, let's tell you in the next article, follow upgrades.

Conclusion
You have already understood, creating an account for the iPhone, it is not more difficult than to have an e-mail. It is necessary to be in the essence of the process and further, mechanically fill the necessary fields. Registration does not take a bunch of time, so, after 20 minutes you will be able to use smartphones as a full-fledged owner of a smart device capable of many amazing things.
Video instruction
Apple's mail service from Apple allows you to quickly, simply and safely implement the entire spectrum of electronic correspondence operations. But before the user appears the possibility of sending, receiving and systematizing letters, you must configure the email address @ icloud.com on a device operating running iOS, or Mac computer. About how to go to the iCloud mail from the iPhone, told in the material offered to your attention.
Depending on which iOS-application (branded "Mail" Or the client from third-party developers) prefers to work the iPhone user, for accessing the electronic mailbox @ icloud.com different actions are taken.
Method 1: Preset in iOS application "Mail"
To use the capabilities of Apple's branded services, and Aiklaud's mail here is not an exception, the easiest way to begin by using the funds pre-installed in IOS. Client application "Post office" Present in any iPhone and is a functional solution for working with electronic boxes.

A specific list of steps that must be implemented for authorization in the iCloud mail through a standard iOS application depends on whether the address under review has been used earlier or obtaining email options from Apple is only planned.
Existing Account @ icloud.com
In the event that you used mail from EPL earlier and at your disposal there is an address @ icloud.com, as well as a password from Apple ID, which is tied to this postal account, access your own correspondence, for example, with a new iPhone, where the EPL identifier Not yet submitted, as follows.


Mail @ icloud.com was not used earlier
If you have a configured iPhone and you use Epl Aidi features, but you will additionally want to get all the advantages offered as part of Apple's postal service, follow the following instructions.
- Open "Settings" on the iPhone and go to the Apple ID section, taping on the first item from the list of options - your own name or avatar.
- Open section "Icloud" And on the next screen, activate the switch "Post office". Next click "Create" Under the screen appeared at the bottom of the screen.
- Make the desired mailbox name in the field E-mail and press "Further".

Name Requirements Standard - The first part of the email addresses should consist of Latin letters and numbers, and may also include the symbols of the point and lower underscore. In addition, it is necessary to take into account that the Aiklaud Mail enjoys a huge number of people, so there are a lot of boxes of boxes can be occupied, come up with something original.
- Check the faithfulness of the name of the future address @icloud and tap "Ready". This is the creation of an ICLOUD mail completed. iPhone Displays the cloud service setup screen with activated now switch "Post office". After a few seconds, you will receive a request for the connection of the created box to the FACETIME video call service from Apple, confirm or dismiss this feature at your own.
- On this entrance to the IICLAD mail on iPhone is really completed. Open the application "Post office", touching his icon on the desktop iOS, tap "Boxes" And make sure that the address being created is automatically added to the list available. You can move to sending / receiving electronic letters through the branded service of the EPL.


Method 2: Third Party Post Clients for iOS
After the @ icloud.com address is activated as a result of the steps of the above instructions, in the mail service from Apple, you can enter through iOS applications created by third-party developers: Gmail, Spark, Mymail, Inbox, Cloudmagic, Mail.Ru Mail and many others . At the same time, it should be borne in mind that before access to the iClaud mail through a third-party client application will be open, it is necessary to fulfill the requirements of the safety claims for the work of third-party applications.

As an example, we consider in detail the entry procedure into the e-mailbox @ icloud.com through the well-known Gmail - an application for working with mail created by Google.

For an effective execution of the instruction below, it is necessary that Apple ID installed on the iPhone is protected using two-factor authentication. About how to activate this option is described in the material on the configuration of Apple identifier on the iPhone.
- Install from the AppStore or through iTunes, and then open the Gmail application for the iPhone.

If this is the first launch of the client tap "To come in" On the welcome application screen, which will lead to the adding account page.

In case Gmail for iPhone is already used to work with electronic correspondence and access to postal service other than ICloud, call the options menu (three drops in the upper left corner), expand the list of accounts and tap "Account Management". Next click "+ Add Account".

- On the Add Account screen, select Application "Icloud", then enter the email address to the appropriate field and click "Further".
- The following screen informs about the need to create a password for Gmail on the control page of EPL AIDI. Tap Link "Apple ID"that will lead to the launch of a web browser (default Safari) and the opening of the entry web page "Apple Account Management".
- Log in by entering the Apple ID first and then password in the appropriate fields. Give permission, tapping "Allow" Under the notification of the implementation of an attachment attempted to the EPL account.
- Open tab "Safety"go to the section "Application passwords" and press "Create a password…".
- In field "Come up with the label" On the page "Safety" Enter "Gmail" and press "Create".

The secret combination of characters, which serves as a key to access the EPL services through a third-party application will be generated. The password will appear on the screen in a special field.
- Long pressing highlight the result and click "Copy" In the pop-up menu. Next tapnet "Ready" On the browser page and go to the app "Gmail".
- Click "Further" On the Gmail screen for iPhone. Long touch in the input field "Password" Call the feature "Paste" And thus enter the combination of characters copied at the previous step. Tapnet "Further" And wait for the settings check.
- On this, adding an ICLOUD mail account to the Gmail application for the iPhone is completed. It remains to enter the desired username that will be signed by the letter sent from the box, and you can go to work with electronic correspondence through the service @ icloud.com.


Land described on the example of Gmail for iOS algorithm input in ICloud mail with iPhone applicable almost for all IOS applications that support work with electronic mailboxes created within different services. We repeat the stages of the process generalizable - you need to do only three mandatory steps (on screenshots below - the popular iOS application MyMail).


As you can see, special or irresistible obstacles to access to mail ICloud with iPhone. By completing Apple's security and in fact, once logged in service, you can use all the advantages of the email considered not only through an application integrated into IOS, but also with the help of a more familiar user user from third-party developers.
 How to reflash iPhone with PC and iTunes
 Best Bitcoin Wallets for iOS Download application wallet on iPhone
 Lenovo Vibe X2 Description, Features, User Reviews
 The computer does not see the flash drive: causes and solving the problem
 About Windows Update From Wannacry Encrypter Virus
 Hot browser keys
 New Mac Mini turned out to be five times more powerful than the predecessor