How to take screenshots on your computer. How to take a screenshot of the monitor. With and without special programs. Description of some programs for taking screenshots
Hello friends. Are you faced with the need to take a screenshot? Then read this article and I'll show you several ways to take a screenshot.
The Internet has become an integral part Everyday life each of us. We visit daily social networks, we communicate on forums, looking for solutions to any problems, and also give advice on how to solve these problems to other people. And sometimes, when an explanation of a question needs to be supported by visual information, screenshots come to our aid.
The definition of this word is quite simple - it's a screenshot of some electronic device, which includes a computer monitor, smartphone and other modern gadgets. It would seem that it could be easier than that to take a screenshot? But some people find it difficult to take a screenshot and turn to search engines for help.
If you are one of those people, then read this article, in which I will tell you about several ways to take a screenshot from your computer screen.
Print Screen button
The easiest way to take a screenshot is to use the Print Screen button. In order not to bother you with the search for this key, I took a photo in which I highlighted it. computer keyboard this button is located here:
If you have a laptop, the Print Screen key is located here:

So, where is she, we figured out what next? And then we press this key. Perhaps one of you will say that by pressing the key, nothing happened or will look for where the screenshot was saved. But take your time, as the screenshot was saved only in the memory buffer, and in order to get it, we need to open it graphics editor Paint.
I think that each of you is familiar with this editor, but just in case, I'll still write where you can find it: Start - Programs - Accessories - Paint. Open it and click insert:

After that, a screenshot of your screen will be inserted into the window, which you can edit if you wish:

That's, in general, that's all, after that we just have to save our picture in any convenient folder by clicking on the save icon:

This method is suitable for absolutely everyone, since it works in all versions of Windows.
Scissors tool
Another way to take a screenshot of your computer screen is to use the Scissors tool, but if you have Windows XP or higher early version, then this method will not work for you, since the tool is only in Windows 7 and 8.
You can find this tool in the same folder as Paint. Opening the scissors:

Click create and select the area of the screen that you need to capture. After that, a captured fragment of the screen will appear in front of you, over which you can also perform some small actions, and save it:

Where to upload a screenshot
Each of us has our own reasons why we need to take a screenshot, but, as a rule, most of the pictures are taken in order to post them on the Internet. Of course, you can post the resulting image on your website or on a page on a social network, but how can you post it on a third-party site?
Especially for this there are photo hosting sites created just to place your image there. They work quite simply: you upload your screenshot there, in response you are given a link to your image, which can be placed on any website. Let's take an example of one of these services and see how they work. I'm used to using photo hosting Radical, so I'll show you how to upload a screenshot using his example. I open it:

Select the image to upload and click "Upload". After that, your image will be loaded, and you will receive links for posting it on other web resources:

Third party screen capture software
How long do you think it will take to take a screenshot of your screen using the methods I described above and upload it to a photo hosting service? I think you will spend no more than two minutes on this. But each of us values our time very much and does not want to waste even these precious minutes looking for simpler ways to take a screenshot.
And no matter how ridiculous it may sound, this method really exists. It allows you to kill two birds with one stone, in our case, take a screenshot and upload it to the photo hosting in one click. This method means using third-party programs to take a screenshot. There are also a lot of similar programs, but I recommend opting for Lightshot, which can be downloaded from this link.
After installing this program, you just need to press the Print Screen button, after which you will need to select the area in which you need to take a screenshot, and it is ready. You will immediately be prompted to edit the resulting screenshot, or save it, both on your computer and upload it to a photo hosting service, after which you will be given a link to your image.
Unfortunately, I cannot take screenshots of working with this program, since during its launch the desktop becomes inactive, but I think you can figure it out without me, since everything is extremely simple there.
Screenshots are an incredibly useful way to document and share what's on your screen. Is this a social media post that you think could end up being deleted, a glitch that you explain to the technical support, or funny dialogue in the chat - one way or another, screenshots help in these and dozens of other cases. Fortunately, there are several simple ways capture the screen you want to save.
How to take a screenshot of the entire screen
Press the "print screen" button on your keyboard. The screenshot is now saved to your clipboard and you need to paste it into a graphics editor such as Windows Paint... Enter "paint" in the search bar next to the Start menu and run the program. Press "Paste" (ctrl + V) - your screenshot is ready!
How to take a screenshot of only the active window

Press Alt + Print Screen. Type "paint" into the search bar next to the Start menu (if Paint is already open, press Control + N and then select "OK" when "paint" asks you for the height and width). Click Insert. Your finished screenshot is your newly opened and active window!
How to take a screenshot file without any additional programs

Press the Windows key + print screen. When you go to the "Screenshots" folder inside your "images", your screenshots will be there!
How to take a screenshot of a specific part of the screen
Type " snipping tool"In the search bar next to the Start menu. Select " Snipping tool"And click" create ". Click and drag to select the area of the screen that you want to use. Release the mouse button as soon as you have selected the location you want to capture. Your screenshot is open in the Snipping Tool!
You can also use third-party services and programs.
- One of them is a simple PicPick () application. Open the official page and click "Free Download". Follow the instructions to install PicPick and you will find a menu of specific methods for capturing part or all of your screen. Clicking the Scroll Window will allow you to capture as much of a page or document as possible than you can scroll, not just a static version of the window.
- If you only need screenshots from time to time, then the standard Windows tools will be enough. If, for work or other activities, you very often take pictures, edit and share them, then it is more convenient to use special application with hotkeys and the ability to place files on the developer's server.
Be sure to visit ours, where you will find all the most popular programs at affordable prices.
Video: 6 Ways to Take a Screenshot on a Laptop
Very often, when working at a computer, many users are faced with the problem of how to make a screen screen on a computer. Most likely, you have already come across more than once that you were asked to make a screenshot. For example, the error generated by the program. Or, with the help of a screenshot, they explained to another user how to correctly perform a particular action on a computer.
A screenshot is an exact copy of a part of a computer screen image that reflects actions taking place at a certain point in time. This is a kind of photograph of the monitor screen, which is created at the command of the user.
Take a screenshot of the screen using Windows.
The developers have provided the ability to create a screenshot using standard Windows tools, and there is a special PrintScreen button on the computer or laptop keyboard.
In order to take a screenshot of the image on the screen, just press the PrintScreen button and the desktop image will be transferred to the clipboard.
Advice! After you have saved the screenshot to the clipboard, do not perform any actions to copy other files, otherwise the screen will be deleted. In order to save the created screenshot, you need to open a graphics editor.
Since in this paragraph, we use only standard system tools, then we use Paint as a graphical editor.
In order to open Paint, follow the path "Start" - "All Programs" - " Standard Windows"-" Paint ".
After starting the graphical editor, you need to insert the created screenshot. To do this, press the key combination "Ctrl + V" or using the menu, right-click and select the "Paste" action from the drop-down list. 
Once the image is inserted, you can edit it or save it. In order to save the screenshot, press the key combination "Ctrl + S".
Note! If you need to screenshot not the entire screen, but only active window, then you need to press the "Alt + PrintScreen" key combination.
Next, paste the created screenshot into a graphics editor. Now you know how to make a screenshot on a computer using Windows tools. This method suitable for those who need to quickly make a screenshot, for example, when a program malfunctions.
Screenshot software.
Not always, using Windows tools, you can make a beautiful screen. At the same time, it is not very convenient to constantly open the graphic Paint editor to edit image edits. Also Paint, has a fairly modest functionality. Therefore, let's consider third-party programs.
Screenshot is a small program that has all the functions you need to take screenshots. With its help, you can take a screenshot as full screen, the active window, and a separate area of the desktop, while the user himself selects the desired one. In order to download the program, go to the official website: http: //skhoter.rf. 
On the main page of the site, press the green button "Free download". After downloading and installing, run the program and complete the initial settings.

As you can see, the program is small enough, but it has all the necessary functions, it will help to cope with the problem of how to make a screenshot of the screen on a computer, while immediately allowing you to edit the snapshot.
Snagit is a more advanced program for taking screenshots of the screen, with its help, you can take not only a screen, but also record a video of your actions on your computer. You can download the program on the Internet. This product allows you to edit the picture after taking it. Add inscriptions, insert various arrows, frames, beautifully crop the image, as well as apply various effects. Even many graphic editors cannot boast of such functionality. In order to download the utility, you can go to the official website of the developers. 
After installing the program at the very top of the desktop, a drop-down Snagit menu will appear. In it, you can select the actions that the program offers:
- To make a photo;
- record a video;
- add a photo to Word;
- collect a group of images.
Since we are interested in how to make a screenshot of the screen on a computer, we press the "Image" icon.
Further, the program will offer you to open the editor to process the created screenshot. 
I will not describe how to fully work with the functionality of the program, since the interface is quite clear. Everything here will depend on your imagination, how you can edit the created screen.
Browser extensions for taking screenshots.
In order to quickly create screenshots of screens in. There are various plugins and extensions to perform these functions. Let's take a look at some of them.
Lightshot (screenshot tool) - very useful extension for the browser. This add-on allows users to take a screenshot of the screen of an open page. After installing Lightshot, a purple feather will appear in the right corner of the admin panel. Next, click on this button and select the area to capture the image, the browser page. 
After you decide on the area of the screenshot, panels for editing will appear on the side of the image. In the process of editing, you can add various inscriptions, indicate with arrows and highlight the places to which you should pay attention. Finally, we apply the effects we need and save the resulting screen by clicking on the button in the form of a floppy disk. The program will offer to save the created snapshot to the following locations:
FireShot is another browser add-on. After installing it, a special button will appear in the right corner of the browser. As soon as you click on it, a menu will appear in which you can choose an action. You can also customize the extension for yourself. Set hotkeys, select the format in which the image will be saved and write the file name template. The extension allows you to create only a screen, an image editor is not provided. 
- save as image;
- save as PDF document;
- print;
- save to clipboard.
Conclusion.
That's all for me, now you know how to make a screen screen on a computer. In this article, various programs and methods for taking screenshots are discussed. In this case, you can make a screenshot both using standard Windows tools and using various programs. It all depends on your needs and the goal that you set when creating a screenshot of the screen.
Today the answer to the question "How to take a screenshot of the computer screen?" no longer sounds unambiguous. Based on the statistics of requests, the number of ways in recent times has grown a lot. This article does not provide all, but most of the ways to take a screenshot. You will also learn how to take a screenshot of the screen on an iPhone and Android (see the contents below), and an overview of programs for screenshots.
How do I take a screenshot of the screen?
If you need a screenshot of the screen exclusively for yourself, and you do not want to install additional software, this method will be optimal for you. Using standard Windows functions you can take the desired picture.
What keys to take a screenshot of the screen
Find the "Print Screen" key or the abbreviated version of "Prt Scr" on your keyboard. When you click on it, a picture of what was on the screen at the time of clicking is saved to the clipboard.
Where is the screenshot of the screen saved on the computer
After the buffer ( random access memory) the picture appeared, you yourself must determine how and where to save it. To do this, open any graphics editor (Paint or Photoshop) and select "Paste", you can simply press "Ctrl + V". In Photoshop, first create a new file (Ctrl + N) and then paste the image. Then you can edit, save (Ctrl + S) or trim.

By the way, if you need a screenshot not of the entire screen, but only a screenshot of the selected area of the screen, use the Alt + Print Screen keyboard shortcut. So only the active window will get into the buffer.
Screenshot program
If you need to constantly use screenshots, and even for public viewing on the Internet, the use of programs will become indispensable for you. Especially if you need the ability to make certain marks on the image. For such purposes, they have a number of standard options. For example, let's take the menu from the first Joxi program.
If you hover over an option and hold it for a few seconds, a description for it will appear. But it is already visually easy to understand that with the help of a certain tool you can draw an arrow or select a part of the image with a figure, say, take it in a circle. It is also possible to "erase" part of the text (make it unreadable), and number the paragraphs.

At the end of editing, choose a save method:
- Publish - means that the image will be uploaded to the server, and you can share a link to it.
- Save - the screenshot will be saved on your computer in the folder you specified in the "jpg" format. Press "Esc" to exit the program.
- Copy - will be copied to the clipboard so that you can paste it into any other convenient graphic editor.

After simply clicking on "Finish" (the blue checkbox, when you hover it changes color to orange), at the bottom right, a menu will appear on what to do with a link to your screenshot.
If you want to make sure that everything is correct, then click on "Open" to look at the screen. If you are already sure, then click "Copy" to quickly copy the link. All your screenshot is ready to use. Just a few seconds and you can share the resulting link if you saved the screen to the server, with friends or for other purposes.
All the programs for screenshots presented below have a similar principle of operation. Choose which one you like best or is more suitable in terms of functionality / practicality and use it to your health.
Programs for screenshots of the computer screen
joxi.ru- a very convenient and multifunctional program. Works on Windows, MacOs and Linux, a special plugin for the Chrome browser is also developed. Go to the site, download and install the program, the installation is quiet. An icon will appear in the tray, which shows that everything is configured and operational. All functions of the program are described on the site in the "Overview" section, you can then familiarize yourself. Here are its main ones:
The second feature is that you can take a screenshot of the site at the full height of the page. Set the parameter "Fit to site", and you get an image of the site from top to bottom. Tip: set the width of the image and the width of the output format the same, otherwise the text in the screenshot will not be readable.
mepic.ru Is a picture hosting. Registration and installation of applications is not required. Just upload your picture, add a description and the service saves it on the server, giving you a number of links to use:- Link to view the picture
- BB code for forum or blog
- HTML code
- Link to delete the picture.
The main condition is that images must not violate the laws of the Russian Federation.
How to take a screenshot on an iPhone or iPad
For all mobile Apple devices one simple procedure works. A screenshot on an iPhone is done by simultaneously pressing the "Home" and "Sleep" keys, that is, on / off.

In this case, you will hear a sound, as it were, of a camera shutter. You can find the screenshot you made in the gallery.
How to take a screenshot on android
On android, the principle is the same. You need to simultaneously press and hold the on / off button and the volume down key for a couple of seconds.

Unfortunately for android owners below 4.0. this option will not work. For operating systems up to version 4.0. you need to install auxiliary programs.
As you can see, now it is not difficult to take a screenshot of the screen. If something from the material does not work or has lost its relevance, write and ask in the comments, I will be glad to help you.
) let's talk about how to take a screenshot of the screen on a computer and laptop. Consider the possibilities operating systems, free web services and third party applications.
Windows includes tools that enable the user to take screenshots without additional tools. Almost everyone knows about one of them - this is the Print Screen key. And few use the rest.
Print Screen
Print Screen ( Prt Scr) functions very simply: just press this key (on some laptops it must be pressed together with Fn) - and the screenshot will be sent to the clipboard. After that, the image can be inserted, for example, in Word document, load into Paint editor or another program, edit and save.
If you want the screenshot to be saved directly to HDD(bypassing the clipboard), together with Print Screen press Windows key(option available in Windows 8 and Windows 10). Pictures will "fall" into the "Pictures" - "Screenshots" folder of your account... If you don't know how to get to this folder, copy the path % Userprofile% \ Pictures \ Screenshots, insert into the address bar of the explorer and click the jump button.
To "screenshot" a separate window, together with Print Screen press the key Alt... To save a picture to a file, paste the picture, for example, in Paint and press Ctrl + S.

"Tricks" with Print Screen are available in any Windows versions and on any device - Asus, Lenovo, HP, etc., with the exception of Apple based on Mac OS. The latter have their own technique, which we will consider below.
Windows application "Scissors"
The built-in utility Snipping Pool ("Scissors") allows you to take not only snapshots of the entire screen or a separate window (like Preent Screen), but also an arbitrary selected area.
In "Scissors" there are the simplest editing tools: a pen (allows you to add inscriptions and handwritten marks to the image), a marker (to underline and highlight areas) and an eraser - to remove marks. In addition, the program has a delayed shooting function - triggering delay for 1-5 seconds, as well as tools for saving, copying and sending a file by e-mail.
To take a screenshot using the Snipping Pool, go to Start, open Programs (or All Programs if you have Windows 7 or Windows 8). "Scissors" are in the "Standard" section.

The application looks like a small panel. Click the arrow icon next to the Create button and select an area to photograph. Freeform and Rectangle functions allow you to capture any area of the screen. In the first case, it will have uneven edges, in the second, it will be rectangular with an arbitrary (at the user's choice) aspect ratio.

Selecting, for example, a rectangle, click "Create" and while holding left button mouse, select the desired area on the screen (the cursor will take the shape of a cross). After you release the button, the screenshot will open in the program window.

Xbox game console
The Xbos console is one of the innovations in Windows 10, designed for capturing the process of the game, for example, World of tanks. As practice has shown, it can be used not only in games, but also in other windowed applications, however, it will not work to capture the view of the desktop with its help - you need to open at least one window.
For start game console press the combination Windows + G. When the panel appears, as in the picture below, check the "Yes, this is a game" checkbox.

The panel will change to look like this:

Click the camera icon. The program will automatically save the screenshot in your account folder - "Videos" - "Clips". To open this folder, paste the following path into the address bar of the explorer: % Userprofile% \ Videos \ Captures and click the jump button.
On Mac OS
Making a screen on a MacBook or Aimack running Mac OS is no more difficult than on a Windows PC. The keyboard is also used for this. More precisely - 3 key combinations, each of which performs one action.
- So, to "screen" the entire screen, press simultaneously Command + Shift + Number 3.

- To capture a specific portion of the screen, press Command + Shift + Number 4... After the cursor changes to a cross, select the desired area and release the trackball or mouse button. The picture will be automatically saved to your desktop.

- To capture a window or shortcut menu along with the previous combination, press the spacebar. The cursor icon changes to a camera. Move it over the desired area and click.

To copy the image to the clipboard, in addition to any combination, press the Ctrl key.
Screenshot apps
Joxy
Joxi cross-platform app is considered by users to be one of the best free alternatives standard Windows tools and Mac OS.

In addition to installing it on a computer, each user of the program registers on the Joxi.ru service and gets access to the cloud storage, where screenshots taken by Joxi will be saved. From there they can be downloaded to your computer and mobile device and also upload to social networks.
After installation, the program will create an icon in the system tray. Clicking on it opens a menu in which there are buttons for selecting the capture area - the entire screen or a fragment. The resulting image is automatically loaded into the built-in mini-editor, where there is everything you need to process the image:
- trim function;
- pencil - for drawing over the image;
- lines and arrows;
- adding text;
- framework;
- blur tool (if you need to hide something);
- numbering with a marker.
When you save a snapshot on Joxi.ru, the program generates a link where you can download it and copies it to the clipboard.
By the way, in addition to installation versions for Windows, Mac OS and Linux, there are Joxi browser extensions. They are designed to create screenshots of web pages as a separate fragment or as a whole.

ScreenShooter
ScreenShooter - free Windows application to take screenshots with the function of automatically saving them to your hard drive, cloud storage or user FTP server... And for those who have installed on their computer mail program, it is also possible to send images by email.

As part of ScreenShooter there is a small graphics editor that allows you to draw lines, arrows, rectangular and elliptical frames on screenshots, as well as write text, add numbers, blur elements that need to be hidden, and crop the edges of the picture. Files are saved in png format.

Other functions and features of ScreenShooter:
- Create screenshots of arbitrary areas, individual windows and the entire screen.
- Paste images to the clipboard.
- Saving screenshots in a predetermined location or at the user's choice.
- Compression of large files.
- Controls hotkeys that the user can override.
- Integration with cloud storage Yandex.Disk, Google drive, Dropbox and OneDrive. Egnyte, Box.com and Mail.ru will be added to them in the near future.
- Support for twelve languages, including Russian and Ukrainian.
- also a simple and convenient tool for creating screenshots in Windows and on Mac. After installation on the computer, it intercepts clicks Print keys Screen and Shift + Print Screen combinations. The first option is designed to take a snapshot of a fragment, the second - the whole screen.

After selecting a fragment using LightShot, two small panels with tools for processing and saving the screen open side by side.
Among them:
- pencil;
- line;
- frame;
- text;
- Color palette;
- download button on cloud service programs;
- a button for sending to social networks;
- Google image search;
- copying;
- seal;
- saving on the computer.
By the way, if you want to use the Print Screen function for other tasks, you can reassign the LightShot hotkeys in the program settings.
In addition to installation versions, LightShot is also released as browser extensions for Google chrome, Firefox, IE and Opera 11 and 12 versions. With their help, you can take screenshots of web pages and screens outside the browser.
Free web services
The web service allows you to take screenshots without installing any programs on your computer. This can help out great when you are not at your own PC, but, for example, in an Internet cafe or at work. It does not even require registration (despite the presence of such an opportunity), but, nevertheless, it stores the files of its users for some time.

Using the SNAGGY service is as easy as shelling pears:
- Highlight the required window and press Print Screen + Alt.
- Open up home page site and press Ctrl + V.
After the image is uploaded to SNAGGY, you will receive a link to it and right in the browser you can edit it a little.
The service works in a similar way. To create screenshots, he also uses standard means OS (Print Screen + Alt), and to upload them to the site - the combination of Ctrl + V.

As in SNAGGY, there is a small built-in editor that allows you to crop the edges of the picture, add captions, arrows, frames, etc. to it.
After downloading and editing, the file will be saved, and you will receive a link to it. The screenshot will be on the PasteNow server for six months since the last opening.
Screenshot of the site page
Screenshots of website pages can also be done without programs - there are specially designed online services for this. And - one of the most popular.
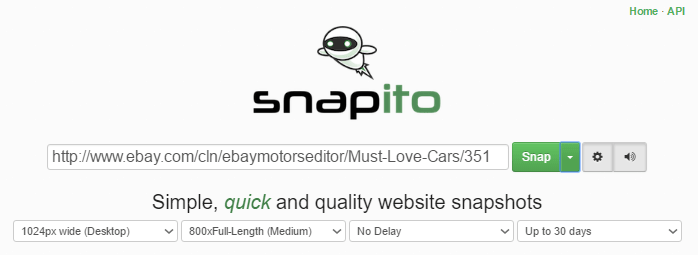
On the main Snapito service there is a field for the address of the page that you are going to "screenshot". After pasting the address, the Snap, Settings, and Sound buttons will appear next to this field (if you turn on the sound while taking a picture, you will hear the camera shutter click).
In the settings, you can set the screen resolution, the quality and size of the snapshot (the entire page or only the visible part), the time delay before taking the picture and the duration of the screenshot storage on the Snapito website.
The Snap button menu also has additional functions- quick switch to photo hosting Pinterest, convert URL to PDF and generate short link.
Once the screenshot has been taken, a link and buttons will appear next to it: “Copy”, “Download original Screenshot” and “Edit Screenshot”. Pressing the latter opens the built-in graphics editor with a pretty solid set of tools. Of course, this is not Photoshop, but it is much more functional than in all the applications reviewed.

The Snapito service is often overloaded (apparently due to a large number users), so it does not always work correctly and sometimes slows down quite noticeably. If you do not need all of its features, use the simpler one online resource — .
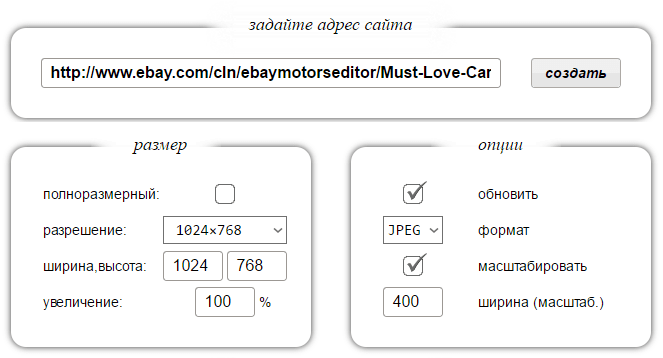
S-shot does not have editing tools - it simply "photographs" web pages and stores their shots on its resources for a while. The storage period of the file is up to 1 month from the moment of the last viewing, but it can be shorter.
To take a screenshot of a site page, paste its address into the specified field, set the size - full (the entire page) or the desired width and height, select the appropriate resolution, enlargement percentage, file format and scale.
The "Refresh" option replaces the previously taken snapshot of the same page with a new one.
The resulting screenshot will be displayed under the table shown in the picture. Next to it there will be links to the location of the file on the S-shot website and the address of the "photographed" web resource.
There is no download button here. If you want to upload a picture to your computer, open it in a new tab, right-click on it and select "Save Image As" from the menu.
To have access to all your screenshots taken at different times, you need to register on the service.
 Free satellite internet is it a myth or reality?
 How can I completely remove Mozilla Firefox from my computer?
 Who invented the telephone and in what year?
 Ways to find information on the web
 Construction of the Belomorkanal: history, terms, description
 White Sea-Baltic Canal
 Sending a request to call back (beggars) from Megaphone How to send I'm waiting for a call from a megaphone