Convert JPG to PNG with a transparent background. How to convert images to a PNG format? Methods of possible conversion
The main thing is to specify a picture on your computer or phone, and then click the OK button at the bottom of this page. By default, a single picture image is replaced with a transparent. The color of the background of the source picture is determined automatically, you just need to specify in the settings, to which color it is to be replaced. The main parameter affecting the quality of the replacement is the "replacement intensity" and for each picture it can be different.
An example of photos of a pink rose without changes and after replacing a monochon background for transparent, white and green:
![]()


First example With a rose flower on a transparent background made with such settings:
1) replacement intensity - 38;
2) smoothing around the edges - 5;
3) replace the monophonic background on - transparent;
4) cropping (<0) или Добавление (>0) at the edges - "-70";
5) Invert - Disabled (Galka is not worth it).
For creating second example, with a white background, used the same settings as in the first example, except the parameter: "Replace the monotonous background on" - white. IN third example, with a green background, the settings are also used, as in the first example, except the parameter: "Color in HEX format" - # 245A2D.
The source image does not change. You will be provided with another processed picture with the transparent or the background you specify.
1. Select one image to convert.
2. Click the button Convert.
7. Use on health
1. Select one zip file containing images for conversion. Only 20 files can be converted simultaneously.
2. Click the button Convert.
3. The file is sent to our server and the transformation begins immediately.
4. The conversion speed depends on the size of the file, the speed of your Internet connection and available resources on our servers.
5. When the conversion is completed, the file returns to the same window of the browser (do not close your browser).
6. In case of the impossibility of conversion, the reason will be indicated in red.
7. Use on health
Select an image to convertJPG / JPEG / JFIF / PNG / BMP / GIF / TIF / TIFF / ICO files are supported only.
JPEG Image JFIF Image BMP Image Gif Image PNG Image Tif Image Ico Image source size ICO 16x16 Image ICO 32x32 Image Recognition OCR (Russian)
Conversion is underway
It may take a few minutes.
On this page it is possible to convert only Jpg. JPEG JFif. PNG. BMP. GIF. TIF. ICO. In other image formats and recognition of Russian text in the images.
- To convert MS Word (Doc Docx) to PDF, use the link Word in PDF..
- To convert RTF ODT MHT HTM HTML TXT FB2 Dot Dotx XLS XLSX XLSB ODS XLT XLTX PPT PPTX PPS PPSX ODP Pot Potx in PDF Use the reference Other Documents in PDF.
- For converting JPG JPEG PNG BMP GIF TIF TIFF in PDF, use the reference Image in PDF..
- To extract text from PDF document, use the link PDF in TXT..
- To convert Doc DocX RTF ODT MHT HTM HTML TXT FB2 Dot Dotx in Doc Docx Dot Odt RTF TXT or XLS XLSX XLSB XLT XLTX ODS in XLS XLSX or PPT PPTX PPS PPSX ODP Pot Potx in PPT PPTX PPS PPSX JPG TIF PNG GIF BMP Use the reference Other formats.
- To convert Doc Docx Dot Dotx RTF ODT MHT HTM HTML TXT in FB2, use the link Documents in FB2..
- For converting PDF. In MS Word (Doc, DOCX), use the reference Convert PDF in Word.
- To convert PDF to JPG, use the link Convert pdf in jpg.
- To convert DJVU to PDF, use the link Convert DJVU to PDF.
- To recognize text in PDF or images, use the link Recognize PDF or image.
Choose Zip Archive For conversionOnly zip files are supported.
JPEG Image JFIF Image BMP Image Gif Image PNG Image TIF Image ICO Image of Original Size ICO 16x16 Image ICO 32x32 Image
The JPG image format has a higher compression ratio than PNG, and therefore pictures with this expansion have a smaller weight. In order to reduce the disk space occupied by objects or to perform some tasks in which only the drawings of a specific format are required, the need to convert PNG to JPG.
All PNG conversion methods in JPG can be divided into two large groups: converting through online services and performing an operation using a software installed on a computer. The last group of methods will be considered in this article. Programs used to solve the task, can also be divided into several types:
- Converters;
- Image Viewers;
- Graphic editor.
Now let's discuss in detail on the actions that should be performed in specific programs to achieve the designated goal.
Method 1: Format Factory
Let's start by S. special programswhich are designed to convert, namely with Format Factory.
- Run factor format. In the list of types of formats, click on the inscription "Photo".
- A list of images of images opens. Choose name in it JPG.
- The conversion parameter window is launched into the selected format. To configure the Outgoing JPG file properties, click "Tune".
- An outgoing object settings appears. Here you can resume the size of the outgoing picture. The default value is set. "Original Size". Click on this field to change this parameter.
- A list of various sizes is available. Choose the one that satisfies you.
- In the same window, you can specify a number of other parameters:
- Establish an angle of rotation of the picture;
- Set accurate image size;
- Insert a label or watermark.
After specifying all necessary parameters click Ok.
- Now you can download the source code. Click "To add a file".
- A means of adding a file appears. You should go to that area on the disk where the PNG prepared for conversion is placed. You can choose at once a group of images, if necessary. After selecting the selected object, click "Open".
- After that, the name of the selected object and the path to it will be displayed in the list of items. Now you can specify the directory where the outgoing JPG pattern will go. For this purpose, click the button "Change".
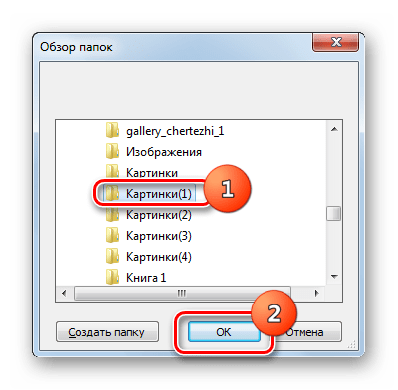
- It is started "Folder Review". Using it, you need to note that directory where you are going to store the resulting drawing JPG. Click Ok.
- Now the selected directory is displayed in the area. "End Folder". After the above settings are manufactured, click Ok.
- Return to the basic window Format Factory.. It displays the previously configured transformation task. To activate the conversion, mark its name and press "Start".
- The conversion process occurs. After graduation in the column "Condition" In the row of the task will be the value "Done".
- PNG picture will be stored in the directory that was specified in the settings. You can visit through "Conductor" or directly through the Format Factory interface. To do this, click the right mouse button on the name of the task. In the context menu, choose "Open the final folder".
- Opens "Conductor" In that directory where the converted object is located with which the user can now perform any available manipulation.


This method is good because it allows you to convert a practically unlimited number of images simultaneously, but it is absolutely free.
Method 2: Photo Converter
The next program that performs the PNG transform in JPG is the software to convert the picture converter patterns.
- Open the photo converter. In chapter "Select files" Click "Files". In the list that appears click "Add files ...".
- Opened window "Add file (s)". Move where PNG is stored. Note it, click "Open". If necessary, you can add several objects at once with this extension.
- After the designated objects are displayed in the base window of the photo converter, in the region "Save as" Click on the button JPG. Next go to the section "Save".
- Now you need to set the disk space where the converted pattern will be saved. This is done in the settings group. "Folder" By rearranging the switch to one of three positions:
- Source (folder where the source object is stored);
- Nested in source;
- Folder.
When you select the last option, you can choose absolutely arbitrarily. Click "Change ...".
- Appears "Folder Review". As with the manipulation with Format Factory, mark in it the directory where we would like to save the converted drawings and click Ok.
- Now you can initiate the conversion process. Click "Start".
- The conversion process occurs.
- After the end of the conversion in the information window will appear an inscription "Conversion is completed". Immediately it will be proposed to visit the Catalog previously assigned by the user, where processed jPG images. Click "Show files ...".
- IN "Explorer" A folder will open where the converted pictures are stored.


This method involves the ability to handle an unlimited number of images at the same time, but unlike the Format Factory, the photo converter is paid. It can be used for free 15 days with the possibility of simultaneous processing no more than 5 objects, but if you want to use it and further, you will have to purchase a full version.
Method 3: Faststone Image Viewer
Convert PNG in JPG can be able to some advanced image viewers to which the Faststone Image Viewer belongs.
- Run Faststone Image Viewer. Press in the menu "File" and "Open". Or apply Ctrl + O..
- An image open window opens. Follow the area where the target PNG is stored. Note it, click "Open".
- With help file Manager Faststone makes the transition to the directory where the picture is found. In this case, the target image will be allocated among others on the right side of the program interface, and its thumbnail will appear in the lower left region preview. After you traced that the desired object is highlighted, click on the menu "File" And further "Save as…". Or you can use Ctrl + S..

Alternatively, you can also apply click on a floppy icon.
- The window is started "Save as". In this window you need to move to the directory of disk space, where you want to place the converted image. In area "File type" From the list that appears on a mandatory, select Option JPEG FORMAT. Question change or not change the name of the picture in the field "Object Name" It remains solely at your discretion. If you want to change the characteristics of the outgoing picture, then click on the button. "Options ...".
- Window opens "File Format Settings". Here with a runner "Quality" You can increase or decrease the level of image compression. But you need to consider that the more high level You will set quality, the object will be slightly compressed and will take large quantity disk space, and, accordingly, on the contrary. In the same window, you can adjust such parameters:
- Color scheme;
- Condiscretization of color;
- Hoffman optimization.
However, adjustment of the outgoing object parameters in the window "File Format Settings" It is not at all mandatory and most users when converting PNG in JPG using FastStone do not even open this tool. After completing the settings, press Ok.
- Returning to the save window, press "Save".
- A photo or picture will be saved with the JPG extension in the specified user folder.


This method is good because it is absolutely free, but, unfortunately, if necessary, convert a large number of Images, such a method should be processed each object separately, since the mass conversion is not supported by this viewer.
Method 4: XnView
The following image viewer that can produce PNG in JPG is XnView.
- Activate XnView. Press in the menu "File" and "Open…". Or apply Ctrl + O..
- A window is started, in which you need to go there, where the source is placed as a PNG file. Noting this objectClick "Open".
- The selected image will be open in the new program tab. Click on the icon in the form of a floppy disk, which displays a question mark.

Those who want to act through the menu can take advantage of the points "File" and "Save as…". Those users for whom closer to manipulation with hot keys have the ability to apply Ctrl + SHIFT + S.
- The preservation tool is activated. Go to where you want to save the outgoing pattern. In area "File type" Choose from the list JPG - JPEG / JFIF ». If you wish to set additional settings outgoing object, although it is not at all necessary, then press "Options".
- Window starts "Options" from detailed settings outgoing object. Go to the tab "Record"if it was open in another tab. Be sure to make sure that the value in the list of formats is allocated JPEG. After that go to the block "Parameters" To directly regulate the outgoing picture settings. Here, as well as in Faststone, it is possible by dragging the slider to adjust the quality of the outgoing image. Among other adjustable parameters are as follows:
- Optimization according to the Huffman algorithm;
- Saving EXIF \u200b\u200bdata, IPTC, XMP, ICC;
- Re-create embedded sketches;
- Choosing a DCT method;
- Discretization and others.
After the settings are made, click Ok.
- Now that all the desired settings are made, press "Save" In the save picture window.
- The image is saved in jPG format And will be stored in a given directory.


By and large, this method It has the same advantages and disadvantages as the previous one, but still XnView has a little more opportunities to set up an outbound option options than the Faststone Image Viewer.
Method 5: Adobe Photoshop
Transform PNG in jpg can almost all modern graphic editorTo which the Adobe Photoshop program belongs.
- Run Photoshop. Click "File" and "Open…" or use Ctrl + O..
- The opening window is started. Choose in it the drawing to be converted by pre-passing to the directory of its placement. Click then click "Open".
- A window will start, where it is reported that the object has a format that does not contain embedded color profiles. Of course, this can be changed by rearring the switch and assigning a profile, but it is not required to fulfill our task. Therefore, press Ok.
- The image will be displayed in the photoshop interface.
- To transform it to the desired format, press "File" and "Save as…" Or apply Ctrl + SHIFT + S.
- The conservation window is activated. Go to where you are going to store the converted material. In area "File type" Choose from the list JPEG. Then click "Save".
- The window will start "JPEG parameters". If you could not even activate this tool when working with viewers during the file saving, then this step will not work. In area "Image settings" You can change the quality of the outgoing picture. Moreover, this can be done in three ways:
- Select one of the four options from the drop-down list (low, medium, high or the best);
- Enter the quality level from 0 to 12 to the corresponding field;
- Reduce the slider to the right or left.
The last two options are more accurate in comparison with the first.

In block "Variety of format" By rearranging the radio channels, you can choose one of three JPG options:
- Base;
- Basic optimized;
- Progressive.
After entering all the necessary settings or install them by default, click Ok.
- The image will be converted to JPG and placed where you yourself are prescribed.


Most shortcomings this method Consistent in the absence of mass conversion and paid Adobe Photoshop..
Method 6: GIMP
Another graphic editor that will be able to solve the task is called GIMP.
- Run GIMP. Press "File" and "Open…".
- An image opening means appears. Move where the picture should be processed. After it is selected, press "Open".
- The picture will be displayed in the shell GIMP.
- Now it is necessary to make conversion. Click "File" and "EXPORT AS ...".
- Export window opens. Move where you intend to save the resulting picture. Then click "Select File Type".
- From the list of proposed formats, highlight « Jpeg image» . Press "Export".
- Opened window "Export the image as JPEG". For access to K. additional settings Click "Extra options".
- By dragging the slider you can specify the quality level of the picture. In addition, the following manipulations can be performed in the same window:
- Control smoothing;
- Use restart markers;
- Optimize;
- Specify the sub-dimensional version and DCT method;
- Add a comment and others.
After completing all the necessary settings, press "Export".
- The picture will be exported to the selected format to the specified folder.


Method 7: Paint
But the task is to solve even without establishing additional software, but using graphic editor Paint.which is already preset in Windows.


You can convert PNG to JPG using software of different types. If you want to convert a large number of objects at a time, then use the converters. If you need to convert single images or set the exact outbound pattern parameters, you need to use graphic editors or advanced pictures with additional functionality.
Formats. PNG was widely popular and was highly appreciated due to the ability to provide good data compression without loss of quality and support alpha channel, which opens up ample opportunities to create effects.
Jpg. - One of the most popular image formats that are currently used. Its main advantage is the ability to store images good quality In small files. This is possible due to the type of compression used. The mechanism of this type of compression establishes the priority of some image parts before others, while maintaining high-quality sections of the image is the most noticeable for the human eye.
How to convert PNG in jpg?
The easiest way is to download it good program Conversion, such as a photo converter. It works quickly and efficiently, allowing you to convert any number of PNG files at a time. You can quickly appreciate that the photo converter is able to save a lot of time that you will spend when working manually.
Download and install a photo converter
The photo converter is easy to download, install and use - do not need to be a specialist in computers to understand how it works.
Add PNG files to a photo converter
Run the photo converter and download.png files you want to convert V.JPG
You can choose PNG files through the menu Files → Add Files Or just throw them into the photo converter window.

Choose a place where to save the received JPG files

Select JPG as a saving format
To select a JPG as a saving format, click on the icon Jpg. At the bottom of the screen, or the button + To add the ability to write to this format.

Now just click Start And the conversion will begin instantly, and JPG files Save to the specified place with the desired parameters and effects.
Try a free demo version.Video instruction
 Causes of why Flash Player does not work, and troubleshooting
 The laptop itself turns off, what to do?
 HP Pavilion DV6: Characteristics and Reviews
 Format representation of a floating point numbers How negative numbers are stored in the computer's memory
 Computer fries and does not turn on what to do?
 Why does not work mouse on a laptop or mouse?
 How to increase or decrease the scale of the page (font) in classmates?