Solar battery made of transistors with your own hands: Step-by-step instructions, video on the assembly. How to make a sunny battery from transistors or diodes? How to make a domestic transistor
Electronics surrounds us everywhere. But almost no one thinks about how the whole thing works. In fact, everything is quite simple. That is what we will try to show today. And let's start with such an important element like a transistor. Tell me what it does, and how the transistor works.
What is a transistor?
Transistor - Semiconductor device designed to control the electric shock.
Where do transistors apply? Yes, everywhere! Without transistors, there is not almost a modern electrical scheme. They are used everywhere in the production of computing equipment, audio and video equipment.
Times when soviet microcircuits were the largest in the world., passed, and the size of modern transistors is very small. So, the smallest of the devices are of the size of a nanometer!
Console nano- Indicates the amount of about ten in minus a ninth.
However, there are also giant specimens used mainly in the fields of energy and industry.

There are different types of transistors: bipolar and polar, direct and reverse conductivity. Nevertheless, the basis of the work of these devices is the same principle. The transistor is a semiconductor device. As you know, in the semiconductor, the charge carriers are electrons or holes.
The region with excess electrons is indicated by the letter n. (Negative), and the area with hole conductivity - p. (POSITIVE).
How does the transistor work?
So that everything is extremely clear, consider work bipolar transistor (the most popular form).
(hereinafter - simply transistor) is a semiconductor crystal (most often used silicon or germanium), divided into three zones with different electrical conductivity. Zones are called respectively collector, base and emitter. The device of the transistor and its schematic image is shown in the figure

Separate transistors of direct and reverse conductivity. The P-N-P transistors are called transistors with direct conductivity, and the transistors N-P-N - with the reverse.

Now about what two modes of operation of transistors are. The operation of the transistor is similar to the operation of a water tap or valve. Only instead of water - electric current. Two states of the transistor are possible - the working (transistor is open) and the rest state (the transistor is closed).
What does it mean? When the transistor is closed, the current does not flow through it. In the open state, when a small control current is fed to the database, the transistor opens, and the high current begins to flow through the emitter collector.
Physical processes in transistor
And now more about why everything happens this way, that is, why the transistor opens and closes. Take a bipolar transistor. Let it be n-P-N transistor.
If you connect the power supply between the collector and the emitter, the collector's electrons will begin to attract to the plus, but there will be no current between the collector and the emitter. This prevents the base layer and the emitter layer itself.

If you connect an additional source between the base and the emitter, the electrons from N region of the emitter will begin to penetrate the base area. As a result, the base area is frozen by free electrons, some of which recombines with holes, part will flow to the plus of the base, and part (most) will go to the collector.
Thus, the transistor turns out to be opened, and the current emitter collector flows. If the database voltage is increased, the current collector emitter will increase. Moreover, with a small change in the control voltage, there is a significant increase in current through the emitter collector. It is on this effect that the operation of transistors in amplifiers is based.

Here briefly and the whole essence of the operation of transistors. Need to calculate power amplifier on bipolar transistors per night, or perform laboratory work on the study of the transistor? This is not a problem even for a beginner, if you use the help of our student service professionals.
Feel free to seek professional help in such important issues as learning! And now, when you already have an idea of \u200b\u200bthe transistors, we suggest relaxing and watch the clip of the Korn "Twisted Transistor" group! For example, you decide to buy a practice report, contact the coaster.
The number of applications of devices called solar batteries increases every day. They are becoming more widely used in naval sectors, industry, agriculture, in everyday life. Despite the fact that you get such a battery at a reasonable price is becoming easier, it is interesting to make it with your own hands.
This article provides practical tips on manufacturing with their own hands of the solar battery, which can be used as a current source for low-power amplifier structures.
A homemade solar battery from diodes or transistors - a device, interesting not only in terms of practical application, but also to understand the principle of its work. Moreover, for its manufacture, it is better to use semiconductor devices, released 30-40 years ago.
How does solar battery work?
Solar battery as a device that converts light energy into electrical energy is known for a long time. Its work is based on the phenomenon of an internal photo effect in the P-N transition. Internal photoeff - the appearance of additional current carriers in the semiconductor (electrons or holes) when the light is absorbed.
Electrons and holes are separated by the P-N transition so that the electrons are concentrated in the N-region, and the holes in the P-region, as a result, an EDC occurs between these regions. If it is connected to the external load, then when the P-n is illumination, the transition will arise in it. The energy of the Sun turns into electrical energy.
EMF and current in such a semiconductor is determined by the following factors:

- semiconductor material (Germany, silicon, etc.);
- surface area P-N transition;
- illumination of this transition.
The current of the current created by one element is very small, and to achieve the desired result, you need to collect modules from a large number of such items. Such a source of current is not afraid of short comments, since the value of the current for the current created by them is limited to some maximum value - usually several milliampers.
Homemade solar battery from semiconductor diodes or transistors
The transitions are also necessary for the creation of the solar battery, and in semiconductor diodes, and in transistors. At diode 1 P-N, the transistor has 2 such transitions between the base and collector, between the base and the emitter. The possibility of using a semiconductor device in this capacity is determined by 2 conditions:
- there must be an opportunity to open the P-N transition;
- the area of \u200b\u200bthe r-n of the transition should be large enough.
Homemade transistor solar battery

The second condition is usually performed for powerful plane transistors. Silicon N-P-N Transistor Kt801 (a) is interesting because it is easy to open the transition. It is enough to press the lid with pliers and take it carefully. In powerful Germany transistors P210-P217 (b), it is necessary to gently cut the lid along the AA line and remove it.
Prepared transistors before using them as the elements of the solar battery, should be checked. To do this, you can use the usual multimeter. Switching the device to the current measurement mode (the limit of several milliamperes), turn it on between the base and collector or the emitter of the transistor, the transition of which is well lit. The device must show a small current - usually the shares of milliamper, less frequently more than 1 mA. Switching the multimeter to the voltage measurement mode (limit 1-3 B), we must get the output voltage value of the order of several tenths of Volta. It is advisable to sort them into groups with close output voltages.
To increase the output current and operating voltage, a mixed connection of the elements is used. Inside groups, elements with close values \u200b\u200bof output voltages are connected in parallel. The general output current of the group is equal to the sum of currents of individual elements. The groups are included in each other. Their output voltages fold. For transistors with the structure of N-P-N, the polarity of the output voltage will be the opposite.
To build the current source, it is better to develop a foil-plated circuit board. After the decay of the elements, the fee is better to put in the body of suitable sizes and close the plate from the plexigla. The current source of several dozen transistors generates a slight voltage of several volts at an output current of several milliampers. It can be used to recharge low-power batteries, to power a low-power radio and other low-power electronic devices.
Homemade diode solar battery
It can be made with your own hands and solar battery on diodes. As an example, we describe the manufacture of batteries on plane silicon diodes KD202. . Instead, you can use other semiconductor rectifiers: D242, D237, D226, etc.
To open the R-N transition of the CD202 diode, you need to do the following operations:

- Pulling the diode in the vice for the flange, cut off, and then carefully recalculate the anode output so that then you can easily release the copper wire to the P-N.
- Having approved a knife or other sharp object to a welded joint, light blows, turning in the vice diode, separate the protective flange.
Approximately you can also separate the protective flange and other diodes.
In the solar panel, the prepared diodes, as well as transistors in the above scheme, are mixed. In each group, the elements are also connected in parallel: on the one hand, the anodes of diodes are connected, and on the other - cathodes. You can select elements by groups in the same way as transistors. The larger in such a source of the current of individual elements, the greater its power.
The current source of 5 groups of 10 diodes generates a voltage of the order of 2.5 V at a current of 20-25 mA. For the manufacture of a self-made source of current, it is permissible to use rectifying diodes of low-power D223 type. They are convenient because they are easy to open for the light of the P-N transition. To do this, it is enough to hold them for some time in acetone, after which the protective paint is easily cleaned from the glass case.
Do not forget that when working with semiconductor devices, we should not forget that they easily fail during overheating. For soldering, it is necessary to use the slight-melting solder and a low-power soldering iron, trying not to warm up too long the spike place.
It is easy to note that the manufacture and assembly of the homemade semiconductor solar battery is not very difficult for a person who is familiar with the azami constructing electronic devices. Try - you will succeed!
In all experiments, CT315B transistors are used, D9B diodes, miniature incandescent bulbs by 2.5V x 0.068a. Headphones are high-resistant, type tone-2. A variable condenser - any, with a capacity of 15 ... 180 PF. The battery consists of two consistently connected 4.5V batteries 3R12. Lamps can be replaced by the consecutive connected LED of the al307a type and resistor with a par value of 1 com.
Experiment 1.
Electrical circuit (conductors, semiconductors and insulators)
Electric current is the directional movement of electrons from one pole to another under the action of voltage (9 V battery).
All electrons have the same negative charge. Atoms of various substances have a different number of electrons. Most electrons are firmly associated with atoms, but there are also so-called "free", or valence, electrons. If the ends of the conductor attach the voltage, then the free electrons will start moving to the positive pole of the battery.
In some materials, the movement of electrons is relatively free, they are called conductor; In others, moving is difficult, they are called semiconductors; In third, it is generally impossible, such materials are called insulators, or dielectrics.
Metals are good current conductors. Such substances like mica, porcelain, glass, silk, paper, cotton, belong to insulators.
Semiconductors include germanium, silicon and other conductors these substances become under certain conditions. This property is used in the production of semiconductor devices - diodes, transistors.

Fig. 1. Determination of water conductivity
This experiment demonstrates the operation of a simple electrical circuit and the difference in conductivity of conductors, semiconductors and dielectrics.
Collect the scheme as shown in Fig. 1, and output the curtain ends of the wires on the front of the board. Connect the curtain ends together, the light bulb will burn. This suggests that electric current passes through the chain.
With the help of two wires, you can check the conductivity of various materials. To accurately determine the conductivity of certain materials, special devices are needed. (On the brightness of the combustion of the bulbs, you can only determine whether the material studied is a good or bad conductor.)
Attach the curtain ends of two conductors to a dry wood piece at a short distance from each other. Light bulb will not burn. This means that dry wood is a dielectric. If the curtain ends of two conductors to attach to aluminum, copper or steel, the light bulb will burn. This suggests that metals are good electrical current conductors.
Lower the curtain ends of the conductors into a glass with tap water (Fig. 1, a). Light bulb does not burn. This means that water is a bad current conductor. If adding a little salt and repeat the experience (Fig. 1, b), the light bulb will burn, which indicates the flow of current in the chain.
The 56 ohm resistor in this scheme and in all subsequent experiments serves to limit the current in the chain.
Experiment 2.
Action diode.
The purpose of this experiment is a visual demonstration that the diode is well conducted in one direction and does not conduct - in the opposite.
Collect the scheme as shown in Fig. 2, a. The lamp will burn. Turn the diode 180 ° (Fig. 2, b). Light bulb will not burn.
And now we will try to figure out the physical essence of the experiment.
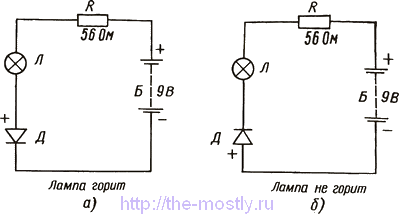
Fig. 2. The action of the semiconductor diode in the electronic circuit.
Semiconductors Germanium and silicon have four free, or valence, electron. The semiconductor atoms are binding to dense crystals (crystalline grille) (Fig. 3, a).

Fig. 3. Crystal grille of semiconductors.
If in a semiconductor having four valence electrons, introduce an impurity, such as arsenic having five valence electrons (Fig. 3, b), then the fifth electron in the crystal will be free. Such impurities provide electronic conductivity, or N-type conductivity.
Impurities having less valence than semiconductor atoms have the ability to attach electrons to itself; Such impurities provide hole conductivity, or p-type conductivity (Fig. 3, B).

Fig. 4. P-N-transitions in semiconductor diode.
The semiconductor diode consists of falling out the materials of P- and N-types (P-N-transition) (Fig. 4, a). Depending on the polarity of the applied voltage, the P-N-transition can either contribute (Fig. 4, d), or to prevent (Fig. 4, c) the passage of the electric current. At the border of two semiconductors, even before the supply of external voltage, a binary electric layer was created with a local electric field of e 0 (Fig. 4, b).
If you pass alternating current through the diode, then the diode will only pass the positive half-wave (Fig. 4 g), and the negative pass will not pass (see Fig. 4, B). The diode, thus converts, or "straightens", alternating current into constant.
Experiment 3.
How the transistor works
This experiment clearly demonstrates the main function of the transistor, which is an amplifier. A small control current in the base circuit may cause a high current in the Emitter circuit - collector. By changing the resistance of the base resistor, you can change the current collector.

Collect the scheme (Fig. 5). Put in the schema alternately resistors: 1 Mom, 470 com, 100 com, 22 com, 10 com. It can be seen that with resistors of 1 MΩ and 470 kΩ, the bulb does not burn; 100 kΩ - the light bulb is barely lit; 22 kΩ - the light burns brighter; Full brightness is observed when connecting the base resistor 10 com.
|
Fig. 6. Transistor with N-P-N structure. |
Fig. 7. Transistor with the P-N-P structure. |


The transistor is essentially two semiconductor diodes having one common area - base. If the total region with p-conductivity is common, then the transistor with the N-P-N structure (Fig. 6) will be obtained; If the common area is with N-conductivity, the transistor will be with the P-N-P structure (Fig. 7).
Transistor region emitting (emigrating) current carriers is called an emitter; The area collecting current carriers is called a collector. The zone concluded between these areas is called the base. The transition between the emitter and the base is called emitter, and between the base and collector - collector.
In fig. 5 shows the inclusion of the transistor of the N-P-N transistor into the electrical circuit.
When the P-N-P transistor circuit is turned on, the polarity of the battery function B changes to the opposite.
For currents flowing through the transistor, there is a dependency
I e \u003d i b + i to
Transistors are characterized by a current gain as the letter β, represents the ratio of the recreation of the collector current to the change in the base current.
The value of β lies in the range of several dozen to several hundred units depending on the type of transistor.
Experiment 4.
Properties of condenser
Having studied the principle of the transistor, you can demonstrate the properties of the condenser. Collect the scheme (Fig. 8), but do not attach an electrolytic capacitor 100 μF. Then plug it for a while in position A (Fig. 8, a). Light bulb will light up and go out. This suggests that the charge of the charge of the capacitor was in the chain. Now place the capacitor to position in (Fig. 8, b), with the hands do not touch the conclusions, otherwise the capacitor can discharge. The light bulb will light up and go out, the discharge of the capacitor occurred. Now, again, place the capacitor in position A. There was his charge. Put the capacitor for a while (10 seconds) to the side of the insulating material, then place the lamp in position. The light lights up and goes out. From this experiment it is clear that the capacitor is able to accumulate and store an electrical charge for a long time. The accumulated charge depends on the capacitance capacitor.
|
Fig. 8. Scheme explaining the principle of the condenser operation. |
Fig. 9. Change voltage and current on the condenser in time. |


Condifted the capacitor charge by setting it to the position A, then discharge it by attaching it to the condenser condenser condenser with random ends (the conductor hold for an isolated part!), And place it in position. V. Light bulb will not light up. As can be seen from this experiment, the charged capacitor performs the role of a power source (battery) in the base chain, but after using the electric charge, the bulb goes out. In fig. 9 are dependable on time: capacitor charge voltage; Current charge flowing into the chain.
Experiment 5.
Transistor as a switch
Collect the scheme according to fig. 10, but not yet install the R1 resistor and the T1 transistor in the circuit. The key in must be connected to the diagram at the point A and E so that the point of connection of the resistors R3, R1 can be closed on the shared wire (minus printed circuit board bus).

Fig. 10. The transistor in the diagram works as a switch.
Connect the battery, the light bulb in the T2 collector chain will burn. Now close the circuit with a switch. The light bulb will go out, as the switch connects the point A with a minus tire, thereby reducing the potential of the point A, consequently, the potential of the T2 base. If the switch is returned to its original position, the light bulb will light up. Now disconnect the battery and connect T1, the R1 resistor does not connect. Connect the battery, the light bulb will turn back again. As in the first case, the T1 transistor is open and an electric current passes through it. Now put the R1 resistor (470 com) at points C and D. The light will go out. Remove the resistor, and the light bulb will light up again.
When the voltage on the T1 collector drops to zero (when installing a resistor 470 kΩ), the transistor opens. The base of the T2 transistor connects through T1 to the minus tire, and the T2 is closed. Light bulb goes out. Thus, the T1 transistor performs the role of switch.
In previous experiments, the transistor was used as an amplifier, now it is used as a switch.
The use of the transistor as a key (switch) is given in experiments 6, 7.
Experiment 6.
ALARM
A feature of this scheme is that the T1 transistor used as a key is controlled by the R2 photoresistor.
A photoresistor available in this set changes its resistance from 2 kΩ with strong illumination to several hundred comes in the dark.
Collect the scheme according to fig. 11. Depending on the lighting of the room, where you carry out the experiment, select the R1 resistor so that the light bulb is normal without dimming the photoresistor.
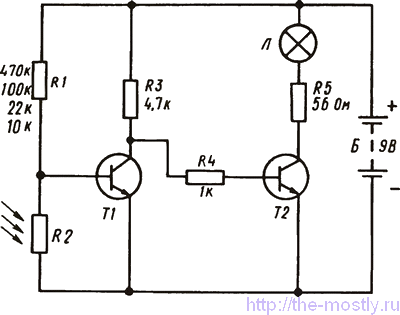
Fig. 11. Chart of alarm based on photoresistor.
The state of the transistor T1 is determined by the voltage divider consisting of a resistor R1 and a photoresistor R2.
If the photoresistor is lit, its resistance is not enough, the T1 transistor is closed, there is no current in its collector chain. The state of the transistor T2 is determined by the supply of the positive potential of the resistors R3 and R4 to the base T2. Consequently, the T2 transistor opens, the collector current flows, the light is on.
When the photoresistor is darkened, its resistance increases greatly and reaches the value when the divider supplies the voltage to the base T1, sufficient to open it. The voltage on the T1 collector drops almost to zero, the T2 transistor is locked through the R4 resistor, the bulb goes out.
In practice, other actuators (call, relay, etc.) can be installed in such schemes in the collector circuit of the T2 transistor T2.
In this and in subsequent schemes, a SF2-9 type photoresistor or a similar one can be used.
Experiment 7.
Automatic light power device
In contrast to the experiment 6, in the given experiment, during the darkening of the photoresistor R1, the bulb is on (Fig. 12).

Fig. 12. Scheme including light automatically.
When light enters the photoresistor, its resistance is strongly reduced, which leads to the opening of the transistor T1, and therefore, to the closure of T2. Light bulb does not burn.
In the dark, the bulb turns on automatically.
This property can be used to turn on and off lamps depending on the illumination.
Experiment 8.
Signal device
A distinctive feature of this scheme is a big sensitivity. In this and a number of subsequent experiments, the combined connection of transistors (composite transistor) is used (Fig. 13).

Fig. 13. Optoelectronic signaling device.
The principle of this scheme does not differ from the scheme. With a certain value of the resistance of resistors R1 + R2 and the resistance of the photoresistor R3 in the transistor circuit of the T1 transistor flows. In the collector circuit, the T1 also flows the current, but in (3 times a larger current of the base T1. Suppose that (β \u003d 100. The entire current going through the emitter T1 must pass through the transition of the emitter - the base T2. Then the current collector T2 in β times The current of the collector T1, the current collector T1 in β times the current of the base T1, the current collector T2 is approximately 10,000 times the current of the base T1. Thus, the composite transistor can be considered as a single transistor with a very large gain and large sensitivity. The second feature The composite transistor is that the T2 transistor must be quite powerful, while the T1 transistor controller can, be low, since the current passing through it is 100 times less than the current passing through T2.
The performance of the scheme shown in Fig. 13, determined by the illumination of the room where the experiment is carried out, so it is important to select the resistance of the R1 of the upper shoulder divider so that in the illuminated room the light bulb is not burning, and it was burning with a darkening of the photoresistor hand, the darkening of the room with curtains or when the light is turned off in the evening.
Experiment 9.
Humidity sensor
In this scheme (Fig. 14), a composite transistor with a large sensitivity is also used to determine the humidity of the material. The database displacement T1 is provided by the R1 resistor and two conductors with severe ends.
Check the electrical circuit, slightly squeezing with the fingers of both hands of the cereal ends of two conductors, while not connecting them with each other. The resistance of the fingers is enough to trigger the scheme, and the light bulb lights up.

Fig. 14. Moisture sensor scheme. Uninsulated carts of conductors permeate the blotting paper.
Now the curtain ends will pass through the wreaking paper at a distance of about 1.5-2 cm, other ends attach to the diagram according to fig. 14. Then Moisten the wrapping paper between the wires. The light bulb lights up (in this case, the decrease in resistance occurred due to the dissolution of the water in the salts available in paper.).
If sheepbearing paper is soaked with a salt solution, and then dry and repeat the experience, the effectiveness of the experiment increases, the ends of the conductors can be dissected for a greater distance.
Experiment 10.
Signal device
This scheme is similar to the previous one, the only difference is that the lamp is lit when the photoresistor is illuminated and goes out when the darkening (Fig. 15).

Fig. 15. Signal device on photoresistor.
The scheme works as follows: with the usual illumination of the photoresistor R1, the light will burn, since the resistance R1 is not enough, the T1 transistor is open. When the light is turned off the light goes out. The light of a pocket lantern or lit mat will make the light bulb burn again. The sensitivity of the chain is regulated by increasing or decreasing resistance of the resistor R2.
Experiment 11.
Counter of Products
This experiment must be carried out in a half-mounted room. All the time when the light falls on the photoresistor, the L2 indicator light burns. If you put a piece of cardboard between the light source (L1 light bulb and a photoresistor, L2 lights goes out. If you remove the cardboard, the L2 light lights up again (Fig. 16).

Fig. 16. Product Counter.
In order for the experiment to successfully, it is necessary to adjust the scheme, that is, to select the resistance of the resistor R3 (the most suitable in this case is 470 ohms).
This scheme can practically be used to count the product batch on the conveyor. If the light source and the photoresistor are placed in such a way that a batch of products passes between them, the chain is turned on, then it turns off, since the flow of light is interrupted by passing products. Instead of the L2 indicator light bulb, a special counter is used.
Experiment 12.
Signal transmission with light

Fig. 23. Frequency divider on transistors.
T1 and T2 transistors open alternately. The control signal is sent to the trigger. When the T2 transistor is open, the L1 light is not lit. Lamp light lights up when the T3 transistor is open. But the T3 and T4 transistors are open and closed alternately, therefore, the L2 light lights up at each second control signal, sending a multivibrator. Thus, the frequency of burning light bulb L2 is 2 times less than the frequency of the light bulb L1.
This property can be used in the electorgano: the frequencies of all the notes of the upper octave organs are divided in half and the temperature is created below. The process may be repeated.
Experiment 18.
Scheme "And" by units
In this experiment, the transistor is used as a key, and the light bulb is an output indicator (Fig. 24).
This scheme is logical. The light bulb will burn if there will be high potential on the basis of the transistor (point C).
Suppose, points A and B are not connected to a negative tire, they have a high potential, therefore, at a point with also high potential, the transistor is open, the light bulb is on.

Fig. 24. Logical element 2I on the transistor.
We accept conditionally: high potential - logical "1" - the light burns; Low potential is a logical "0" - the light is not lit.
Thus, if there is in points A and in logical "1", at a point with also will be "1".
Now connect the point A with a negative bus. Its potential will be low (falls to "0" B). Point in has a high potential. According to R3 - D1 chains - the battery will flow current. Consequently, at the point C will be low potential or "0". The transistor is closed, the bulb is off.
Connect from the ground the point V. The current is now flowing around the chain R3 - D2 - battery. The potential at a point with a low, transistor is closed, the light is not lit.
If both points are connected to the earth, at a point with also there will be low potential.
Such schemes can be used in an electronic examiner and other logic circuits, where the output signal will only have simultaneous signals in two or more input channels.
Possible states of the scheme are reflected in the table.
Tatac of truth scheme and
Experiment 19.
Scheme "Or" by units
This scheme is opposite to the previous one. In order to be "0" at the point, it is necessary that at points A and B was also "0", i.e., points A and B must be connected with a negative tire. In this case, the transistor closes, the bulb will go out (Fig. 25).
If now is only one of the points, or in, connect with a negative bus, then at the point with still there will be a high level, i.e. "1", the transistor is open, the light is on.

Fig. 25. Logical element 2Ili on the transistor.
When the point is connected to the negative bus, the current will go through R2, D1 and R3. Through the d2 d2 will not go, as it is included in the direction inverse to the conductivity. At the point C will be about 9 V. The transistor is open, the light is on.
Now the point A connect with a negative bus. Current will go through R1, d2, R3. The voltage at the point C will be about 9 V, the transistor is open, the light is on.
Tatac of truth scheme or
Experiment 20.
Scheme "Not" (inverter)
This experiment demonstrates the operation of the transistor as an inverter - a device capable of changing the polarity of the output signal relative to the input to the opposite. In experiments and the transistor, it was not part of the acting logic schemes, it only served to turn on the light bulb. If the point is to connect with a negative bus, then the potential will fall to, "0", the transistor closes, the light bulb will go out, at point B - high potential. This means a logical "1" (Fig. 26).

Fig. 26. The transistor works as an inverter.
If the point is not connected to the negative tire, i.e. at point A - "1", then the transistor is open, the light is on, the voltage at the point is close to "0" or this is a logical "0".
In this experiment, the transistor is an integral part of a logic circuit and can be used to convert the circuit or or non-diagram and in and non.
The truth table is not a scheme
Experiment 21.
Scheme "and not"
This experiment combines two experiments: 18 - diagram and and 20 - no scheme (Fig. 27).
This scheme functions similarly to the scheme, forming on the basis of the transistor "1" or "0".

Fig. 27. Logical element 2I - not on the transistor.
The transistor is used as an inverter. If "1" appears on the basis of the transistor, then the output point is "0" and vice versa.
If the potentials at the D point are compared with the potentials at the point C, it can be seen that they are inverted.
The truth table of the scheme and is not
Experiment 22.
Scheme "Or-not"
This experiment combines two experiments: - scheme or and - no scheme (Fig. 28).

Fig. 28. Logical element 2Li-not on the transistor.
The scheme functions in the same way as in the experiment 20 (on the basis of the transistor is produced by "0" or "1"). The only difference is that the transistor is used as an inverter: if "1" at the input of the transistor, then "0" at its output and vice versa.
The truth table of the scheme or is not
Experiment 23.
Scheme "And not", assembled on transistors
This scheme consists of two logical circuits not, the collectors of transistors are connected at point C (Fig. 29).
If both points, A and B, connect with a negative tire, their potentials will become equal to "0". Transistors will close, at the point C will be high potential, there will be no light bulb.

Fig. 29. Logical element 2I - not.
If only a point and connect with a negative bus, at a point to a logical "1", the T1 is closed, and the T2 is open, the collector current flows, the light bulb is on, at a point with a logical "0".
If the point is in combining with a negative bus, then the output will also be "0", the light bulb will burn, in this case the T1 is open, the T2 is closed.
And finally, if points A and B have a logical "1" (not connected to the negative tire), both transistors are open. On their collectors "0", the current flows through both transistors, the light burns.
The truth table of the scheme and is not
Experiment 24.
Phone sensor and amplifier
In the experimental scheme, both transistors are used as an amplifier of sound signals (Fig. 30).

Fig. 30. Inductive phone sensor.
The signals are caught and fed to the T1 transistor database using an inductive coil L, then they are enhanced and served in the phone. When you finished collecting the circuit on the board, place the ferrite rod near the phone perpendicular to the incoming wire. It will be heard.
In this scheme, in the future, a ferrite rod with a diameter of 8 mm and a length of 100-160 mm, 600 NNH grade is used as an inductive coil. The winding contains approximately 110 turns of the copper insulated wire with a diameter of 0.15..0.3 mm of the PAL or PEV type.
Experiment 25.
Microphone amplifier
If there is an excess phone (Fig. 31), it can be used instead of the inductance coil in the previous experiment. As a result, we will have a sensitive microphone amplifier.

Fig. 31. Microphone amplifier.
Within the assembled scheme, you can get a semblance of a two-way device. Telephone 1 can be used as a receiving device (connection at point A), and telephone 2 - as an output device (connection at point B). At the same time, the second ends of both phones should be connected to the negative bus.
Experiment 26.
Amplifier for player
Using a gramophone amplifier (Fig. 32), you can listen to the record without breaking the rest of others.
The scheme consists of two cascades of sound amplification. The input signal is a signal that goes from the pickup.

Fig. 32. Amplifier for the player.
In the scheme of the letter A marked with a sensor. This sensor and C2 capacitor are a capacitive voltage divider to reduce the initial volume. The C3 trimmed condenser and C4 condenser are a secondary voltage divider. With C3, the volume is adjusted.
Experiment 27.
"Electronic violin"
Here the multivibrator scheme is designed to create electronic music. The scheme is similar. The main difference is that the transistor database displacement resistor T1 is variable. The resistor 22 com (R2), connected in series with a variable resistor, provides a minimum resistance of the database of the base T1 (Fig. 33).

Fig. 33. Multivibrator to create music.
Experiment 28.
Flashing buzzer Morse
In this scheme, the multivibrator is designed to generate pulses with a tone frequency. The light lights up when the diagram is turned on (Fig. 34).
The phone in this scheme is included in the chain between the T2 transistor collector through the C4 condenser and the negative tire of the board.

Fig. 34. The generator for studying the ABC Morse.
With this scheme, you can practic in the study of the ABC Morse.
If you are not satisfied with the sound of sound, change the C2 and C1 capacitors in places.
Experiment 29.
METRONOME
The metronome is a device for setting the rhythm (tempo), for example, in music. For these purposes, the pendulum was previously used, which gave both visual and auditories of the tempo.
In this diagram, the specified functions perform a multivibrator. The rate of tempo is approximately 0.5 s (Fig. 35).

Fig. 35. Metronome.
Thanks to the telephone and indicator light, there is an opportunity to hear and visually sense the specified rhythm.
Experiment 30.
Sound signaling device with automatic return to its original position
This scheme (Fig. 36) demonstrates the use of a single-man, the operation of which is described in the experiment 14. In the initial state, the T1 transistor is open, and the T2 is closed. The phone here is used as a microphone. Whistle to the microphone (you can just pour) or the lung tapping excites alternating current in the microphone chain. Negative signals, entering the T1 transistor base, close it, and therefore, open the T2 transistor, in the T2 collector circuit, the current appears, and the light bulb lights up. At this time, the C1 condenser is charged through the R1 resistor. The voltage of the charged C2 capacitor is sufficient for opening the transistor T1, i.e. the scheme returns to its original state spontaneously, the light bulb goes out. The breaking time of the bulb is about 4 s. If C2 and C1 capacitors change places, the breaking time of the bulb will increase to 30 s. If the R4 resistor (1 com) is replaced by 470 kΩ, then the time will increase from 4 to 12 s.

Fig. 36. Acoustic signaling device.
This experiment can be represented as a focus that can be shown in the circle of friends. To do this, remove one of the microphones of the phone and put it under the fee near the bulb so that the hole in the board coincides with the microphone center. Now, if you look at the hole in the board, it will seem that you blow on the light bulb and therefore it lights up.
Experiment 31.
Sound signaling device with manual return to its original position
This scheme (Fig. 37) on the principle of action is similar to the previous one, with the only difference, which when switching the scheme does not return automatically into the initial state, and it is done using the Switch B.

Fig. 37. Acoustic signaling device with manual discharge.
The status of the readiness of the circuit or the initial state will be when the T1 transistor is open, the T2 is closed, the lamp does not burn.
A light whistle into the microphone gives a signal that locks the transistor T1, while opening the T2 transistor. The light bulb lights up. It will burn until the T2 transistor closes. To do this, it is necessary to move the database of the T2 transistor to the negative tire ("Earth") using the key V. To such schemes, other actuators can be connected, such as a relay.
Experiment 32.
The simplest detector receiver
A novice radio amateur design of radio receptions should be started with the simplest structures, for example, from a detector receiver, the diagram of which is represented in Fig. 38.
The detector receiver works as follows: electromagnetic waves sent to air radio stations crossing the receiver antenna, supply voltage to it with a frequency corresponding to the frequency of the radio station signal. The induced voltage enters the input circuit L, C1. In other words, this circuit is called resonant, as it is configured in advance to the frequency of the desired radio station. In the resonant circuit, the input signal is intensified in tens of times and then enters the detector.

Fig. 38. Detection receiver.
The detector is assembled on semiconductor diode, which serves to straighten the modulated signal. Low-frequency (sound) component will pass through the headphones, and you will hear speech or music depending on the transfer of this radio station. The high-frequency component of the extended signal, bypassing the headphones, will pass through the C2 condenser to the ground. Capacity C2 capacitor determines the degree of filtering of the high-frequency component of the extended signal. Usually the C2 capacitor capacity is chosen in such a way that it represents a lot of resistance for the sound frequencies, and there was little for the high-frequency component.
As a capacitor C1, any small capacitor variable capacitance can be used with a measurement limits of 10 ... 200 PF. In this constructor, a ceramic trimmed capacitor of the PDA-2 type capacitance from 25 to 150 PF is used to configure the contour.
The inductor L coil has the following parameters: the number of turns is 110 ± 10, the wire diameter is 0.15 mm, the type - PEV-2, the diameter of the frame from the insulating material is 8.5 mm.
ANTENNA
The correctly assembled receiver begins to work immediately when the outer antenna is connected to it, which is a piece of copper wire with a diameter of 0.35 mm, 15-20 m long, suspended on the insulators at some height above the ground. The higher the antenna will be above the earth, the better the reception of radio stations.
Ground
The volume of the reception increases if a grounding is connected to the receiver. Grounding wire should be short and have a small resistance. Its end is connected to the copper pipe going deep into the soil.
Experiment 33.
Low Frequency Detector Receiver
This scheme (Fig. 39) is similar to the previous diagram of the detector receiver with the only difference, which is added here the simplest low frequency amplifier, assembled on the transistor, the low frequency amplifier serves to increase the power of signals prohibited by a diode. The circuit of the oscillating circuit setting is connected to the diode through the C2 capacitor (0.1 μF), and the resistor R1 (100 com) provides a diode constant displacement.

Fig. 39. Detector receiver with a single-stage UNG.
For normal operation of the transistor, the power supply is used by a voltage of 9 V. The R2 resistor is needed in order to ensure the supply of voltage to the transistor base to create the necessary mode of its operation.
For this scheme, as in the previous experiment, an outer antenna and grounding are needed.
Experiment 34.
Simple transistor receiving
The receiver (Fig. 40) differs from the previous one that instead of the diode d, a transistor is installed, which simultaneously works and as a detector of high-frequency oscillations, and as a low frequency amplifier.

Fig. 40. Monolayer receiver.
The detection of a high-frequency signal in this receiver is carried out on the base area - emitter, so this receiver does not require a special detector (diode). The transistor with the oscillatory circuit is associated, as in the previous scheme, through a capacitor with a capacity of 0.1 μF and is unleashed. The C3 condenser serves to filter the high-frequency component of the signal, which is also enhanced by the transistor.
Experiment 35.
Regenerative receiver
This receiver (Fig. 41) regeneration is used to improve the sensitivity and selectivity of the contour. This role is performed by the L2 coil. The transistor in this scheme is incorporated somewhat differently than in the previous one. The voltage of the signal from the input circuit enters the transistor database. The transistor detects and enhances the signal. The high-frequency component of the signal does not immediately go to the filter capacitor C3, and it takes first through the feedback L2 winding, which is on the same core with the contour coil L1. Due to the fact that the coils are located on one core, there is an inductive connection between them, and part of the reinforced voltage of the high-frequency signal from the collector circuit of the transistor comes into the input circuit of the receiver. With the proper onnd of the ends of the Communication coil L2, the feedback voltage coming into the circuit L1 due to the inductive communication coincides with the phase with the signal coming from the antenna, and there is an increase in the signal. The sensitivity of the receiver is increasing. However, with a large inductive connection, such a receiver can turn into a non-teaching oscillation generator, and a sharp whistle listens in phones. To eliminate excessive excitement, it is necessary to reduce the degree of communication between the coils L1 and L2. It is achieved by either the removal of coils from each other, or a decrease in the number of turns of the coil L2.

Fig. 41. Regenerative receiver.
It may happen that feedback does not give the desired effect and reception of stations that are well audible before, when the feedback is introduced at all. This suggests that instead of a positive feedback, a negative and need to be swapped the ends of the L2 coil.
At short distances from the radio station, the described receiver works well without an external antenna, one magnetic antenna.
If the audibility of the radio station is low, the receiver still needs to be connected to the outer antenna.
A receiver with one ferrite antenna must be installed so that the electromagnetic waves coming from the radio station created the largest signal in the oscillating coil. Thus, when you are configured using a radio station with a variable "condenser if the hearing is bad, turn the circuit to receive signals in the phones you need for you.
Experiment 36.
Two-striped regenerative receiver
This scheme (Fig. 42) differs from the previous one that the low frequency amplifier collected on the T2 transistors is used here.
With the help of a two-strip regenerative receiver, we can conduct a large number of radio stations.

Fig. 42. Regenerative receiver with low frequency amplifier.
Although in this designer (set number 2) there is only a coil for long waves, the scheme can work both on medium and short waves, when using the corresponding rapid coils. They can be made by themselves.
Experiment 37.
"Perelelector"
The scheme of this experiment is similar to the Scheme of Experiment 36 without antenna and "Earth".
Tune in to a powerful radio station. Take a fee in your hands (it must be horizontally) and rotate until the sound (signal) or at least decreases to a minimum will disappear. In this position, the ferrite axis accurately indicates the transmitter. If you now turn 90 ° fee, the signals will be well audible. But more precisely, the location of the radio station can be determined by the columatalog method, using the compass to determine the angle in azimuth.
To do this, it is necessary to know the direction of the transmitter from different positions - A and B (Fig. 43, a).
Suppose we are at point A, determined the direction of the transmitter location, it is 60 °. Now we will move to the point in, with the distance of the av. We define the second direction of the transmitter location, it is 30 °. The intersection of two directions and is the location of the transmitting station.

Fig. 43. Scheme of radio station deplementation.
If you have a map with the location of broadcasting stations on it, that is, the ability to accurately determine your location.
Tune in to the station A, let it be located at an angle of 45 °, and then configure to the station B; Its azimuth, for example, is 90 °. Given these corners, spend on the map through points A and in the line, their intersection and will give your location (Fig. 43, b).
In the same way, ships and aircraft are oriented in the process of movement.
Chain control
In order to work reliably during experiments, it is necessary to make sure that the battery is charged, all compounds are clean, and all nuts are reliable. Battery conclusions must be properly connected; When connected, it is necessary to strictly observe the polarity of electrolytic capacitors and diodes.
Check components
Diodes can be tested in; transistors - in; Electrolytic capacitors (10 and 100 μF) - in. You can also check the headphone, connecting it to the battery, - in the headphone will be heard "crackling".
After we began to study bipolar transistors, a lot of messages began to come to personal messages. The most common questions sound like this:
If the transistor consists of two diodes, then why not just use two diodes and do not make a simple transistor of them?
Why electric current flows from the collector to the issuer (or vice versa) if the transistor consists of two diodes that are connected by or cathodes or anodes? After all, the current flows only through the diode included in the forward direction, after all, it cannot flow through another?
But the truth is yours ... Everything is logical ... But something it seems to me that somewhere there are catching ;-). But where is this very "highlight" we will consider in this article ...
The structure of the transistor
So, as you all remember from previous articles, any bipolar transistor, let's say, consists of two diodes. For
the equivalent scheme looks like this:

And for NPN transistor

something like that:

And what to wise? Let's have a simple experience!
We have all of us favorite Soviet transistor KT815B. It is a silicon transistor NPN conduction:

We collect a simple scheme with OE (ABOUTblessed E.mitter) to demonstrate his some properties. I showed this experience in previous articles. But as they say, the repetition is the mother of the teaching.
To demonstrate experience, we will need a low-power incandescent light and a couple of power supplies. We collect the whole thing here's such a scheme:

where we have BAT1. - This is a power supply that we turn on between the base and the emitter, and Bat2. - The power supply that is turned on between the collector and the emitter, and the lamp is still tucked in addition.
All this looks like this:

Since the light bulb shines normally at a voltage of 5 V, on Bat 2 I also put 5 V.
On BAT 1 smoothly increase the voltage ... and at a voltage of 0.6 V

we light up the light bulb. Consequently, our transistor "opened"

But since the transistor consists of diodes, then why don't we take two diodes and not "make" the transistor? No sooner said than done. We collect the equivalent scheme of the transistor KT815B of two 1N4007 brand diodes.

In the figure below, I designated the conclusions of the diodes as an anode and cathode, and also identified the conclusions of the Transistor.

Collect all this case according to the same scheme:

Since our transistor KT815B was silicon, and 1N4007 diodes are also silicon, then in theory, the transistor from diodes should open at a voltage of 0.6-0.7 V. Add voltage to BAT1 to 0.7 V ...

and…
no, the bulb does not burn ((

If you pay attention to the BAT1 power supply, you can see that consumption at 0.7 V was already 0.14 A.
Simply put, if we were still a bit of tension, they would burn the diode "base-emitter", if, of course, to recall the operator characteristic (WA) of the diode.
But why, what's the matter? Why is the transistor KT815B, which in essence consists of the same silicon diodes pass through the emitter electric current through the emitter, and the two diodes, they also do not work as a transistor? Where is the dog buried?
Do you know how these "diodes" are located in the transistor? If we consider that N semiconductor is bread, and the thin layer of ham is P semiconductor, then in the transistor they are located about this (do not look at the salad):

The thing is that the base in the transistor width is very thinlike this ham, and the collector and the emitter in width as these halves of bread (slightly exaggerate of course, they are slightly less), therefore, the transistor, behaves like a transistor :-), that is, it opens and skips the current through the emitter collector.
Due to the fact that the base is very thin in width, So two P-n of the transition are on a very small distance from each other and interact between them. This interaction is called transistor effect. And what could be the transistor effect between diodes, in which the distance between two P-N transitions like to the moon?
This article will be interested in the first place for those who love and can make up. Of course, you can buy various finished devices and appliances, including products of solar photovoltaics assembly or squeezing. But the craftsmen are much more interesting to create their own device, which is not similar to others, but possessing unique properties. For example, a solar battery can be made of transistors with their own hands, various devices can be collected on the basis of this solar battery, for example, the illumination sensor or low-power charger.
We collect a solar battery
In industrial helium modules as an element that converts sunlight into electricity, silicon is used. Naturally, this material has passed the appropriate processing, which has turned the natural element in the crystalline semiconductor. This crystal is cut into the finest plates, which then serve as the basis for the assembly of large solar modules. The same material is used in the manufacture of semiconductor devices. Therefore, in principle, from a sufficient number of silicon transistors, you can make a solar panel.
For the manufacture of helium battery, it is best to use old powerful devices that have labeling "P" or "CT". The more powerful transistor, the largest area has a silicon crystal, and therefore, the greater area will have a photocell. It is desirable that they were workers, otherwise their use can become problematic. You can, of course, try to use and defective transistors. But at the same time, each of them should be checked for the absence of a short circuit on one of two transitions: Emitter - base or collector - base.
From what is the structure of used transistors (P-N-P or N-P-N), the polarity of the created battery depends. For example, KT819 has the structure of N-P-N, so it will be positive ("+") the output of the base, but negative ("-") - the conclusions of the emitter and the collector. And transistors of type P201, P416 have the structure of the P-N-P, so for them negative ("-") the output will be the output of the base, and positive ("+") - the conclusions of the emitter and collector. If you take domestic P201 - P203 as a photo converter, then with good lighting, you can get at the output of the current up to three milliamme aver at a voltage of 1.5 volts.
Transistor p202m
After the type is selected and a sufficient amount of transistors is collected, for example, P201 or P416, you can start making the solar battery. To do this, on the boring machine, the flanges of transistors should be mounted and remove the top of the case. Then you need to hold a routine but necessary operation to check all transistors on the suitability of using them as photocells. To do this, use a digital multimeter by setting it to a milliammeter mode with a measurement range up to 20 milliam. We connect the "positive" probe with the collector of the test transistor, and the "minus" - with the base.
![]()
If the lighting is quite good, the multimeter will show the current value ranging from 0.15 to 0.3 milliam. If the current value will be below the minimum value, then this transistor is better not to use. After checking the current, check the voltage. Without removing the implications from the conclusions, the multimeter should be switched to the voltage measurement in the range to one volt. At the same time, the device should show voltage equal to about 0.3 volts. If current and voltage indicators correspond to the values \u200b\u200bgiven, the transistor is suitable for use as a photocell in the solar battery.
![]()
Scheme of transistor connections in the solar panel
If possible, you can try to choose transistors with maximum indicators. In some transistors in terms of location of the conclusions for the installation of the battery, it may be more convenient to transition base - Emitter. Then the collector is free. And the last remark to be borne in mind when making a helium battery from transistors. When assembling the battery, you should take care of the heat of heat, since when heated by a semiconductor crystal, starting at about 0.5% of the initial voltage at each subsequent degrees.
![]()
P203E transistors with cooling radiators
On a summer sunny day, silicon crystal can heat up to a temperature of + 80 ° C. At such a high temperature, each element included in the helium battery can lose an average of 0.085 volts. Thus, the efficiency of such a self-made battery will noticeably decrease. It is in order to minimize losses, and a heat sink is needed.
Normal transistor as an element of solar photovoltaics
In addition to the fact that the usual transistor can simply be turned into a photoelectric converter, with a small fantasy you can use it in other useful schemes using the semiconductor's photoelectric properties. And the scope of these properties may be the most unexpected. Moreover, the modified transistor can be used in two versions - in the solar battery mode and in the phototransistor mode. In the solar battery mode from two conclusions (base - collector or base - emitter) without any modifications, an electrical signal generated by a semiconductor during its illumination is removed.
The phototransistor is a semiconductor device reacting to the light stream and operating in all spectrum ranges. This device converts radiation into an electrical DC signal, simultaneously enhancing it. The phototransistor collector current is depending on the radiation power. The more intense is highlighted by the phototransistor base area, the more the collector current becomes.
From a conventional transistor, not only a photocell can be made, which converts light energy into energy electrical. The usual transistor can be easily turned into a phototransistor and use in the future its new functionality. Almost any transistors are suitable for such a modification. For example, MP series. If you turn the transistor with the conclusions up, then we will see that the base of the base is soldered directly to the transistor housing, and the conclusions of the emitter and the collector are isolated and started inward. The electrodes of the transistor are located triangle. If you turn the transistor so that the top of this triangle is the base - was turned to you, the collector will be left, and the emitter is on the right.
![]()
Transistor housing, waste from the emitter
Now the supphyl should be neatly strain the transistor body from the emitter before getting the end-to-end hole. Phototransistor is ready to work. Both a photocell from the transistor and the self-made phototransistor can be used in various schemes that respond to light. For example, in illumination sensors that control the on and off, for example, external lighting.
![]()
Scheme of the simplest lighting sensor
And those and other transistors can be used in the tracking schemes for the sun position to control solar panels. A weak signal from these transistors is simply amplified, for example, a composite Darlington transistor, which, in turn, can already control the power relays.
Examples of using such homemakes can be brought by a great set. The scope of their application is limited only by the fantasy and human experience that took place for such work. Flashing christmas garlands, lighting controllers in the room, controlling the illumination of the country area ... All this can be done with your own hands.
 Magnetometry in the simplest version The ferrozond consists of a ferromagnetic core and two coils on it
 Effective job search course search
 The main characteristics and parameters of the photodiode
 How to edit PDF (five applications to change PDF files) How to delete individual pages from PDF
 Why the fired program window is long unfolded?
 DXF2TXT - export and translation of the text from AutoCAD to display a dwg traffic point in TXT
 What to do if the mouse cursor disappears