How to make an inscription in the picture. How to make an inscription on a photo online with a beautiful font. EffectFree - add text to mobile
Hello, dear readers blog Start-Luck. Sometimes very simple actions cause a lot of inconvenience and force a person to think for a long time: "And how, in fact, to solve the task?". Today we will discuss this.
I'm going to tell you how to impose text on the picture by four ways with the help of programs that, I think installed on your computer is Word, Paint and Photoshop, as well as by one very popular service, online photoshop analogue in which you can work for free.

You will learn about the benefits of each method and can solve in what case one or another will suit the best way. Well, let's start?
Pixlr.
Maybe you once heard or stumbled upon service Pixlr.com. . I wrote about him when I told about. By the way, any of them will help make an inscription in the photo, so I recommend to read this publication. I myself continue the main topic and I will try to describe all the advantages and disadvantages. this method right now.

Pros: a large number of Beautiful fonts, the ability to create without downloading additional programs.
Cons: I would not call the interface of this program very simple and understandable for beginner. If you know what to seek and already worked with the full version of photoshop, most likely it is most likely to get to the desired functions, if not, then your capabilities will be somewhat limited.
Now I will try to show you the basic functions of the utility. To work with the picture you will need Pixlr Editor And not Express, the link to it is on the left.
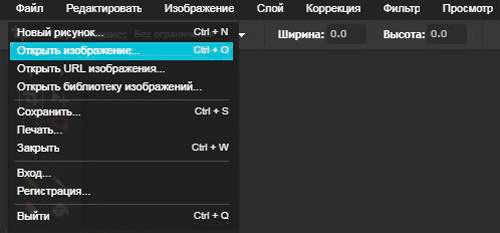
Now open the image. This can be done using a function that appears when opening the program window.

There is a second boot option for pictures. It will be suitable if you have already closed the welcome window. It will not necessarily restart the service. Just click on the file, and then click on the "Open Image" item.
You can also use the Ctrl + O key combination.
As in many programs and services, the text of adding text opens with the help of an icon with a large letter "A". Next click anywhere in the picture.

To add your text, you must enter it in the menu that appears. Here you can choose the font size, style and color of the text.

The "Font" section contains a rather large number of beautiful writing options, but not all of them are suitable for text in Russian.

You already know ? If so, then there is no need to read another publication from this blog with a detailed clarification. Just click on the text layer with the right mouse button and choose the item "Styles".
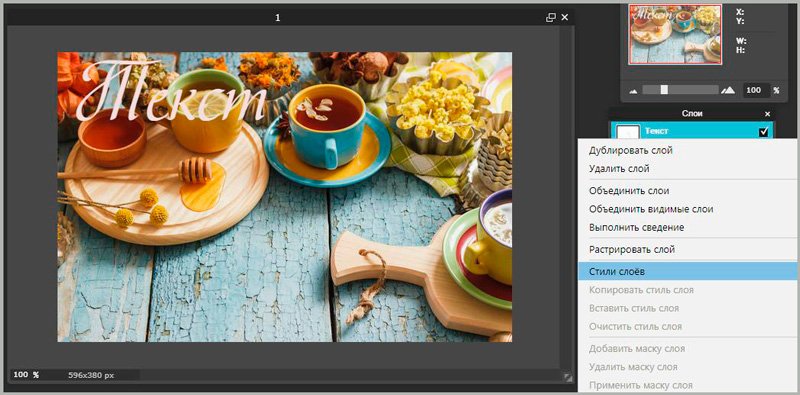
Here you can add a shadow, stroke and some other effects. Each of them contains various settings - pick up the color, install the width, hardness of the brush, opacity. Try to figure out these buttons to the present button. It's not hard.


No logos of the program and other watermarks will not appear on your work. This is a significant advantage of this method with respect to similar online services and editors.
Full version of photoshop
I already described in detail the possibilities of photoshop and then, including, and much more. The possibilities of this program are truly limitless. What is just not capable of utility! It turns into a real treasury in experienced hands who know what they do.
If you also want to learn how to own Photoshop by 100%, I can offer you two training courses. One will suit beginners who still know nothing about this program. " Photoshop for beginners in video format ».

For more advanced users, more will suit 100 lessons photoshop " These lessons are noteworthy also in that they will tell you not only about the technical moments, you will learn a lot about the light, shadows, important moments Decoration. All this will bring design skills to a new level.

I will talk about the basic possibilities of writing a beautiful text in Photoshop. To begin with, open the file. This can be done by dragging the photo from the folder to the working window of the program, using the Ctrl + O key combination or through the top toolbar: "File" - "Open".

Here, an icon for adding text is indicated by the letter "T" in the menu on the left, and the special panel for managing the settings opens from above. Here you and the choice of font, by the way, maybe you will use my article and the size of the text, and its color, and additional features.

All fonts that are displayed in the Photoshop program are those that are installed on your operating system. Want to add new ones? Make it is not so difficult, I have already given a link to the training instruction.

By pressing first on the text layer, and then opening the option "Overlay parameters" you can easily add new effects - a smooth transition of color, pattern, shadow, stroke and much more. Here functions are many times more than in a trimmed online service.

Again, the method of tyk or courses, which I told you a little higher help to understand what and in what case it is applied.

It remains only to "save as ..." All in the same "File" tab of the toolbar at the top of the program. By the way, you may need to move the text. To do this, press the instrument with the arrows, it is located first. Well, use the hot keys Ctrl + T.

By the way, I can advise you another article that I wrote recently. She says . On it all texts look very impressive. Do not miss.
Word
I do not know what can make a person purposefully open Word to create text in the picture in this way, in my opinion, much easier to work with the image of the methods already described by me, but in life anyone and my long to describe each possibility that it provides us with a computer.
Insert the picture into the document can also be done by dragging out the folder.

So you have the opportunity to open the "Insert" tab and click on the image image icon. A standard conductor will open in which it will be necessary to click on required file..

All in the same tab "Insert" click on the letter A, and then choose the text of writing text.

It remains only to enter your text and ready.

To subsequently download the picture, I would advise you to use, that is, by photographs of the monitor screen.

Paint.
The last way of work - paintFrom which, according to rumors, Windows creators are going to abandon soon. Click on the "Start" menu, then click on the folder "Standard" and I find out there the necessary programwhich is still available in this menu. 
After the prog is open, open the desired file.

Click on the icon with the letter "A" and insert your inscription.

You can choose a font from those that already exist on your Windows system.

The choice of color and font is the only features that are available if you use this method Work.


I think it is not difficult to guess what method, in my opinion, is the most acceptable. Learn photoshop, Meet this program, at least by means of a trimmed online version. This will open up a lot of new opportunities.
Even if you do not in any way think about earnings on a web design, you have neither the shadow of the talent and the desire to discover the gift of the designer, even simple tasks better, nevertheless, solve with one hundred percent return.
If you have such a need for you, why not improve the level of your knowledge in the area basic programs. Photoshop now know how to use everything without exception. Do not stay aside.
I have everything on this. Do not forget to subscribe to the newsletter and group Start-Luck VKontakte . Prior to new meetings and good luck in your endeavors.
That the usual user does when document Word. Need to put the text in the image? That's right, it applies different graphic editors from standard Paint to powerful Photoshop, and time spent time and the result may not please. But there are several options inserts to the text of the text in the Word, which will look original, in the Word itself without resorting to the use of other programs.
The given instruction will introduce the techniques to create any inscriptions in the image.
Method number 1: Text block
If you need to make an illustration of the usual explanatory inscription, this method is most appropriate. The feature of the object is that it can be placed anywhere.So, suppose that the document already presents the desired drawing and it remains only to place several offers or list. How to do it? For each release text editor The scheme is different, but slightly.
After that, the menu will unfold. ready templates. There, click "Simple Inscription" (this will be the first example in the window). As a result, a frame with a sample text will appear on the sheet.
Next, drag the resulting object to the picture. To do this, hover over the framing, the arrow will change the view of the black cross. Hold the left button and without releasing it, move the unit to the desired place in the picture.
While you get a white field framed by a black frame. Type the desired fragment in place instead of the text example and format it according to your requirements (font size, color, style, etc.). The size of the block is also changed. It can be expanded or reduced.
Now we need to remove a white background and framing. To do this, simply click on the label and go to the "Format" tab. Lay and click in the "Styles" group on the "Filling of Filight" button. A menu will fall out where to select "No Pouring", and the background will turn off.
It remains to remove the frame. In the same group, click "Contour of Figures", and in the list, click "No Contour". The command disables the framing.

Standard word Tools You can create a well-decorated signature, any color, style, size. It is much more convenient and faster than using graphic editors.
Method number 2: Object Vocard
There is another interesting receipt of the creation of an inscription - the insertion of the Wordart object. In fact, this is the same text field that only having a more interesting styling of the font (with a shadow, reflection, volume, and so on).In the "Insert" tab, click the "Add Wordart Object" in the form of a blue rotated letter A. Display visual examples. Select what is suitable for the image and simply click on the sample.

Now enter necessary information In the block and drag the resulting on the picture.
Method number 3: flowing text
The method is good if the picture is used as a substrate page entirely.On the inserted picture, right-click and select the "Flashing Text" line in the context menu. Next, click "Text".

Now fill the document as usual. Only the background will serve as a drawing, not a standard white color.
With the help of the receptions you can easily make a well-designed text in the picture. At the same time, the need to use graphic editors disappears.
Inserted in Word drawing sometimes it is necessary to somehow designate or sign, and how to make an inscription in the picture in the Word, we will then consider.
There are several ways to place text over the picture in Word. If you need to place in the figure beautifully decorated text, it is best to use Wordart's inscriptions, and if enough ordinary text, you should use the text field.
To insert the lettering Wordart go to the tab "Insert", we find the WordArt object and choose the style of the design. After that, a special field for entering text will appear on the sheet. Using the menu on the tab that appears "Format" You can produce additional settings inscriptions. After all the settings and the final location of the text in the picture, it is best to group them so that when moving the picture immediately moved to it and the inscription.

To insert ordinary text over the picture in the Word, select the menu item "Text field" on the tab "Insert"in which you choose the option "Simple inscription". In the field that appears, enter the necessary text, make additional settings using the menu on the tab "Format", including removing the fill and contour of the figure, as well as if necessary, change the color and size of the text standard method. After all settings, it is also desirable to group text and a picture.


How to make an inscription in the photo? In this article, we will foresee this question in detail. When creating unique photos or pictures, many users conceive their protection. We use the PIXLR service to create an inscription in photographs and other similar programs.
Why make the inscription in the picture and photos
Hello, friends! What are inscriptions in photos? There is a basic reason - copyright protection, or for the recognition of the author, brand. For example, you made your personal photo, and want to sign it with your personal name. So you can confirm that this is just your photo.
Or for example, when blogging, many bloggers create inscriptions in the form of text on their unique pictures - usually there is a site domain or the name of the author. So people will find your pictures on the Internet, and recognize you. They can also go to your website or blog.
If you wondered how to make an inscription in the photo, this article will be useful to you. Below we apply to the practice of Service Pixel online and several programs that will create the inscription in the photo and not only.
How to make an inscription in the photo
Inscriptions in the photo are made simply. In this section, articles will be given simple adviceWith which you can do it quickly:
- Select a font for text. You can use standard fonts in the PIXLR service and other programs.
- Choose a program, service to create an inscription. A lot of them. But we will disassemble those that beginners will be able to master quickly. For example, Pixlr online in Russian, photoshop and so on.
- Let's create an inscription and save the photo with the inscription on the computer. Each service and program can be chosen different format Preservation of photos and pictures. For example, in JPEG, PNG, GIF and the other.
The question is how to make an inscription in the photo will be able to fully in practice further in the article.
How to make an inscription on the photo using the PixLR service
So, create an inscription in the photo using the PIXLR service. This service writes articles on my blog. For example, such as (, and).
Open this image editor in the browser through this address - "Pixlr.com". Next, click on the section in the "Language" editor to select from the list of English languages. And begin work. Click the "Upload Image from Computer" button (Screen 1).

Choose your photo or wallpaper from the desktop.
Then, click "Open" so that the photo is loaded to the service. Further, in the editor itself there is a "A" button, with which you can add text in the photo, namely the inscriptions. Click on the picture with a mouse in an arbitrary area where we want to add inscriptions. And press the above button (Screen 2).

After which the text add panel appears. It can write any text or add your website address (blog). Change the font, and the size of the text. After that, confirm the operation with the "OK" button.
As can be seen from the result above, the inscription in the photo was added. It should be noted a very important detail. When you use this service, disconnect the advertisement block in the browser (if any) so that PIXLR worked correctly.
How to make an inscription in the picture in other programs
So, there are programs that will help you create an inscription in pictures and photos. This is Photoshop, and the Paint program, which has all users on computers.
We will not disassemble the photoshop in detail. Since the inscriptions in it are created by analogy, as well as on the PIXLR service. And PAINT will create you an inscription in the picture even faster.
Click on the picture right mouse button, and select an item from the "Change" or "Open Using" menu to start this program (screen 3).

When the picture is displayed in the program, click on the "A" icon, and set the text in any area of \u200b\u200bthe photo. Then, write it and change the color, size, font of the text, and so on.
To save the changed photo, you need to click at the top of the file "File", "Save As" and select the image format. After that, we save your photo with the inscription on the computer. These programs are free and they can easily use a novice.
In fact, the logo is the usual picture. To impose a logo, means overlaying pictures to the picture. First of all, you need to then impose it in the photo. Then, run on your computer any editor or program. For example, the same Pixel. The entire process of overlaying the logo on the picture, we will show the Pixel Service. Open the prepared picture with the inscription or photo in this service. Then, press the "File" button and "open" in it. After that you can choose from a computer logo.
You can also apply a logo on the picture, photos using other programs and services. For example, in Photoshop. And how to impose a picture on the picture in online program PIXLR is shown in the blog article.
Conclusion
This article helped us deal with the question, how to make an inscription in photos, pictures and impose a logo on it. This information will be needed by many beginners who first have encountered this issue. These tools that we review will be needed by bloggers, photographers, to protect their paintings and copyrights from piracy on the Internet. After all, many on the Internet earn, and the inscriptions in the photo and pictures will be, just by the way. Thank you for attention!
Get new blog articles directly by mail. Fill out the form, click "Subscribe"
Since we live during the heyday social networksWe often have to deal with the question - how to make an inscription in the photo. And this is not at all surprising, because daily millions of users are laid out in all sorts of communities and on their pages dozens of photographs.
This article will consider the most popular ways to create inscriptions in the photo.
We do the inscription in the photo in Paint.
This method of creating an inscription in the photo is the most common and simple, since the "Paint" program has already been preset on all computers / laptops with an operating room. windows systemThat is, she comes with standard programs.
It is pretty easy to learn and allows users to perform "standard" actions with images.
1. To create any inscription in your photo, you need to open the program to start. It is very easy to find it: go to the "Start" menu, click on the inscription "All Programs", then open the "Standard" folder. In it, you will find the "palette with a tassel" icon and there will be a paint inscription nearby. Click on it.
2. You will open the program window. You can drag to it the desired image or open it through the editor itself. To do this, click on the blue rectangle located on the left in upper corner Windows, and select Open option.
After that, you can only choose the image.

3. After you have discovered the photo, and have made other changes, for example, you can start creating an inscription. To do this, click on the letter "A" and select the desired color.

4. Pulling the right mouse button, highlight the part of the image you want to write. Select the font and size. After clicking on the inscription "Transparent" (this parameter will allow you to create an inscription on the photo itself, without overlapping it).

If something does not work the first time, or you simply do not like the selected font, you can easily remove the inscription (remaining in the writing mode) or change it.
5. Save the modified image.
Inscription on the photo in Faststone Image Viewer.
This method provides for some difficulties, especially if you are new. but this program So "multifunctional" and simple interface, which rash, you will only use it.
1. First, download the program (preferably from the official product site) and install it on your device.
2. Open. Select the File tab, and in it the Open option, specify the image you need.

3. Now that your photo is displayed in the program window, click on the Edit tab and select the "Drawing" parameter.

4. You will have a large window. In it you need to click on the letter "A". After that, you will see the Parameters at the bottom of the page. Remove the checkbox from the Background parameter.

5. Highlight the area on which the inscription will be created. From above, you have an additional menu, allowing you to choose a font, change its size and color.
Stop the parameters you need and start writing.

6. Without leaving the regime, you can set "transparency" to your text by dragging the slider located next to the inscription "Transparency". In addition, you can move your inscription in the photo and change its "size".
7. After performing all the "procedures" do not forget to save your image. To do this, click on the "OK" button, and then in the main program window, click on the blue icon.

Now you know how to make an inscription in the photo.
 How to reflash iPhone with PC and iTunes
 Best Bitcoin Wallets for iOS Download application wallet on iPhone
 Lenovo Vibe X2 Description, Features, User Reviews
 The computer does not see the flash drive: causes and solving the problem
 About Windows Update From Wannacry Encrypter Virus
 Hot browser keys
 New Mac Mini turned out to be five times more powerful than the predecessor