Computer tuning - installing the backlight on the system unit. Diode modding of your computer How to make a glowing system unit
WITH Nowadays it has become very fashionable to use LEDs to illuminate rooms, suspended ceilings, etc. But today we will use LEDs to decorate a computer case, keyboard. In other words, computer modding .. Let's start with the system unit. PC cases are available in different types and sizes. In closed cases, we will illuminate the cooler grilles, and for those with a transparent side wall, they will illuminate along the contour of the main frame. So, to illuminate the cooler, we need 4 LEDs of 4 volts each, we will take power directly from the PC power supply. You also need 820 ohm resistors to connect to a 12V power supply. With a drill, carefully drill 4 holes in the direction of rotation of the cooler. We solder the resistors to the LED leg, where the + is located. Attention, the main thing is not to make a mistake, otherwise the "light" will not burn. After completing these steps, we install the LEDs in the holes and supply power. We take the wires from the molecules. The yellow wire is + 12V, and the black wire is 0, i.e. minus. Since 12V is not enough for 4 LEDs, we will connect them in parallel. After carefully soldering the wires, turn on the computer. And now our cooler glows beautifully.
Now let's move on to the illumination of the case with a transparent side wall. Since the area of work is large, it is better to purchase LEDs in the store, with adhesive tape. For such an LED strip, resistors are not needed and they are inexpensive, about 200 rubles per meter. Having measured the contour of the frame, we buy the length we need and carefully glue it along the entire length. Having finished with this part of the work, we move on to the next one. We also supply power, and carefully solder the wires. There are many types of these LED flasks with different colors. There is even a system with a remote control, with which you can change the colors of the diodes.
It happens with each of us that while sitting at the computer at night, in the dark you cannot see the letters on the keyboard. Therefore, I will tell you how to make an LED lamp for Claudia. We will take food directly from the Claudia. 5V comes out from the usb connector of the computer. This is a lot for our LED. Therefore, we take a 120 Ohm resistor and also solder it to the leg with +. Flexible hoses for taps are available from your hardware store. Having cut off the length we need, we install our LED at the end and bring in the wiring. To attach our "lamp" to the table, you can buy stationery pins and glue them to the bottom end of the tube. As a result, we get an ergonomic, comfortable and quite bright lamp, with which you can illuminate not only the keyboard, but also the surface of the entire table. In the next articles I will tell you how to make a light music, an ADSL modem backlight, how to decorate a mouse and a rug.
Probably, it sometimes occurs to many to embellish their monotonous computer unit, which acts as a dust collector. Modern gaming computers already have built-in PC backlighting. But, judging objectively, the case for the system unit performs the function of a "skeleton" on which all the necessary organs are attached. This does not directly affect performance. For some, it will not be profitable to buy a backlit case on a PC. Then people start looking for alternative ways to decorate their corner and not spend a lot of money while doing it.
Backlit enclosures
If you are not going to buy a backlit gaming PC, all you need to do is get yourself a backlit case. They differ in price from ordinary cases, but this is compensated by the fact that all the elements are already factory-made, that is, if an unforeseen circumstance occurs, then you can try to return the case under a warranty certificate (besides, if a person is not confident in his abilities, then it is better overpay for a backlit PC case). And if you decide to take a regular case and fill it with tape and glue, then it will be much more difficult to return it. In any case, everyone decides for himself which case to take and whether it is worth framing it with an LED strip.
Illumination with LED strip
The first step is to buy an LED strip or order it from an online store. When the LED strip is in your hands, you need to remove the side cover of the case of the system unit and outline for yourself where this strip will be located. These places must be cleaned from dust and other contaminants, you can use alcohol and wipe the inside of the lid.

Now you need to cut the LED strips. On most models, cut lines are indicated every three diodes. The next step is to strip the back of the adhesive tape and apply it to the back of the lid.
Working with wires requires a separate skill, but even without it, you can perform the simplest operations. It is necessary to measure and cut the wires, and then solder them to the tape, the most important thing is not to confuse "+" and "-" (usually the positive wire is black / white, the negative wire is any other colors). For the best effect, hot glue can be used to keep the wires from moving.
The LED strip must be connected to the MOLEX connector. Remember that in the connector, the black wire is ground and the yellow wire is voltage. After connecting with MOLEX, you need to find a free power supply plug to turn on the LED strip.

Backlighting the monitor via Arduino using Ambilight technology
Backlighting via Arduino is a cheap analogue of monitors and TV screens from Philips with patented Ambilight technology. For the project, you will need an Arduino Nano board and LED strips. The pin connection diagram is shown in the video instructions, it is pretty simple even for a beginner. A photoresistor will also be built into the circuit to regulate the light of the tape depending on the time of day.

To use the LED strip, you need to download and install the Ambibox program, as well as keep it in the background during the operation of the strip.
Some people hate PC backlighting, while others like it. With just a little effort, you can decorate your computer with lighting, no matter the case manufacturer or design. Many different lighting options can be found on the market, including the popular LED fans. Alternatively, you can buy classic cold cathode fluorescent lamps or simple LEDs that can be installed anywhere in the enclosure.
After looking at all the possible lighting effects, we came up with some interesting solutions. We carried out testing in a completely transparent case from Sharkoon, which allows you to clearly see the result.
This kind of backlighting will always attract attention.
For greater clarity, we have attached a video:
To play the video, you need a codec from the site DivX.com .

Projects like this require a transparent case.
|

I have been modding for many years with lighting effects... In the transparent Sharkoon case, I installed all kinds of illumination that I could get to. It sounds crazy, but I really decided to equip the case to the maximum.
The only thing I didn't think about was the big jumble of cables inside. Each pair of cold cathode tubes requires its own voltage converter, so it will take you a long time to hide the converters and cables. In addition, cables that are too short are sometimes an obstacle.
Another problem is the power supply of the backlit fans. Most fans use a 3-pin power plug. Although motherboards have matching connectors, most of them cannot power more than three fans. To solve the problem, you need to buy an adapter that connects to a Molex plug.
Finally, from my own experience, I realized that too many lighting effects look ridiculous and tiring of the eyes!
Two in one: LED fans
The easiest way to kill two birds with one stone is to replace the standard case fans with corresponding backlit models. As a result, you will not only give the system a stylish look, but in some cases also reduce the noise level.
Most cases use modest black fans. The right fan will shine with bright colors and add light. Fans usually come in three sizes: 80mm or 120mm, with 92mm models being increasingly rare. It is for this reason that we will focus our attention on the most common sizes.
The range of lighting effects available is limited - usually three colors dominate. As a rule, all manufacturers offer fans with blue backlighting, but it is not uncommon to find red and green LEDs. In addition, if you wish, you can find a fan with three multi-colored LEDs.

A range of 80mm backlit fans.
Some models are capable of real "color music" - it is difficult to look away from them. Such fans first appeared at the current CeBIT fair in Hanover. Sharkoon offers a wide range of models, each with a different lighting scheme.
Sharkoon, Thermaltake, Cooler Master and Antec were the first to respond to new user demands. Today on the market you can find multi-color and single-color models, moreover, the number of LEDs depends on the manufacturer. For example, Antec and Thermaltake fans have only three LEDs, while Sharkoon, Logisys and Sunbeam have four. However, the choice is a matter of taste, but both options give quite good backlighting. By the way, it's a shame that the popular company Papst still doesn't produce LED fans.

Cooler Mate 80mm: Standard 4 LED fan.

The Aspire DF1208SM is backlit by four LEDs.

Thermaltake TT-8025T: Three LEDs in total.
We loved the Rainbow fan, which shines in different colors. Another model, called the UV Strobo FAN, is not only UV sensitive, but also creates an interesting stroboscopic effect. In addition, Logisys Computer sent us a very interesting model.
When switched off, a Logisys fan is no different from a normal fan. Looking closer, you can see four LEDs in a transparent plastic case. Even after switching on, the fan does not immediately reveal its secret - you need to look at the back side of the fan.

Looks like a regular fan with 4 LEDs. But where are five more?
The other five LEDs are on a small board inside the fan. Interestingly, the impeller generates its own current - and does not use the power of the PC. The principle is simple and ingenious: there is a generator on the axle, which works like a bicycle flashlight. It generates electricity to light five LEDs. The small control module constantly changes the character of the backlight. You can see all this in our video.

The rest of the LEDs are located in the center of the fan.
DivX.com .
Sharkoon Rainbow Fan: classic "color music"
The most prominent feature of the Rainbow Fan is the small shawl located near the pivot axis. The 80mm fan uses a plastic grille that can be easily removed. After this action, it becomes clear that another function of the lattice is to hide the permanent magnet, which serves to receive current. There are several induction coils on the board. By the way, the board is attached to the fan with just a double-sided Velcro. If you spin the board quickly enough, the five LEDs will dimly light up. And since the fan is spinning at 3000 rpm, the five colored LEDs are pretty bright. Built-in logic turns the glow into "color music".
Of course, a smaller black capacitor could have been chosen - it not only looks ugly, but also interferes with the balancing of the fan. Poor balancing is palpable. Hopefully this flaw will be fixed in the final version of Rainbow. Sharkoon, it seems to us, should replace the black fan on which the Rainbow unit is installed. In addition, it would be nice to revise the pricing policy - after all, $ 19 is a bit expensive for a piece of plastic with LEDs.

Without power, the Rainbow FAN doesn't really stand out.

As you can see, the Rainbow fan is equipped with its own generator.

A round permanent magnet is located inside the plastic grill.

Now the 80mm fan looks much better.
To play the video, you need the latest codec from the site DivX.com .
The small red fan is equipped with four blue LEDs. And this $ 9 fan would be nothing remarkable if it weren't for the long cable. The UV Strobe Fan is controlled by two wheels: one for the rotation speed and the other for the blinking interval of the four LEDs. With their help, you can change the settings and get the desired lighting effect. If you try, you can achieve the effect when the fan impeller begins to move in the opposite direction - an optical illusion.
Unfortunately, the wheels are not very easy to work with - the control unit will be difficult to access after installation, of course, if you do not take it outside the case. We think a 3.5 "or 5.25" bay module would be the best solution.

Fan UV Strobe Fan.

Once installed, the control box will be difficult to reach.
The video captures everything that is difficult to see in the photographs.
To play the video, you need the latest codec from the site DivX.com .
Thermaltake UFO has an unusual design. The 92mm fan is covered with a special silver cover, which is equipped with 6 LEDs. They are powered by the computer, so the induction effect, as in the case of the Rainbow Fan, is not used here.
The LEDs are controlled by a chip that makes them flash at regular intervals. The UFO fan speed is temperature dependent - the higher the temperature, the faster the fan rotates. The amount of heat does not affect the intensity of the glow or the gaps.

The UFO fan is equipped with six bright LEDs.

The UFO FAN can be installed in an 80mm mount using a special adapter.
To play the video, you need the latest codec from the site DivX.com .
Review: 80mm Backlit Fans
| Manufacturer | Model | Rpm | Number of LEDs | LED colors | Special functions |
| Aerocool | Centaurus II | 2000 | 4 | Blue | |
| Akasa | Nebula | 2500 | 4 | Cyan / Red / RGB | |
| Antec | LED Fan | 2600 | 3 | Blue / red / green | |
| Antec | LED Fan | 2600 | 3 | RGB | |
| Antec | TriCool LED | 1500 - 2600 | 3 | Blue / red / green | |
| Antec | TriCool LED | 1500 - 2600 | 3 | RGB | Rotation speed switch |
| Arctic | Pro2LTC | 1000 - 2500 | 4 | Blue | |
| Coolermaster | Neon LED | 2500 | 4 | RGB, orange, white, magenta | Very bright |
| Coolermate | CMT-ALF | 4 | Blue | Aluminium case | |
| Cooltek | Colorful UV LED FAN | 2200 | 3 | Blue / orange | UV sensitive |
| Firework | LED Fan | 2700 | 3 | Blue / red / green | |
| Just cooler | Crystal fan | 1500 - 3200 | 4 | Cyan / RGB | |
| Levicom | Ceramic | 2400 | 3 | Blue | |
| Logisys | 4-LED | 2500 | 4 | Cyan / Red / Green / Magenta | |
| Logisys | 9LED Blue | 2500 | 4+5 | Blue + red | 5 LEDs powered by induction |
| Logisys | Strove Fan | 2600 | 3 | Blue / red / green | |
| Revoltec | LED Colorchanger | 2000 | 4 | White | |
| Revoltec | LED Fan | 2000 | 4 | Red and blue | |
| Revoltec | LED Fan | 2600 | 4 | Blue / green / red + orange | UV sensitive |
| Revoltec | LED speed control | 2000 - 3500 | 4 | White | LED color varies with temperature |
| Revoltec | LED transparent | 2000 | 4 | Blue | |
| Revoltec | LED transparent | 2000 | 4 | RGB | |
| Revoltec | Neon air edition | 2000 | 4 | Blue | In an aluminum case |
| Sharkoon | Rainbow | 2000 | 5 | RGB | LEDs are powered via induction |
| Sharkoon | Strobe Fan | 2500 | 4 | White | |
| Sharkoon | UV Strobe Fan | 2500 | 4 | White | With two adjustment wheels |
| Sharkoon | UV-LED Fan | 2000 | 3 | Uv | |
| Sunbeam | CCFL LED FAN | 1800 | 4 | With a cold cathode lamp | |
| Sunbeam | Silent Anodized | 1800 | |||
| Sunbeam | Silent LED FAN | 1800 | 4 | Cyan / Red / Green / RGB | |
| Sunbeam | Silent UV | 1800 | 4 | Blue / green / orange | |
| Sunbeam | UV CCFL LED FAN | 1800 | 4 | Cyan / Red / Green / RGB | With a cold cathode lamp |
| Thermaltake | Blue-eye | 2000 | 3+1 | 3x blue, 1x red | |
| Thermaltake | Fireball | 2000 | 3 | Blue / red / green | |
| Thermaltake | Perfect light | 2+2 | 2x blue, 2x red | Flashing fan grill | |
| Thermaltake | Thunderblade | 2000 | 3 | Blue / red / green | |
| Thermaltake | Thunderblade | 2000 | 3 | RGB | |
| Thermaltake | Thunderblade | 2000 | 3 | RGB | Flashing |
| Thermaltake | UFO | 4+2 | 4x blue, 2x white | Flashing | |
| Thypoon | Acrylic Quad | 2500 | 4 | Blue / red / green | |
| Vantec | UV LED Fan | 2900 | 3 | Blue | UV sensitive |
Of course, besides the 80mm backlit fans, there are also 120mm models on the market. Their advantage lies in their lower rotational speed, which nevertheless allows them to pump the same amount of air. This not only reduces the noise level, but also makes the backlight effect more noticeable.
120mm fans range from $ 7 to $ 20, depending on the color and number of LEDs.

Fan rack.
The Antec fan comes in two versions: with and without LEDs. At the same time, in any case, a small control unit is attached to the fan, which allows you to change the rotation speed to low, medium or high. At any speed, the brightness of the LEDs does not change. Antec fan is priced under $ 15.

Antec Tricool RGB fan: truly colorful.

The switch allows you to set the rotation speed.


There is also a 120-mm model in a blue case.
The CMT-ALF-12S fan clearly shows that plastic should not always be used. This model uses an aluminum body, which increases the weight to 280 grams, as opposed to the standard 90 grams. In addition, the light from the LEDs is directed inward. The price of the CMT-ALF-12S starts at $ 19, and with the controller it will cost $ 25.

Metal body instead of plastic.
Two regular 120mm fans with four LEDs.

With a rotation speed of 1200 rpm, the Revoltec LED FAN is very quiet. And the price is only $ 8.

The Sharkoon fan is UV sensitive - and costs less than $ 9.
Review: 120mm Backlit Fan
| Manufacturer | Model | Rpm | Number of LEDs | LED colors | Special functions |
| Antec | LED Fan | 2000 | 3 | Blue / red / green | |
| Antec | LED Fan | 2000 | 3 | RGB | |
| Antec | TriCool LED | 1200 - 2000 | 3 | Blue / red / green | Speed controller |
| Antec | TriCool LED | 1200 - 2000 | 3 | RGB | Speed controller |
| Coolermate | CMT-ALF | 1700 | 4 | Blue | Aluminium case |
| Just cooler | Crystan fan | 2000 | 4 | Blue | |
| Logisys | 120 mm Case Fan | 2400 | 4 | Blue / red / green | |
| Revoltec | LED Fan | 1200 | 4 | Red and blue | |
| Sharkoon | UV-LED Fan | 2000 | 3 | Uv | |
| Sunbeam | Silent Anodized | 1200 | 4 | Blue / red / green / yellow | |
| Sunbeam | Silent LED FAN | 1200 | 4 | Cyan / Red / Green / RGB | |
| Sunbeam | Silent UV | 1200 | 4 | Blue / green / orange | |
| Thermaltake | Thunderblade | 2000 | 3 | Blue / red / green | |
| Thermaltake | Thunderblade | 2000 | 3 | RGB | |
| Thermaltake | Thunderblade | 2000 | 3 | RGB | Flashing |
| Thypoon | Acrylic Quad | 2000 | 4 | Blue / red / green |
Light "sticks": may the Force be with you
Cold Cathode Fluorescent Lamps (CCFL) great for illuminating the insides of your computer. These lamps emit one color, several colors, or nearly ultraviolet light. The length of the "sticks" is 10 cm or 30 cm. For programming and flashing, an additional controller is required, which is usually installed in the expansion bay. Most controllers offer five keys for executing programs that include simple blinking, transitions, and always on. Setting your own program is usually impossible.

Cold cathode lamps come in a variety of colors and are available from a large number of manufacturers.

Boxes from different manufacturers.

Differences in length and color.
Connecting a cold cathode lamp is not very convenient, since each pair of lamps requires its own voltage converter. The devices are not very large, but they still complicate installation. In addition, the second or third transducer will be very difficult to place in a transparent case. Cables can be laid with cable ties, but the transducers will stand out too much. In addition, during installation, you will have to arm yourself with a soldering iron - no adapters for connecting cables to the converter have been released yet.

Conventional voltage converter 85 mm long.

The Sharkoon voltage converter is slightly smaller - it fits easily into the case.
To play the video, you need the latest codec from the site DivX.com .
For small enclosures, mini bulbs are best. They are 10 cm long, available in many colors, and are easy to install in the case, unlike the 20-cm models. A pair of lamps will cost about $ 7.

These small glow sticks have a high level of brightness.

Some fans and motherboards are UV sensitive.

However, the range of UV illumination is limited.

Bottom illumination.

The backlight is clearly visible even during the day.
In addition to fans and cold cathode lamps, you can also decorate the case with mini spotlights that produce one or more colors. Taiwanese manufacturer Sunbeam has gone a step further by connecting tricolor LEDs to a Chameleon controller, which fits into a free 5.25 "bay. Knobs adjust the red, green, or blue intensity of the four connected mini-spotlights. Colors can be individually adjusted, resulting in, for example, magenta (red and blue). The controller is designed for four light sources. If you need more, you will have to install another Chameleon. At the same time, the controller does not work with other light sources.

Chameleon controller box.

The light is very bright.

You can even get white.

Choice of color combinations.

Chameleon controller from Sunbeam.

If you are going to equip your computer with backlighting, then the maximum possible number of effects will not be superfluous. The Lightbus controller allows you to control four channels, providing 625 different effects. Each channel can be configured individually, although free programming is not provided.
As a special function, the controller offers communication with a sound card and a hard disk activity LED. If you turn the corresponding knob, the audio signals will be converted to optical signals. Sound card and hard disk activity signals can be tied to any of the four channels. The four knobs control the brightness of the channels, so LEDs or fans will react differently to Lightbus. We were saddened by the fact that you cannot set the effects programmatically. However, Sunbeam is working on this issue and has already sent a prototype controller to our lab.

Lightbus controller box.

625 lighting effects can be set.

Four backlight power outputs.

Control knobs.

A prototype of the new Lightbus controller.
If the Sunbeam Lightbus controller does not allow you to program your own lighting effects, then the mCubed T-Balancer has no problem with this. The controller channels can be easily programmed using the utility. The controller is supplied as an external module or an internal version, and, in both cases, the same filling is used. The internal version of the T-Balancer looks like a regular PCI card, but it does not connect to the PCI bus - communication is carried out via the USB port. We recommend that you read the separate T-Balancer review on following link.

External USB version of T-Balancer.

Internal card, but no PCI interface.

With this utility, you can program four T-Balancer channels.

The new version of the utility allows you to control the backlight and fans, as well as monitor the state of the PC using temperature sensors.
In the videos below, we were able to show only a small set of T-Balancer capabilities.
To play the video, you need the latest codec from the site DivX.com .
You should always approach the backlight with imagination - you should not push light into the PC case every time. What do all the buildings hold on? That's right - on legs. This is exactly what Sunbeam thought with the Case Chassis legs. You can either replace the existing legs on the Sunbeam model, or simply add them. Now the body will also be highlighted from below. Case Chassis legs can be easily installed on the following cases (according to the manufacturer's information): Thermaltake, Chenming 601, Chenming DX, BX and Office. The retail price is expected to be $ 10, and blue, red and green legs are available.

What it is?

The set consists of four legs.

The backlit legs look pretty.

And the mini PC with legs looks good too.
Having considered several options for motherboards, we settled on a model from Abit. Pay Fatal1ty AA8XE comes with pre-installed LEDs on the back. But once installed, they are difficult to spot unless you are using a transparent case.

Without a housing, the LEDs look good.

Motherboard inside a transparent case.

Aspire power supply glows blue.
The backlight can be used to create impressive masterpieces. In addition to cold cathode lamps, LED fans are gaining popularity today. The latest trend is fans whose LEDs are powered inductively. But for a proper demonstration, you should equip your PC with a transparent case or side window... But it should be remembered that the transparent case does not provide electromagnetic protection.

Our test case.
In some cases, there is a need to make additional highlighting of the work surface. Backlit keyboards can be purchased, but if that option is appropriate.
If the price of such devices does not match the user's capabilities, it is enough to stock up on time and do it yourself. For such a procedure, you will need some knowledge of working with a soldering iron, connecting a diode tape.
Why do you need a backlight on the keyboard?
A backlit computer keyboard is essential for people working at night. Night owls often wonder how to achieve keyboard lighting when blind typing has not been mastered. Also, for some operations it is necessary to look at the keys, which is difficult in case of poor-quality lighting.
Additional illumination is necessary for:
- IT employees;
- gamers;
- night shift dispatchers;
- technical personnel testing on-site equipment with a keyboard connected to the instrument.
Work surface lighting is not only a beautiful fantasy for aesthetic pleasure. The need to see the necessary keys in the complete or partial absence of light requires a similar measure. Taking care of the correct operation can save time, give an acceptable option for interacting with devices.
In some cases, the required keyboard option is difficult to obtain, or not possible at all. Taking an option similar in configuration, it is enough to simply make highlighted keys in it. For such a procedure, you will need some soldering skills and knowledge of the elementary principles of radio electronics.
Required tools
Backlit Keyboards Reviews showcases different backlit keyboard options:
- standard rectangular;
- gaming;
- laptop keyboard;
- wireless counterparts.
To repeat a similar experience, illuminating standard options without additional special effects, certain tools and materials are required:
- LED strip (up to 1 m);
- soldering iron;
- batteries (in the case of a built-in backlight recharge option);
- network cable (about 3 m);
- adapter 2-4-pin to 1-6-pin;
- set of screwdrivers;
- insulating tape;
- switch;
- stationery knife;
- glue (for some variants with changing the keypad);
- a tester for the final check of the performance of all elements of the circuit.
Almost all the required materials at hand can be purchased at any specialized store. This also applies to LED strips for Multi-color backlighting systems.
Backlight power supply
Any illumination option requires a power source. This task remains the # 1 solution for everyone who wants to create additional special effects on the work surface. It is worth considering the resource consumption of the diode element, since most of the recommendations come down to the implementation of a connection to the computer's power supply.
This factory-made backlit gaming keyboard is built on this principle. Since all the elements are already included, they directly take the resource on the internal elements of the computer. This process is resource intensive.
Electronics technicians propose to make a separate output for connecting to the socket of the system filter, or build in an additional power supply to unload the main one. This has its share of truth, as the abundant consumption of energy wears out your computer.
Advantages of using diode tape
Backlit mechanical keyboards are all based on the principle of using an LED strip. This approach was preceded by numerous not entirely successful experiments. The choice of diodes was based on the following requirements:
- compact arrangement inside the keyboard box;
- light weight;
- ease of installation;
- resource consumption;
- convenience when replacing a worn out element;
- requirements for the brightness of the light source;
- resistance to multiple mechanical damage;
- the ability to add additional colors.
The last point is important for the built-in Multi-color system. Gaming keyboards or laptop panels require contrasting backlighting. This is due to the requirements of the orientation of the gamer or tester in the process of work. The areas painted in different light colors allow you to quickly orient yourself and prevent confusion. In addition, LEDs interact harmlessly with computer or laptop systems.
Is any keyboard suitable for transformation?
Any volumetric keyboard can be suitable for transformation. Backlit gaming keyboards in various configurations all have a certain height. The backlight, which is not built on the principle of using the LED, is possible only in the factory. Therefore, for an experimental project, it is necessary to take a device of a certain height.
Experienced electronics technicians for the first experiments on installing a light element are recommended to practice on the mechanical keyboards of the following companies:
- Assus;
- Genius;
- A4tech;
- Gmej;
These keyboards are of sufficient height and simple design. They have a certain margin of safety, since they are designed for the average user.
They can be used to work out many different techniques, including a complete replacement of the key zone with a similar version with transparent inserts. In addition, when compiling several variants into one for decorative effects, their standard configuration allows for similar manipulations.
The backlit wireless keyboard has its own specificity associated with the signaling element. During the addition of such an option with the LED component, the following manipulations must be performed:
- make accurate measurements of all keyboard parameters;
- distribute on the diagram all the mounting points of the LED strip at a sufficient distance from the pulse feed boards;
- choose a reliable place for attaching the battery;
- decide how the backlight will be turned off / on;
- make some changes in the housing for the button output.
The main goal of this process is to install the ribbon without damaging the basic functions of the keyboard. When dismantling the keypad, you must remember the main rule that applies to all other keyboard options:
If you peel off the rubber pads, it will be impossible to reinstall them correctly. There is an additional option for mounting on a transparent backing sheet, but in some sensitive models this will lead to a complete lack of key response when pressed.
Where to get an LED strip?
To solve the question of how to turn on the keyboard backlight, you must have an LED canvas. The standard tape is sold in all hardware stores and markets. If the conditions for developing a project for installing the backlight require any special properties or requirements, analogs can be found through Internet sources.
The standard tape consists of:
- elastic polymer tape;
- a row of diodes connected in series;
- points of exit of elements of connection to power supply;
- separation zone marked with special markings.
In the variants of the tape for the Multi-color system, there are some differences. Diode pairs of different colors are connected in parallel at some distance opposite each other. Otherwise, all points of soldering (attachment) of twisted pair wires have a standard output.
According to the markings, one output point has 5 volts, the other 12 volts. This must be taken into account when connecting the backlight circuit to the connectors. In addition, with the option of connecting the web through a charger, it must be borne in mind that the charger must be transformer, not pulsed.
Turn on the keyboard backlight on the Asus laptop
One of the frequently asked questions is how to turn on the keyboard backlight on an Asus laptop. Since this type of model has a very moderate glow. Some users are not satisfied with the quality of the fluorescent element. However, the machine itself suits in terms of its parameters and quality of work.
To install an LED element, you should immediately decide on the type of lighting. For beginner electronics engineers, it is recommended to make a backlight along the contour. Since this will minimize the possible damage to performance in case of inept installation.
The rules for installing a diode tape require:
- disconnect the battery;
- remove all fasteners (some are submerged, and are hardly noticeable at first glance);
- gently pull out the hard drive;
- dismantle DVD rum;
- release the key panel from the fasteners;
- disconnect the display cable suitable for the motherboard;
- disconnect the loop;
- shoot WLAN.
The LED strip itself must be installed along the free contour of the edge of the keyboard. In this case, take into account the place of attachment of the battery or any battery that is flat enough to be mounted in the case. One of the inconvenient moments of such a process will be the need for a similar dismantling when replacing the feeding element.
# 1 The easiest way to backlight
Attaches the tape to the bottom of the monitor or the inside of the keyboard drawer. This is one of the easiest ways to make a keyboard backlight. This method is suitable for those who are not familiar with the principles of electronics. The installed strip has a simple connection type:
- twisted pair (similar to the Internet connection wire) is soldered to the output points of the internal connection of the diodes;
- connection via a molex-type power connector to the hard drive;
- the connector with the yellow marking is rated for 12 volts;
- the red labeled connector is for 5 volts.
Mounting can be done inside the table top, which gives a bright illumination of the surface of the keys. In this version, a switch can be attached under the surface of the table top, with which you can remove the lighting in the daytime.
Switch fasteners
In various systems, it is important to turn off the backlight when it is not needed. When it comes to standard mechanical keyboards, everything is simple. An additional groove is cut out in the case, where the shutdown button is displayed. Accuracy and aesthetics depend on your diligence.
In models with a more complex structure, this approach has no functional meaning. Since damage to the integrity of the case may affect the operation of the entire apparatus. On laptops, this option is, in principle, not acceptable.
Factory backlit keyboards have dedicated keys to turn off the backlight. Such keys have an additional LED on the case, which does not shine if the backlight is turned off. This principle can be applied to turn off a homemade keyboard backlight LED circuit on a laptop.
Keyboard Key Lighting Principle
The light from the diodes reaches the surface in two ways:
- through the gaps between the keys;
- through the transparent parts of the keys.
Pay attention to this when working with the keyboard. LED backlighting is considered the most optimal and correct. The light source produces an even beam that has a clear dispersion radius. This option is especially well observed if the symbols themselves are illuminated.
On standard keyboards, all buttons are opaque. The situation can be corrected by cutting out the area of the working surface and replacing it with a more progressive one. With such manipulations, it is worth considering the moment of coincidence of the location of the button area.
Also, such a process requires accuracy when processing joints and fitting to the area of the hole. A new panel with keys is glued using specialized glue. It is necessary to carefully monitor the joints so that the structure is taken tightly. In any case, the light supplied by the diode is reflected from the hands, creating additional illumination of the panel.
No. 2 Installation of LEDs in the body of the keyboard 760
Before installing the backlight strips, you need to draw up a diagram of all the exit points of additional elements. This applies to:
- switch;
- wires to the power supply;
- connection of the console system for Multi-color.
Thus, the diagram must necessarily include:
- exit points for additional wires;
- location of rubber key pads;
- points of internal fasteners of all wiring, connections.
Since all the planks are connected in one knot, a thoughtful plan is needed for laying this part. So that its volume does not interfere with the installation of the panel with keys.
DIY keyboard backlighting requires some care. When installing the tape, the first task is to dismantle the housing. All fasteners must be carefully disconnected, paying attention to the possible outputs of the various connectors.
In the case of a solid panel of keys, it makes sense to melt the holes for the output of the diodes with a soldering iron. For such a manipulation, it will be necessary to accurately calculate the location of the diode along the guide and the places where the keys are attached. It makes sense to attach the connected wire to the beginning of the circuit with adhesive tape to the main wires of the keyboard for greater ease of use.
A connector adapter for the power supply wires of the diode tape is mounted on the wire. We connect it directly to the power source. The backlight off button can be inserted into the exit of the boards by breaking one strip.
Multi-color rainbow backlighting for ordinary keyboard
The multicolor backlighting system is based on the use of RGB diode strip. For this option you will need:
- keyboard with transparent key symbols;
- RGB diode tape;
- RGB controller rated for 12v;
- power unit;
- control panel for switching modes;
- power connector;
- signal receiving sensor.
The ribbons are dismissed into the required lengths. They are attached in a well-defined place under the keys. Connected in parallel, connected to the controller. Additionally, the remote control signal receiving sensor is displayed. A groove is cut out in the case to bring out the power supply connector. When the final preparations are made, the body is assembled.
 Simple tips on how to test a transformer with a multimeter for operability
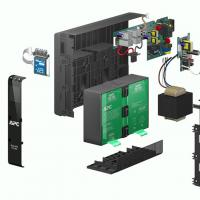 Repair of uninterruptible power supplies Commercial proposal for the repair of an uninterruptible power supply
 Do-it-yourself UPS repair: wizard's advice Repair of apc uninterruptible power supplies
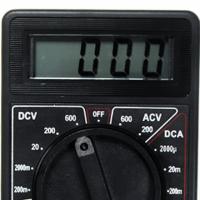 Repair of a multimeter m 830b does not show an ohmmeter
 Programs for drawing electrical circuits
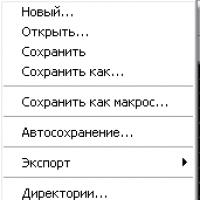 Drawing boards in Sprint-Layout correctly from the first steps
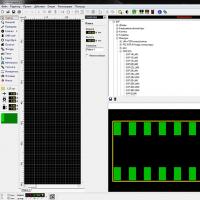 What program can open the file