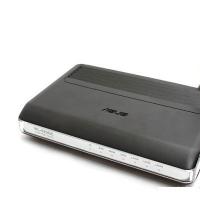
Asus router setting up wifi home network. Setting up the ASUS RT N10P router - detailed instructions. Installing router firmware updates
DIY ASUS model WL-520GC. The configuration of most devices of this class from this manufacturer is no different. Therefore, this guide applies to other models as well. There should not be any special problems with the software layout of such devices.
Here is a list of all external communications of this device:
- 4 RJ 45 ports for organizing a local network over wires.
- Universal USB port for connecting a printer.
- Round connector for supplying voltage from the power supply.
- RJ 45 input connector for communication with an external network segment.
- Mounting location for installing the antenna.
The front panel has the following indications:
- Power (PWR LED).
- Indication of operation of the air segment of the network (AIR LED).
- Indicator of data exchange between local and (WAN indicator).
- 4 indicators for the operation of local wired network ports.
Before setting up the WL-520GC models, you need to familiarize yourself with the location of the following buttons on the back:
- Setup button - EZ Setup.
- Reset button - Reset.
- Power supply button.
We perform all device switching. To do this, connect the power supply wire to the appropriate place. Next, install it into the outlet. Then the external network wire is connected to the seat on the back side. At the final stage of connection, a computer (laptop) is connected to the router.

First, before setting up the ASUS router, you must perform the following manipulations in the toolbar (this will significantly simplify and speed up the configuration process; the sequence is valid for the Windows 7 operating system.
- Click the “Start” menu and select the “Control Panel” sub-item.
- Next, you need to reconfigure its appearance to “small icons” by clicking the corresponding button on the toolbar.
- Select “Network and Sharing Center”.
- Go to the “Change adapter settings” tab.
- Open the adapter shortcut and select “Properties”.
- In the window that opens, remove support for IP protocol version 6 and be sure to install support for version 4.
- Next, double-click with the left mouse button on the line of the 4th version and in the window that appears, set the automatic acquisition of an IP address and DNS server.
- Accept the changes.
- Disable the connection by right-clicking and then enable it in the same way.

Power is supplied to the ASUS network device. The router should boot. After the download is complete, launch any browser that is installed on the PC. Enter the address 192.168.1.1 into it. A window will appear asking for your login and password. They are usually indicated in the user manual, and the most common option is the username and password “admin”. Next, in the process of setting up an ASUS router, go to the menu item and select “WAN & LAN”. Then we set the “WAN Connection Type” parameters: the value “PPTP” and “Choose WAN Bridge Port” should be “NONE”. Then we set the parameters of the address, DNS server, encryption and access (this information is provided by the provider). Then go to "Wireless" and select "Interface". Here the name of the future network is entered, the encryption method is selected, and the security key is indicated. Then you need to save the changes and exit the browser.
The article shows the ASUS modification WL-520GC. The complete sequence of actions when performing this procedure is shown: starting with a visual inspection of the case and ending with setting the software parameters. This algorithm is valid for all devices of this manufacturer, it can be used everywhere.
The Asus RT-N 12 router is a standard device with average characteristics, which should be sufficient to meet the needs of users. The presented model is compatible with IPTV, but setting up iptv on an asus router can only be done at the standard level: a port is allocated for this, but traffic is not recorded. Wi-Fi is fully supported by 802.11n, which, under ideal conditions, allows you to overclock the Internet to 300 Mbit. But in reality, of course, the speed is several times lower, although this is enough.
So how's Asus? Let's figure it out.
Setting up the router
The IP address on the network for the presented device is the most common - 192.168.1.1. To see the web interface, you need to enter the following into the browser line: http://192.168.1.1. It looks something like this:Figure 1. Interface
The user name and password are standard – admin, admin. After the first login, the “Setup Wizard” will be displayed. The tool is useful for beginners as it allows you to configure the router in simple conditions. After clicking the “Next” button, an attempt will be made to automatically select the connection type. If unsuccessful, the device will give you the choice.
When setting up an asus rt router, L2TP is selected for Beeline, and PPPoE is selected for Rostelecom and other providers of a similar type. Click “Next”.
Advanced setup
How to set up a wifi router asus rt nt12 yourself without a program?If the default language is English, then change it:

Figure 2. Changing the interface language
Below you will find the settings for currently popular Russian providers.
These include:
- Rostelecom;
- Dom.ru;
- Beeline.
Setting up PPPoE for Rostelecom
In the additional settings section, you need to select the “WAN” subsection:
Figure 3. Select WAN
We use the parameters specified as follows:
- Type of WAN – connections – select PPPoE;
- Digital television receiver (IPTV STB parameter) – you should select exactly the port where the STB device is connected;
- UPnP – connect;
- Obtain an IP address offline – enable;
- DNS – server – enable offline retrieval;
- Login – information specified on the card or in the agreement concluded with the provider;
- Password – provided by the provider;
VPN L2TP on Beeline
How to configure the Asus RT N12 router to work with Beeline?- WAN – connection – L2TP;
- Port selection – where the device is connected;
- UPnP – enable;
- Automatic WAN acquisition – enable;
- Offline DNS server – enable;
- Login and password - the latter is issued by the provider, and the login is the phone number itself;
- L2TP server – resource tp.internet.beeline.ru.
Opening the port
In the additional settings section, go to “WAN” and click on the virtual server subsection:
Figure 4. Virtual server
We enable the “Virtual Server” service, that is, set it to “Yes”.
Fill in the service name line. Here you need to write the name of the program or application for which the port is opened.
In the “Port range” value we enter the one that opens for the application. The same is indicated in the value of the local port.
In the local IP address line, enter the value of the personal computer for which it will be registered.
Confirm and apply the settings.
Setting up Wi-Fi
Setting up wifi is quite simple. How to set it up correctly? Let's go to the additional section. settings and in the wireless network subsection.
Figure 5. Wi-Fi setup
Step-by-step instructions for setting up the Asus RT N12 lx router to work with a wireless network:
- "SSID". In this field we write the name (identifier) of the network. It can be absolutely anything;
- "Verification Method". Select the “WPA2-Personal” option;
- "WPA Preshared Key". The Wi-Fi password is entered here. This can be either a letter or number combination. But the main rule is at least 8 characters.
Reset
How to configure the Asus RT N12 wifi router to reset settings? It is worth noting that this procedure is optional and is used if the user is unable to connect to his personal account due to hacking or intentional modification of identification data.A router, also called a router, is a necessary device for accessing the Internet. The easiest way to connect and configure it is to follow the instructions that came with the current model upon purchase. If it is lost or for some reason inaccessible, we will describe in detail how it works with a typical device from Asus.
Turning on the Asus router
Despite the fact that we will consider the connection using specific examples (router model - Asus RT-N10, providers Beeline and Rostelecom), for other routers and operators it is easy to act by analogy. If you encounter any error when using the router for the first time, double-check whether its elements are correctly connected to the computer and the network.
- A standard router (in our case, Asus RT-N10) requires connecting at least 3 wires - power, provider cable and “cord” leading to the PC. If in the first case everything is clear - we simply plug the power supply into the socket, then it is important not to forget the other two connectors and not to confuse them. The provider's cable socket is usually marked with an image hinting at Internet access (globe, WAN, etc.). The connectors leading to the PC are grouped together, marked in a different color and numbered. You can choose any Lan port, the main thing is to remember its number, just in case.
- If the indicators on the surface of the router do not light up, check whether the “Power” button is pressed, turning the device on/off.
Before setting up via the web interface, it’s worth doing some preparatory testing on your computer:
- if you previously had access to the Internet on your PC, turn it off and use the one that appears during the setup process for this router;
- press the “Win + R” buttons, enter the command ncpa.cpl;
- A window with Internet connections will appear - right-click on the local one, which is installed with the router;
- from the context menu select “Properties”;
- in the new window, under the line “Components used by this connection”, select “Protocol version 4”;
- click on it, under the window click the “Properties” button;
- the connection parameters should indicate that IP and DNS are obtained “automatically”.
Setting up an Asus router via the web interface
When the preliminary manipulations are completed, we move on to the final stage of the process:
- launch any browser;
- write in the address line 192.168.1.1;
- we will be greeted by an authorization window asking for a login and password;
- enter admin\admin into the fields (if it doesn’t work, reset the preset password using the reset button on the router);
- in the menu, select the “WAN” section and enter the parameters indicated in the attached video (connection to Beeline is considered, for other providers - contact technical support or check in the concluded contract);
- After clicking the “Apply” button, the router should establish a connection to the Internet and open sites without problems.


For the router to start distributing WiFi, select the “Wireless Network” section in the web interface menu, fill in the items SSID (network name), authentication – WPA2-Personal, WPA key – your password.
Setting up an Asus router is a fairly simple process that does not cause any difficulties. However, to avoid problems, you still need to adhere to a certain algorithm. These instructions are universal for all routers from this manufacturer.
Knowing how to connect and configure this device gives the user a lot of options. He will be able not only to use the router, but also to enter all the necessary information. This could be changing personal data, setting up the Internet, or the ability to change settings.
Connection and configuration follow a simple scheme:
- The user connects the router and then goes into the settings.
- ASUS provides quick setup with special features.
- If it is impossible to configure through the wizard, you can contact your WAN provider.
- Enter personal data, set a password and change your name if necessary.
- A change of the pin code.

To configure your router, you will need additional information. The user needs to know what type of connection the provider uses. If he uses PPTP or L2TP, information about personal data will be needed. To get all the necessary data, just contact your provider.
How to quickly connect and configure

Important! There are cases when the network is called differently. Sometimes it is password protected. This is an indicator that another user has already attempted to configure the ASUS. Therefore, it is recommended to reset all settings before proceeding. To do this, you need to press the button located on the back of the device and do not release it for 10-15 seconds. After this time, the indicators will go out and the router will turn on again.
Go to the control panel
After a successful connection, the user needs to open the browser that he usually uses.
- In the address bar you need to write the following: 192.168.1.1. If everything is done correctly, the settings will open immediately. The “Welcome to ASUS” window will appear. At the bottom of the screen there will be a “Go” button.

- After clicking, you will be prompted to write a password that will help protect your device settings. Experts advise paying close attention to the reliability of the data you enter; the password should be difficult to crack. It is better to write down all the necessary data on a piece of paper so that there are no problems with logging in in the future. Tips “Weak”, “Reliable”, “Very reliable” will pop up in the window. It is recommended to use a combination of uppercase and lowercase letters in your password, combined with numbers.

- Clicking “Next” will bring up the “Wireless Network Settings” window. You must specify a unique network name; you can also use the SSID (wireless network identifier). It is important to fill out the “Network Key” field, in which you specify a strong password for the connection. It should not duplicate the password set for the router. This data will be needed to identify the user’s wireless network; it is also recommended to write it down on a piece of paper.

- You will have to wait for some time, the router must reboot. Now a window will appear with the name that was specified earlier. You need to click on the “Connect” button and enter the password. It is recommended to check the box next to “Connect automatically”.

- As soon as the connection is made, you need to return to “Quick Internet setup”, “Router settings” item. All necessary connection information will be displayed there. The user must click Next.

- The “Sign In” window will appear. You need to specify the data that was previously specified in the settings. By clicking the “Login” button, the user will successfully complete the process of connecting and setting up the router.

On a note! Often the entire process runs smoothly when the ISP uses an automatic IP address. The device configures everything itself. But L2TP, PPPoE and PPTP involve a longer connection process. There is nothing complicated in the actions, but the user will need to enter a number of data manually.
Setting up a router for other connection types
In this case, after checking the connection, the “Select the type of WAN connection provided by your Internet service provider” window will appear. This indicator will need to be selected manually:
- PPPoE;
- PPTR;
- L2TP.

On this tab you can view the basic settings, WAN IP address settings, WAN DNS settings and change them if necessary. At this stage, the connection and configuration of the ASUS router ends.
Important Settings
These tasks are simple to perform, but no less important. To change the name of the wireless network, you need to:

Important! Once the user changes the password or name, they will need to connect their devices to Wi-Fi again. If problems occur, it is recommended to delete the network and perform all connection steps again.
An important point is to protect your router settings. If you need to enter a new password or replace an old one, you need to:

Now only these specified data will be used for login.
Video - Setting up the router (router) Asus RT-N12+
Hello! Since I myself use an ASUS laptop, I decided to write a separate article about turning on Wi-Fi on an ASUS laptop and connecting to a wireless network. This is a very popular topic. As a rule, when it first becomes necessary to connect a laptop to a Wi-Fi network, users have a lot of questions: “where to turn on this Wi-Fi,” “where to find it on an Asus laptop,” “how to connect to a wireless network,” etc. d. In addition, many problems and errors may arise. Both during the process of turning on the wireless module and during the process of connecting to the network.
We have a task: connect an ASUS laptop to a Wi-Fi network. And here it is important to understand that the decision depends largely not on the laptop itself (manufacturer's company), or a specific model, but on the operating system installed on the laptop. Now the most popular are Windows 10, Windows 8, and Windows 7. I think that there is no point in considering Windows XP. Yes, this system is still used now, but everything has been set up there for a long time. And I don't have XP installed.
We will do everything according to this scheme:
- First, I'll show you how to connect your laptop to Wi-Fi. Most likely, you already have everything turned on and configured there. And there is no need to burden yourself with some buttons and settings.
- Next I’ll show you how to enable Wi-Fi on an ASUS laptop. This step will come in handy if you are unable to connect in the usual way. We will enable it using a keyboard shortcut, and without using the Fn key.
I will try to show everything using the example of Windows 10 and Windows 7. Most of the settings and actions will be similar. My laptop is ASUS K56CM (not the newest). But the article should be suitable for all models, including: X553M, X55a, X54H, N61VG, X751M and others.
Connecting an Asus laptop to a Wi-Fi network
Ideally, the Internet connection status should be like this (provided that there is no network cable connected to the laptop):
This star-shaped icon indicates that the laptop sees wireless networks available for connection and is ready to connect to them. If you have a different status, see the article below. To connect, just click on this icon, select the desired network, click the connect button, enter the password (if the network is secure), and you're done.

This is how the connection goes when everything is configured and turned on. Of course, type errors may occur, but that's another story. Ideally, everything goes as I showed above. It's very cool if everything worked out for you. Next, I will show you what to do if the Wi-Fi adapter in your laptop works, the driver is installed on it, but for some reason it is disabled.
There may also be a connection icon in the form of an antenna with a red cross (no connections available):
![]()
In this case, see the solutions in the following articles:
- For Windows 7 –
- For Windows 10 –
Turn on the Wi-Fi adapter on the ASUS laptop
If the connection icon on the notification panel does not in any way resemble a wireless network, but looks like a computer with a cross, then most likely the wireless module on the laptop is disabled or does not work at all (most often due to an uninstalled driver). Let's figure it out now.

I immediately advise you to go to the "Device Manager" and see if the "Wireless" adapter is there. If it is not there, then there is no point in torturing the laptop and yourself. You need to install drivers. If the adapter is not in the device manager, then there is no way to enable it. And it doesn’t matter what kind of laptop you have, Asus or another.
It's very easy to check. In Windows 7, open Start and start typing “manager...” in the search bar. Launch Device Manager. On Windows 10 it’s exactly the same, only there is a search button next to the Start button.
In Device Manager, open the “Network Adapters” tab and look. If you have an adapter there whose name includes “Wi-Fi”, “Wireless” “802.11 b/g/n”, then everything is OK. Let's look at the article further and try to enable it. Since you are already in the device manager, try right-clicking on the adapter. If there is an “Engage” item in the menu, then click on it. Perhaps after this Wi-Fi will work. You can tell by the icon in the notification bar (if there is no network cable connected to the laptop!).

If there is no such adapter, there is only one (network card), then this most likely indicates that the Wireless adapter driver is not installed. Previously, I had already prepared an article in which I showed how to install the Wi-Fi driver on ASUS laptops:. The instructions are very detailed. After installing the driver everything should work.
And we continue. What to do if you have an adapter, but there is no way to connect to a wireless network.
Turn on Wi-Fi using a switch or a combination of buttons on the keyboard
It seems to me that ASUS no longer makes separate mechanical switches to enable/disable wireless modules. But on older laptops they may be. If you have an older model, then look for such a switch on the laptop case.
Typically, a keyboard shortcut is used for these tasks. Key Fn with a key from a row "F". But on ASUS laptops, most often this is Fn+F2. An antenna is drawn on the F2 key. This is what it looks like on my laptop:

If after pressing the key combination there is no result, then I advise you to press it once and restart the laptop.
Trying to turn on Wi-Fi on an ASUS laptop without the Fn key
It doesn't matter what Windows you have installed. Right-click on the Internet connection icon and select "Network and Sharing Center." Next, go to “Change adapter settings”.

There should be "Wireless Network Connection". Or “Wireless Network” - in Windows 10. If this connection has a “Disabled” status, then right-click on it and select “Enable”.

In Windows 10, the wireless network can also be disabled with the "Wi-Fi" button:

All these tips should definitely help you. If you encounter a situation that is not described in this article, or the solutions described above do not help, then write in detail about your case in the comments. Write the ASUS laptop model and what problem you encountered while connecting to the Wi-Fi network.
A few more articles on this topic that may be useful to you:
- Solving various problems with connecting to a wireless Wi-Fi network -
- A separate article on solving problems with Wi-Fi in Windows 10 –
I hope I didn’t waste my time and that my article was useful to you. Write about it in the comments. Best wishes!
 Setting up the ASUS RT N10P router - detailed instructions
 Computer settings do not open - Windows 10 treatment does not go into settings
 Changing hard drive partitions using Acronis Disk Director How to partition a hard drive with Acronis
 How to remove a second Windows operating system from your computer
 How to reinstall Windows on an Asus laptop?
 Free virtual router for distributing wi-fi from any computer
 Virtual reality glasses