Program virtual router wifi windows 8. Free virtual router for distributing wi-fi from any computer. What's new in this version
To distribute Wi-Fi, just download Virtual Router Plus in Russian and install it as an Internet distributor. Download and try the stable version of this program.
Do you only have a cable connection to the Internet, but still want to use a smartphone or tablet in addition? Now this problem can be easily solved. By installing a small utility called Virtual Router Plus on your laptop, you can create a full-fledged Wi-Fi access point, which is no different from that provided by a regular router.
Virtual Router Plus download in Russian
All you need to do in order to enjoy wireless Internet without any problems is to install the above-mentioned application on your laptop and, immediately after launching, perform simple settings. Namely, in the appropriate fields, indicate the login and password for subsequent connection to the newly created access point.
Thus, having Virtual Router Plus among the list of installed programs on your device, you can provide yourself and your friends with high-quality wireless Internet at any time. And most importantly, you will get all these privileges absolutely free, since the utility is freely distributed and does not have a paid license.
If Virtual Router Plus is not suitable for your purposes, then you can go to the "" section of our website and select other, more suitable applications there, for example -.
A virtual router plus will allow you to distribute the Internet using an access point on a computer or laptop. Use the free, latest version of the program in Russian to distribute Wi-Fi.
Png" data-category="Programs for WiFi distribution" data-promo="https://ubar-pro4.ru/promo/bnr/download3..html" target="_blank">Download Virtual Router Plus
| Standard installer |
For free! | ||||
|---|---|---|---|---|---|
| check | Official distribution Download Virtual Router Plus | check | |||
| close | Silent installation without dialog boxes | check | |||
| close | Recommendations for installing the necessary programs | check | |||
| close | Batch installation of multiple programs | check | |||
There is an urgent need for high-quality Internet connection. Cellular operators do not always guarantee high speed and quality, which cannot be said about Wi-Fi. If you consider that using a home network will be cheaper, then having a router becomes almost mandatory.
The laptop can both receive a Wi-Fi signal and distribute it to other devices
But if for some reason there is no router or purchasing one is not practical, its functions can easily be replaced using a laptop with Windows 8/8.1. Read our review to learn how to turn it into an access point.
How to distribute Wi-Fi using Windows functionality
A laptop with Wi-Fi and Windows 8 (8.1) installed is suitable for this purpose. Absolutely all current models are equipped with it. It is possible to deploy an access point using the OS in a matter of minutes.
- Turn on the Wi-Fi adapter on your laptop and double-check the availability of drivers for it. It is activated by a combination of Fn and F1–F12 (depending on the manufacturer). You can also click on the network icon in the system tray and activate the “Wireless Networks” slider. In the Device Manager subsection “Network adapters” the name of the communication module should be presented. If there is an exclamation mark next to the name, it means the module is not active. Right-click Enable. If you see an exclamation mark with a yellow triangle next to the name, you need to install the driver. Download it from the laptop manufacturer's website.
- Connect your laptop to the Internet using a network cable, 3G/4G or ADSL modem. The Windows 8.1 system tray should show an active connection.
- Make sure that the “WLAN Auto Configuration Service” and “Internet Connection Sharing (ICS)” are running. Click Win+X - Control Panel - Administrative Tools - Services. Make sure that autorun is selected in the settings.

- Enter the command line using one of the following methods:
- Win+X - Command line (administrator).
- Win+R - cmd.
- Enter the Windows start screen, go to the applications menu, find “Command Prompt”, right-click, activate “Run as administrator”.
- Make sure that the wireless module is ready to distribute the Internet as a Wi-Fi access point. On the command line type netsh wlan show drivers. Find "Hosted Network Support". If the entry says “Yes,” then we move on to the next step.
- Add a command netsh wlan set hostednetwork mode=allow ssid=Your_network key=123456789 keyusage=persistent to implement a virtual access point.

- SSID is the name of your connection, you can call it whatever you want. The main thing is that there are no Russian characters in the name.
- Key - network password, you can also change it to your own. Moreover, it must contain at least eight characters, without Russian characters.
- Activate the educated network. Type the command netshwlanstarthostednetwork. The access point has started, distribution has begun. You can check its availability, for example, on your tablet or phone. Your name will appear among the available networks.
- Allow network members to receive Internet:
- In the Network and Sharing Center (in the system tray, right-click on the Internet symbol) go to “Change adapter settings.”
- Find “Local Area Connection* 1” (number may vary).
- Right-click on the connection you used to share Wi-Fi, then go to “Properties” and switch to the “Access” tab.
- Check "Allow other users to use this computer's Internet connection" and check the new Wi-Fi connection in the list of home networks.
Now the equipment will be able to receive the Internet from the newly formed access point. To control the operation of the virtual router, enter in the laptop command line netshwlanshowhostednetwork, so you can check the number of connected devices. The connection is stopped using the command netshwlanstophostednetwork. The only drawback is the need to write start and stop commands when connecting. Therefore, we recommend saving them, for example, in a text file. Now a laptop running Windows 8.1 can easily become a source of wireless Internet.
Use of third party programs
If constantly using the command line does not suit you or you want to run everything with two mouse clicks, special programs that make it easier to distribute the Internet from a laptop running Windows 8.1 will help.
Connectify Hotspot. A popular program that distributes Wi-Fi without unnecessary operations. It is enough to launch the program, define the connection for sharing, set a password and launch. Often, the free version is quite sufficient, although one of its tangible limitations may be the lack of an Internet distribution function from a 3G/4G modem, which can cause inconvenience during business trips. We will not consider the inability to change the connection name as a critical drawback.

MyPublicWifi. A free program for sharing Wi-Fi between devices, it can function as an access point or repeater. Supports all latest versions of Windows, including 8.1. Launch it, come up with a network name, password, select the network for distribution and click “Start”. A few movements - and the access point in the laptop is launched.
Conclusion
We looked at all the methods by which you can distribute the Internet via the Wi-Fi adapter of a laptop running Windows 8/8.1. It's really not difficult at all and takes a few minutes.
Write in the comments if you managed to follow all the recommendations? Has the access point started? We'll be glad to read you.
You can quickly and correctly set up, thereby obtaining a full-fledged Wi-Fi network between any devices, using special software, which will allow you to do this quickly enough, without delving into the intricacies of the process itself.
It is known that under normal conditions, in order for a wireless Wi-Fi network to work between laptops, we also need a wireless router. A virtual router helps you avoid buying a real router and build a network between laptops, one of which will act as a distributor in the network (Wi-Fi Hot Spot).
At the very beginning, we will need these same programs to automatically install and configure a Wi-Fi wireless network. There are several similar ones, but in this article we will consider one of them - the simplest.
Preparing to install a virtual router (router) on a laptop
Download the free program “Virtual Router” (Virtual Router - Wifi Hot Spot for Windows 8, Windows 7 and 2008 R2) from the developer’s website http://virtualrouter.codeplex.com.
To download the Virtual Router program directly, click on the picture just below Download.
I would like to note that by installing a virtual wireless router (router) on one of the laptops and having configured it, we will automatically get a ready-made Wi-Fi network between:
- our laptop and any other laptop;
- laptop and computer (if it has a Wi-Fi card);
- laptop and smartphone with any OS (Android, iPhone (tablet).
Beginning of work
So, since the whole process boils down to using a special program to turn a laptop into a Wi-Fi access point, to which you can easily connect several devices - another laptop, computer, smartphone (Android, iPhone, Windows Phone), tablet, then , all that is needed is a laptop, correctly configured, with drivers installed and a simple but effective working one. I would like to warn you that some antiviruses may interfere with the correct operation of this program - be careful!
The last item on the list of required software will be the same utility for automatically creating a Wi-Fi router on a laptop.
Installing a virtual router
We perform the installation on a laptop, which we plan to use as a wireless network broadcaster. Installing the application itself is simple and without any special features.

Set all settings to default. Once the program installation is complete, if you look in the Windows Device Manager, a new device will appear: Microsoft Virtual Wi-Fi miniport adapter.

It is this that will act as a virtual router on our laptop (computer). If the device does not appear, you will need to find and download, then install the “native” drivers for the Wi-Fi adapter on your laptop. Otherwise the program will not work correctly!
Setting up a virtual router
Immediately after installation, the initial program setup window appears.

Change the network name (SSID) to the required one.

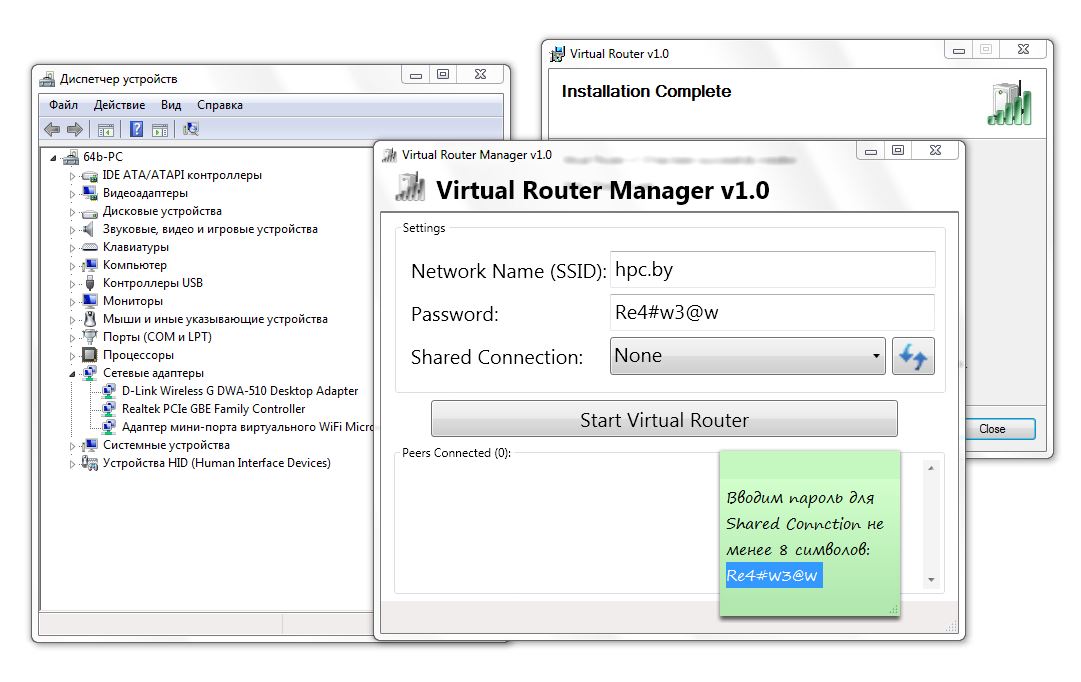
“Share” (make available) access to the Internet - select the connection type from the program’s drop-down menu. 

Click the start button Start Virtual Router. The laptop should start broadcasting a network with a given name (SSID) and Internet access, which will be provided via a network cable connected to our provider’s ADSL modem. 
Automatic configuration and installation of a wireless network between laptops is completed
In our case, the program will automatically create a wireless router with minimal understanding of the process itself.
Thus, we created a wireless access point - a virtual router based on the network adapter of our laptop. We check the functionality of the created network by opening the network search in the smartphone - a new network with our name should appear in the available networks - SSID. It is to this that you need to connect any existing wireless device (smartphone, other laptop, tablet) in order to gain access to the Internet via a laptop connected to the global web via a regular network cable. At the same time, on another laptop that we will connect - there is no need to configure or change anything in the parameters - the network should distribute network parameters automatically.
I would like to remind you once again: sometimes antivirus programs block the operation of software of this kind - in our case, it was necessary to disable the free Avast Antivisus for Wi-Fi to start working correctly. Therefore, it is better to turn on the anti-virus program after all the settings and checking the network’s functionality.
When we were expecting a new addition to the family of gadgets (a children's tablet joined us), we decided not to provide it with its own card for connecting to the network. But we also saved on buying a WiFi router: we decided to make full use of the capabilities of unlimited home Internet and a laptop with a Wi-Fi module. In this article I will tell you what a Windows 8 WiFi virtual router is and how to install it.
Access point from a virtual wi-fi router: what are the requirements?
To make an access point from a virtual Wi-Fi router using these instructions, your device must meet the following requirements:
- WiFi module;
- Installed OS Windows7, 8 or 8 R2;
- Stable and secure Internet connection via wired network or 3G/4G.
As a rule, the latest laptop models are perfect for this role. Have you chosen the right one from the available range of devices? Let's learn how to choose and download a virtual wifi router for Windows.
Virtual router for Windows 8: select a program
A virtual router for Windows 8 cannot be called a complex program with a variety of functions and custom settings. However, there are several options:
- Virtual WiFi router for Windows 7 is the most common program for creating a virtual router. Minimum settings, simple and intuitive interface. The safest way to download Virtual WiFi router for Windows is from the program’s official website.
- Virtual Router Plus for Windows 7, 8, 8 R2 and 2012. The program is very popular among our compatriots due to the presence of a Russian interface. Otherwise, it is no different from analogues;
- Virtual router for Windows 7, 8 and 8 R2. Convenient and easy to install program. You can download Virtual router for Windows on the official website;
- WiFi Hotspot Creator is suitable for Windows XP and subsequent OS versions. One of the advantages is that already at the setup stage you can specify the maximum number of users of the access point. A good option if you are afraid of unscrupulous neighbors and password brute force.
Download and install Virtual router for Windows
I will not describe the installation process for each program, since it is similar. I’ll give an example of installing a virtual router for Windows 8, and you can easily figure out the rest.
- Download the Russian version of Virtual Router from the website and install it. After the process is completed, click “Close”;
- A window for setting up an access point from a virtual Wi-Fi router will appear on the screen. Fill in the required data:
- The line “Network Name SSID” is the name of your access point;
- “Password” – password for the access point. We come up with a password of at least 8 characters with a combination of Latin letters and numbers, if we do not want our connection to be shared by several other neighboring devices;
- “Shared Connection” - select an Internet connection from the list, which we will distribute to other devices.
- Have you made the initial settings? Click “Start Virtual Router”.
Access point from a virtual Wi-Fi router: working
Then everything is traditional: on your tablet or smartphone, turn on the search for wireless networks. A new network with the entered SSID should appear in the list - select it. Enter the password and take advantage of all the benefits of working with a full Wi-Fi connection.
To download My WiFi Router, follow the simple instructions.
- To start downloading the installation file, click on the blue “Download from server” button located just above.
- After which, the server will prepare and check the installation file for viruses.
- If the file is not infected and everything is fine with it, a gray “Download” button will appear.
- By clicking on the “Download” button, the file will begin downloading to your computer.
We do not ask you to go through a tedious registration process or send any SMS for confirmation. Just download and enjoy for your health =)
How to install My WiFi Router for Windows 8
To install the program, follow simple instructions that apply to most programs.
- Launch the downloaded file by double-clicking on it. All installation files are taken from the official websites of the developers.The last update date of the My WiFi Router version 3.0.64 file was January 10, 2017 at 15:57.
- In the window that appears, accept the license agreement. You can also read the license agreement on the official website of the program developer.
- Select the required components you want to install. Uncheck the boxes that may be selected to install additional programs.
- Select the folder on your computer where you want to install the program. In most cases, the program automatically selects a folder, for example in Windows it is C:\Program Files\
- Finally, the program installation manager may suggest creating a “Desktop Shortcut” or “Start Menu Folder.”
- After which the installation process will begin. After completion, the installation manager may ask you to restart the computer for the program to work more correctly.
 Popular tablets of the year
 How to remove a second Windows operating system from your computer
 How to reinstall Windows on an Asus laptop?
 My system of working with information Methods of working with information
 Steam Wallet or Gift Card Code
 How to translate the engineering menu into Russian
 Firmware update Highscreen Black Box Radar-HD Firmware 5