Recovering deleted files from a flash drive using R-studio. Recovering deleted files using R-Studio
Or the data from the recycle bin is deleted, excessive anxiety may begin due to the fact that, along with unclaimed DLLs, INI files, remnants of long-deleted programs and other garbage, valuable photos, important documents or files with a list of logins and passwords for logging into all the services you use (email accounts, file sharing services, cloud storage, trackers, web wallets, etc.). But there is no need to sound the alarm ahead of time - if “broken” sectors appear or one of the entire file partitions “flies off”, there is a high probability that everything lost can be returned if proper timely measures are taken. In today's tutorial we will tell you how to recover information from a hard drive using a popular specialized application capable of reincarnating deleted data called R-Studio.
But first, a little theory. How is it possible that erased information can be restored? After all, it’s as if it’s no longer on the disk, so where is it stored all this time? Actually this is not true. When deleting data from a hard drive, it is not physically destroyed; only its description with a label about the logical partition and clusters where it is stored is erased. Until the user writes new data to the same cells, deleted files can still be recovered by running one of the appropriate system applications. This is what we will do today.
There are a lot of programs available on the software market that can recover information from a hard drive. This operation is carried out by scanning the internal structure of the hard drive with a fixed depth. In this case, the search for hidden data is carried out not only in the file table, but also in boot records. The corresponding subtypes of file objects in the programs below are identified by individual headers. Some of the faulty objects can only be partially reincarnated. Moreover, it may happen that during the recovery procedure the location of the files and their names are lost.
Critical Note: if, before restoring information from a hard drive, you decide to resort to the services of one of the appropriate programs, you should definitely prepare a sufficient amount of free internal (local) or external (on a connected USB HDD or capacious flash drive) space on the disk drive , so that data recovery is carried out there. If those files that can be recovered are written to the same logical partition from which the recovery is carried out, this will lead to the fact that information about deleted objects will be instantly overwritten, and only grains of lost content will be restored.
How to recover information from a hard drive using R-Studio?
R-Studio– one of the most powerful, functional and useful programs in its field. Among other applications designed to perform similar tasks, R-Studio is rightfully considered one of the best in its class, and for good reason. The utility supports almost all file systems, without exception, used today in application operating systems: Ext2FS, UFS, NTFS, HFS/HFS+, FAT, etc. The application is able to interact with both portable and local storage devices: network sources, USB flash drives, external HDDs, DVDs/CDs.
How does the recovery technique itself work in this program? When loading the complex, a form appears on the screen with a choice of disks that need to be analyzed for the presence of residual files. Select the logical device and click the “Scan” button on the top panel.
To view the contents of a disk, taking into account the presence of deleted files on it, select the corresponding disk in the main working window and click the “Show disk contents” button. In this case, identification of deleted objects will be much faster, since the disk structure will not be scanned, and information about the contents of the device will be obtained based on titles and descriptions stored in system areas.

So, suppose we decide to scan the structure of the disk contents and extract from it the remaining file objects located in remote sectors. What options does R-Studio offer us for this?
When you press the “Scan” button, the scanning settings form appears on the display. What can you indicate here?
At the top of the window, the developers offer us to set the area on the disk to scan, i.e. starting from which byte the program will check system sectors. By default, a null byte is offered, i.e. from the very first cluster. Based on the Disk Size field, you can get information about how many total bytes or sectors your selected logical device contains, so you can set the appropriate scan parameters.

The most interesting, in our opinion, is the “Scan Type” field. Here you can select a mode for studying the disk structure, starting from the fastest, in which the scanning process itself does not carry any visual load, and all the action occurs only in the background. Next comes the “Simple View”, which displays only the scanning position without visualizing the results of the scan already performed. The most detailed mode is the “Detailed View”, which displays the scanning position, as well as data about already detected file objects. Choose the mode that you find most suitable. Whichever option you choose, the actual recovery procedure can only begin once the scanning phase is completed, and this can take many hours, depending on the size of your logical device.

Another quite important field is “Known File Types”. With the “Search for known file types” checkbox checked by default, the program will identify only those file types that are marked as known in the settings. Click on the “Known file types” button and mark those categories that we consider necessary. This is important to do in light of the fact that it will take much more time to search for all types of objects, and this is a significant factor.


So, before you recover information from your hard drive, you need to start the analysis process. To do this, just click on the “Scan” button, and the routine will begin.

The scanning procedure itself is very visual and is presented in an attractive graphical form with the types of detected clusters marked.

When the scan is completed, the item “Found by signatures” will appear in the list of source logical devices, just under the drive that you analyzed.

Click on it, and a list of document types that you want to recover as a result of the scan will appear on the screen. Check the corresponding boxes and click the “Restore marked” button on the top panel.

You can get to the same form by using the “Show disk contents” button on the top panel.

Well, now let’s talk about how to recover information on a hard drive. We begin to restore the detected objects. By clicking the “Restore” or “Restore Marked” button, a form appears on the display for specifying recovery settings. One of the most important options is the “To Folder” field. Here you need to specify the path on the internal or external drive where you would like to save the detected files. Click the mini-button with three dots and set the appropriate path.

Another option that may be useful to us is the “Restore folder structure” option. When using it, all detected files will be presented in a hierarchical directory tree corresponding to the types and subtypes of files.

We will leave all other settings at default. To restore data, click the “Yes” button.

Now comes the time for the longest procedure – data recovery itself. Be patient, brew a cup of strong tea and wait until all the files are on your hard drive or USB drive.
Finally, when everything is ready, go to the resulting directory and check the detected files. The first thing that catches your eye is that the real file names have been replaced with other, arbitrary ones. But if all the information is in place, then returning the correct names to the identified files is a matter of technique. Unfortunately, all this will have to be done entirely manually.
Now you already know how to recover information from a hard drive. We hope that our instructions will help you understand all the intricacies and nuances of the R-Studio application, if you had to resort to its services. The program has been completely translated into Russian, so the process of getting acquainted with R-Studio will be smooth and free.
This program consists of several utilities that make it possible with a high degree of probability to return deleted information from various storage devices, such as flash drives (USB) and hard drives. Data that has been deleted from the Recycle Bin or lost due to viruses or a sudden loss of power to the PC is subject to processing.
The program runs and operates successfully on various types of computers running the Microsoft Windows operating system.
Attention: a free program for data recovery from flash drives and hard drives R – Studio is available for download via the direct link at the bottom of the article.
It must be said that the program has great potential in the field of searching for destroyed files, as well as their further recovery. In the case where there is no damage inside the hard drive or there were not very many rewrite cycles, the utility is quite capable of bringing deleted files back to life.
The developers of this wonderful and highly sought-after software have increased the number of functions and opened up more opportunities for ordinary users of this system utility. Most experts advise using this software product for one simple reason - it is able to successfully work with most popular file systems such as FAT32, exFAT, NTFS, NTFS5, UFS1, UFS2, Ext2, Ext3, Ext4 FS, etc.
How to use R-studio correctly?
If you need to make recovering deleted files from flash drive, then first of all connect the flash drive by connecting it to the USB port of a personal computer or laptop. Next, we launch the program. On the main menu page you will be shown all active digital storage media that have been connected to the computer.
To continue, you need to click on the image of the flash drive, and then click “Scan”.
As a result, we get a window in which we should indicate the type of data that we are going to resuscitate. Select a memory area and activate the search for lost files.
Typically scanning occurs in a short period of time, which can vary from ten minutes to half an hour (it all depends on the power of the computer and the speed of the USB port).
After the scan is completed, the user is notified. Next, to view the found files, follow the prompts of the data recovery wizard, which will allow you to restore the found data on the flash drive.
Attention: at recovering deleted files you should specify a disk different from the one on which scanning with further recovery takes place. In this case, the probability of success of the operation to return lost files increases significantly.
However, it should be noted that the utility is not able to save the entire file. This situation occurs if a lot of time has passed since the data was erased or the media has been repeatedly rewritten. Therefore, the sooner you decide to launch the R-studio program, the higher the likelihood of success in finding and recovering deleted files.
Positive aspects of the utility
R–Studio works with many modern file systems. The function of developing a virtual disk array is supported. Information is restored in various situations (as a result of simple deletion or formatting (not to be confused with low-level formatting)). The program is able to search for files using specified masks. R–Studio can be used on various popular operating systems of the Windows family. The utility has a Russian version, which simplifies its use by the Russian-speaking category of users.Disadvantages in the program
Most often, it is possible to return only graphic files (raster / vector graphics), text files, music compositions, and videos. The utility is not free, but in the free version it allows you to search for files up to megabytes in size.
The program is not used so often by the general category of users, so whether it is worth purchasing depends on the specific task and need. It is advisable for inexperienced PC users not to attempt file recovery on their own, but to contact appropriate specialists. This will protect against loss of existing data and increase the likelihood of returning previously lost information, although you can “practice on cats” and thus learn how to recover files deleted from the recycle bin.
conclusions
In general, the R–Studio program is very useful and necessary; it has come in handy for many users who have lost valuable information. Of course, the utility is not capable of returning data in the event of mechanical damage to a flash drive or hard drive (this is an expensive and special undertaking for highly qualified specialists), but this does not underestimate its already significant capabilities. Files are recovered even if disks are formatted or the file system is damaged.Initially, R–Studio was developed for the purpose of being used by people working in computer repair services or experienced PC users. Beginners can be advised to use the R–Undelete program, which is a simpler analogue of the program from this category.
One day, R–Studio helped in returning a block of four disks located in a RAID array. More than 70 percent of the data was successfully recovered. I must say a special thank you to the programmers who created such a wonderful software product as R–Studio.
Advice: do not forget to make backup copies of especially important data from time to time, the loss of which will incinerate a large number of nerve cells. After all, this is what backup was invented for, to save nerves and time. As a last resort, the files can be encrypted and placed in the cloud for safekeeping.
We recommend this program for recovering deleted files from a flash drive or hard drive.
Recently, the support service has received several letters at once, where users report that they do not know how to work with the program R-Studio.
In this lesson I will give an example of working with this program.
R-Studio is designed for data recovery– deleted files or files from a damaged disk.
It is suitable for working with both flash drives and regular disks. The main thing is that the disk itself is visible in the OS so that the program can work with it.
Sometimes it happens that files are accidentally deleted past the recycle bin; Sometimes a failure occurs in the system areas of the disk and then all files on the disk are no longer accessible to the user.
If the area of the disk where the files themselves were written is not damaged or modified, then you can try to restore the files.
The main thing is to try to do this immediately after the “loss” of files. If, after the “loss” of files, the disk was formatted or defragmented, then the likelihood of successful recovery is very low.
Another important point– you need to restore files to another disk, or, in extreme cases, a disk partition, but not to the same place where they were before.
In the article I will give the following example: I will create a test folder on one drive with different files, then delete all the files, and then try to restore the files to another drive.
Stage one.
I create a folder on the partition "R" with different files - presentation (ppt), 2 pictures - small and medium size (jpg), Excel table (xlsx), music in mp3, 4 texts - in different formats and sizes (txt, doc, rtf).
As an example, I took frequently used small file types.
Stage two. I'm deleting all files.
Not to the basket, but completely. For an inexperienced user, they can be said to be irretrievably lost.
Stage three. I launch the R-Studio program.
I found version 5.2 of this program in English. In this version I will show the main elements and their translation so that users can navigate both the English and Russian versions.
I also remind you that for this program to work, you need administrator rights for the current OS user; in Windows 7, the program must be run as an administrator.
Here is the R-Studio window after launch:

The program has a clear interface. At the top there is a menu and buttons for main actions. The central part is divided into two areas.
On the left is a list of drives on your PC ( Drives) with basic information about disks and partitions. If you select a section, its detailed information will be visible on the right ( Properties).
Below is the log area ( Log), where the results of actions are displayed.
Stage four. I'm looking for deleted files.
To do this I select the section "R" and double-click to open it. The program scans the entire partition at once. If the disk is damaged, then the partitions on it will not be visible, and the program will scan the entire disk.

In the log area ( Log) two entries appeared - about the start and completion of scanning the partition "R".
A list of directories/folders appears on the left side ( Folders), on the right is a list of contents ( Contents).
After that I select the folder "test" in the folder list.
If the folder name is unknown, then to search for files you need to go through all the folders in turn and even look into folders that do not have a name, but only a question mark (?).
When I selected the folder I needed, I saw the deleted files on the right. Among them there was even a temporary file from MSWord work - this is a file whose name begins with the tilde and dollar sign (~$).
Above the log area ( Log) there is a file sorting setting ( Sorted by:): « real"– valid (as I understand from the alphabet of file names), “ extensions"-by extension, " creationtime"-time of creation, " modificationtime"– change time, “ accesstime"–time of last access to the file.
This setting can be useful, for example, if you know the file type or the approximate time the file will be deleted.
In the right pane I select all the files as an example. After opening a disk or partition, the following buttons appear in the button bar:

These are buttons to restore all content from the right panel ( Recover) or only marked files ( Recover Marked).
I press the second button and see a new window - recovery settings ( Recover).
I didn’t quite understand the purpose of some settings; perhaps they are necessary in cases of more complex failures, and they are used by more advanced specialists.

The very first setting is the folder for the recovered files ( Output folder). It must be selected on another disk, which is what I did - I selected « H:/test» .
Below there are two tabs - basic settings ( Main) and extended ( Advanced).
On the main settings tab ( Main) there are the following points:
- condense successful restoration events– this is compression of messages about successful recovery, i.e. Successful recovery messages will not be shown in the log area. If this checkbox is checked, only error messages will appear in the log;
- restore folder structure– restore the folder structure. This setting is needed when restoring subfolders, so that the result is not a jumble of files, but the original appearance of the folders. Sub-items allow you to configure the actual folder structure and structure, starting from the root directory;
- recover metafiles- restoration of metafiles. In my example, this setting was disabled;
- recover alternative data streams– restore alternative data streams, this setting is associated with the NTFS file system;
- recover security– restore security settings. If the files initially had any security settings (for example, access for different users), then this setting can restore them too;
- recover extended attributes– restore additional attributes, as far as I understand – these are the attributes “ hidden», « systemic», « for reading" etc.;
- skip file with bad sectors– skip files with bad sectors. This setting is needed in case of physical damage or wear of the disk platters, when you need to quickly restore what is still possible to read.
At the very bottom there is a setting “ ignore file mask" - ignore file mask. I don't understand what its effect is.

On the advanced settings tab ( Advanced) there are the following points:
- file already exist– the file already exists in the specified folder. In this case, you can configure the following actions with the file: “ prompt"rename"-rename, " overwrite"- rewrite, " skip"-miss;
- brokenfilename– corrupted file name. In this case, you can configure the following actions with the file: “ prompt"– offer the user all other actions, “ rename and change all invalid symbols to:"- rename and replace all incorrect characters with a new character, which is indicated in the input field " skip"-miss.
- hiddenattribute– hidden file attributes. Or does it mean only one file attribute – “hidden”. You can configure the following actions with it: “ prompt"– offer the user all other actions, “ remove"–delete attribute, " keep"– save the attribute.
I set the recovery settings as shown in the pictures above and click “OK”.
The restoration process is underway. During this process I saw this message:

Just that temporary MSWord file (whose name begins with the “tilde and dollar” sign (~$)) has the attribute “ hidden" (in English hidden).
Because I checked the box next to “ prompt", then the program gave me a request about what to do next with this file.
There are two options: " remove"– remove attribute, “ continue"– save the attribute.
You can also check the box so that the action will be automatically applied if the same issue arises again.
I choose the option to remove the attribute.
Recovery occurs quickly. Its result is visible in the log area:

The last entry means that 10 files were restored successfully, 0 files could not be restored, i.e. All the files I specified have been restored.
Here are the contents of the folder « H:/test »:

I checked all the files - they all open and the data inside them is not damaged.
In this example, the files were restored immediately after deletion, so the recovery was successful.
From my limited experience recovering data both at home and at work, I have noticed the following:
- Small files are best restored because... they occupy fewer clusters on the disk, and the likelihood of them being “put back together” is greater;
- files like "jpg" or " doc" may be restored, but then they cannot be viewed or the image/text will be distorted;
- Excel (xlx) files are most often not recovered.
And finally, we can say that data recovery programs can help out, but it’s better not to be lazy and don’t forget to do it backup copies of all important data.

Many PC users have the same problem from time to time - they turn on their computer and see that it does not boot. For some this happens only once, for others - two or more. The computer hardware is working properly and the operating system can be restored from a system recovery disk. But all the messages that appear in this case tell the user that this can lead to the complete loss of his data - family photos, films, music collections, important financial documents.
Yes, this situation is indeed quite real. However, before this happens, you can use a bootable disk (CD/DVD, USB or other removable disk) containing a file recovery tool.
R-Studio Emergency is the best solution in such situations. Let's look at how this utility allows you to save user files that are in danger of being lost.
Let's study the step-by-step procedure for data recovery using R-Studio Emergency on a typical example of a laptop computer with the following configuration: a 100 GB hard drive, consisting of two logical drives: C: (system, NTFS file system, SYSTEM label) and D: (FAT32 file system, DATA label). In this case, the system disk is damaged and the computer does not boot.
Checking the Hard Drive
The goal is to identify possible hardware failures of the hard drive. The following symptoms of hard drive damage may occur:
- The hard drive is not recognized by the operating system or is recognized under some unusual name.
- The operation of the hard drive is accompanied by atypical sounds, clicks, and it works very slowly.
- Bad sectors constantly appear on the hard drive.
- SMART hard drive condition assessment programs provide messages about significant hardware malfunctions.
Attention! If you think that your computer's hard drive is faulty, then use the R-Studio Emergency utility only to create an image of it. DO NOT TAKE ANY ACTION WITH THE DISK YOURSELF! Do not attempt to start the scanning or file recovery process. Do not try to use any other data recovery software. Remember that any incorrect actions with such a disk will likely cause even more data damage. It is best to use the services of data recovery laboratory specialists, otherwise you risk, at best, incurring even greater financial costs, and at worst, permanently losing your files. Take the disc to specialists: they have special equipment and, most importantly, the necessary level of knowledge to work with such discs.
If no hardware failures of the hard drive were detected, then you can proceed to the data recovery process itself.
Preparing for Data Recovery
To recover data you will need:
1. Computer connected to the Internet. It is required to create a bootable R-Studio Emergency device and obtain an activation key for registering R-Studio Emergency. If this computer is located on the same local network as the damaged one, then its hard drive can be used to store recovered files. How this can be done will be explained below.
2. A place to store recovered files and other information (disk images, scan information, etc.): for this you can use:
- A formatted USB flash drive is the best choice if the drive is large enough to store the recovered files.
- External USB hard drive formatted in NTFS or Ext2/3fs.
Note:
a. The NTFS hard drive must be properly removed from the Windows computer via the Safely Remove Hardware and Disks icon on the taskbar, and not simply disconnected from the computer. If this was not done, then in R-Studio Emergency this disk will be defined as read-only. In this case, you should connect it again to your Windows computer and eject it accordingly through the above taskbar icon.
Also, a computer that does not have Windows installed may detect files on these drives as read-only or not read them at all.
b. The Ext2/3fs hard drive requires some additional drivers to read files if it is connected to a non-Linux computer (for example, a Windows or Mac computer). - . Below we will explain how to connect a network drive of a given computer in R-Studio Emergency.
And always remember the most important rule: NEVER SAVE RESTORED FILES/FOLDERS TO THE ORIGINAL DISK!!! Otherwise, you may get unpredictable results and completely lose your data.
3. If you have already purchased R-Studio, then order information (Order ID, e-mail, R-Studio registration key, etc.). You will find this information in the email sent to you after purchasing the product.
However, the chances of recovering files using R-Studio Emergency can be assessed in the demo version of the program, before purchasing it. In this mode, it is possible to test any functionality of the utility (including erasing data from a disk or partition), with the exception of working over a network and saving recovered files. It is also possible to view the contents of files to assess the chances of recovery (using the built-in file viewer).
Creating an R-Studio Emergency Boot Device
If your computer has a CD/DVD burner, you can download the R-Studio Emergency ISO image directly from the R-tt website for Macintosh, UNIX, Linux and Windows (Intel compatible computers) users and create a bootable disk using any ISO burning program images onto a CD/DVD disc.
Windows users can also use the R-Studio Emergency Startup Media Creator utility. It is used to create bootable devices such as CD/DVD disks, FAT/FAT32 formatted removable disks (including USB flash drives) or a set of floppy disks. A detailed description of this process can be found in R-Studio on-line Help:.
The necessary files can be downloaded either from the Registered User Console or from .
Booting Your Computer Using the R-Studio Emergency Boot Device
Check that the R-Studio Emergency device is set to boot in your computer's BIOS settings (for more information, see your computer's documentation). Most likely, the computer will automatically boot from the disk located in the CD/DVD drive of your computer.
After this, turn on the computer. You will see the Startup Options interface on your computer screen
Select R-Studio Emergency GUI GUI (Graphic Mode) to run R-Studio Emergency in graphical mode. In this mode, R-Studio Emergency has the same functionality as R-Studio, with the exception of some restrictions when viewing graphic files. Almost all the controls in R-Studio Emergency are similar to the controls in R-Studio. So if you have any questions or misunderstandings, you can always contact.
Select R-Studio Emergency GUI TUI (Text Mode) if you have problems running R-Studio Emergency in graphical mode. In this mode, R-Studio Emergency also has a graphical interface, but it consists of alphanumeric characters and uses standard graphics modes supported by all video cards. This mode has more limited functionality, but it also allows you to perform most data recovery operations; the mouse is also supported in this mode. In TUI mode, for example, viewing graphic files is not supported. Additional information about running R-Studio Emergency in text mode can be found in R-Studio on-line Help: .
After launching R-Studio Emergency, you will immediately see the R-Studio Emergency Demo Activation dialog box. 
Click on the image to enlarge it
Enter the Activation Code if you already have one, or click the Cancel button to work with R-Studio Emergency in demo mode and evaluate the chances of data recovery. If you have already purchased R-Studio Emergency and want to immediately receive an Activation Code, then read the section.
Checking a Damaged Computer
When you start R-Studio, the main window (user interface) of the program opens. In this window you can see the computer's hardware resources and try to determine what data on the hard drive is damaged. 
Click on the image to enlarge it
In our case, you can see (Drives panel) that the computer has two hard drives.
| The internal hard drive of a computer that contains lost files. | |
| External hard drive for storing recovered files, scan information, etc. |
The internal hard drive has two partitions: the first partition with a damaged file system (Partition1) and the second healthy partition with a FAT32 file system (Partition2). would be shown as Empty Space objects.
Please note: sometimes when you create partitions on your hard drive in Windows, there will be a small amount of free space left. The Empty Space7 object is exactly such a free space.
File Recovery
In our case, it is necessary to perform two operations to restore files:
1. Recover files from an existing logical drive (Partition2)
2. Recover files from a damaged logical drive (Partition1)
Recovering Files from an Existing Logical Disk/Partition
Let's start recovering files from the existing logical drive Partition2.
Double-click on the existing logical drive from which you want to recover files. R-Studio will begin to re-read the disk files and then show the folder/file structure of the partition. 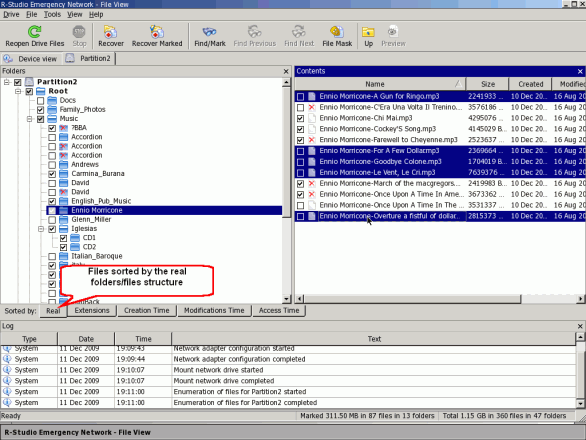
Click on the image to enlarge it
Mark files and folders for recovery.
The marked files and folders for recovery will be shown in R-Studio.
Folders panel
| Remote folder | |
| Marked folder (all children of this folder are marked) | |
| Partially marked folder (some of the folder's children are marked) | |
| Cross remote folder (a FAT folder containing data that also belongs to other FAT folders) | |
| Invalid remote folder (FAT folder found by R-Studio with obviously incorrect contents) |
Contents panel
| Deleted file | |
| Marked file. It will be restored when you click the Recover Marked button. | |
| Selected file. It will be restored when you click the Recover button. |
To find and mark files for recovery, you can use the following methods:

The path to the files will be shown in the Contents panel if you select the corresponding Path item from the View menu -> Contents View Columns.
You can also use the Find/Mark dialog box to find and mark specific files for recovery. Click the Find/Mark button, specify the file(s), search (marking) parameters and select the desired action. 
Click on the image to enlarge it
You can search either for specific files, files with any extension, or all files with certain specified conditions. Advanced users can use regular expressions.
| If this option is selected | then R-Studio processes the entered expression as |
| Files | File names. You can use file masks (the character "?" (question mark) is used to specify one undefined character, and "*" (asterisk) is used to specify an unlimited number of undefined characters). |
| File Extensions | File extensions. |
| Regular Expressions | Regular expressions. |
| All Files | Advanced Options will be applied to all files. |
After this, you need to set the search parameters.
| If the checkbox (radio button) is selected, | |
| Match case | R-Studio will perform a case-sensitive search. |
| Deleted files | R-Studio will search among the deleted files/folders. |
| Existing files | R-Studio will search among the available files/folders. |
| Look at Files | R-Studio will search among the files. |
| Look at Folders | R-Studio will search among the folders. |
| Direction | Sets the search direction from the current position. The parameter is only available when the Look in: parameter is set to From current folder. . |
| Look in: | Specifies what R-Studio does with found files. You can search: on the entire disk (Entire disk), From the current folder (From current folder), in the Current folder and subfolders (In the Current folder and subfolders) and only in the Current folder (Current folder only). If the From current folder option is selected, it is also possible to set the Direction of the search from the current position in the current folder. |
| Find all matched files | R-Studio searches for all matching files. The search results will be presented in the Find Results panel. |
| Find first matched file | R-Studio will stop searching when it finds the first file. |
| Mark matched files | R-Studio will mark all found files. |
| Unmark matched files | R-Studio will unmark all found files. |
Please note that each time R-Studio searches and marks/unmarks files, it does not take into account the previous state of the files (marked/unmarked). For example, if you first marked all files with the doc extension, and then all files with the txt extension, then files with the doc extension will also remain marked. To unmark them, you need to specify the doc extension again and select Unmark matched files from the Find/Mark mode drop-down list.
If You Didn't Find the Files You Want to Recover
Sometimes R-Studio may find files and not find the full path to them. Such files will be placed in the Extra Found Files folder. Try searching for your files there. If this does not help, then search the entire disk.
On the Advanced tab, you can set the size and timing characteristics of the files you are looking for. 
Click on the image to enlarge it
Additional information can be found in R-Studio on-line Help: .
If Find All Files is selected in Find/Mark Mode, the Find Results panel will appear after the search is completed; it can also be displayed by selecting Find Results from the View menu. 
Click on the image to enlarge it
This panel has a context menu with basic commands for recovering files. To call it, you need to right-click on the required file.
To assess the chances of file recovery, you can use the built-in graphic viewer. To do this, simply double-click on the file (deleted or existing). The viewer supports most graphic file formats. 
Click on the image to enlarge it
If you have found all the files and are satisfied with the results of viewing them, you can immediately activate R-Studio Emergency (if you are working in demo mode). This will not affect the data already found - you can continue recovering files immediately after entering the program Activation Key. For more detailed information, see the section Activating R-Studio Emergency.
Having marked the files necessary for recovery, click the Recover Marked button. This will open the Recover dialog box: 
Click on the image to enlarge it
Set recovery options. The table below shows the most important of them. You can also leave the default settings. Additional information can be found in R-Studio on-line Help: .
| If the checkbox is checked | Then R-Studio will restore |
| Restore folder structure | Full path to the selected object. |
| Restore from root | Full path to the selected object from the root folder of the disk. |
| Recover real folder structure | The actual folder/file structure on disk for files sorted in this way. This checkbox is only applicable when files are sorted by extension or date. |
| Ignore file mask | All contents of the selected folder, ignoring the specified file mask. |
| Skip files with bad sectors | R-Studio will skip files with bad sectors during recovery and display a list of them in the Files with bad sectors dialog box after the recovery process is complete. Then you can decide for yourself what to do with these files. If this checkbox is not checked, then R-Studio tries to read the sector data several times (the number of times is set in the Settings/Bad Sectors dialog box) and if it fails to read the sector data, it fills them with the sample that is specified in the same window. Information about such files will be displayed in the Log panel. Additional information can be found in R-Studio on-line Help: . |
Then you need to select a location to save the recovered files. Click the Select button. 
Click on the image to enlarge it
You can select either an external USB drive (C:) or a network drive. In this case, pay attention to the Mode column. To be able to save files, the value must be RW (Read and Write).
Select the drive NET_DRIVE_1 and the folder on it./Recovered_Files/.
If you want to save many files at once, you need to set some options on the Advanced tab of the Recover dialog box. 
Click on the image to enlarge it
File Already Exists: These options allow you to select an action if a file with the found name already exists.
| In this case, R-Studio will prompt the user to select an action. The recovery process will be interrupted until a response is received. | |
| Add ID to File Name (Rename) | In this case, R-Studio will add an ID to the file name. If a file with the given name and ID already exists, a number will be added to them. |
| Overwrite | In this case, R-Studio will write a new file in place of the old one. |
| Skip | In this case, R-Studio will skip all files with that name when restoring. |
Broken File Name: These options allow you to select what action to take if the found file name is incorrect.
| If this radio button is installed | |
| Prompt | In this case, the standard Broken File Name dialog box will open for each file with a bad name. The recovery process will be interrupted until a response is received. |
| Rename and change all invalid symbols to: | In this case, all invalid characters in the file name will be replaced with the specified characters. |
| Skip | In this case, R-Studio will skip all files with the wrong name during recovery. |
Hidden Attributes: These options allow you to select what action to take if the file being restored has hidden attributes. Such attributes may prevent the user from viewing files in Windows Explorer.
After setting your recovery options, click OK. R-Studio will begin to recover files, showing the progress of the process. 
Click on the image to enlarge it
The Log panel will show the results of file recovery.
We have finished recovering files from the existing logical drive Partition2
Recovering Files from a Damaged Logical Disk/Partition
Let's continue the recovery and now recover files from the damaged logical drive Partition1.
First you need to scan the partition using R-Studio to determine what information remains on the disk. After the scan is completed, R-Studio will show one or more found partitions, from which you need to select only one correct one and recover files from it, as described in the section Recovering Files from an Existing Logical Disk/Partition.
To scan a section,
Right-click on the disk, select Scan from the context menu and then set the necessary scanning parameters in the Scan dialog box. 
Click on the image to enlarge it
By default, R-Studio offers to scan the entire object. This is the optimal choice when scanning Known File Types (see below).
File Systems: Specifies the file systems of the objects to be searched.
Currently, R-Studio supports the following file systems: FAT, NTFS, exFAT, Ext2/3/4FS, HFS and UFS.
Please note that if you need to scan a disk with HFS, HFS+ or HFSX file systems, then you must check the Extra Search for Known File Types checkbox, since when you delete files on these file systems, the computer will be completely deleted all information about the files and the only way is to use the Extra Search for Known File Types option. Additional information can be found in R-Studio on-line Help: .
In our case, we will select NTFS and FAT file systems.
Save scan Info to File: If you check this box, R-Studio will save the scanned information to the specified file, which you can then open. Please note that this operation does not save the data on the disk, but only information about the structure of the data on the disk obtained as a result of the scan.
It is recommended to always save the scanned data, as there are often cases when you need to temporarily interrupt the data recovery process and turn off the computer. The saved scan information file can be opened later, saving you the trouble of rescanning the drive.
Once you have checked the Save scan Info to File checkbox, you will see the following warning: 
Click on the image to enlarge it
Click the Continue button and select a location to save the scan information. For example, this could be a file on an external USB drive.
This may result in complete data loss.
Leave the rest of the scan settings unchanged. Additional information can be found in R-Studio on-line Help: .
Scanning Files of Known TypesThis is a very useful feature when recovering files from damaged or reformatted partitions. When scanning, R-Studio can determine what specific file type the data belongs to. This will allow R-Studio to find more files. After scanning, such files will be placed in the Extra Found Files folder of the scan results.
By default, R-Studio attempts to install all supported file types specified on the Known File Types tab of the Settings dialog box, but this will significantly increase scanning time. You can reduce scanning time by selecting only the file types you need. Click the Known File Types... button and select the required file types in the File Types dialog box.

Click on the image to enlarge it
This selection will only apply to the current scanning session.
After setting the scanning parameters, click the Scan button. R-Studio will begin scanning. After the scan is completed, R-Studio will show the partitions found on the disk. 
Click on the image to enlarge it
R-Studio will show such sections in different colors depending on what section elements were found.
| An existing logical drive or partition. | |
| Both boot records and files were found on such a partition. | |
| Only files were found on such a partition. | |
| Only boot entries were found on such a partition. | |
| Free space of an object. |
To successfully recover files from, you need to find exactly the one that correctly matches the real logical drive on which the lost files were located. There are no specific rules for this, but the following must be taken into account:
- If you want to recover files from a disk with a damaged file system, then most likely it will be a green partition found.
- If you want to recover files from a previously deleted or reformatted partition, then most likely it will be a yellow partition found.
Also always check the file system, the beginning and size of the found partition. These characteristics must match the found partition and the actual logical disk/partition. If in doubt, try viewing a couple of files from the found partition. If you succeed, then you have chosen the right section.
In our case, we only have one section found, Recognized0, so we have no choice.
Double-click Recognized0. R-Studio will re-read the files of the found partition and show the found files and folders. 
Click on the image to enlarge it
Mark files for recovery as you did when recovering files from an existing logical drive.
If you could not find files on the found Recognized0 partition, then return to the Drives panel, double-click on the Extra Found Files item and select the file types that you want to recover. You can review the graphic files to make sure they are correct and can be restored. 
Click on the image to enlarge it
Please note that when scanning Known File Types, R-Studio does not recover file names and can only successfully recover unfragmented files.
After that, click the Recover Marked button, set recovery options in the Recover dialog box as you did when restoring files from an existing logical drive, and click OK. 
Click on the image to enlarge it
Please note that in our example, we selected the /Recovered_Files/ folder on the external USB drive to save the recovered files.
R-Studio will begin to restore the marked files. 
Click on the image to enlarge it
After the restoration is completed, its results will be shown in the Log panel.
Turning off the computer
After file recovery is complete, remove the CD/DVD or USB drive and turn off the computer.
If you want to restart the computer, select Exit from the Drive menu and then click OK in the dialog box with a warning message about shutting down the computer. 
Click on the image to enlarge it
Your computer will restart.
To save the image file, you will need free disk space greater than or equal to the size of the object. NEVER SAVE IMAGES OR RESTORED FILES/FOLDERS TO THE ORIGINAL DISK!!! Otherwise, you may get unpredictable results and completely lose your data.
The image can be opened in R-Studio and files can be restored from the open image in the same way as from the original object.
How to Create an Image
1. Select an object in the R-Studio Drives panel and click the Create Image button. 
Click on the image to enlarge it
2. Specify the image parameters, name and location of the image file in the Create Image dialog box. Please note: To save the image file, you will need free disk space greater than or equal to the size of the object. 
Click on the image to enlarge it
| Image filename | Specifies the name and location of the image file. Both local and network drives can be used to save image files. For more information on connecting network drives, see the section. |
| Uncompressed image (Byte to byte image) | If this option is selected, R-Studio will create an exact copy of the object. This image format is compatible with the formats of previous versions of R-Studio |
| Compressed image (R-Drive Image compatible) | If this option is selected, R-Studio will create an image file that can be compressed, split into several parts and protected with a password. This image file is fully compatible with images created by the R-Drive Image program, but is incompatible with images of previous versions of R-Studio. |
| Compression ratio | You can compress image data to save disk space. This option is only available when creating a Compressed Image (compatible with the R-Drive Image). |
| Estimated size | Shows the estimated size of the image file. The actual size of the image depends on how much free space is available on the selected partition and what type of files are located there. This option is only available when creating a Compressed Image (compatible with the R-Drive Image). |
| Image split size | You can set this option to Automatic, and the size and partitioning of the image file will be determined automatically by Windows. This mainly depends on the file system of the disk where the image file is saved. You can also explicitly set the image file size (Fixed) or select a template size for various removable media. This option is only available when creating a Compressed Image (compatible with the R-Drive Image). |
| Password (Image password) | You can protect the image file with a password. Please note: This option provides a medium level of protection for the image file from unauthorized access. This option is only available when creating a Compressed Image (compatible with the R-Drive Image). |

Click on the image to enlarge it
| Read attempts | The I/O Attempts value, which determines how many times R-Studio will try to read the bad sector. |
| Pattern to fill bad blocks | A template that R-Studio will use to fill in bad sectors in a given image. This pattern can be specified in ANSI or Hex data formats. Attention: R-Studio never modifies anything on the disk from which data is restored or the image of which is created. This template fills bad sectors only in the image. |

Click on the image to enlarge it
R-Studio will begin to create an image showing the progress of this process.
How to Open an Image
1. Click the Open Image button: 
Click on the image to enlarge it
2. Select the required image file: 
Click on the image to enlarge it
The object image will be opened in the Drives panel: 
Click on the image to enlarge it
Image files can be processed by the program as a regular disk.
Activation of R-Studio Emergency
To save the recovered files, you need to activate your copy of R-Studio Emergency. Without activation (if you click Cancel in the Activation dialog), R-Studio Emergency will run in demo mode. In this mode, you can perform any operations except surfing the network and saving recovered files. But you can view files to assess the chances of their recovery.
To activate your copy of R-Studio Emergency, write down the computer hardware code. Please note that this code is unique for each computer. That is, if you run R-Studio Emergency on another computer, the hardware code will be different.
To obtain an activation key, please use the R-TT website. Using a computer connected to the Internet, open the Registered User's Console, enter the required data and click the Submit button.

Click on the image to enlarge it
You must complete at least three fields to log into the Registered User's Console.
After that, click the R-Studio Emergency Activation Code button.

Click on the image to enlarge it
Enter your computer hardware code and click the Submit button. It can be entered case insensitively.
Click on the image to enlarge it
Please note that the R-Studio Corporate license is limited to the device on which the software product is installed, and you have the right to receive an Activation Key only for it. The license may not be transferred to another computer after the product has been installed or launched and registered. Therefore, in the corresponding field of the Registered User Console, you should enter the hardware code of only the computer for which the license was purchased.
Click on the image to enlarge it
Write down and keep the Activation Key in a safe place. The best place for this will most likely be a CD/DVD disc. Each time you launch R-Studio Emergency you will need to enter it during activation.
You can enter the Activation Key while starting R-Studio Emergency in the R-Studio Emergency Demo Activation dialog box or while running by selecting Activate from the Help menu. 
Click on the image to enlarge it
R-Studio Emergency will show that the activation process was successful: 
Click on the image to enlarge it
Now you can take advantage of all the features of R-Studio Emergency.
Network configuration
You can either automatically (via DHCP) or manually configure the network to obtain the IP address of the computer on which R-Studio Emergency is running.
To configure the network, select Network configuration from the Tools menu.
After this, the Network configuration dialog box will open and R-Studio will automatically prompt for a network address. The Log panel will display the message Network adapter configuration started. 
Click on the image to enlarge it
To cancel this process, select the Configure manually radio button. After this, you will need to enter the IP address manually. If your computer has several network interfaces, then you need to choose which one will be used
Once received, the IP address will be shown in the dialog box and the Log panel will display the message Network adapter configuration completed.
If R-Studio fails to obtain an IP address, the Log panel will display the message Network adapter configuration failed. In this case, you must either enter the IP address manually or troubleshoot possible network problems.
After that, select a location on the network to save your data. Select Map network drive from the Tools menu. The Map network drive dialog box will open. 
Click on the image to enlarge it
Enter the required information and click OK. The Log panel will display the message Mount network drive started. After connecting the network drive, the Log panel will display the message Mount network drive completed.
If R-Studio fails to connect to a drive on the network, the Log panel will display the message Mount network drive failed. You will need to fix the network problems and try connecting to the network drive again.
R-studio is a set of programs for recovering data and files from a hard drive. The application has versions for both Windows and Mac, as well as Linux. The program is paid, but has a free version, and is considered one of the best data recovery programs.
The program performs a complete analysis of the disk and determines what file systems were on it before, and then allows you to restore files from these file systems. Interestingly, you can detect file systems that were on the disk for a long time and even recover files from them. We previously reviewed free utilities for, and in this article we’ll talk about how to use R-Studio.
You can download the program installer for your operating system on the official website. For Linux there are deb and rpm packages that will be installed on most distributions.

For example, on Ubuntu, after the package is downloaded, go to your downloads folder and run the installation:
cd ~/Downloads/
$ sudo dpkg -i RStudio*

After installation is complete, the program shortcut will appear in the main menu:

On Windows, you only need to go through a few wizard steps.
How to use R-Studio
Now let's move closer to working with the utility, consider its first launch of the interface and file recovery.
1. Launch R-Studio
When you first launch the program, it will ask for a license. I don’t need to tell you where to look for free licenses, or you can click the Demo button. It's fine for recovering small files. The maximum file size for recovery is 256 kb.

If the program window is completely empty, then you need to launch it through the terminal using the following command:
QT_X11_NO_MITSHM=1 rstudio
Everything should now work.
2. R-Studio interface

The program interface is quite typical for this kind of utility. It can be divided into the following parts:
- Main menu- contains all available actions and functions;
- Toolbar- the main functions of the program are included here;
- Tabs - switch between different areas;
- Workspace- divided into two parts, on the left side there is a list of disks or folders, and on the right side there is detailed information about them;
- Status bar- at the very bottom of the window there is a status bar, where messages about the program’s operation are displayed.
In the work area of the main window you will see a list of all disks and partitions. By default the program is in English, but you can choose Russian. To do this, open the menu "Help" ->"Language" and select "Russian":
3. Easy recovery
As a reminder, regardless of the file system, files are not physically removed from the disk during deletion. But you can lose them forever if the file system overwrites them with something. If you accidentally deleted some data, it is better to immediately disconnect this hard drive from the computer and restore it by connecting it as an external drive to another device. We can scan the entire partition and identify all the file systems that still exist on it, but there is an easier way. You can only work with this file system. To do this, simply select the desired section and click on the toolbar "Show section contents":

All deleted files will be marked with a red cross. To restore them, just press the button "Restore" on the toolbar:


3. Scan partition
If you want to recover all the data, you need to scan the desired partition to detect all the file systems that were there and with which the utility can work. To do this, select the desired section and click the button "Scan". This process may take a long time, progress will be displayed on the right side of the work area:


Once the scan is complete, you will see all available file systems. Select one of them and click "Show disk contents". By the way, the same option is available from the context menu:

Now, as in the previous case, you can see all available files and those that can be recovered are marked with a red cross. In addition, you can tick the required files on the right side and restore them as a group:

If it is a media or text file, then you can open it directly in the program, without performing rstudio data recovery.


4. Search files
Very often, previous file systems have a very confusing directory structure and you don’t always remember what was where. But the program has built-in search capabilities. To configure the search, click "Find/Cancel":

In the window that opens, you can choose where to search, what files to search, what format, you need or search for directories, and so on. In the drop-down list at the very top of the window, you need to select the parameter by which we will search, for example, extension, file name or regular expression.
After completing the settings, click "Ok". All found files will be displayed on the right side of the workspace and you can restore them.

 PWM controller: circuit, principle of operation, control
 Output of printed forms with a request for data in the "Print documents" form from the BSP "Print" subsystem
 Setting up the home page 1s 8
 Free graphic editors Programs for creating effects in graphics
 How to disable home and other system buttons in Android?
 Samsung Apps for OS Bada - impressions of an evil user Download applications for Samsung bada
 Firmware Samsung Galaxy S5 Mini SM-G800H