Self-disassembly of the iPad Mini tablet. The subtleties of the process. Self-disassembly of the Apple iPad Mini tablet Removing the battery and other elements
They represent almost the pinnacle of technical achievements, sometimes they still have to be repaired, damaged elements or parts of hardware filling that have ceased to fulfill their functions should be replaced. To do any repair operation, you need to know how to disassemble the iPad. We note right away that the procedure is rather complicated and requires considerable skills. So, let's go step by step.
Have different models the glass is attached in the same way - it is glued. Therefore, disassembling the iPad begins with the most delicate operation - dismantling the display protection. Let us immediately note two very important points.
- Glass is very fragile. If you are unsure of your neatness or if you are disassembling for the first time, use suction cups and perimeter pads.
- Apple does not spare glue. This is a special compound that softens at high temperatures.
For dismantling the glass and subsequent disassembly, you will need:
- thin plastic tools - spatulas and spatula plates;
- glass pads - thin plastic strips are needed, picks can be used (paper will not work - it absorbs glue);
- powerful suction cups for working with glass;
- screwdriver different sizes for hour work.

So, there are two ways to disassemble and remove glass.
- The first involves the use of a construction heating pad. This is a tube with a special composition that is heated in the microwave and maintains a high temperature for a long time. By laying such a heating pad along one side of the screen, you can smoothly and safely warm up the entire joint plane. This forms a kind of insurance against the fact that when one zone is lifted, the second will maintain contact and safety glass will crack.
- The second is more barbaric, designed for an experienced repairman. The glass around the perimeter is warmed up with a building thermal hair dryer. It is important here to control the uniformity of heating, temperature and not to spoil the case of the device. Therefore, a lot of experience is needed.
The dismantling itself looks the same for both methods. The glass is gently pushed off with a thin plastic instrument, lifted slightly, a pick or strip is placed. After that, you can move on to the next zone. Gaskets are required - the glue tends to cool down quickly and set again when air gets in.

After all the glass is separated from the base around the perimeter, it is taken with the help of suction cups or simply pryed off and gently lifted from one edge.
Removing the display
So, the first stage is over. In the future, how to disassemble the iPad, it will be clear to the uninitiated. We start shooting.
First, carefully unscrew the screws that secure it to the body. It is important not to damage the heads and use the correct tools.

The display can then be raised. It is connected along one edge with motherboard several trains. Protective tape is applied in the places of their connection. The first step is to remove it.
Hardware part
Now we have access to all the key areas - motherboard, power controller, camera, speakers, and so on. Everything is removed quite simply. Screws are used everywhere, so enough simple actions: unscrew the necessary fasteners, disconnect the component from the loops and put it aside.
Video on how to disassemble iPad:
- Motherboard.
- Battery. Important Notice: An unpackaged battery is used. If it is bent or damaged in some way, it will no longer work. Therefore, it must be carefully pry off with a spatula and just as carefully removed.
- Loop and antenna.
- SIM card slot.
- All connectors and modules are located on one strip and can be removed together.
That's all - only the body of the device remains, from which all the hardware parts have been removed.
Brief summary
Generally rated maintainability iPad worst of all devices, on the order of two points out of ten. The reason is glue and no other connections. Therefore, it is almost impossible to disassemble the tablet without experience, and at the same time not spoil anything. But even if you succeed, you still need to collect it later.
Disassembly iPad Mini for the next renovation
iPad Mini is a smaller copy of its own older brother, the everyday iPad. Its advantages are in the smallest size and weight. Therefore, most people prefer to take it with them specifically. After all, he amazingly copes with all the tasks set, such as: watching movies, surfing the web, working in Word or implementing it as a game console.
But specifically, since the iPad mini is so often taken with you, it is not at all difficult to destroy it. It can fall out of the bag or from the hands, or moisture can get into the tablet. Any damage to Apple technology requires immediate repair. And then you need to decide: disassemble the iPad mini yourself or take it to a service center. Taking your own iPad to a service center, you give the device into the wrong hands and end up paying a lump sum for the work.
In candidacy, you will be able to disassemble the accessory yourself and change the defective parts. With all this, you will save money and gain confidence that specific new parts will be installed. We will tell you how to disassemble a mini tablet in this article.
Preparation for disassembly
Before disassembling the iPad, you need to acquire a set of professional tools. If you have an iPhone disassembly toolkit, you need to purchase a different kit to repair your iPad mini. Since not everything in the iPhone set is suitable for the iPad.  After you have acquired the tools, you can proceed to the disassembly procedure Apple iPad mini. The newcomer will be surprised, because the differences from the iPhone are obvious. There is not a single screw or bolt. Why disassemble the iPad?
Disassembling iPad Mini
If you purchased a special set, then you need to take a tool similar to a pillow and put it in the microwave. After that, put the pad on the edges of the screen and wait. During this period of time, the adhesive between the body and the touch glass will heat up and the parts can be detached. If suddenly there is no such "pillow", you can use an ordinary hair dryer. After you have warmed up the tablet, we begin to separate the structure.
Read the same
Raise the touch glass using plastic picks or a plastic spatula, but do not make any sudden movements. Because the touch glass is attached to the body with a special ribbon cable. It is not so easy to disconnect the cable, because the shield structure prevents it. To do this, unscrew the screws that secure the screen. As the screws are unscrewed, we lift the screen from below.  There is a plate under the screen, which is fastened with screws. It is necessary to unscrew 16 screws in a circle, after that, the plate can be removed. All the "stuffing" of the iPad mini is located under it.
  To get close to the flex cable of the touch panel and monitor, you need to remove a special protective plate. This is done painfully simply: you need to unscrew three more screws).
Full disassembly and reassembly of iPad mini 3 (iPad mini 3 teardown)
We would like to offer all subscribers of our Youtube channel a 6% discount on repair services. To get it, click.
Apple iPad mini - how to disassemble an iPad and technical review
Apple repair Ipad. iPad/ Detailed step by step description parsing iPad mini: how .  Now we have access to the screen loop. Disconnect it with a plastic spatula. Then, peel off the special adhesive tape that holds the screen structure. Now freely detach the display. If there were any malfunctions with the display, we replace it.
Read the same
In such a collapsible sandwich design, there is a certain disadvantage, dust can get between the touch glass and the display. Therefore, when reassembling the entire structure, wipe the glass and display well. And be careful not to get dust particles there.  The touch glass can now be removed. Disconnect the cable and remove the glass to the side. If it was broken, we change it to a new one. Also here is the Home button, which can also be replaced with a new one if the old one is faulty.
  Next up is the battery. To get it, you need to disconnect the connector that goes to the motherboard. Here it is the same as on the big iPad. The battery needs to be picked up with something like a plastic card, as it is also attached with glue.
Gently run the card around the edges of the battery to peel it off evenly. Then just take out the battery. If the battery is defective, it can be replaced. A common problem with her - this is overheating, after which accumulator battery swells up and requires immediate replacement.  Next, remove the stereo speakers that are located below. Together with them, there are Bluetooth and Wi-Fi modules. Unscrew a couple of screws and remove.
The main thing is not to lose the screws, because they are very small. We continue dismantling. Some will also mistakenly try to remove the unique Lightning connector from Apple... But we warn you right away that the USB cable socket is part of the motherboard design, therefore it cannot be removed completely.
Next, remove the Power buttons, volume controls and the button for switching to silent mode. If this is not done right away, then they will not allow to disassemble the remaining structure further and dismantle the motherboard. 
Then, you need to use a hair dryer (it is better to take an industrial one). We heat the case from the back. Because motherboard is attached to the body with glue, you need to warm up the body to dismantle it. It is better not to hold the body with bare hands during this operation, as it gets very hot and can burn the hand.
You can take a silicone potholder or a towel. Then we take a plastic spatula and carefully push it under the board, slowly peel it off from the case. That's it, the board is dismantled and ready to be replaced if the problem was in it. 
On one's own? Then use our step by step instructions with pictures and videos, and remember the cheat for parsing You will need a set of special tools for repairing Apple equipment: a Phillips screwdriver, tweezers and a special spatula. Also, be extremely careful when carrying out repairs.
Independent ipad repair mini is a very responsible business that should be approached carefully. You need to be confident in your abilities and understand that you will not harm. If you have any doubts, then you better turn to the master. Each user should take into account the fact that during self repair the owner may lose the device official guarantee from the manufacturer and takes responsibility for all damage that may arise in the course of independent work related to the repair of equipment.
Prices for iPad Mini repair
[[! getPriceNTimeTableSingle? & resId = `123` & productId =` 8` & tpl = `priceNTimeRow` & tplCaption =` priceCaption` & tplFields = `priceField`]]Video tutorial on parsing iPad Mini
Step-by-step instructions for disassembling iPad mini
Important! Before the start renovation works be sure to turn off your ipad mini!
They start repairing the ipad mini, usually by removing the touchscreen. To do this, warm up the iPad a little (you can use a hairdryer), pry the touchscreen with a simple spatula and fold it back with top corners at the bottom, to the side where the Home button is located. Be careful, because working with loops can damage them. They are short and require a special approach.
Unscrew the 4 screws of the matrix, move it towards the touchscreen.

Unscrew 16 screws with internal protection... The design protects the fragile matrix.

Remove the 3 screws from the protection of the touchscreen, matrix, disconnect the touchscreen cable, remove it and the matrix.


Disconnect the battery from the surface of the motherboard. It is important to separate the battery from the device. To do this, use a spatula. When repairing your iPad mini, be very careful and careful.

Get rid of the three speaker screws, as well as the left antenna. At this stage, the antennas are disconnected.


Remove the four screws on the 8-pin connector. Remove the left speaker.

Typically, the speakers in iPads are connected to the board with thin adhesive tape. It is very important, when repairing the iPad mini, not to damage this adhesive tape, which is very difficult to buy later.
Unscrew the 2 bolts of the connector. Pull out the connector, take out the remaining speaker.


Remove the cable protection from the camera. Remove it by first disconnecting the ribbon cable.


Now disconnect the ribbon cable from the front camera. Fold back the ribbon cable and disconnect the audio disconnect ribbon cable and screw.


Use a spudger to pry the small plastic notch from the camcorder and detach.

Peel off the audio connector ribbon cable from the case, and then disconnect the volume and power button ribbon cable from the motherboard.


Remove the board from the device. Before that, you should warm up the iPad well, but do not overheat the device.

Remove the 4 screws from the volume control ribbon cable and the Power button. Remove the buttons by first unsticking the ribbon cable.


Someday iFixit you will not need to raise all your connections in order to get and disassemble the next Apple gadget even before the start of sales. Someday they will be included in the list of especially close ones, they will be invited to presentations, and immediately afterwards, they will be donated free pre-sale copies of devices. Apple will take such a step without fear, since by then it will be impossible to disassemble the devices without damaging them. MacBook Pro with Retina, aka 13 inches, now - ... Everything goes to this.
The model number is A1432.

No, this is not a pillow for the tablet. This is the new creation of iFixit - a heating pad specially for opening the iPad! You heat it up in the microwave and then put it on top of the edges of the device. The glue between the display and the case melts, you carefully slip in several complete picks, wield plastic tools ... In a word, remove the touch panel in no time. And, yes, that's sarcasm.

It's funny that even at this stage, the touch panel can be set aside a little to the side of the display, and at the same time it will remain functional (like the display itself). Funny, but alarming: will dust get between them?
iPad mini opens up like a book with pages stuck to one another. The touch panel cannot be removed, since its cable goes under the display on the main part. This means that the display should be removed, but its screws are insidiously hidden.


The next "page" is found inside, namely - a metal shielding plate in full length and width mini. This panel attaches to 16 screws. A real challenge for even the most diligent repairman.

This is where the book analogy can best be traced. Hull and Touchpad is the cover, and the display and plate are two pages. Only at this stage can you start to get something out of the case.

The panel cable goes under the plate. Record, come on bye.

Before us is the edge of the motherboard with the Murata 339S0171 Wi-Fi module.


The connector is disconnected, but the display is still adhered to by adhesive tapes along the bottom end. There is a Lightning connector somewhere ...

Display disconnected! In terms of how easy it is to replace it, Apple outperformed Amazon and ASUS (did you know the Nexus 7 is made by ASUS?). But this is just the beginning.

The display has its own board, however, it is hidden under adhesive tapes and another plate.


Display board:
Red - hardware Samsung driver W1235 S6TNMR1X01. So the display is also made by Koreans;
Orange and yellow - go and find out.
iFixit is taken for the battery. The design of the connector is inherited from the large iPad.

This is a 1-cell battery, and the easiest way to remove it from the case is with a plastic card. Better not to rush.

Different markings in different places on the battery indicate different metrics. The voltage "fluctuates" from 3.72 to 3.78 volts, the energy characteristic is from 16.5 to 16.9 watt-hours, and the capacity is from 4400 to 4440 milliampere-hours. Apple's official specs contradict everything, they say 16.3 Wh. Wisely.


Wi-Fi and Bluetooth antennas are laid close to each of the two speakers. The speakers themselves are set on very small screws.

The size of a speck of dust. Next to it is a standard overgrown screw from the iPhone 5.


An attempt to remove Lightning even with the screws unscrewed is doomed to failure: the connector is part of motherboard.

The board is still not available - firstly, because of the cable with the volume buttons and the Power key ...

... secondly - because of the glue. Here you can't do with a heating pad, you have to blow with an industrial hairdryer from the back. The aluminum panel heats up so much that it becomes impossible to hold it. IFixit has silicone pads ready.

I am afraid to peel off the board without seeing what you are slipping the tool under.

Fortunately, then it turns out that there is nothing on the other side - the board is one-sided.

The A5 chip is the undisputed record holder for the number of devices in which it is installed. iPad 2, iPhone 4S, Apple TV 3rd generation, iPod touch and iPad mini - everywhere A5. RAM? If you believe the markings, 512 megabytes.

Chipworks has kindly provided a detailed crystal diagram overlaid on the high resolution image. At least put it on the wallpaper, clickable:

Clickable

Orange - Hynix H2JTDG8UD2MBR 16GB Flash Memory
Green - Apple 338S1116 audio controller, manufacturer - Cirrus;
Yellow, blue, violet - markings will be scanned, but are not in anyone's database;

Red - Apple 338S1077 audio amplifier, made by Cirrus again.
Key difference mobile devices from Apple's competitive solutions is a non-separable de jure design. This feature makes it possible to guarantee iPhone users and iPad high level characteristics in sufficient compact body and unparalleled build quality. Each successive generation of them becomes more complex, which does not facilitate the replacement of their components. The iPad Mini 3 is no exception, but the use of a few special tools and a short set of rules will allow de facto to completely disassemble it in a few minutes, even at home.
So how do you disassemble the iPad Mini 3?
Please note that the images show the individual disassembly points of the device, and not the entire process progress.
1. Warm up the front part of the case along the perimeter of the screen and lift the front panel:

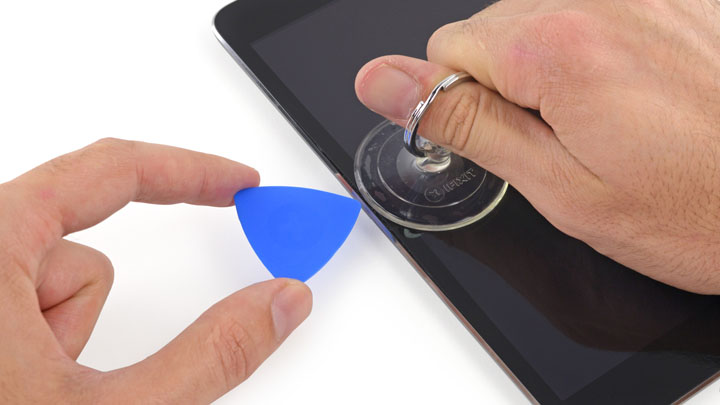


You can warm up the device using a special heating element, building or household hair dryer. The front panel can be lifted using several sharp-edged plastic tools and suction cups.
2. Remove the protective cover from the front panel, if it remains on it, and reinstall it on the front camera:


The operation can be performed manually.
3. Unscrew the four screws that secure the device screen, open it like a book:


The screws made by Phillips are of a standard design, so they can be removed with a few ordinary screwdrivers from a quality toolbox.
4. Unscrew the seven screws that secure the screen protector of the device and remove it:


The screws made by Phillips are of a standard design, so they can be removed with a few ordinary screwdrivers from a quality toolbox. The screen protector can be removed with a sharp-edged plastic tool.
5. Unscrew the four screws of the metal protection and remove it, disconnect the shield cable and remove it:


The screws made by Phillips are of a standard design, so they can be removed with a few ordinary screwdrivers from a quality toolbox. The metal protection can be removed with tweezers, the loops are disconnected with a sharp-edged plastic tool.
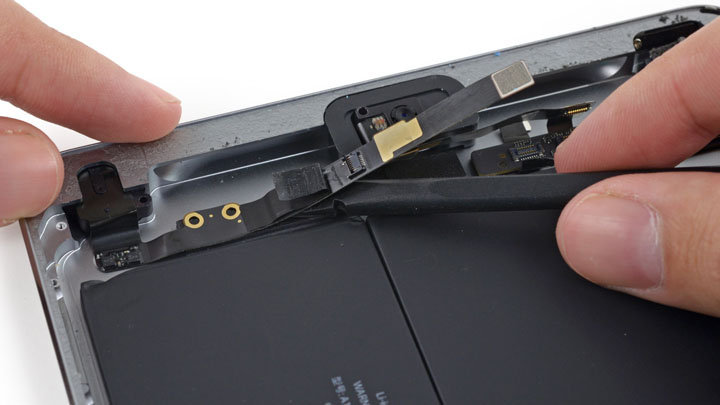
6. Disconnect the front panel cables and remove it:


7. Disconnect the Home button loops and remove it:

This can be done with a sharp-edged plastic tool.
8. Warm up the back of the case and remove the battery:


You can warm up the device using a special heating element, building or household hair dryer. The battery can be removed with a sharp plastic tool.
9. Disconnect the front camera cable, remove its protection and remove the camera itself:


Disconnect the cables and remove front camera you can use the most common tweezers and a plastic tool with a sharp edge.
10. Disconnect the ribbon cable, warm up the case and remove the microphone:


You can warm up the device using a special heating element, building or household hair dryer. You can disconnect the cables and remove the microphone using the most ordinary tweezers and a plastic tool with a sharp edge.
11. Unscrew one screw of the metal protection, disconnect the main camera cable and remove it:


The screws made by Phillips are of a standard design, so they can be removed with a few ordinary screwdrivers from a quality toolbox. You can disconnect the cables and remove the main camera using the most common tweezers and a plastic tool with a sharp edge.
12. Unscrew one screw securing the volume button cable, two screws securing the volume buttons, two screws securing the power button, disconnect the cables and remove the button block:


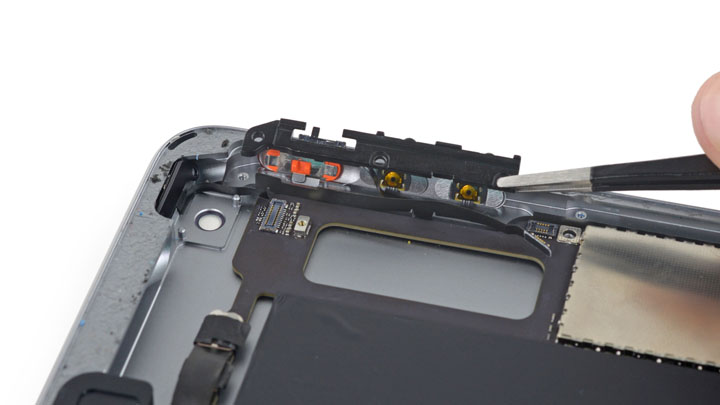


The screws made by Phillips are of a standard design, so they can be removed with a few ordinary screwdrivers from a quality toolbox. You can disconnect the cables and remove the buttons using the most ordinary tweezers and a plastic tool with a sharp edge.
13. Unscrew one fixing screw, disconnect the cables and remove the headphone jack:


The screws made by Phillips are of a standard design, so they can be removed with a few ordinary screwdrivers from a quality toolbox. You can disconnect the cables and remove the headphone jack using the most common tweezers and a plastic tool with a sharp edge.
14. Disconnect the cables, unscrew the three fixing screws and remove the left side of the Wi-Fi antenna:


The screws made by Phillips are of a standard design, so they can be removed with a few ordinary screwdrivers from a quality toolbox. You can disconnect the cables and remove the left side of the Wi-Fi antenna using the most ordinary tweezers and a plastic tool with a sharp edge.
15. Disconnect the cables, unscrew the three fixing screws and remove the right side of the Wi-Fi antenna:


The screws made by Phillips are of a standard design, so they can be removed with a few ordinary screwdrivers from a quality toolbox. You can disconnect the cables and remove the right side of the Wi-Fi antenna using the most ordinary tweezers and a plastic tool with a sharp edge.
16. Unscrew the two fixing screws and remove the left speaker:


The screws made by Phillips are of a standard design, so they can be removed with a few ordinary screwdrivers from a quality toolbox. You can remove the left speaker using the most common tweezers and a plastic tool with a sharp edge.
17. Unscrew the two fixing screws and remove the right speaker:


The screws made by Phillips are of a standard design, so they can be removed with a few ordinary screwdrivers from a quality toolbox. You can remove the right speaker using the most common tweezers and a plastic tool with a sharp edge.
18. Disconnect the cables, unscrew the two screws securing the Lightning port, one screw securing the microcircuit, warm up the back of the device and remove the motherboard:


The screws made by Phillips are of a standard design, so they can be removed with a few ordinary screwdrivers from a quality toolbox. You can warm up the device using a special heating element, building or household hair dryer. Disconnect the loops and motherboard you can use the most common tweezers and a plastic tool with a sharp edge.
Thus, it is possible to disassemble the iPad Mini 3 using several tools, only some of which are specialized, in just a few minutes, even at home. Nevertheless, it is better to use the services of qualified specialists of the EtoService company, who will definitely not cause any harm to the components of the device.
 Skype free download Russian version Install Skype application
 How to recover a photo on Android after deleting it?
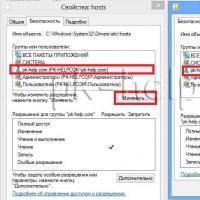 Original hosts for Windows operating systems What should be in a Windows 7 host
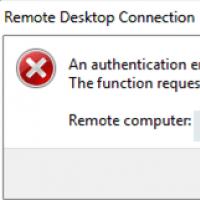 An authentication error has occurred
 Open the following ports at the client's workstation
 How to hide all VKontakte friends in the new version?
 Hide friends on VKontakte