The simplest metal detectors of their schemes are a step-by-step assembly description. Homemade metal detectors: simple and more complicated - for gold, black metal, for construction site. Package preparation
If you have sharply a question arose how to make a metal detector with your own hands at home, now we will find a response on it. Consider a step by step creation of three types of metal detectors with schemes, video and step-by-step photos.
Simple Metal Detector Kid FM at Home - Scheme, Installation
Baby FM is one of the simplest metal detectors today. The scheme is great for creating a pinpoint.
The kid fm works on the principle of the frequency meter (before that it was used in the mi koshi FM). Metal detector is simple, the search coil is also easy to make it yourself at home. It is for this reason that the baby FM has rarely raised the popularity of radio amateurs, despite the small flaws that we will talk about.
The new idea that arose from the creators of the Koshovy FM, had their own "pitfalls". The work of the metal detector was unstable due to the constant drift, and the search depth is relatively small. However, in the baby FM, these problems tried to eliminate the software and something from it happened.
Metal detector toddler FM scheme

Metal detector toddler FM scheme
All items are simple and available. The main thing is to use thermostable capacitors, they can be taken from the burnt multimeter or Soviet K71. But ceramic capacitors are not suitable.
Note! The better the quality of the capacitors will be, the more stable the metal detector will work!
Metal detector card Baby FM is very simple and looks like this:

To power the metal detector, the Crohn type batteries or another power source from 9 to 12 V. Metal detector itself consumes only 10 mA, and an increase in power consumption can only cause a powerful speaker. For this reason, it is better to use piezoodynamics or headphones.
Board and firmware for metal detector Kid FM can be downloaded below.
Download files:
Manufacturing Coil for Metal Detector Kid FM
The coil for metal detector Kid FM is also important as high-quality capacitors. Together with the capacitors, it forms a oscillating circuit with a frequency of 19 kHz.
Metal detector Metal detector Kid can be used as a pinpoint or beach metal detector.
Data for winding coil: The rim with a diameter of 70 mm is used by a cross section of 0.1-0.18 mm (95 turns).
In the photo below, the sample of serially produced pinpoints Kid FM:

For the beach: on the rim with a diameter of 180 mm, the Wire PET 155 0.1-0.18 (55 turns) is used.
Next, the turns are removed from the rim and are tightly wounded with a thread, then aluminum foil is wound on the coil to shield the coil, the screen is made at the end of the coil ends (the gap without foil). Then the cooled copper wire is wound onto the foil, and connect it with a minus on the board of the metal detector. To connect the coil to the metal detector board, the microphone wire (2 veins in the dormitory screen) are well suited to the ends of the coil, and the "screen to the screen".

Video, how the metal detector is working Kid FM:
How to make a metal detector with your own hands - schemes chance, detailed instructions

We present to your attention a diagram of a pulsed metal detector with discrimination of metals chance. Compared to other similar devices, it has a huge advantage associated with the relative ease of making a search coil.
Metal detector assembled with his own hands. A chance of a coil with a diameter 25 will be able to find a wedding ring at a distance of 18 cm, and the helmet - 40-45 cm. Maximum search depth is 1 meter.
Metal detector chance scheme

Metal detector chance scheme
We also give a diagram of a metal detector control buttons:

Metal detector control buttons chance
The scheme has an average level of complexity. For the assembly of the metal detector, with their own hands at home, there will be some experience.
Required components for assembling metal detector chance with their own hands
The schemes of the chance contains a microcontroller, so it will take the intra-chemical programmer for its successful assembly. Also in the scheme there is a number of fairly expensive components: screen, processor and ADC.
Upon assembly, the device is not more complicated than the Tracker PI-2 and Clone PI-W, and on the setting - it is even easier, since it does not even have a traditional trimmer for balancing OU.
Special attention should be paid to the ADC MCP3201, only after its acquisition you can move to the further assembly of the device, since it is very difficult to find it.
According to the MSR3201 scheme, but there are analogues - ADS7816, ADS7817, ADS7822, LTC1285, LTC1286, SP8528 (can differ something).
After that, the next important point is the LCD indicator, as the most expensive item, its price is about 10 dollars. Any indicators on the built-in HD44780 controller are suitable (almost all that), many firms produce them, so it is very difficult to give a specific labeling. It is best to simply select the LCD indicator with a built-in controller for two lines of 16 characters. It will be with the support of Cyrillic or not - it does not matter. It will have a backlight or not - it also does not matter if it is not planned to use in the dark or in basements / catacombs. But in any marking of the desired indicator, the "1602" will take place - denoting that this is a sign-sensing indicator with two lines of 16 characters.
If you keep such an indicator in your hands for the first time, it is better to get closer to him with it. Well, if you find a datashet on it, but you can do without it, if you carefully examine. We connect from the external source +5 to the output 2 of the indicator, and the ground - to the conclusions 1 and 5. Usually, the holes and screen of the indicator itself are sitting on the mass, and the power conductings are wider than the signal - it will also help it better and more correctly.
Conclusion 3 of the indicator through a trim resistor 22 kΩ Sadim for mass (as on the instrument diagram). Include and rotate this rapter to achieve the beautiful display of the entire top line of the indicator. It is advisable to figure out the backlight - it is removed on the opposite side of the indicator by two separate conclusions, it can be duplicated and to conclusions 15 and 16 (usually). We find where "plus", where "minus", we try to power from +5 V, preferably through a 200 ohm resistor (as in the diagram). Now, with the indicator, you are well acquainted, customized contrast and you can be confident that because of it you will not have any problems.
Now, as for the rest of the configuration, out of the OU (according to the scheme it is OP37), so far, only NE5534p has been working, which is much cheaper than said or37 and more common. Positive voltage converter with +12 V in negative -12 in can be applied without the letter S in the title. Instead of the field KP505 goes KP501A.
Detailed instructions for assembling metal detector Chance with their own hands
The process of assembling the metal detector chance should begin with the manufacture of a printed circuit board. Download Picture Figure and Other Materials for Assembling Metal Detector Chance with your own hands below.
Download files:
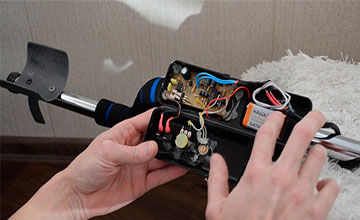
The collected board of the metal detector The chance looks like this:

Board Metal Detector Chance 2D

Metal detector board 3D chance
After the manufacture and spikes of the board, you need to flash the microcontroller. Last firmware version 1.2.1.
All versions of firmware for download:
For the firmware of the microcontroller, the configuration bits arrange as in the figure below:

After that, we connect the power to the metal detector, and it should earn. True while the metal he does not see. You need to make a coil.
But the already collected block looks like:

Metal detector Chance with your own hands - making coil

For winding coil, you can use the winding wire with a cross section of 0.67-0.85 mm.
After connecting the coil, you can already fully check the metal detector. But for full-fledged work with the metal detector, it is worth knocked into the housing and make a bar for him.

False responses from the metal detector there are no chance, if there are no electrical appliances included nearby. The sensitivity is good, as for selective MD. Selectivity and discrimination make your business. All nuances that accompany work even very decent and expensive corporate instruments, similarly work out here - for example, flat iron objects "beat in a collar", as the conductivity is also disappointed. It is not particularly waiting for miracles here - you will not deceive nature, but with experience on the indicator and the sound, it is possible to distinguish the glands from brass and bronze.
In the work, the chance showed itself as a simple and reliable metal detector, but everything is not very rosy with discrimination. Really, the device sends only small iron garbage and small nails, but the beer stoppers are already caused by difficulties. Also, the device, like other pulse metal detectors, does not see the gold chains.
Video with running chance on the table:
Metal detector Clone PI at home - diagram and detailed instructions
Clone PI is a pulse metal detector without determining the type of metals that can work with coils of various sizes. When using a ring with a diameter of 20 cm, the clone can find a coin at a depth of up to 25 cm, and a large metal - up to 1 meter.
The basis of the clone is taken by the Tracker PI-2 Metal Detector scheme with some changes to it.
The CLone PI metal detector has the following differences from the original (Tracker PI-2 Metal Detector):
- Using the AVR microcontroller instead of a PIC controller.
- Using the LCD screen without LEDs to indicate.
- The presence of fast and slow auto-adjustment.
- All metal detector control (without variable resistors).
CLONE PI Metal Detector Scheme

CLONE PI Metal Detector Scheme
ATTENTION: The latest firmware versions for metal detector were produced for PIC18F252 microcontroller!
Clone Pi is a pulsed metal detector of medium difficulty, it will be folded for a beginner in the manufacture. However, a person who has little experience in assembling metal detectors or other electronics, can cope with it.
The clone of metal detector contains several expensive elements: LCD screen, MCP3201 ADC and microcontroller. Before the start of making a metal detector, be sure to purchase the ADC, as difficulties may arise with its purchase!
Also, the diagram of the metal detector, contains a programmable microcontroller, so you will need a programmer with support for programming microcontrollers - PIC18F252 and use the ability to use it.
On the screen, the metal detector clone Pi displays the following information:

- Response level ("fast" and "slow" sliders).
- Supply voltage.
- Threshold (value, inverse sensitivity).
- Volume.
- A sign of auto-adjustment activity (the response exceeds the threshold to any side).
- A sign of a slow auto adjustment (deviation of the response to a positive side), coincides with sound alarm.
- Display indicator displayed display.
Assembling metal detector Clone Pi do it yourself
The clone PI metal detector assembly, as already mentioned above, you should start with the search and purchase of parts, for the manufacture of a printed circuit board. After that, you can move to the direct process of manufacturing and assembly.
First of all, you need to raise a printed circuit board:

Clone Pi Metal Detector Printing Board
After making a printed circuit board in it, it is necessary to have all radio components. Chips are better installed on the panels. Also, we connect the control buttons, the screen, speaker, and connectors for the metal detector's coil and power connectors. After the soldering is completed, you need to rinse with alcohol and dry well.
Then carefully inspect the fee to identify unapproed places and the "dullness". If everything is fine, you can proceed to programming the microcontroller.
Firmware, PCB Drawings and Other Materials that may be needed when creating a metal detector clone-pi with your own hands at home, you can download below.
Download files:
After programming, the microcontroller is installed on the fee, and you can already see the first fruits of your work.
Metal detector power is better supplied through a fuse (2-5 A). In case of closure or error when soldering, he can save your fee!
If the metal detector turned on, everything shows on the screen, it gives the sound and reacts to the control buttons, you can proceed to the manufacture of the search coil. If something does not work, then we return to the stage of visual inspection, checking the fee on the scheme and identifying the defects of the assembly!
Production of search coil for metal detector Clone Pi
A simple search coil for the CLone PI metal detector can be made from the winding enamel of the wire with a diameter of 0.6-0.8 mm, wrapped 25 turns on a mandrel with a diameter of 25-27 cm. You can use a saucepan or another suitable round item.
Then the coil's turns are tightly weaken with a tape or scotch. To the ends of the coil, we swell a retinuous stranded wire with a cross section of 0.75 mm and a length of 1-1.3 meters. For the convenience of work, protect the coil from shocks and give her aesthetic species, you can shove it into such a case:

By the end of the coil, we swell the connector and connect it to the metal detector. Include it and check the presence of a reaction to the metal. If the reaction is and you have good sensitivity, you can make an adjustment of the metal detector and proceed to the final assembly of the metal detector in the case. The photo below shows an example of the location of the elements of the metal detector inside the housing.

After assembling the metal detector and coils in the case, it remains to make a bar for it and start searching!
- See also how to make it yourself
Equipment and materials
To assemble a homemade metal detector with their own hands, the following components and tools will be needed:
- Chip. It is suitable as a domestic, type KR1006RV1 and its analogue of foreign production (Ne 555)
- Copper wire for coil winding
- Transistors of various formats (BC 547, IRF 740, NPN, etc.)
- Finished printed circuit board or material for its manufacture
- Plastic or metal tube sufficient length, for use as a rod
- Material for all hull elements - Durable plastic
- Consumables: Any suitable fasteners, tape
- Equipment: Soldering Iron, Screwdriver
This is the minimum set that will be enough to collect the simplest device. Such a device is perfect for beginner treasures.
Build device
To collect the simplest metal detector, you need to go through a few steps.
Paper assembly
The electronics by tradition is the most difficult part of any instrument. It is impossible to do without chip in this case, so it will be logical to start the assembly from the printed circuit board.
For a simple metal detector there are two options for printed circuit boards:
- Board under the microcircuitNe 555 (or similar domestic
- Transistor board.
Even with self-assembly, the printed circuit board is still better acquired in the finished form. They can be found in any radio electronics store. The fact is that even if the wizard decides to collect a printed circuit board, it will take to buy materials for her manufacturer, which is unlikely perhaps, such as Getinax - plates from pressed paper.
Installation of electronics on the fee
Next, the task of the master is to install all electronic elements on the fee. Here, the main condition is to strictly observe the principal electrical scheme of the metal detector. From the accuracy of the soldering depends on the further operation of the entire device.
To increase the stability of the metal detector, it is recommended to additionally install the film capacitors on the fee. They have increased thermal stability. Especially important is for use in cold weather, for example, with frequent searches in autumn.
Power supply
Powerful scheme The self-made metal detector is provided by any power source, with a total voltage of 9 to 12V. But it is believed that the sensitivity of the device is better when using the power supply of 12V. It can be like a battery and several batteries. You can even use unnecessary rechargeable batteries from laptops.
It is worth noting that even with the simplicity of the scheme, as a result, the device turns out quite powerful and consumes a significant amount of energy. With prolonged in time, search should be taken care of the presence of spare batteries, and it is best to use charged batteries, which will avoid trouble with the discharge of batteries at the most inopportune moment.
Assembling coil
So, as a collected device refers to a pulse, the accuracy of the coil assembly here is less important. The optimal option is to use rims with a diameter of about 200 mm. It requires 25 turns of the copper cable. After completion of the winding, the coil must be additionally copied to any tape. This will provide additional protection against moisture.

To make the coil more sensitive, you can increase the frame diameter to 250 mm, while simultaneously reduce the number of cable turns to 21-22. After winding and isolation of the coil, it must be installed on a rigid base. It is extremely important that it is from non-metallic material. You can use shockproof plastic. Such a coil becomes more sensitive to non-ferrous metal, and with small additional improvements theoretically be able to produce signals and from precious metals that occur not too deep in the soil.
Conclusion The coil in a durable building is very important, because it is located at the very bottom of the rod and often comes into contact with the ground, low-growing plants, grass, stones and garbage. Thus, the coil is securely protected from shocks.
The conclusions from the coil must be soldered to the wire, and better to twisted pair.
Setting the device
If the assembly was made according to the detailed instructions, then the metal detector does not need additional configuration, since the default will have the highest possible sensitivity. But if you need a more subtle tuning, you can twist the resistorR. 13, having achieved rare single clicks in the dynamics of the device.
But if it is possible to achieve such an effect only at extreme position, then the resistor is better changed toR. 12. Clicks in the dynamics during normal operation should occur at average positions. If there is an oscillage, this device is easy to measure the frequency and speed up the process of setting.
The frequency for normal operation should be approximately 130-150 Hz.
Work with a metal detector
Immediately after switching on, you need to wait a bit (approximately 15 seconds) so that the device stabilize its work. Setting resistorR. 13 To the desired state, you can proceed directly to search operations.
Make a metal detector at home
Do not everyone know how to make a metal detector with their own hands at home.The basis of the work of any metal detectors is the transmission and response of electromagnetic waves. Key elements of this type of devices: two coils (sometimes connected in one). The first coil is transmitting, the second is responsible for receiving the response signal emanating from the found items.
Metal detector works on the following principle:
Silent magnetic rays from the device are passing through metal objects, which creates an additional (secondary) magnetic field. The receiving coil catches the appearance of such a field, sends information about it to the control unit, which activates the alert system.
On the principle of operation, such devices can be divided into:
· Simple. The cheapest devices leading their work on a banal, but effective principle of "transmission-reception".
· Induction. This is just that in which two coils are combined into one common.
· Pulse. Work on the basis of a pulse emanating from the transmitter. After the release of the pulse, it is immediately disconnected and turns on when it is necessary to generate a new pulse.
There is a different classification of devices based on their technical features:
· Dynamic. Simple in the design and operation, the device continuously scanning the action area of \u200b\u200bthe created field. The key principle of working with such a metal detector is the need for constant location in motion, otherwise the signal disappears. Minus such seekers is a rather low sensitivity.
· Pulse instruments. Have increased sensitivity, however, require experience and additional configuration skills. Sometimes such a device is equipped at several coils at once, each of which is applied to various types of metals and soil on the ground, where work is carried out. Among the metal detectors of this type, electronic devices leading to a low frequency level are most popular - in the 3 kHz region.
· Electronic. Such detectors are good to search for large metal objects, having a good level of sensitivity. However, on the other hand, they can skip small artifacts, as they often have setting to ignore small signals, most often emanating from unnecessary objects, such as metal debris.
· Depth The detector is designed to search for objects that occur at a considerable depth underground. Such devices are capable of catching the signal even at a depth of 6 meters, despite the fact that the remaining most often work at a depth of no more than 3. Such a device works on the basis of two coils, like others. But here change their position relative to the earth's surface. One of them is located in parallel to the ground, the second is perpendicular.
· Another option that interests search engines to a lesser extent is stationary metal detectors. This is nothing like a framework that can often be seen on particularly important objects: stadiums, metro stations. They ways to calculate the presence of any metal products in bags and internal people who pass through the installed frame.
The simplest of metal detectors who base their work on the Provision-reception principle also have a simple design and assembly principle, therefore such devices are best suited for making with their own hands. It is important here only a competent selection of details in accordance with the instructions, and the presence of minimal experience with electronics.
How to make metal detector do it yourself
Making a metal detector from domestic parts for beginners is best viewed on the basis of the Pirate model. This option has long been included in the top homemade metal detectors. It is widely in demand among lovers of self-assembly, and in the finished form is a device with good indicators of depth and accuracy of the search. It allows you to detect items at a depth of 1.5 meters, which for instruments with such a simple design can be called a good indicator.
Among the devices of this level there is another scheme based on frequency beats. But if you compare the characteristics of the "pirate" with devices on this scheme, the comparison will be in favor of Pirate. In addition, the scheme of this metal detector is also easier to assemble, consists of fewer parts and nodes.
One of the possible disadvantages of this model is the lack of a discrimination function. A simple metal detector scheme simply cannot provide the ability to connect a discriminator. But with experience, the seekers learn to independently determine which metal gives a signal from fluctuating the field.
Device of the metal detector "Pirate"
This detector refers to pulse type devices. To understand how to assemble such a device yourself, you need to know how the metal detector is arranged, and then you will need to purchase:
· Long plastic tube for rod. All the rest of the equipment will be attached to it. Well in this case fit water pipes from PVC.
· Material for the control unit housing. You can use any robust plastic suitable container.
· Speaker. Anyway will suit, for example, from a small Chinese portable radio. The main condition is the level of resistance from 8 to 50 ohms.
· Headphones with format connectormini - Jack (3.5 mm ). Any headphones from the phone are suitablemP 3-player or any similar device
· Copper cable on the coil
· Isol
· Transistors of various types:BC 547, IRF 740 and BC 557
· Two chips: K157UD2 andNE 555.
· Capacitors. It is better to use ceramic and film.
· Electrolyte capacitors, only 5 pieces.
· Resistors of various resistance levels

"Pirate" is a metal detector on two chips. Here is a chipNe 555 or its domestic equivalent.
The operation of the device begins with a comparator. One output is attached to the generator (creating an electromagnetic field), the other to the receiving coil, and the third to the speaker for sound alarm.
When the objects of metal objects are detected within the framework of the created field, the signal of this from the receiving coil comes to the comparator, and after - on a speaker, to the corresponding audio alarm.
A ready-made fee, with elements placed on it placed in a conventional junction box. It can be made independently of durable plastic, and you can buy in any radio reciprition store.
If the standard device is not enough, that is, the option to make a more advanced model for gold. The power of the device collected by the usual scheme is not enough to respond to gold and objects from it, so the network is easy to find an improved scheme.
Can I use the details from the radio?
To create a signal in this model, the transistors of KT-361 and KT-215 samples are perfectly suitable. These are the details of the USSR sample and can be found in any old radio, or in any radio engineering from those times.
Collect the printed circuit board "Pirate"?
A printed circuit board for such a device can be made independently, but it will not be possible to make it from the girlfriend. For the manufacture you will need a sheet of special material - Ghetynaks. It is a pressed tight paper plates impregnated with epoxy resin. Additionally, it must be covered with a special copper foil, which is used in electrical engineering.
At such a fee you need to transfer all connecting items, place places for fasteners and neatly drill holes in them. All tracks must be covered with a special protective varnish, and as soon as it dries, the fee must be omitted into a chlorine solution. This gives additional protection to the plots where the protective layer of copper foil is the finest.
Assembling coil
As a base, a ring is needed, from any non-metallic material having a diameter of about 200 mm. There may be even wooden hoops. A copper wire is wound on the selected base, about 30 turns. To increase the sensitivity, it is necessary to increase the diameter of the ring to 250-260 mm, and the number of turns - to decrease to 20-22.
Wash comfortably on a pre-prepared board or any smooth surface. The distance between the turns must be observed approximately at a level equal to the base diameter. In several places for reliability, you must additionally strengthen the winding of the coil with a tape.
The coil is ready, it can be attached to the detector and test performance.
Also, the coil can be collected from the minimum set of undergraduates in just a few minutes. For this, in addition to the twisted pair of a 2.5 mm cable pair, you will need a minimum set of tools: a soldering iron, a multi-seater, a sharp knife and a little solder.
Procedure in this case is this:
· To begin with, the wire must be collapsed by a pigtail in two emissions, leaving about 10 cm. On both sides.
· Then - to clean the winding, freeing the cable veins for the connection.
· Connect the veins according to the scheme, for the reliability, to solder them with a soldering iron with a solder.
· Test the presence of a signal with the help of a multitetester, the winding ends to attach a soldering iron to a stranded cable.
Assembly of the metal detector "Pirate" from finished parts
Once all design elements are ready, you can start a complete assembly. All items are attached to a fairly long bar. The convenient handle from rubber is attached from above, just below - the control unit enclosed in the plastic case, at the very bottom - the coil. If everything is done correctly, when assembling items, errors were not allowed - the device is ready for operation, additional manipulations do not have to do.
The deep metal detector for the design resembles the usual, with the exception of some technical details. His difference is also increased sensitivity to metal objects, which makes it possible to detect them at greater depth compared to a simple metal detector. In addition, there is a function of selective search, that is, the ability to find objects of a certain size, without reacting to unsuitable by parameters.
Diagram of the deep metal detector
It is pretty simple, despite the seeming complexity. It consists of a metal detector of two parts - receiving and transmitting. The main device is the high frequency transmitter generator. Two frame antennas, one of which serves as a transmitter of the signal, the second receiver. They must be located strictly at an angle of 90 degrees to each other to prevent the receiving antenna signal trash signal. When finding a metal object, a magnetic field created by the generator is subjected to distortion, and is subsequently captured by the host antenna. In this case, the mass of the metal object is used as a source of radiation, sending the energy produced to the receiving antenna.
Metal detector receiver scheme
The transmitter includes a thyristor with a power of 0.25 to 1 W, a sound generator with a frequency of 200 Hz. When the metal object is located, the operator hears the sound with a frequency of 200 Hz, the strength of which depends on the value of the found object and the distance to it.
The detector receiver, the contour of the oscillations of which reacts to the frequency of 120 kHz, and consisting of two diodes. An absolutely any low frequency generator can be served in an old radio receiver. Sufficient amplifier on transistors in the amount of 5-6 pieces. A transistor is also used as a current amplifier for an arrow device that allows you to measure the level of the received signal. That is, in the composition of the device there are two types of indicators - visual and acoustic. The frequency of operation is configured in such a way as not to interfere with the operation of the signal receiver.
 Transmitter scheme
Required parts and tools for assembly
To build such a metal detector, you must first prepare a set of necessary details and tools.
In the case of a pulsed metal detector approximate list of parts Will look like this:
- Electrolyte capacitors with a voltage of minimum 16 in the following containers: 2 capacitors with a capacity of 10 μF, one capacity of 2200 μF, 2 pcs - 1 μF.
- Capacitors from ceramics: 1 pcs with a capacity of 1 NF.
- Film capacitors of the minimum voltage values, for example, 63 V - 2 pcs 100 nf.
- Resistors of 0, 125 W: 1 K - one, 1.6 K - one, 47 K - one, 62k - two, 100 K - one, 120 K - one, 470 K - one, 2 ohm - one, 100 ohms - one, 470 ohms - one, 150 ohms one,
- Resistors of 0.25 W: 10 ohms one.
- 0.5 W resistors: 390 ohms - one
- Resistors 1 W: 220 ohms one.
- Resistors Variables: 10 KODIN, 100 K - one,
- Transistors: Sun 557 - one, Sun 547 - one, IRF 740 - one,
- Diodes: 1N4148 - two, 1N4007 - one.
- Microcircuits: K157 UD2, NE555.
- Panels for each of them.
 Details for metal detector
From instruments When performing work, you will need:
- Soldering iron, Tin, Special Solder, Other soldering facilities.
- Set of screwdrivers, nippers, pliers and other plumbing tools.
- Materials for the production of printed circuit board.
Metal detector assembly stages
The process of assembling the depth metal detector includes the following steps:
At the first stage, it is necessary to assemble the electronic part, namely the control unit.
Step-by-step process looks like this:
- Cutting textolite required size.
- Preparation of the pattern of the printed circuit board and its transfer directly on the fee.
- Preparation of the etching solution. It consists of salt, cooler, electrolyte and hydrogen peroxide.
- Etching board and drilling technological holes.
- The logging of the board using the soldering iron.
- Next comes the most important stage in the assembly of the control unit. This is the selection, search and soldering parts directly on the fee.
- Wreathing the trial coil. There are several options for its winding. The simplest option is to use the PEV wire with a size of 0.5 and to wind it 25 turns on a suitable rim with a diameter of about 19-20 cm.
The best option will be soldered all directly, and after the end of the setup it is necessary to choose the necessary connectors and adapters. The twist is better not to do, it has a negative effect on the sensitivity of the device.
The second is a good option will make such a ring from the wire twisted pair. It will take about 2.5 - 2.7 m wires.
To achieve maximum sensitivity, you must perform the following steps:
- Wim 25 turns of the wire.
- Test, cut off the small pieces of wire and watching the increase in sensitivity.
- It is necessary to do it until the sensitivity starts to decline.
- Calculate the number of turns, to wind the final coil version, adding 1-2 turns. Thus, the maximum sensitivity value is achieved.
At the end of the main works, the control unit, the coil and the remaining parts are fixed in their places on the rod. Metal detector can be included and checked.
Possible problems when assembling
- The assembled device does not give a reaction to metal items. The reason may be a breakdown of diodes or a transistor. It is required to replace faulty parts.
- Excessive heating of the transistor. There should be a resistor of smaller resistance, reducing it until heating stops.
The assembly of this type of metal detectors is not too complicated, with a clear observance of all rules and instructions.
Best Metal Detector
Why was Volksturm called the best metal detector? The main thing is the scheme really simple and really working. From a variety of metal detectors schemes that I personally did, it is here that everything is simple, deep and reliably! Moreover, with its simplicity, in the metal detector there is a good discrimination scheme - the definition of iron or non-ferrous metal is in the ground. The assembly of the metal detector consists in an error-free solder of the board and setting the coils into the resonance and at zero at the output of the input stage on the LF353. There is nothing superser, there would be a desire and brains. We look constructive metal detector execution and a new enhanced Volksturm scheme with a description.
Since, in the course of the assembly, questions arise to save your time and not to force the hundreds of pages of the forum, here are answers to the 10 most popular questions. The article in the process of writing, so some items will be supplemented later.
1. Principle of operation and detecting the goals of this metal detector?
2. How to check whether a metal detector work works?
3. What resonance to choose?
4. What condensers are better?
5. How to set up resonance?
6. How to cut coils in zero?
7. What wire for coils is better?
8. What are the details and what can be replaced?
9. What is the depth of the search for goals?
10. Nutrition of the Volksturm Metal Detector?
The principle of operation of the Volksturm Metal Detector
I will try in two words about the principle of operation: transmission, reception and balance of induction. In the search sensor of the metal detector, 2 coils are installed - transmitting and receiving. The presence of a metal changes the inductive link between them (including phase), which affects the received signal, which is then processed by the indication unit. Between the first and second chip, the switch controlled by the generator shifted by phase relative to the transmitting channel (i.e., when the transmitter works, the receiver is turned off and on the contrary if the receiver is turned on the transmitter rests, and the receiver calmly catches the reflected signal in this pause). So, you turned on the metal detector and it beeps. Excellent, if stamps - it means many nodes work. Let's figure out why it is stamping. The U6B generator constantly generates a tone. Next, it enters the amplifier on two transistors, but the UHH will not open (will not miss the tone) until the voltage at the y2B (7th output) will not allow it. This voltage is set by changing the mode using this very resistor TRACH. They need to set such tension so that the UHR almost opened and missed the signal from the generator. And the input pair of Milvololt from the metal detector coil, passing the amplifying cascades, will exceed this threshold and it will open completely and the speaker will be discovered. Now let's follow the passage of the signal, or rather the response signal. At the first cascade (1-U1A) there will be a pair of Milcivolt, you can up to 50. On the second cascade (7-U1B), this deviation will increase, on the third (1-U2) will already be a couple of volts. But without a response everywhere at the outputs at zeros.
How to check whether the board is working

In general, the amplifier and key (CD 4066) is checked with a finger at the RX input contact with the maximum Sens resistance and the maximum background on the dynamics. If the change in the background is when pressing a finger for a second, the key and the operating rooms work, then connect the RX coils with the circuit condenser in parallel, the condenser on the TX coil sequentially, we give one coil to another and begin to reduce in 0 by the minimum AC indication on the first leg of the amplifier U1A. Next, we take something big and iron and check there is a reaction to metal in the dynamics or not. We will check the voltage on the U2B (7th output) it should be a trash regulator, change + volt. If not, the problem is in this Cascade of OU. To start checking the board, turn off the coil and turn on the power.
1. Must go sound when the sensor regulator is positioned on the maximum resistance, totto the finger on the Px - if there is a reaction, all the operatingors work, if not, we check the finger starting with U2 and change (survey the strapping) of non-working OU.
2. The generator operation is verified by the frequency meter program. Plug from headphones soldered to 12 withdrawal CD4013 (561TM2) prudently dropping P23 (so that the sound card does not burn). In the sound card to use in-lane. We look at the generation frequency, its stability is 8192 Hz. If it is strongly shifted, then the C9 capacitor should be harvested, if after it is not clearly highlighted and / or a lot of frequency bursts nearby - replace quartz.
3. Checked amplifiers and generator. If everything is fine, but still does not work - change the key (CD 4066).
What resonance to choose

When connecting the coil into a serial resonance, the current in the coil and the overall consumption of the circuit increases. Increases the distance detection distance, but it is only on the table. On the real soil, the earth will feel the stronger than the larger the pumping current in the coil. It is better to turn on parallel resonance, and raise the input cascades. Yes, and the batteries are enough much longer. Despite the fact that consistent resonance is used in all branded expensive metal plates, in the storm you need it precisely parallel. In imported, expensive devices, good configuration schematics from the ground, therefore, in these devices can be allowed to be allowed.
What condensers are better to install in the scheme metal detector

The type of capacitor connected to the coil is not when, and if it was experimentally changed two and saw that with one of them the resonance is better, then it is simply one of the supposedly 0.1 μF really has 0.098 Igf, and the other 0.11. So the difference between them in resonance is obtained. I used Soviet K73-17 and green imported pillows.
How to set up resonance coils metal detector

The coil, as the best option, is obtained from plastering grads glued with epoxy resin from the ends to the size you need. Moreover, its central part with a piece of the handle of this very grater, which is processed to one wide ear. On the bar, on the contrary, the fork of two bunches of fastening. This solution allows you to solve the problem of deformation of the coil, when tightening the plastic bolt. The windings for the windings make the usual delicate, then setting the zero and fill. From the cold end TX, we will leave 50 cm. Wires, which originally not to fill, and press the small coil from it (with a diameter of 3 cm) and place it inside the RX, moving and deforming it in small limits, you can achieve an accurate zero, but to do it It is better on the street by placing the coil at the Earth (as when searching) with the geb disconnected if it is, then finally pour the resin. Then the detuning from the Earth, it works more, less tolerable (the exception is strongly mineralized soil). Such a coil is obtained easy, durable, little prone to thermodood, and treated and painted very pretty. And one more observation: if the metal detector is assembled with downtown (GEB) and under the central location of the resistor's engine to set zero a very small washer, the geba adjustment range is 80-100 mV. If you set the zero large subject of a coin 10-50 kopeck. The adjustment range increases to + - 500-600 mV. For voltage in the process of adjusting the resonance, do not chase - I have about 40V with a 12V power with a consistent resonance. To discriminate, condensers in the coils turn on in parallel (the sequential inclusion is only needed at the selection stage for resonance) - on ferrous metals there will be a long sound, color - short.
Or even easier. We connect the coils in turn to the transmitting TX output. We configure one in the resonance, and configuring it - another. Step by step: they connected, parallel the coil was twisted by a multimeter at the limit variables, the condenser 0.07-0.08 ICF soldered the coil parallel to the coil, see the testimony. Suppose 4 V is very weak, not in resonance with a frequency. Pressed parallel to the first condenser of the second small capacity - 0.01 μF (0.07 + 0.01 \u003d 0.08). We look - already showed a voltmeter 7 V. Excellent, we will increase the container, connect to 0.02 μF - we look at the voltmeter, and there are 20 V. Great, we are going on - another dock is a couple of thousand peaks of tanks. Yeah. Already the beginning fall, roll up back. And so to achieve maximum voltmeter readings on a metal detector coil. Then, similarly on the other (reception) coil. Configure maximum and connect back to the receiving socket.
How to reduce metal dealer coils in zero

To adjust zero, we connect the tester to the first leg LF353 and we begin to compress, stretch the coil. After the epoxy bay - Nolik will definitely run away. Therefore, it is necessary to pour not the whole coil, but leave space for adjustment, and after drying, bring to zero and pour finally. Take a piece of twine and half the coil to tie in one turn to the middle (to the central part, the place of connecting two coils) insert a piece of a piece of sticks after which it is twisted (pulling the twine) - the coil will shrink, catching the spike sponge to be powered by glue Again, to adjust the nolik by turning the wand more slightly and pour the twine finally. Or easier: the transmitted is fixed in plastic stationary, and the reception is superimposed on the first 1 cm, such as wedding rings. At the first pin, U1a will be a peak of 8 kHz - can be controlled by a voltmeter of alternating current, but better just high-level headphones. So the receiving coil of the metal detection must be shifted, then shifted with transmitting until the output of the OU does not appeal to a minimum (or the testimony of the voltmeter will not fall to several milcialt). Everything, the coil is reduced, fix.
Which wire for search coils is better

Wire for winding coils does not matter. From 0.3 to 0.8 there will be any, it will still have to pick up the capacitance to adjust the contours to the resonance and the frequency of 8.192 kHz. Of course, a thinner wire is quite suitable, just what it is thicker, the kindness and, as a result of a little - better. But if you wind 1 mm - it will be quite hard to carry. On a sheet of paper, we draw a rectangle 15 to 23 cm. From the left upper and lower angle, we deposit 2.5 cm, and connect their line. We also do the same with the right top and bottom corners, but we post 3 cm. In the middle of the bottom we put the point and on the point left and right at a distance of 1 cm. We take Phaneur, we put this sketch and drive the carnations to all points specified. We take the wire of the PEV 0.3 and wind 80 turns of the wire. But honestly, no difference how many turns. All the same, the frequency of 8 kHz will be exhibited in a condenser resonance. How many wounds - so much wound. I wind 80 turns and a condenser 0.1 of the ICF, if you wog up 50 - the container, respectively, somewhere 0.13 μF will have to have. Next, without removing from the template, wind the coil is thick thread - such as wiring harnesses. After covering the coil with varnish. When dried, remove the coil from the template. Then there is a winding of the coil with insulation - FUM tape or tape. Next is the winding of the foil coil of the coil, you can take a ribbon from electrolytic capacitors. TX The coil can not be shielded. Do not forget to leave the gap in the screen 10 mm, in the middle of the coil. The foil winding is on the tinned wire. This wire, along with the initial contact of the coil, we will have a mass. And finally winding the coil with a tape. The inductance of coils is about 3.5 mg. Capacity is about 0.1μF. As for the fill of the coil epoxy, I did not stick it at all. Just tightly climbed the tape. And nothing, two seasons went away with this metal detector without setting. Pay attention to the moisture insulation of the circuit and search coils, because you will have to mock the grass. Everything should be hermetically - otherwise the moisture will fall and the setting will float. Worsen sensitivity.
What details and what can be replaced

Transistors:
BC546 - 3pcs or kt315.
BC556 - 1pc or kt361
Operations:
LF353 - 1pcs or change to a more common TL072.
LM358N - 2pcs
Digital microcircuits:
CD4011 - 1pc
CD4066 - 1pc
CD4013 - 1pc
Resistors permanent, Power 0.125-0.25 W:
5.6K - 1pc
430K - 1pc
22K - 3pcs
10K - 1pc
390K - 1pc
1k - 2pcs
1.5K - 1pc
100K - 8pcs
220K - 1pc
130K - 2pcs
56k - 1pc
8.2K \u200b\u200b- 1pc
Resistors variables:
100K - 1pc
330K - 1pc
Capacitors are notolar:
1NF - 1pc
22nf - 3pcs (22000pf \u003d 22nf \u003d 0.02222222222
220NF - 1pc
1MKF - 2pcs
47NF - 1pc
10nf - 1pc
Electrolytic condensers:
220MKF on 16V - 2pcs
The dynamic miniature.
Quartz resonator on 32768 Hz.
Two supermarket LEDs of different color.
If you can not get imported chips, here are the domestic analogues: CD 4066 - K561T3, CD4013 - 561TM2, CD4011 - 561L7, LM358N - kr1040ud1. The LF353 chip is there is no direct analogue, but boldly put LM358N or better TL072, TL062. It is not necessary to put the operational amplifier precisely - LF353, I simply raised the reinforcement on the U1A replacing the resistor in the negative feedback circuit of 390 kΩ per 1 mΩ - sensitivity increased significantly by percentage of 50, though after this replacement gave zero, I had to glue the coil in a certain place Scotch tape slice of aluminum plate. Soviet three kopecks feels over the air at a distance of 25 centimeters and this is 6 volts when nutrition, the current consumed without indication is 10 mA. And do not forget about the panels - convenience and simplicity settings will increase significantly. CT814 transistors, KT815 - to the transmitting part of the metal detector, CT315 in UH. Transistors - 816 and 817 It is desirable to choose with the same gain coefficient. Replace on any appropriate structure and power. In the metal detector generator, a special hour quartz is installed at a frequency of 32768 Hz. This standard is absolutely for all quartz resonators, which are in any electronic and electromechanical clock. Including wrist and cheap Chinese wall / desktops. Archives with a printed circuit board for the option and for (option with manual detuning from the Earth).
What depends the depth of the search for goals
The greater the diameter of the metal dealer coil, the more deeply. In general, the depth of detection of the target with this coil depends primarily on the size of the target itself. But with an increase in the diameter of the coil, there is a decrease in the accuracy of the detection of the object and even sometimes loss of small goals. For objects with a coin, this effect is observed with an increase in the coil size over 40 cm. Total: a large search coil, has a greater depth of detection and greater capture, but less accurately detects the target than the small one. The big coil is ideal for finding deep and large goals, such as treasures and large objects.
The coil shape is divided into round and elliptic (rectangular). The elliptical coil of the metal detector has the best selectivity compared to the round, because it is less than the width of the magnetic field and there are less extraneous objects in its field. But the round has a greater depth of detection and better sensitivity to the goal. Especially on weakly mineralized soils. The round coil is most often used when searching with a metal detector.
The coils with a diameter of less than 15 cm are called small, the coil with a diameter of 15-30 cm is called medium and coils over 30 cm - large. The big coil generates a greater electromagnetic field, so it has a large detection depth than small. Big coils generate a large electromagnetic field and, accordingly, have a greater depth of detection and coating when searching. Such coils are used to view large areas, but when using them, there may be a problem on highly messenger sites because in the field of the action of large coils can be caught several goals and the metal detector will react to a larger goal.
The electromagnetic field of a small search coil is also small, so with such a coil is best to search in the territories highly lit for all sorts of small metal objects. The small coil is ideal for detecting small objects, but has a small area of \u200b\u200bcoating and a relatively small detection depth.
For universal search, medium coils will fit well. This search coil size combines a sufficient depth of search and sensitivity to goals with different sizes. I made every coil with a diameter of about 16 cm and both of these coils laid in a round stand from under the old monitor 15. "In this embodiment, the depth of this metal detector will be the following: aluminum plate 50x70 mm - 60 cm, nut M5-5 cm, coin - 30 cm, bucket - near the meter. These values \u200b\u200bare obtained in air, in the ground will be 30% less.
Metal detector power
Separately, the metal detector scheme pulls 15-20 mA, with a connected coil + 30-40 mA, and there is up to 60 mA. Of course, depending on the type of dynamics used and LEDs, this value may vary. The simplest case - the power took 3 (or even two) consistently connected lithium ion batteries from Mobile by 3.7V and during charge of discharged batteries, when you connect any power supply to 12-13V, the charge current starts from 0.8A and drops to 50m An hour and then do not need to add something at all, although the restrictive resistor of course does not prevent. As general, the most simplest option - Krona on 9V. But note that the metal detector will eat it in 2 hours. But to configure this power option. Crown under any circumstances will not give a large current that can burn something in the board.
Homemade metal detector

And now a description of the metal detector assembly process from one of the visitors. Since I have only a multimeter from the devices, I downloaded the virtual laboratory of records OL. Assemmed the adapter, a simple generator and drove into a single oscilloscope. It seems like some picture. Next, I started searching for radio components. Since the sizes are mostly laid out in the "Lay" format, Sprint-layout50 downloaded. I found out that such a laser and ironing technology of manufacturing printed circuit boards and how to train them. Put the board. By this time, all microcircuits were found. What I did not find in my shed, I had to buy. I began to solder jumpers, resistors, microcircuit sockets, and quartz from the Chinese alarm clock on the fee. Periodically checking the resistance on the power tires so that no snotes were. I decided to start collecting the digital part of the device as the easiest. That is a generator, divider and switch. Collected. Put the generator chip (K561L7) and the divider (K561TM2). B / ear microcircuits, out of some boards discovered in the shed. Submitted power 12V controlling current consumption by amermeter, 561TM2 became warm. Replaced 561TM2, filed food - zero emotions. We measure the voltage on the legs of the generator - on 1 and 2 legs of 12V. I change 561l7. I turn on - at the exit of the divider, there are generation on 13 legs (I observe on a virtual oscilloscope)! The truth is not so good, but for the absence of a normal oscilloscope - will go. But on 1, 2 and 12 legs there is nothing. So the generator works, you need to change TM2. Installed the third chip of the divider - beauty at all outputs is generation! For myself, I concluded that the chips need to be filled as careful! This is the first step of the building made.
Now configure the metal detector's fee. The "SENS" regulator did not work - sensitivity, I had to throw out the C3 capacitor after that the sensitivity adjustment earned as it should. I didn't like the sound that occurs in the extreme left position of the "Thresh" regulator - threshold, got rid of this replacing the resistor R9 with a chain of a successively connected resistor by 5.6 kΩ + condenser by 47.0 μF (negative condenser withdrawal from the transistor). While there is no LF353 chip instead of her LM358, the Soviet three kopecks feels with it at a distance of 15 centimeters.

I turned on the search coil on the transmission as a sequential oscillating circuit, and on the reception as a parallel oscillating circuit. Called the first transmitting coil, connected the collected design of the sensor to the metal detector, the oscilloscope parallel to the coil and at the maximum amplitude, the capacitors picked up. After that, the oscilloscope connected to the receiving coil to the receiving coil and at the maximum amplitude, the condensers were picked up on RX. The adjustment of the contours in the resonance takes, in the presence of an oscilloscope, a few minutes. TX and RX windings in me contain 100 turns of the wire with a diameter of 0.4. We start mixing on the table, without a case. Just so that there were two wrap with wires. And to make sure that work and the possibility of information is generally - the collapse of the coil from the DRA half the meter. Then zero will be accurate. Then impoverish the coil of the flask about 1cm (as wedding rings) shift - to move away. The zero point can be quite accurate and catch it immediately difficult. But it is.

When, I raised the reinforcement in the RX path of MD, he began to work unstable on the maximum sensitivity, this was manifested that after passing over the goal and its detection was given a signal, but it continued and after the goals before the search coil did not have any manifested in the form of intermittent and oscillating sound signals. With the help of an oscilloscope, the reason for this was found: during the operation of the dynamics and a minor feeding drawdown of the supply voltage, "zero" and the MD scheme goes into an auto-oscillating mode, to exit from which you can only download the triggering threshold. It did not suit me therefore I put it on the food of KR142EN5A + over the bright white LED to raise the voltage at the output of the integral stabilizer, the stabilizer to a higher voltage was not in me. Such an LED can be used even to illuminate the search coil. The speaker connected to the stabilizer, MD after that it became immediately very obedient all began to work as it should. I think the Volksturm is really the best homemade metal detector!
Recently, this scheme has been proposed, which will allow us to turn Volksturm S in Volksturm SS + GEB. Now the device will have a good discriminator as well as the selectivity of metals and tuning from the soil, the device rolls on a separate board and is connected instead of C5 and C4 capacitors. The scheme of refinement and in the archive. Separate thanks for information on the assembly and configuration of the metal detector to everyone who participated in the discussion and modernization of the scheme, especially helped in the preparation of the material of the electrocity, festka, XXX, SLAVAKE, EW2BW, REDKII and other radio amateurs colleagues.
A dream to find a treasure is increasingly replaced by our time more realistic program for the search for precious metals in a natural or artificial environment.
In modern conditions it is very important to find and extract valuable materials, Possed among waste, or in another uncontrolled medium.
The equipment is an important component of this search technology.
Search and extracting gold and valuable metals from waste, garbage, in a natural environment - part of the recycling strategy, efficient processing technologies used, including.
The occupation of their search in the Earth or the mass of industrial and other waste not only requires the use of equipment, but also stimulates its improvement. Created devices of different levels and specialization. There is an interest in such equipment from fans and enthusiasts for the search for valuable metals.
 Metal detector is the most important tool for manual search for metals in a chaotic natural or artificial environment.
With the help of such an appliance, you can search not only, but also silver, other precious metals.
Principle of device of any metal detector based on electromagnetic effects.
This is how the typical metal search technology is working:
- Device creates an electromagnetic field.
- Metal an objecthiddenly located in the foreign environment, has an impact on such a field when enters the sphere of his influence.
- Device catches the impact of an object on the electromagnetic field and signals about it.
A greater number of metal detector models work precisely on this principle.
Technical differences of such equipment allow you to obtain more complete information about the fact of detecting a metal object, for example:
- evaluate the mass of the find;
- get data on the form, size and configuration of the object;
- specify the location, including - in depth.
The network has many information about metal detectors of different complexity and design. There you can also refresh the theory of the electromagnetic field studied at school.
The most simplePrimitive metal detectors (usually it is homemade structures for the search for gold, silver and other metals of enthusiastic lovers) collect ready-made devices and products working using electromagnetic effects.
Many are familiar with a primitive, but well-workable metal detector scheme in which the electromagnetic field creates a pulsed element of a conventional calculator.
 Reaction Created fields on discovered metal objects catches the easiest household radio. A signal of such a find is sound, quite clear and understandable.
More complex Amateur and Professional Metal Search devices keep the logical basis of technology in the form of three components:
- electromagnetic field generator;
- sensor changes in this field;
- equipment for evaluation of discovered anomalies signaling about it.
Devices of different levels of complexity and functional potential can be divided into groups. Professionalism Classification and user specializations are one of the generally accepted:
- amateur equipment collected by personnel and used as a tool hobby or newcomers in the search for metals;
- semi-professional equipment necessary to passionate lovers and fans;
- professional metal detectors for constantly working in this area;
- special devices for metal search masters in difficult conditions - at a depth, under water, with the release of precious metals.
The distribution of the search equipment is such that many of the devices of this type can be purchased at the Garden and Country Inventory stores.
The device for search and metal detection is needed not only in recycling, in the search for artifacts and treasures. Numerous security systems, all famous framework - one of the versions of technology Metal search. The settings of these frames are focused on the search for weapons and similar dangerous items.
Coil
Very important node Metal search equipment - coil or frame. This is most often the winding of a special configuration, the task of which to form an electromagnetic field and catch its reaction to the detection of foreign for the search environment of the metal body.
In most structures the coil is placed on a long bar - handle to move it near the search zone.
For amateur manufacturer of coils for sale the framework of the most sought-after types. The easiest way to make such an acquisition in the online store.
 Many lovers make the coil frames on their own. This is done for reasons of money saving or in the hope of getting a better instrument of the author's design.
For this, used primary means - Plastic products, plywood and even filling in the assembly construction foam of the collected winding.
The search operator or the treastery seeks to find the most efficient technique of working with the metal detector, choosing the desired modes of operation of electronics and the correct techniques of the coil manipulation.
Electronic circuit
The logical element of the metal detector is an electronic circuit. She is Performs many functions:
- The first task of this component is in creating an electromagnetic signal of the desired formatWhich with the help of the coil is converted to the field.
- Second task of the electronic circuit - analysis of the captured frame of field changes, their processing.
- Third task - feed the information signal to the operator - Sound, light, indications of indicators and appliances.
It is best that the electronic scheme wants to assemble independently owns knowledge of radio amateurs or in electronic technology. Such a master may not just collect the desired scheme, but also change, improve the design.
Many electronic devices are simple enough their assembly can even perform a beginner. The resulting device will be operational without configuration if the collector performed the recommendation of the developer of such a scheme.
How to make a "pirate" yourself?
 One of the most popular models of metal detectors designed for his own amateur manufacturer - "Pirate".
This name containing the abbreviated data of its device and the site developers, witherally reflects the romance of the search for precious metals.
Here the main advantages of this model:
- easy device and assembly;
- low cost of parts and materials;
- sufficient operating parameters;
- defositive convenience for beginners.
The electronic circuit of this model does not require programming. In pirate used available to each part, the correctly assembled scheme is fully operational.
Design and principle of operation
The design diagram and layout of the metal detector "Pirate" is traditional for the equipment of this kind. It is a rod, at the lower end of which installed coil, and at the top - electronic unit with power element.
The location of the electronic unit must leave the place for convenient hold of the bar of the hand.
Some wizards prefer that the audio signal of the device is applied not to the speaker, but headphones. In this case, the headphone cable is departed from the electronic unit.
Technology of the device - impulse. This allows you to provide very good sensitivity indicators for such a class. Below is the diagram of the electronic unit on chips. 
Similar scheme can be collected by using transistors instead of chip. This version may require additional settings available only to experienced radio systems. That is why the transistor circuit is used less often.
Materials, details and blanks
In addition to the details of the electronic block of details specified on the schematic diagram for assembly Metal detector for gold and other metals it will be necessary to prepare some materials. and blanks:
- ready fee for assembling electronic circuit or foil material for its independent manufacture;
- power supply in the form of any combination of batteries or batteries with a total voltage 12V;
- enamel wire with a cross section of 0.5 - 0.6 mm for the manufacture of the coil;
- stranded copper wire for compounds with a cross section of at least 0.75 square meters;
- the housing for the electronic unit is the plastic capacity of the appropriate size;
- a rather durable plastic tube for the rod;
- frame for winding coil;
- consumables - solder, heat shrinkable cambrick, tape, screws and screws fasteners, adhesives and sealants.
The printed circuit board for assembling the electronic circuit is best to do according to the design of the developments presented on the Internet.
Below is presented one of such samplessuitable for assembling electronics on chips.
Lovers of homemade electronics are engaged in the manufacture of the board, and not everything. Most of those who want to create a metal detector independently prefer to buy such detail.
For assembling the coil required frame or framenot containing metal elements. The amateur master can make such a frame of plywood, plastics, or choose similar by parameters from finished plastic products, such as dishes. Right can be purchased in the finished form or made independently
Recommended coil parameters - 25 turns enamel-wire with a diameter of 0.5mm on the mandrel with a diameter of 190-200mm. The increase in diameter by 30% will increase the sensitivity of the apparatus, provided that the number of turns will be reduced to 20-21.
The plastic frame for the coil is one of the most extended metal detector details.
The technology of manipulating the coil is such that this very continuing knot can suffer from shocks about the irregularities of the Earth, stones, sharp objects. In order to avoid it the coil on the frame is covered below the plastic plate. Such a plate not only protects the coil, but also provides high-grass sliding mode. The search becomes more intense.
Order assembly and design
 For successful assembly of metal detector best adhere to such a procedure:
- production of printed circuit board and assembly of an electronic circuit;
- choosing a suitable plastic container for it and the completion of the assembly of the electronic unit;
- manufacture of coil;
- production of a rod of a comfortable shape and mounting the electronic unit and coil, performing an electronic circuit connections.
Although fundamental nature of the assembly does not have. For those who make the apparatus for constant long-term work in the search for non-ferrous metals and subsequent recycling (recycling for reapplication), an important factor is the usability.
In this case, the study of the shape of the rod and the layout of the main elements of the device becomes a key factor. Thus, a serious designer phase appears in the creation of the device.
It is best to perform this stage of work with genuine size. Such modeling can be made using wooden parts of a suitable form, for example:
- stalk for shovels;
- plywood pieces of the desired form;
- trimming of;
- temporary fastener from pieces of wire, nails and ropes.
Making sure that the arranged model of the device will be functional enough and convenient, you can start a decisive assembly. Ready apparatus, usually, does not require configurationHe is completely ready for work. You can start searching for metal by choosing the desired level of sensitivity and the correct tactics of the coil manipulation.
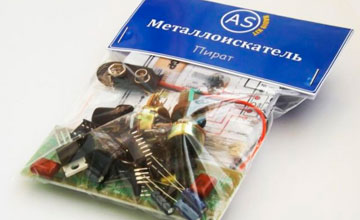 Collectors who need to collect their device as quickly as possible can take advantage of ready-made sets of parts.
Buying such a kit allows you to significantly simplify the manufacture of "pirate". One of the proposals is.
Metal detector users "Pirate", which have skills in amateur affairs, modify the design of this apparatus. That's just a few directions such improved:
- Manufacture coils with unusual parameters - in size, from special materials, such as cable type "twisted pair".
- Device of additional functional systems, for example, indication of the discharge of the battery.
- Manufacture models for underwater work.
- Supplements electronic circuit allowing to distinguish metals (Creating a function of discrimination).
Simple, inexpensive and reliable metal detector "Pirate" works regularly in a variety of conditions.
Homemade Metal Detector - Pros and Cons
Cheapness, basic advantage Independent manufacture of any products, relevant for the metal detector. That's what else there is dignity The homemade apparatus:
- the greatest compliance of the search technology for beginners;
- the possibility of creating a device fully individual form, design and configuration;
- pleasure from self-making efficient, efficient device.
Like any device made by amateur, metal detector not devoid of some flaws.
 Here are the features of the model "Pirate", users say:
- energetic charge consumption batteries nutrition;
- no discrimination, that is, accurate sensitivity on black, colored and precious metals;
- limited in comparison with expensive models sensitivity.
Despite the disadvantages, the model "Pirate" is very popular. This is explained by the simplicity of homemade manufacturing and high effectiveness of an inexpensive device.
Experts employed in the field of recycling believe that the possibilities of discrimination of the metal detector do not matter much. All the metals found are so valuable that their recycling is always justified. The orientation for the search for gold requires not only equipment, but also considerable experienceconcomitant knowledge And, of course, good luck.
Video on the topic
The video presents a detailed guide to the manufacture and collector "Pirate" with your own hands:
Conclusion
When the metal detector is ready, you can start work. You need to pay myself a report that no most perfect device will allow you to find only gold hidden objects.
The metal detector will help to find a valuable metal, and it will be very likely that it will be gold. It is best if the future seeker of metals and gold will be a real idea of \u200b\u200bthe search technique.
Many features of the operation of the finished equipment are very important for those who develop and collect their own models. Need to have an idea of \u200b\u200bthe work technology in advance. With such equipment - this is the basis of its high-quality design.
The performance of gold search rises with experience. Here the most important elementssuch Experience:
- the right choice of the design of the metal detector and its high-quality manufacture with your own hands;
- the ability to properly select a search platform;
- the ability to use the potential of the metal detector is completely;
- choosing the right search technology in different conditions;
- modernization of the metal detector.
Properly assembled and debugged equipment will always help in finding gold, and this valuable metal must be found.
In contact with
 How to reflash iPhone with PC and iTunes
 Best Bitcoin Wallets for iOS Download application wallet on iPhone
 Lenovo Vibe X2 Description, Features, User Reviews
 The computer does not see the flash drive: causes and solving the problem
 About Windows Update From Wannacry Encrypter Virus
 Hot browser keys
 New Mac Mini turned out to be five times more powerful than the predecessor