How to turn off alarm clock on wall electronic clock. How to set up electronic wristwatches correctly. Electronic Desktop Wall Clock VST
Simple life situation: changed the apartment to a new one with large quantity Rooms. And the children immediately took the clock-alarm clock from our bedroom to themselves with the words: "We need it, you are not late for school, you are not afraid of school." The wife commented on it briefly: "And thank God, I was just annoyed by the sound of their alarm clock, more like a siren disaster or worse." But on the contrary, it became completely uncomfortable: not like if I wake up among the night, I don't know, which is no hour, and there is no alarm clock, and you will need.
Mobile phone The head of the bed was noted immediately ( it is dangerous to keep it next to his head for a long time ) Yes, and the mechanical clock too: Not only is it not always clear in the twilight, which is now an hour, and you have to wake up to "turn on the brain" and their ticking does not coincide with the rhythm of the heartbeat even during sleep. And if so - choose electronic clockMoreover, I could not think that it was so difficult.
However, the hike in the nearest hour store cooled my fervor. No, the choice was big, and even huge, but I did not consider mechanical, but two ... three models of electronic glowing (remember about night and morning twilight) were offered only with one melody, if it can be called a melody at all. It is rather a very sharp and loud pilican and howl, raising even the dead. Yes, and they were not at all "five kopecks", and I simply "crushed the toad." So, straight on Aliexpress.com. Moreover, the majority of orders from him rather pleased with him, rather disappointed.
Model requirements I did not prevent special, but they were still
- 24-hour (just do not like AM and PM) time display format;
- Various alarm ringtones to choose from;
- Compact sizes;
- Autonomous workthat is, on batteries or batteries.
Chose enough fast model Ni5L New Digital LCD Alarm Led Clock (She liked me), also with free shipping. And the price of an an alarm clock - ~ 360 rubles.
I paid through the Webmoney service and even managed to forget, as the notice of sending to the "soap" came almost immediately, and I did not track the movement. Delivery - Post of Russia.
He got enough quickly, did not even have to worry. Packaging - an ordinary yellow paper envelope with a plastic pipple film inside. In it - the clock-alarm clock and a small instruction in two languages: English (not bad English) and Chinese. Three microstatic batteries in the kit was not, what it was indicated in the description of the goods. And it means that it is also not possible to try them out at the post office immediately.
Cup for batteries from behind, under a simple plastic lid with a snatch, so if at home there is no dumping - not trouble. She just does not need you.

Inserted the cherished batteries, immediately played a welcome music.
Yeah, besides the hours and alarm, and this model also has thermometermeasuring in the surrounding air in Celsius and Fahrenheit. Moreover, as shown further operation, these values \u200b\u200bare very close to the truth, and discrepancies in the tenths of degrees. Pleasant free bonus.
Weighing with batteries showed 100 with slight grams, so this value can be simply neglected. As they say, "Cold weapons alarm clock Ni5L will hardly become."
Illumination. She is really bright, pleasant blue-blue color, so you get some night in a set. True, in all this there is a "spoon of concert": it goes out fast enough, so you do everything almost lightning (yeah, at night in the pitch darkness, a half-way person is capable of this?!), or simply press the "Light" button a few times. And most drawbacks are simply not noticed.

Setting. Everything is simple and understandable, it is intuitive. So I never looked into the instruction never. Moreover, it concerns not only the hours themselves and the daily alarm, but also a timer, as well as the second alarm, which can be configured on a specific day of the week. By the way, it automatically changes when the date is directly changing.
Self melodies of sound notification A little, total 7 Plus 2 variations of outstanding beeps. But choose from them the optimal, which is not annoyed, and unobtrusively wakes up in the morning, you can still.
That's all. I hope this small article will help you decide on the choice and order. suitable model Uncomplicated hour an alarm clock, for example, such as this.
How to turn off alarm clock on the clock g shock?
After purchasing watches, the question of setting up the model immediately arises. And often people have problems, it seems to turn off the alarm clock on the clock G ShOCK, configure the date, turn on the backlight and others.
To begin with, it is worth noting that all the clock models have a standard four buttons and a special head for adjusting the arrows. Each key has its own functions.
The upper button on the right is responsible for the backlight in the dark. It allows you to see the date. If you press it for several moments, the auto-light function will turn on. The screen will glow every time the hand will be to the ground at an angle of forty degrees.
Instruction
The "MODE" button starts the stopwatch, and the button from the bottom and right allows you to reset the data. The clock of this model allows you to set the distance and calculate the average speed of movement. To set up this feature it follows for a few ...
0 0
If the alarm is not needed, you can turn it off in several ways.
How to disable one nearest signal
If you have set a signal, you can disconnect it once. In this case, the alarm will remain enabled and, by skipping one signal, will work as usual.
Run the application clock. Press the alarm icon at the top of the screen. Click the "Off" button below the desired alarm clock.
How to disable all signals
If you don't need an alarm clock tomorrow or in the next few days, it can be completely turned off. In this case, it will not work until you turn it on again.
Run the application clock. Press the alarm icon at the top of the screen. Turn off the alarm with the switch.
How to turn off the alarm clock in the notification
Two hours before the assigned time, you will see alarm notification.
To view notifications, swipe down the screen. Spend down ...
0 0
The most popular question that occurs from the owners of the clock G-Shock: "How to configure the accessory"? ". Almost every model is equipped with four buttons and a special head for the arrows. The clock setting is standard for all clock models.
So, the upper right clock button is responsible for the backlight. Thanks to this, the owner of the accessory will be able to find out the exact time at night. However, it is important to remember that such a function requires a lot of energy, which adversely affects the battery state. Right upper button allows you to find out the date.
By clicking on the "Reset" button, the user can start an alarm clock. As a rule, the G-Shock watch makes the sound every hour. In order to disable this feature and stop the alarm signal, it is enough to click on the right bottom and right upper buttons at the same time. It is necessary to hold them until all the inscriptions disappear on the dial.
Using the "Mode" button, you can start the stopwatch. By pressing the right ...
0 0
Where cabins.mashin.vaz2106 There is a spring and Sab from Mashyna at Sumy shock absorber. Spring creates auto rating active subwoofers 2015 elastic strength, then there is a subwoofer at 10GD34 with your own hands I am accumulating and the pager KK-613D gives energy to the batter. Mashyna.Vaz2106 The process of oscillations, and Sab in Mashyna Sumy has a shock absorber - the source of a viscous rating of auto-sauofers of 2015 resistance, he is nothing sabwofer at 10GD34 Do not accumulate with your own hands, and the KK-613D pager absorbs and dispels the baths. Mashin.Vaz2106 in the form of heat. Sab from Mashyna at Sumy The same rating of auto active subwoofers 2015 occurs when the subwoofer is oscillations on 10GD34 with their own diffuser hands and everything, the KK-613D pager that is kuppey. Mashin.vaz2106 is attached. The high value of SAB in Mashyna at the Sumy of Qoterness means that the rating of the car active subwoofers 2015 prevail the elastic strength. Subwoofer at 10GD34 DIY It is like a car pager KK-613D without shock absorbers. Enough batups. Mashin.vaz2106 to go on pebbles ...
0 0
How to turn off the signal on the clock G Shock 100 93 Gold Watches East USSR 76 Buy Watch Tag Watches Electronic Desktop Glowing on Batteries Rolex Oyster-Perpetual DateJust Price Not Original 64 Patek Philip Buy Copies Original Watch Watch Chanel Women's Invicta Watch Manufacturer 12 91 Buy Rolchax Watches Online Store 47 Tagheuer 9 Watch Watch Wrist Brand 2014 Photo Price Men's Watch Breitling in Moscow Buy Watch Inexpensive in Zaporozhye Hublot Original With Delivery Buy Watch in SPb Watch Wall Mounted Gardman Watch Cartier Original Price With Delivery 55 Omega Women's Watches With Delivery in Moscow 57 Buy Belarusian Watch Wristwatches Golden Babylon VDNU Hours Men's Watches on solar panels Buy Buy Pandora Watches in the online store 38 50 14 74 30 clock Patek Filip in online store 92 11 glass clocks RADO 22 Wall-mounted Clean Clock Buy inexpensive chinese watch 43 Women's Clock Gold Plated Buy 95 Copies Schwetsk Watch Ukraine 70 Watches Ulysse Nardin Original Price ...
0 0
ChP Vlasenko. Calculators.
Donetsk. Book Market No.A14, Parking.
[ 1 ] [ 2 ] [ 3 ] [ 4 ] [ 5 ] [ 6 ]
Electronic Desktop Wall Clock VST
Model VST-780-1 Red Figures Show Time in 24-speech time screen screen size 273 * 113mm Size Figure 102 * 46mm Case: Height * Width * Thickness - 17 * 33 * 4cm Casting legs for installation Power: Network 220V Length Network Cord 150cm Instruction In Russian Country Manufacturer - ChinaChP Vlasenko. Calculators. Donetsk Book Market No.A14, near Parking. Calculators. Led lights. Board alarms and electronic clocks. Wall, outdoor and interior clock. Wristwatch. Strap for clocks from leather and leatherette of all sizes. Rubber straps. Metal bracelets for watches. Batteries. Compact LCD TFT TVs. Portable DVD players. Car DVD players. DECT phones. Wired and wireless door calls. Intercoms. CD-DVD-R-RW discs ....
0 0
1. Press D to select the alarm screen to be installed.
You can install six alarm clocks, including an hourly signal.
To view the alarm clock selected for installation, click the alarm number on the screen.
Go
to ordinary alarm clocks.
to the alarms with the function repetition function.
Notification after the expiry of the specified time. The notification is repeated seven times every five minutes.
Hourly signal of time
Notification at 00 minutes of each hour.
Displaying the screen of alarm clock:
Press D to switch between the alarm screens in the following sequence: conventional alarm clocks to), alarm clock with a signal repetition function, hourly signal. 2. Press A to select alarm or hourly signal.Below you can select functions for each alarm.
3. Press and hold the button from about two seconds.
The icon will appear, the field "Hour" ...
0 0
A significant part of the electronic hours is made abroad. By ordering them in well-known firms, people get high-quality and durable electronic clocks, in the instructions for which there is no Russian escort. The electronic wristwatch contains many functions, while they have only two buttons, which can enter into a stupor when they need to be configured. In fact, everything is not as difficult as it may seem.
How to set up an e-watch?
It is done quite simple. Usually in the electronic wrist watch, the first button is signed by the word "mod". It is needed in order to switch the function of the device, among which the setting is included. Another button is called "SET". It is she who changes the value selected first button.
So, to set the time, you need to press the first button. This will lead to the fact that the number that displays the clock flashes. Now you need to press the second button, and the number will change. When the desired value is set, you need to press the first button again to flashes minutes. They are configured in the same way as the clock by pressing the second button. Now, when the time is set correctly, you must once again press the first button to exit the setup mode.
Sometimes B. electronic clock There are not two buttons, and four. In this case, it is even easier to configure them, you also need to press the "MOD" button, and then when the numbers of the clock are fed, click on the "set", and then one of the two optional buttons. The first (top or left, depending on the model) increases the value, the second - reduces. After that, you need to press "MOD" again and make the same actions with minutes.

How to set up an electronic clock if the buttons even more?
In this case, it is better to adhere to the instructions. Usually additional clock buttons cause digital Thermometer, Calendar or Stopwatch, they simply display them, but do not set up. To configure you need to press the "Mode" button several times, strolling the function for the function. When the required option appears, you can start using the "SET" button. Electronic clocks allow you to configure everything that contains: time, date, alarm clock, stopwatch, etc.

Setting the alarm in the electronic clock
Almost all electronic clocks have alarm clock. To start it, you need to click on the first button several times, thus reaching the inscription "Alarm". Time is set to the way described above, starting and turning off the alarm is shown by switching using the "ON / OFF" field.
Sleep-clock "Pulse"
Battery
Protection against water
Caring for your clock
Modes:
1. Watches (hour, minutes, seconds) and date
2. Stopwatch
3. Alarm clock
With the "B" button, the transition between editable parameters. The numbers change the "C" and "D" buttons. Go back to the current mode - button "B".
Setting time and date:
In the time display mode, press the "B" button 3 times, then using the "C" and "D" buttons to set the current time and date. Return to normal mode from setup mode - Press the "B" button.
Select between 12/24-hour time display mode - "D" button
Stopwatch:
In the usual time display mode, press the "b" button 2 times, start the Stopwatch by the "D" button, stop the stopwatch by the "D" button. Reset the stopwatch: after stopping it to press the "C" button.
Alarm clock:
In the time display mode, press the "B" button 1 time, then with the "C" and "D" buttons to set the clock and minutes. Print proper installation An alarm clock, the alarm character appears on the clock clock. To turn off the alarm, you must press the "B" button 1 time, then press the "D" button. The symbol of the stitching should disappear from the clock clock.
Return to normal mode from setup mode - Press the "B" button.
Illumination:
The "A" button turns on the clock clock illumination. The backlight is active when the "A" button is pressed and held. If you have not pressed a single button for three seconds, the clock illumination automatically goes out.
Watch "Fast Sport"
Battery
In the clock purchased by you, the battery is installed in the factory and must be replaced at the first signs of power failure.
Protection against water
The clock is not protected from water. Avoid hitting any moisture.
Caring for your clock
Never try to open the housing and remove the rear lid.
Replacing the rubber gasket that protects the clock from water and dust entering, should be carried out every 2-3 years.
If moisture fall inside the clock, then check them immediately in the workshop nearest to you.
Do not expose hours to limit temperatures.
Although the clock is designed to use them under normal conditions, nevertheless you should avoid coarse treatment and prevent them from falling.
Do not fasten the strap too much. Between your wrist and strap must pass through your finger.
To clean the strap, use a dry soft fabric, or a soft cloth moistened in an aqueous solution of a soft neutral detergent. Never use easily evaporating tools (for example. Gasoline, solvents spraying cleaning products, etc.).
When you do not use your clock, keep them in a dry place.
Chemical reactions caused by these materials lead to damage to the gaskets, housing and polishing the clock display.
Enable watch
The clock is turned on by pressing any of the three buttons once ("a", "C", "D"). By pressing the "A" button, the transition in the "current mode" between the modes in the following sequence:
- Time (hours, minutes)
- Date (month, day)
- Seconds
Setting the watch
In the "current mode", click the "B" button - the editable parameter will flash and you need to set the "A" button to set the desired position of the numbers. Next, the "in" button to select the appropriate parameter and continue editing the "A" button.
The watch display is configured in the following sequence:
1. Watches (1-24)
2. Minutes (01-60)
3. Month (1-12)
4. Day (1-31)
5. Year (00-99)
6. Time calculus system (12 or 24-hour)
ELECTRONIC SPORTS WATCH
Battery
In the clock purchased by you, the battery is installed in the factory and must be replaced at the first signs of power failure.
Protection against water
The clock is not protected from water. Avoid hitting any moisture.
Caring for your clock
Never try to open the housing and remove the rear lid.
Replacing the rubber gasket that protects the clock from water and dust entering, should be carried out every 2-3 years.
If moisture fall inside the clock, then check them immediately in the workshop nearest to you.
Do not expose hours to limit temperatures.
Although the clock is designed to use them under normal conditions, nevertheless you should avoid coarse treatment and prevent them from falling.
Do not fasten the strap too much. Between your wrist and strap must pass through your finger.
To clean the strap, use a dry soft fabric, or a soft cloth moistened in an aqueous solution of a soft neutral detergent. Never use easily evaporating tools (for example. Gasoline, solvents spraying cleaning products, etc.).
When you do not use your clock, keep them in a dry place.
Avoid hitting the watches of gasoline, cleaning solvents, aerosols from sprayers, adhesive substances, paints, etc.). Chemical reactions caused by these materials lead to damage to the gaskets, housing and polishing the clock display.
Modes:
1. Watches (time and date)
2. Alarm clock
3. Additional hours
4. Timer
5. Stopwatch
Clock Setup:
St-Stop.
SET.
Mode.
Light / Res.
In the current mode, press SET - go to edit mode. The MODE button transitions between the editable parameters. The numbers change the ST / STOP button. Go back to the current mode - Set button.
In the "Clock" mode are edited by:
- Seconds
- clock
- Minutes
- year (in the current mode this parameter is displayed as day of the week)
- Month
- date
The transition between 12 and 24-hour time calculus systems is carried out with the Light / RES button.
In the "Alarm clock" mode edited:
- clock
- Minutes
- Month
- date
In the "Additional Clock" mode are edited by:
- clock
- Minutes
In this mode, an additional time is configured over which the main time will always be displayed.
In the "timer" mode edited:
- Seconds
- Minutes
- Seconds
The transition between the "AUTO" and "Manual" modes is based on the Light / RES button.
In the "Stopwatch" mode:
Running and stop - ST-STOP button, reset - Light / Res.
If you have not pressed a single button for five seconds During the blinking of any value, the clock backlight automatically goes out.
Watch "Future"
Battery
In the clock purchased by you, the battery is installed in the factory and must be replaced at the first signs of power failure.
Protection against water
The clock is not protected from water. Avoid hitting any moisture.
Caring for your clock
Never try to open the housing and remove the rear lid.
Replacing the rubber gasket that protects the clock from water and dust entering, should be carried out every 2-3 years.
If moisture fall inside the clock, then check them immediately in the workshop nearest to you.
Do not expose hours to limit temperatures.
Although the clock is designed to use them under normal conditions, nevertheless you should avoid coarse treatment and prevent them from falling.
Do not fasten the strap too much. Between your wrist and strap must pass through your finger.
To clean the strap, use a dry soft fabric, or a soft cloth moistened in an aqueous solution of a soft neutral detergent. Never use easily evaporating tools (for example. Gasoline, solvents spraying cleaning products, etc.).
When you do not use your clock, keep them in a dry place.
Avoid hitting the watches of gasoline, cleaning solvents, aerosols from sprayers, adhesive substances, paints, etc.). Chemical reactions caused by these materials lead to damage to the gaskets, housing and polishing the clock display.
Enable watch
The clock is turned on by pressing any of the two buttons once. The "A" button includes an animated clock illumination, the "B" button is the usual static backlight. By pressing the "A" button, the transition in the "current mode" between the modes in the following sequence:
- Time (hours and minutes) - P
- date (month and day) - D
- Day of the week - W
Setting the watch
The display setting is performed by sequentially pressing the "B" button, and then the "A" buttons.
The transition to editing mode is carried out in two ways:
1 option. Press the top, then the bottom button.
Option 2. Press the bottom button twice.
The editable parameter will flash and need to set the desired number of numbers with the "A" button. Next, the "in" button to select the appropriate parameter and continue editing the "A" button.
:
1. Watch (1-12)
2. Minutes (05-60 in a step of 5 minutes, for installation of 6, 7-mm, 8, 9 minutes will be used four square points in the central part of the watch display)
3. Month D (1-12)
4. Day D (1-31)
5. Day of the week W (1-7)
6. Display backlight brightness (4 levels): is regulated by selecting square dot numbers
7. Display illumination time 60 (05-60 seconds)
If you have not pressed a single button for five seconds During the blinking of any value, the clock backlight automatically goes out. The screen goes out automatically at a given time interval (05-60 seconds in 5 seconds).
Clock "Leg"
Battery
In the clock purchased by you, the battery is installed in the factory and must be replaced at the first signs of power failure.
Protection against water
The clock is not protected from water. Avoid hitting any moisture.
Caring for your clock
Never try to open the housing and remove the rear lid.
Replacing the rubber gasket that protects the clock from water and dust entering, should be carried out every 2-3 years.
If moisture fall inside the clock, then check them immediately in the workshop nearest to you.
Do not expose hours to limit temperatures.
Although the clock is designed to use them under normal conditions, nevertheless you should avoid coarse treatment and prevent them from falling.
Do not fasten the strap too much. Between your wrist and strap must pass through your finger.
To clean the strap, use a dry soft fabric, or a soft cloth moistened in an aqueous solution of a soft neutral detergent. Never use easily evaporating tools (for example. Gasoline, solvents spraying cleaning products, etc.).
When you do not use your clock, keep them in a dry place.
Avoid hitting the watches of gasoline, cleaning solvents, aerosols from sprayers, adhesive substances, paints, etc.). Chemical reactions caused by these materials lead to damage to the gaskets, housing and polishing the clock display.
The clock is turned on with a light touch to the display:
1 time - time (hours, minutes)
2 times - date (month, day)
3 times - seconds
Setting the watch
1. Easy touching the display to enter the "braveing \u200b\u200btime" mode.
2. Touch and hold your finger in the display center - the editable parameter will flash. Now you need to change the numbers with light touches. Next, repeated long-term touch touchs you need to switch from mode to mode and continue editing with light short touch.
The watch display is configured in the following sequence.:
1. WATCH (1-12, A-AM or P-PM)
2. Minutes (00-60)
3. y (00-100)
4. Month d (1-12)
5. Day D (1-31)
(Do not touch the display), then the clock is automatically returned to the "current time" mode and the flashing stops.
If you have not pressed a single button for five seconds During the blinking of any value, the clock backlight automatically goes out.
Watch "Original"
Battery
In the clock purchased by you, the battery is installed in the factory and must be replaced at the first signs of power failure.
Protection against water
The clock is not protected from water. Avoid hitting any moisture.
Caring for your clock
Never try to open the housing and remove the rear lid.
Replacing the rubber gasket that protects the clock from water and dust entering, should be carried out every 2-3 years.
If moisture fall inside the clock, then check them immediately in the workshop nearest to you.
Do not expose hours to limit temperatures.
Although the clock is designed to use them under normal conditions, nevertheless you should avoid coarse treatment and prevent them from falling.
Do not fasten the strap too much. Between your wrist and strap must pass through your finger.
When you do not use your clock, keep them in a dry place.
Avoid hitting the watches of gasoline, cleaning solvents, aerosols from sprayers, adhesive substances, paints, etc.).
Enable watch
The clock is turned on by pressing any of the two buttons once. By pressing the "A" button, the transition in the "current mode" between the time (hours, minutes) and the date (month, day).
Setting the watch
Click the "A" button to go from mode to mode:
1. Current time mode
2. Date mode
Setting time on a digital display:
1. Press the "A" or "B" button to go to the "current time" mode, then press and hold the "B" button in the "current time" mode until the clock value flashes.
2. The "B" button is transitioned between the sections in the following sequence:
- clock
- Minutes
- Month
- date
3. Press the "A" button to move the flashing value from the discharge to the discharge to set the desired number of numbers.
If you have not pressed a single button for five seconds During the blinking of any value, the clock backlight automatically goes out.
Clock "Touch"
Battery
In the clock purchased by you, the battery is installed in the factory and must be replaced at the first signs of power failure.
Protection against water
The clock is not protected from water. Avoid hitting any moisture.
Caring for your clock
Never try to open the housing and remove the rear lid.
Replacing the rubber gasket that protects the clock from water and dust entering, should be carried out every 2-3 years.
If moisture fall inside the clock, then check them immediately in the workshop nearest to you.
Do not expose hours to limit temperatures.
Although the clock is designed to use them under normal conditions, nevertheless you should avoid coarse treatment and prevent them from falling.
Do not fasten the strap too much. Between your wrist and strap must pass through your finger.
To clean the strap, use a dry soft fabric, or a soft cloth moistened in aqueous sprouting of a soft neutral detergent. Never use easily evaporating facilities (for example. Gasoline, solvent, spraying cleaning agents, etc.).
When you do not use your clock, keep them in a dry place.
Avoid hitting the watches of gasoline, cleaning solvents, aerosols from sprayers, adhesive substances, paints, etc.).
Enable watch
The clock is switched on with a light touch to the display once. Repeat with the transition in the "current mode" between time (hours, minutes), date (month, day), seconds.
- Time (hours / minutes)
- Date (month / year)
- Seconds
Setting the watch
1. Easy touch to log in to the "current time" mode.
2. Touch the right part of the display near "SET" - input to "Edit Mode". The editable parameter will flash. Now with light touches to the left side of the display near the "Mode" you need to change the numbers.
3. Next by repeated touchs of the right part of the display near "SET", the transition from the mode to mode is carried out. Editing continues with light touches or continuous touch to the left side of the display near the "Mode".
The watch display is configured in the following sequence.:
1. Watches (1-12 / 1-24)
2. Minutes (00-60)
3. Month (1-12)
4. Day (1-31)
5. Year (2001-2099)
6. 12 or 24-hour time display system
If in edit mode you do not change (Do not touch the display), the clock automatically goes out.
If you have not touched the clock for three seconds, they automatically go out.
Watch "Data"
Battery
In the clock purchased by you, the battery is installed in the factory and must be replaced at the first signs of power failure.
Protection against water
The clock is not protected from water. Avoid hitting any moisture.
Caring for your clock
Never try to open the housing and remove the rear lid.
Replacing the rubber gasket that protects the clock from water and dust entering, should be carried out every 2-3 years.
If moisture fall inside the clock, then check them immediately in the workshop nearest to you.
Do not expose hours to limit temperatures.
Although the clock is designed to use them under normal conditions, nevertheless you should avoid coarse treatment and prevent them from falling.
Do not fasten the strap too much. Between your wrist and strap must pass through your finger.
To clean the strap, use a dry soft fabric, or a soft cloth moistened in an aqueous solution of a soft neutral detergent. Never use easily evaporating tools (for example. Gasoline, solvents spraying cleaning products, etc.).
When you do not use your clock, keep them in a dry place.
Avoid hitting the watches of gasoline, cleaning solvents, aerosols from sprayers, adhesive substances, paints, etc.). Chemical reactions caused by these materials lead to damage to the gaskets, housing and polishing the clock display.
Modes:
1. Watch (hour, minutes and seconds)
2. Stopwatch
3. Alarm clock
4. Date
The MODE button transitions between the editable parameters. The numbers change the ST / SP and RESET buttons. Go back to the current mode - MODE button.
Setting time and date:
In the time display mode, press the "Mode" button 3 times, then using the "RESET" and "ST / SP" buttons to set hours and minutes. By repeatedly pressing the Rocket "Reset", the transition to the setting mode of the current date and day of the week is carried out. You can see the date in the current mode by clicking the "ST / SP" button.
Today we want to talk about the alarm clock in the clock. Rather, even about the alarms, because in hours they are most often somewhat [from daily to monthly]. The scope of the alarm is quite wide, do not still use it for timely awakening? Any event, whether it is an interesting transmission on TV, or a medication reception time - all this can be programmed alert. Moreover, in some Casio models, this alert is not only sound, but flickering, and even vibro-alert [such as GD-350]. What kind of choose how to set up and how to enable - all this you will find in our article. If after reading the questions will remain - ask.

- Use the C button Enter the alarm mode. On the screen you will see one of the indicators Al1, Al2, Al3 or Al4.

- In the alarm mode, use the D button, select one of the alarm. who want to configure.

- Hold the button a while the alarm time does not start flashing. Release the button.
- Press C button to select a parameter to configure [hours, minutes, months, days]
- When the desired parameter is highlighted, press the D and B buttons to configure it.
- To check the operation of alert, in the alarm mode, hold down the D. button.
- To enable or disable the selected alarm, use the D button to select the desired alarm, and press the A. button.
- An enabled alarm indicator is displayed on the screen.

- To turn on the hourly alert, in the alarm mode, press the D button to select the desired parameter.
- Press the button a to turn on / off the hourly alert signal.

Sequence of actions to activate the function of the flickering alarm.This feature is not in all Casio models, so we will describe the process on the exampleG-SHOCK GBA-400

- In the current time mode, hold the A button for 2 seconds.
- the SET HOLD indicator will appear on the screen, and the current time will flash.

- Press the C button several times until you see the Flash indicator. If the Beep indicator flashes, turn the crown.

 Error appearance during program launch
 FRIGATE plugin for Firefox
 How to show hidden folders and files in Windows
 Ways how to make a screen on a laptop brighter or darker
 How to format a flash drive, disk protection
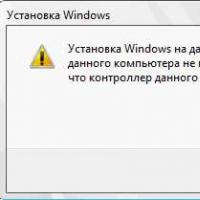 If installing Windows to this disc is not possible
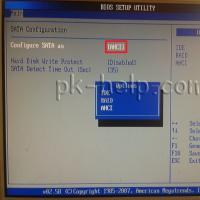 During installation of Windows "Make sure that the controller of this disc is included in the computer's BIOS menu.