How to change messages on iMessage. Do not send SMS and iMessage with iPhone? It's easy to fix! How to enable or disable post view in iMessage for iPhone and iPad
Allows you to send and receive text and multimedia messages. However, instead of a simple phone number, it uses your address. email and works only with other apple devices, such as: iPad, iPhone, iPod Touch and Mac.
Before you can start using messages, sending texts, photos, videos, voice notes, locations and contact cards, you need to configure iPhone on iPhone, iPad or Mac.
If you configured your iPhone using icloud, it is possible that iMessage has been activated with it. If this did not happen, or if you ever need repeated activation, Read this article to the end.
If you need to create a new Apple identifier, go to the site to create it. Otherwise, use your current login credentials.
1. Open "Settings" On your iPhone or iPad.
2. Tap "Messages".
3. Switch "IMESSAGE" in the Regulation "OFF"and wait for it to activate.
After, a message will appear "Waiting for activation"This phase usually lasts only a few seconds, but there are cases when the activation of the application is stretched to 24 hours. You can also encounter unpleasant.
After activating iMessage, you can send and receive text and multimedia messages to other Apple users!
How to add multiple email addresses to iMessage on iPhone and iPad
If you have additional email addresses that you want to associate with iMessage, be it icloud / me / Mac / Gmail / Yahoo or hotmail accounts, they are also easy to configure them.
1. Troyt "Settings"
2. Sign up menu down
3. Tap "Messages"
4. Then click "Sending and reception"

5. Click « Add another e-mail ... "
6. Enter the email address you want to add, you can also start a conversation with new users.

You'll get email with a request to confirm that you have access to the introduced account Email. As soon as you do it, you can start sending iMessages from the newly added address!
How to enable or disable reading messages in iMessage for iPhone or iPad
Read the messages so that your contacts see, whether you viewed their iMessages.
1. Open « Settings " on your iPhone or iPad
2. Tap "Messages"
3. Now enable or turn off reading messages depending on your preferences.

Turning on and off works with iOS 5, but a new option appeared in iOS 10, which allows you to enable and disable reading in a specific case. Also, if you do not always have access to the Internet, activate the "" function.
Thus, you can disable the visibility of reading a message for all users and turn it on for individual. To do this, you will need.
- Open user correspondence.
- Press "Details" in the upper right corner.
- switch to "Send reading messages" and press "Ready".

How to enable or disable post view in iMessage for iPhone and iPad
By default, iOS will show a brief view of your iMessage (or SMS) on the lock screen and on the main screen. However, if you prefer your notification to show only the sender's name, you can easily configure application settings "Messages"To do it, you will need:
1. Open "Settings" on your iPhone or iPad
2. Press "Notifications"
3. Tap on "Messages"
4. Move the slider " On a blocked screen"To the Regulation "ON"To disable it (on the old version, maybe another inscription).

Now, if you get an incoming text message (SMS), MMS or IMESSAGE, only the name of the recipients will be displayed on the main screen, and the message content will be hidden. What to do, if ?
macos High Sierra.
Setup To use Mac messages is very similar to what you need to do on the iPhone. Opening an application for the first time will lead to reuse Your Apple ID, which you plan to use.
1. Run messages from the folder "Desktop" or "Applications"

2. Enter your email address and password Apple. ID. If you use two-step or two-factor authentication for your Apple ID, enter your confirmation code.

3. Tap "Messages" On the menu bar and select "Settings"

4. Go to the tab "Accounts"

5. Select the phone number and email address to which you want access.
6. Select which phone number or email address will see people when you start a new conversation.
After setting up the account, you can send and receive iMessages messages from your iPhone and Mac.
How to configure messages in iCloud for Macos High Sierra
Messages in iCloud save your messages in sync between your Mac and your iOS devicesAnd also allow you to upload your messages when setting up a new device.
You will need to synchronize your iPhone and Mac through your account. Be sure to register both devices under the same email address to make this process as simple as possible - this means that you will use the same Apple identifier for both.
1. Open « iMessage »
2. Tap "Messages" In the menu bar

3. Tap "Settings"
4. Go to the tab "Accounts"
5. Click on your account "IMESSAGE"

6. Install a tick "Enable messages in ICloud"
7. Press the button "Synchronize now"
Such a simple way to synchronize devices, but there is one nuance - iOS 11 or above must be installed on the iPhone or iPad.
You will need to make sure that messages in iCloud are included in iOS 11 so that it can synchronize messages between your iPhone, iPad and Mac.
1. Open "Settings"
2. Touch the icon "Apple ID"
3. Tap "Icloud"

4. Make sure the slider next to the message is in the position. "ON".
5. After, return to "Settings".
6. Click " Messages».

7. Click " Synchronize now"To immediately synchronize your message from ICloud.
How to send not only text in iMessage?
Recently, Apple has expanded message capabilities by adding the ability to send more than just text in the message. In the "Messages" application now if you touch the heart with two fingers, you can draw a message to a friend. This is really a cool way to express your feelings, drawing a heart or your disappointment by drawing a gloomy face.
You can also click the "A" button to send an animated GIF, music or other stickers you purchased through App Store.. The #IMAGES section contains animated GIF files that go with iPad. There are quite a lot of opportunities so that you can express almost any emotions.
iMessage - Internet Service instant messageswhich was implemented by Apple to iPhone and iPad still in iOS 5, and today is actively operated by users worldwide as an affordable alternative to SMS. FaceTime is an Internet service of audio and video calls, which allows you to completely communicate with relatives, close, friends or colleagues located in any part of the planet, using both video from both chambers of the device, and content only by voice.
So how to configure and use iMessage and FaceTime on iPhone and iPad on iOS 7?
How to configure iMessage?
2. Go to the "Messages" section:

3. Move the iMessage Activation Switch to Active Position:

Advanced, if necessary, the ability to send to other users of notifications about reading your messages by moving the switch "Read Review" in active position. It is possible to "send as an SMS" is used if the subscriber fails to send a message via iMessage.
4. Go to the Sending / Reception menu and configure the list of identifiers:


Original iMessage is associated with the phone number and email addresses designed to work with Apple ID and created by Apple to work with mail via iCloud automatically.
How to use iMessage?
1. Go to the message "Messages" of the IOS operating system:

2. Create a new dialogue or resume the previous one:

3. Dial the message in the corresponding field:

If a apple Servers determine that the user who needs to send a message is configured to iMessage, the text will be sent exactly through this protocolOtherwise, the traditional SMS will be used.
4. Confirm the sending by pressing the "Subp." Button:

All messages sent through iMessage will use a blue selection color, via SMS - green.
How to configure FaceTime?
1. Go to the "Settings" application of the IOS 7 operating system:

2. Go to FaceTime:

3. Move the FACETIME switching switch to the active position:

4. Configure the list of identifiers:

Original FaceTime is associated with the phone number and email addresses designed to work with Apple ID and created by Apple to work with mail via iCloud automatically.
How to use FaceTime?
1. Go to the phone "Phone" of the IOS 7 operating system:

2. Determine the desired subscriber and switch to the operation menu with the contact, select the FaceTime feature by pressing the button with the image of the handset or the camera next to the corresponding menu item (Phone Tube - AudioSovizov, Camera - video call):

Thus, using the iMessage and FaceTime functions iPhone users And the iPad can not only save money on calls, but also significantly increase the convenience of communication and communication quality.
If you are the owner of the iPhone, iPad and iPod Touch. on iOS 5 or higher; Or use Mac OS X Lion or OS X Mountain Lion, you can save your money by sending free text messages (SMS), pictures and video (MMS), location data and contacts any person using the iMessage service,
In contact with
integrated in the message application.
The iMessage interface is simple enough, but nevertheless there are some nuances that are not found by all users.
How to configure iMessage?
On the this moment Apple uses two identification systems in iMessage. In the case of iPod Touch, iPad and Mac, Apple ID is used. If you have several Apple IDs, then incoming and outgoing messages will be displayed in each of them separately, i.e. Messages from these accounts will not be united.
In the case of iPhone, identification can pass as you mobile numberand Apple ID. In the first case, messages will come only on the iPhone; In the second - on all devices connected to this account Apple ID.
In order to configure iPessage on the iPhone, iPod Touch, iPad Go to Settings -\u003e Messages, activate iMessage and enter your Apple ID and password.

In order to configure iMessage on Mac OS X, open the application, go to Settings -\u003e Accounts, enter your Apple ID, password and click Login.

Color indicators
Everything is simple here:
- if the message application determines in the contact of your destination, e-mail or phone number that is "tied" to iMessage, then automatically go devil paid messageThe name of the contact and the send button will be blue.

- If the message application has not defined in contact "attached" to iMessage phone or email numbers, then a paid message will automatically go using mobile cellular networkThe contact name and the send button will be green.

How to send messages on the iPhone, iPod Touch or iPad
Sending iMessage messages on these devices is performed in the same way - through the "Messages" application.
After you went to "Messages":
- Press the button with the picture of the box and handle (new message).
- You can select the destination in three ways: Start entering the name and iOS will automatically begin to offer suitable contacts; Click on the blue plus card and then select a contact from the list; Just enter the phone number or Apple ID in the address bar.
- If the selected contact uses iMessage, then the "PRED" button In this case, lights up in blue, if not - green.
- If you send a message via the iPad or iPod Touch, and the destination you selected does not use iMessage, the contact will turn red and the contact will appear. exclamation point.
- If you chose suitable contact And he caught fire with blue or green, then it's small - write a message and click the "Press" button.
How to send iMessage messages in Mac OS X
Mac OS X messaging also occurs through the "Messages" application. The only difference is different icons.
Download iMessage for Mac OS X you can.
Here, actually, and that's it!
Apple has taken care of free, due to the connected Internet, messaging, video files ... This feature Available from 5 version of iPhones. That is, there is no iMessage on the iPhone 4S, but on the iPhone 5S, 6, etc. Perfectly functions. So, the iMessage application on the iPhone makes this possibility, but by default it is in sleep mode. Activation is required to connect it. Not all users know what imessage in iPhone. And as a result, do not know the system and the order of its connection. You must perform a number of steps to configure after which this program must be properly turned on.
So, consider how to configure iMessage on the iPhone. Options this messenger There are differences whose characteristics depend on the system version. First of all required active sim card in your device. Next, we find the "Settings" section in the iPhone, then "messages" after which "iMessage" appears. We bring to the operating status by turning on the icon on the opposite this function. And the agreement will appear, which is necessary to approve - "OK". It should have information about the possible removal of minor means by the company by the operator, for the activation service provided, then-there for SMS. After a second, "Your Apple ID for iMessage" appears. By touching this link, you go to the field for filling out "Entry Apple ID". For further action requires registration of an Apple ID account. Next, we enter an Apple ID and password in the corresponding field, after which this program will be activated. If the program is not activated, it means that some function or action you are not true, or did not fulfill at all. Try all over again, in gradually following these recommendations. Be sure to appear why this function does not turn on.
Now we learn how to configure the included and already activated apparatus. By activating the "Account Reading" function, you specify the command on which all SMS sends will be informed about your reading of the corresponding messages. Selecting the "Send as SMS" function you agree to sending one or another text. in conventional method. Including the "Thread Show" feature, you allow the display of the message themes. "Number of characters" gives accurate information about the number of characters in it. "Blocked" tells about your blocked interlocutors, those whose messages cannot come. In the "History of Message" item, Aemestzh allows you to control the number of days of preserving certain texts on this device. There is also the ability to disable messages about unknown senders and many other functions.
The item is responsible for sending and receiving letters requires a special setting, it is the provision of requested information. In the section "Sending letters" you need to inform and designate those electronic addresseswhich you would like to receive duplicate SMS contents. Section "Start a new conversation with" is responsible for outgoing SMS. There is the phone number from which you will send them, then-there with the number of the SIM card, which will be in your iPhone. After the above actions, the iMessage application system must function correctly. The messages themselves will be highlighted in blue, and not green, as regular messages, and at the top there will be a designation that you use this category of messages. In order to re-enjoy the usual messages, you just need to disable iMessage. Next, you will learn how the iMessage works.

Sending messages iMessage
This feature is certainly carried out through the "Messages" section. So, how to send a message. To do this, you need to activate the item new messages by clicking on the similar icon depicting the sheet and the fountain pen on it. Then one of the ways choose the contact to whom the message will be addressed:
1. Enter the desired phone number or Apple ID in the address string.
2. Start entering the name of the interlocutor and the system itself will offer number options.
3. Touch the blue "Plus" icon and select the desired contact from the entire list of possible addressees.
Next, if the system works correctly and the iMessage is connected as it should, the link-button will send it in blue. If your interlocutor does not use this program Or it is not correctly connected to him, the same button will burn in red, and an exclamation mark will appear opposite. If you have configured sending as ordinary SMS (they have unsubscribed above) or on the device, the iMessage program "Subdire" icon is not connected, it will burn in green. Well, and if everything is properly written in the message field, the message itself and touch the blue button "PRED" send a message where it was selected, it starts to go.
Friends, many of you use iMessage. In everyday life, but do not even notice this! Naturally, I'm talking about SMS - if the message addressee has gone in blue, IMESSAGE has joined the case! Now I will tell you how to configure iMessage correctly, so that there would be no confusion in the correspondence!
Not everyone, alas, correctly set up this wonderful service (which, as it turned out, you can still be configured), and I very often get on the "wrong" users 🙂 The fact is that I write someone's message, and it goes Green (although I am exactly sure that the subscriber is the ogajt), that is, SMS, but in response, I receive a message from an e-mail address unknown to me, with the answer. Somewhere here are catching - and this can notice very many? Now I will try to tell you how to make communication more comfortable.
How to configure iMessage
To begin with, we need to go to the iPhone in settings - messages and check there that iMessage is generally included. Next, if we set up iPhone, not iPad / iPod, we need to look into sending / reception menu And make sure the addresses are connected: phone number and icloud account.

Dogging the list just below we see the item Start a new conversation with - And here it is here that you can choose from where messages will leave - the telofon numbers or by mail! The fact is that, depending on when the iMessage was activated - before or after entering the account records icloud.may stand different variants! Unfortunately, many by default can stand E-mail address that prevents from receiving and accepting messages ... In general, you need to highlight your phone number.

If for some strange reason you have there another number (for example, from another SIM card) or mail, and your number is inactive, then you need to turn off the iMessage, and again turn on - then you can activate your current phone number. If suddenly it does not help, turn off the iMessage, remove your SIM card and insert it again, then turn on the "blue" messages - everything should earn! 🙂
In the case of iPad / iPod / Mac in the settings, the default is your mail attached to iCloud, and then you can communicate with other core through "mail".
If you have friends / colleagues / relatives that are observed this problem - Help them correctly configure iMessage, to simplify and cheat your conversations! 🙂
 How to pay a domain name
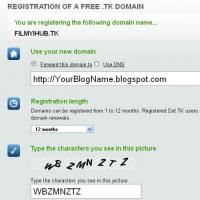 Domain zone of tokelau islands
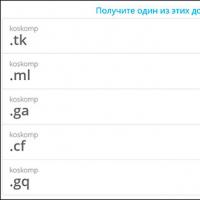 What is domain what problems may be
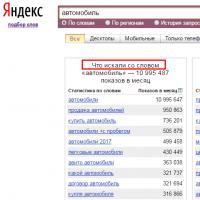 Yandex Wordstat: detailed instructions for using the service and grouping operators and a complicated request
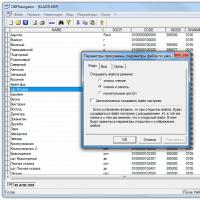 Editing DBF files
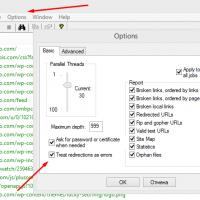 Xenu Link Sleuth - What is this program how to use the Xenu program
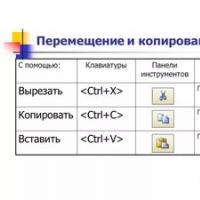 Methods Copy and insert text from keyboard without using mouse