Installing an additional cooler on a computer. How to put an extra cooler on the computer. Installation of a cooler on the processor
Most work electronic components PC is accompanied by increased heat release. Most effective way Cooling is active (forced, fan). But do you all know how to connect the cooler to the computer? Here with this in detail and will understand.
In principle, the work is simple - you only need to install a cooler at the place and attach to the desired contacts of the power supply of the computer of its wires of a certain color. But there are a number of nuances, without taking into account proper connection not to do.
First, there are computer fans on sale with various connectors. They can have from 2 to 4 contacts. But the conclusions from the PC power supply to which the connection is made are always four.
Secondly, the wires of the cooler can have one of the two color marking options.
Thirdly, laptop processors require a special temperature regime. Therefore, their fans are turned on only periodically, as needed. FROM desktop computers All otherwise. The chalk problem is to ensure continuous cooling of their electronics, that is, we are talking about him permanent work. And here it already appears on such an indicator as "noise" fan. That is why it is desirable a rating rating of a voltage cooler (standard +12 c) at least to reduce slightly. On the efficiency of cooling the system unit, this will not be significantly reflected, but the user's comfort will be provided.
Connection order
Build a computer
Just turning off the PC using the button - not the best decision. It must be completely isolated from the power grid, that is, pull the plug from the outlet or put the switch to the "Off" position.
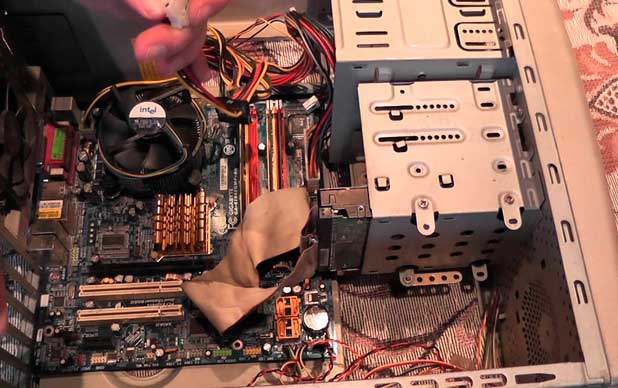
Fix the cooler
To do this, dismantle the side cover, install the fan to the place intended for it and secure it with the bolts. It is necessary to pay attention to the direction of the direction of rotation of its impeller (the arrow on the ends of the cooler). Depending on how the fan is located, the air flow can be directed both inside the computer (retract) and from it. And this is directly reflected on the efficiency of cooling electronics of the system unit. In order not to be mistaken, it is desirable to replace the cooler to do "one to one", so it is not desirable to take a faulty before purchasing a new one.
Connect to power unit
The author does not know which fan the reader will be installed instead of the failed. It can be a used product from another computer or purchased, but they all have different modifications. Therefore, only possible options are considered.
The photo shows the pinout of the coolers connectors depending on the number of contacts. If their number does not coincide with the conclusions of the computer's BP, the adapters will have to use. In brackets - color designation of conductors on the second option.

Wiring marking
- +12 V - KR (Zh).
- -12 B is always black.
- Tachometer line - Zhle (green).
- Speed \u200b\u200bcontrol - blue.
 Cutting Power Supply Computer
  Coupling connecting connector
If the fan is quite noise, it can be powered by 12 V, and the family (connection to the extreme conclusions) or five (to the red). Wire "Earth", as noted above, always black.
Some articles provide recommendations for changing the speed of rotation of the impeller using restrictive resistors. Their power is about 1.2 - 2 W, and the dimensions are relevant. Already - not quite convenient. In general, this is understandable. But for what criteria, pick up the rates of resistance, if the user with email / technology is at best of the best on "you"? And at worst - in no way.
The author advises not to experiment and, if desired, include a diode in the chain. Regardless of the type, it will definitely provide a certain drop in the voltage of order from 0.6 to 0.85 volts. If it is required to reduce the nominal even more, you can consistently use 2 - 3 semiconductors. For this you do not need to engage in engineering calculations or consult with a specialist.
Good afternoon, respected technoblog subscribers. Today I want to tell how to correct the cooler on the processor. It would seem that there would be something to think: you take the turntable, fasten into the appropriate grooves on the motherboard, stick the 4-pin connector, you run - you enjoy. But walked there, the mistakes wave unlucky users at every step and now I will explain why.
The most frequent errors when buying and installing:
- banal ignorance of the processor socket (775, 1151, 1155, AM3, AM4, etc.);
- ignorance of the heat pump chip;
- saving money for good cooling;
- buying a dubious cooler with hands without checking the configuration;
- forgot to substitute the reinforcement plate on the back of the MP;
- applying too thin (thick) layer thermal paste;
- too big height of the tower (the side wall does not close);
- too wide radiator, closing slots for RAM;
- cryruction (no comment).
What is the cooling system
If we talk simple language And not to go into details of different degrees of specifics, then the cooler of the processor, whether it is an armor for Intel or AMD, always consists of 2 elements:
- radiator;
- fan.
And then more interesting. Radiators can be both classic (aluminum bar with fins, sometimes with a copper stain contact to the processor) and the tower (impressive shape aluminum design, often penetrated with copper heat pipes, as well as with the direct contact of these most tubes with a processor or a mediator from copper ).  There are also radiators oriented under their own, but they are completely attached to another place.
Classic are designed for office builds, because there are little different from box coolers (which are supplied in the box with a processor). They are able to dispel to 95 W heat and are not designed to accelerate the chip, even if you strongly want. Even if the board has a good nutrition subsystem.
The tower already allow you to dispel from 130 to 250 W heat, depending on the model. Take for example the bestseller of past years - Zalman CNPS10X Performa (or Optima) and its 150 W performance thanks to a branded turntable with "shark fins" and the successful design of the radiator.
Do not know which turntable you need? Google characteristics of your stone and recognize its heat pump.
The installation process of the Cooling Boxing System
Tightened a little with the preface, but for many this fact should become a useful material for thought. Now proceed to the installation process itself and begin with boxer bottles.
If you have a system on an Intel chip, starting with a 775 socket and higher, then it's easier to nowhere. First, stock fents that lie in a box with a chip, already blurred thermocons, and therefore it is not necessary to apply it. But if you really want, you can look here and read about that.
Then everything is simple: install Carlson according to 4 holes and insert 4 plastic latches in them. Everything is ready - you are amazing.  Now let's talk about AMD and their latches, which, by the way, and look much more reliable, and hold as Soviet spies. There is a plastic square insert with two "tongues" around the processor socket, for which the radiator of the Blood turntable is cling.
You only need to throw the ear in one eye, and then do the same with the second, in parallel fixing Carlson in a certain position by a special limiter. This design then your teeth will not tear off.
Installation of custom cooler
And now we will deal with a more complex case - the tower. Immediately I will say that the thermal paste layer is also applied to such models, but often its quality leaves much to be desired, and therefore wipe the factory and thin layer we appline a new layer on the surface of the crystal. How to do it right -.
But before starting, it is necessary to do what everyone needs probability about the lion's share - read the instructions! She lies in the box if that. Tower models in the overwhelming majority of cases are universal in the attachment plan. They have written a list of suitable sockets that I I advise you to read before buying, so that it is not like last time.
Now we separate the plates of AMD from parts under Intel and unnecessary fold back to the box. From the radiator, a fan is removed, which only interferes when installing, after which the place for installation and fasten the rear plate - the bochplate, to which the cooler is attached on the screws (not in all models, but still).
The main thing is to clearly get into the holes under the bolts so that there is no skew. Screw the radiator is needed strictly crosswise (first the first bolt, then the next diagonal is diagonally and so all 4).  The whole process is carried out on the table, while motherboard Also lies on the table outside the housing on a complete dielectric film, or a box that does not miss the static current. Otherwise will be very uncomfortable.
Check the mounting system, with the help of a bracket, lock the turntable, connect the last connector on the CPU and check the performance of your works. Works - already good.
The pasta should be changed at no less than once a year, although in more detail about this already in.
If you need a huge selection of cooling carlsons, then "Welcome" in this internet shop.)
I hope the above-described tips will help you to do everything in the mind and without adventure. Subscribe to all while so far.
Cooling the central processor is a fundamental factor in the performance and speed of the computer. What would powerful processor You did not stand, with bad cooling, the system will slow down, issue errors and spontaneously reboot (off). Earlier, the processors did not provide a special controller, which, when a certain verge of temperature, gave a reboot command or shutdown, which subsequently led to a breakdown, without the possibility of repair.
And at least now such controllers are embedded, the increased temperature of the processor can significantly affect functionality And do not issue the stated characteristics. That is why high quality installation of a cooler on the processor very important.
There are two types of cooling: active, passive.
- The passive is the installation of only the radiator, which is energy efficiently, but has less high-quality characteristics, compared with active.
- The actively applies the installation of the radiator to which the fan is fixed. Also, the active are the radiators that independently distinguish the cold, the so-called Peltier chips.
The most popular cooling system is a radiator with a cooler. This system provides quite maximum efficiency and is relatively inexpensive. The only defect can not be noted. It's no secret that the fan produces not only the cold, but also the noise is quite loud, the same goes and the computer fan. But, running the cold air in the radiator slots, there is a constant cooling, which is necessary for the processor. Also, when an abundant noise appears, it is always recommended to lubricate the fan rotor with machine oil. In no case do not use vegetable oil for lubrication, because after drying it, the fan will stop working, and the subsequent analysis may be impossible
The structure of the cooler and the main components
As already mentioned, the main task of the cooler is the distribution of heat that highlights the processor, thereby cooling the component. For this, the flat side of the radiator, which is called the sole, is tightly fixed to the processor. All heat that is allocated to the processor falls on the base of the radiator and diverges through the entire body.
Aluminum, copper and combined alloys from copper and aluminum are used as a material for the manufacture of the radiator. It is worth noting that the copper cooler provides the most, but its cost is quite high, and the mass can be up to one kilogram.
For the greatest effect, the fan is fixed to the top of the radiator. They are axial or radial.
Axial fans are usual, with a propeller of the air flow of which is directed along the axis of rotation. In the radial coolers, the air flow is directed perpendicularly. It consists of several impellers. This type of fans is much larger in size, and also consumes significantly more energy, but the quality of cooling is much better, compared to axial.
Installing Coolers for AMD Processors
The process of installing the cooler is quite simple, but requires care and a hurry in this process will be anything. To place a cooler on the processor, follow these steps:
- If you purchased a new cooler, most likely, a thermal paste is placed on the radiator sole. In this case, you can move to clause 3, but if the thermal paste is not applied, it must be placed;
- issimate some thermal paste on the fixed processor (as a rule, this paste is placed in the syringes). The abundant layer of this material will not lead to a greater effect, and may also harm, because the cooler in this case will be placed away from the processor. Distribute it all over the area;

Apply the thermal chaser for the processor


Installing a cooler on Intel processors
On the principle of fixing the cooler, it does not differ from the installation on the AMD crystal. The only difference is the fastening itself. It consists of four pins, which are inserted into special grooves and when turning 90 degrees is made a dense fix.

Pin is taken to the groove
Many experts argue that such a mount is not reliable and recommended to use a screw mount, which can be separately purchased or supplied directly with the cooler. In this case, a special plate is placed on the back side. Next, a lining of four plates placed on the cooler are made and then it is necessary to twist the bolts and a full-fledged fixation.
Selection of cooler
The coolers differ only only by the method of fastening, as well as cooling efficiency. The more productive processor, the more powerful cooler needs to be purchased.
If you decide to purchase a fan, try to choose more slow to reduce the noise, as well as identical sizes so that it can be tightly fixed.
Each processor, especially modern, requires active cooling. Now the most popular and reliable solution is to install a processor cooler on the motherboard. They are different sizes and, accordingly, different capacities that consume a certain amount of energy. In this article, we will not deepen into details, and consider the mounting and removal of the processor cooler with the motherboard.
During the assembly of its system, the need arises to install a processor cooler, and if you need to replace the CPU, the cooling must be dismantled. In these tasks, there is nothing difficult, you just need to follow the instructions and do everything carefully so as not to damage the components. Let's consider the installation and removal of coolers.
Installing AMD Cooler
The coolers from AMD are equipped with a kind of mount, respectively, the mounting process is also slightly different from others. It is easily carried out, you need to perform only a few simple steps:


Installing Intel Cooler
At the box version intel processor The kit already has corporate cooling. The method of attachment is slightly different from the above, but there is no cardinal difference. These coolers are attached to the clamps in special grooves on the motherboard. Simply select the appropriate location and alternately insert the pins into the connectors before the characteristic click.

It remains to connect the power as described above. Please note that the coolers from Intel also applies to the thermalcase, so carry out the unpacking.
Installation of the tower cooler
If the power cooling power is not enough to ensure normal operation of the CPU, the installation of the tower cooler will be required. They are usually more powerful due to large fans and the presence of several heating tubes. Installation of such a detail is required only for the sake of a powerful and expensive processor. Let's describe in detail the stages of mounting the tower processor cooler:


On this process of mounting the tower cooler is over. We once again recommend learning the design of the motherboard and set all the details in such a manner so that they do not interfere with when trying to mount other components.
How to remove the processor cooler
If you need to repair, replace the processor or apply a new terboard, then you always need to remove the installed cooling. This task is very simple - the user must unscrew the screws or open the pins. Before that, you need to turn off the system unit from the power supply and pull the CPU_FAN cord. Read more about dismantling processor cooler, read in our article.
Today we examined in detail the topic of mounting and removing the processor cooler on latches or screws from the motherboard. Following the above instructions, you will easily be able to fulfill all actions yourself, it is only important to do everything carefully and carefully.
What is a cooler? PC air cooling systemCooler (From English. Cooler) - literally translated as a cooler. Essentially, this is a device designed to cool the heating element of the computer (most often the central processor). The cooler is a metal radiator with a fan driving air through it. Most often, the cooler is called the fan in system block Computer. This is not entirely right. The fan is a fan, and the cooler is the device (the radiator with the fan), the cooling specific element (for example, the processor).
The fans installed in the system of the system block of the computer provide overall ventilation in the housing, the flow of cold air and the output of the hot outside. Thus, there is a general decrease in the temperature inside the case.
Cooler, unlike body fans, provides local cooling of a particular element that is very hot. Cooler most often stands on central processor and video card. After all, the video processor is heated at least CPU, and sometimes the load on it is much stronger, for example, during the game.
In the power supply, there is also a fan that simultaneously serves as for cooling the heating elements in the power supply, as it blows through it the air and for the overall ventilation inside the computer. In the simplest version of the PC cooling system, the fan inside the power supply provides air ventilation inside the entire body.
Helpful advice:
At least sometimes recognize the temperature of the PC components. This will help avoid many unnecessary problems. Now there are many free software for this. For example, . Working temperature The processor should not exceed 75 degrees, the temperature of the video card largely depends on the power of the model. For expensive cards and 90-100 degrees can be considered normal. Optimal temperature for hard disk - 30-45 degrees.
Which way should the fans should be spinning in the case.
So, consider the ventilation and cooling circuit. After all, many newcomers, when self-assembling a computer, there is a question "where the fan must blow" or "which way the cooler should spin." In fact, it is really important, because correctly organized ventilation inside the computer is the key to its reliable operation.

Cold air is supplied to the housing from the front bottom (1). It must be taken into account when cleaning the computer from dust. We must definitely add the place where the air is suused inside the computer. The airflow gradually heating up up and in the upper back of the housing is blown through the power supply (2) already hot air.
In the case of a large number of heat elements inside the housing (for example, a powerful video card or several video cards, a large number of hard disks etc.) or small amount of free space inside the housing to increase the air flow and increase the cooling efficiency in the housing, additional fans are installed. It is better to install fans with a large diameter. They provide a larger air flow with smaller turnover, and therefore more efficiently and quieter than fans with a smaller diameter.
When installing fans, consider the direction in which they blow. Otherwise, you can not only not improve the cooling of the computer, but also worsen it. With a large number of hard drives, or in the presence of high speeds (from 7200 rpm), set additional fan In the front of the housing (3) so that it blows hard drives.
If there are a large amount of heating elements (a powerful video card, several video cards, a large number of boards installed in the computer) or when the free space is lacking inside the case, it is recommended to install an additional fan in the rear of the top of the case (4). This fan must blow the air outward. This will increase the air flow passing through the housing and cooling all the internal elements of the computer. You can not install the rear fan so that it blows inside the housing! So the normal circulation inside the PC will be disturbed. On some enclosures it is possible to install a fan on the side cover. In this case, the fan should spin so that it sucks the air into the case. In no case, it is impossible for him to blow it outside, otherwise it will not be enough to cool the upper part of the computer, in particular the power supply, motherboard and processor.
Which way should blow the fan on the cooler.

I repeat that the cooler is designed for local cooling of a particular element. Therefore, the overall circulation of air in the case is not taken into account. The fan on the cooler should blow the air through the radiator, thereby cooling it. That is, the fan on the processor cooler must blow toward the processor.

On some coolers models, the fan is installed on the rendered radiator. In this case, it is better to put it in such a way that the air flow is directed into the straight of the rear wall of the case or upwards in the side of the power supply.
On most powerful video cards, the cooler is a radiator and an impeller, which does not blow up the air on top inside, and he drives it in a circle. That is, in this case, in one half of the radiator, the air is sued, and it blows out through another.
Share the record in your social networks!
 How to pay a domain name
 Domain zone of tokelau islands
 What is domain what problems may be
 Yandex Wordstat: detailed instructions for using the service and grouping operators and a complicated request
 Editing DBF files
 Xenu Link Sleuth - What is this program how to use the Xenu program
 Methods Copy and insert text from keyboard without using mouse