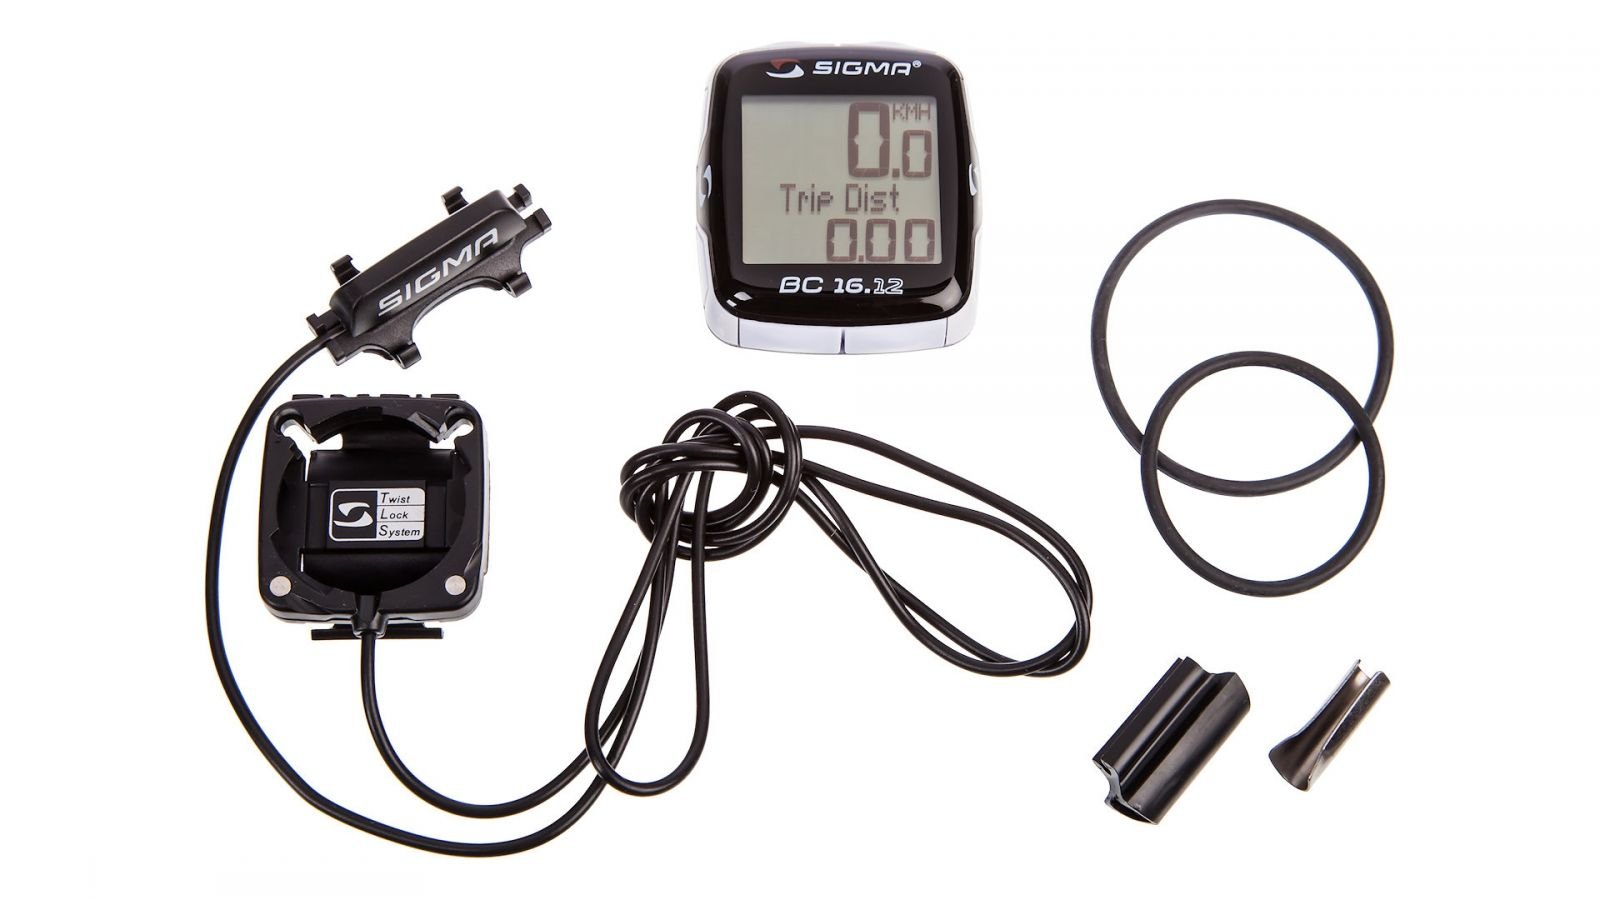
Installing a bike computer on a bike 26. Installing a bike computer on a bike. Ways to set up a bike computer
seize the moment
2 months ago
6 COOL BIKE GADGETS. In this issue, we will look at the top 6 cool bike products, some of which you can find on aliexpress. SUBSCRIBE to the channel and be the first to know about all the technological innovations. https://goo.gl/eUhWHj LIFEPAIN Innovative paint for bicycles. It is designed to improve the safety of cyclists at night. By its consistency, the paint is applied in the form of a spray and reflects light. https://youtu.be/kEhGZdV8UWA https://www.youtube.com/channel/UCionQxapaJwuDALKpafx2nQ https://youtu.be/i2G6yV0hE5s https://www.youtube.com/channel/UCGpMJ00AKUUg3XcAQJNN7cA STOMPUMP Stompump bike pump does it all assigned responsibilities in this area. But its main advantage is compactness - the weight is only 185 grams. https://youtu.be/eXZKOGvTIw0 https://www.youtube.com/channel/UCCrvo6ot_kox7x56BfYlyFw SHOCKSTOP SEATPOST The ShockStop Seatpost bike suspension is designed to smooth out bumps while riding on uneven road surfaces.
This invention will come in handy when driving outside the city (especially off-road). https://youtu.be/vL2QIG1l2n8 https://www.youtube.com/channel/UCmZyoAA1PWPDGWk6rVEqLiw AIR-LINER The Air-Liner is a mountain bike tire accessory. It is a tubular foam-based insert to protect the rim, enhance grip and prevent punctures. www.vittoria.com/us/air-liner-vittoria https://www.youtube.com/channel/UCfsSN97U8dlPh01_K1lRZ1Q https://youtu.be/CP_fjInQw-g UNIRACK Compact device designed to carry and quickly load bikes, skis and snowboards. Suitable for any type of bikes and skis of any length. https://kck.st/2mWl2RX PEAKRIDER A simple and lightweight innovative device for carrying any type of bike. Designed primarily for climbing steep hills and then descending. https://youtu.be/e5G4E5JQAyA https://www.youtube.com/channel/UCFlgkF1-yNQ_h0TT1intxcw RETYRE An innovative system that allows you to change the tire profile on a bicycle in a few seconds. To change the profile, design or color of the tire, it is enough to put a removable cover on the installed tire and fix it with a zip lock. https://www.youtube.com/channel/UCqx6qVReqRUsKVFo69uViEA/featured https://youtu.be/Thh-CUsCYmg https://youtu.be/1UFTbrmrwLg
cheposmotret.ru
There are a few more points related to the accuracy of wheel circumference tables:
Firstly. It happens that your tire size is simply not in the attached table.
Secondly. With the same size written on the tire, the circumference may be different. This is due to the fact that different manufacturers take into account the width and, accordingly, the height of the tire in different ways. It also depends on the type of tire and tread pattern - i.e. slick and toothy tires have different tire heights, although the width can be the same.
Third. Compare these few tables from the internet:


Not all of them for the same tire sizes have the same circumference values.
For example, size 23-622 (700x23C) has a circumference of 2096 and 2133.
Fourth. Well, the Chinese, there are the Chinese. How they write instructions, where they get the tables from, remains only on their conscience and your faith in their honesty and decency.
Therefore, how it relates to the data from these tables is a private matter for everyone. How important is the accuracy of the instrument readings to him.
It is because of all these nuances that for measuring the circumference of a wheel your bike, I personally recommend using the second method from the article "How to determine the circumference of a wheel."
For those who are especially lazy, here is a summary of it:
A second person is needed to accurately measure the circumference of your bicycle wheel. He will help. The owner inflates the desired wheel (front or rear, and best of all both) to the usual pressure, which most often rides and sits on a bike. If the pressure in the wheel is lower or higher, then the size of the circumference will also differ.
With a seated cyclist, measurements will be more accurate, as tire compression is taken into account during an actual ride. Your assistant will put marks on the pavement.
Then proceed according to the following algorithm:
- At the point of contact of the wheel with the road with chalk, draw a thin line on the side of the tire and the road. They must, of course, match. It can also be done directly opposite the nipple on the wheel - as a natural mark.
- Sitting on a bicycle, we ride it in a straight line so that the wheel makes one complete revolution.
- Where the line on the wheel touched the ground again, put a second mark.
- We measure the distance between the two marks - this is the circumference of the wheel.
- To improve the accuracy of calculations, you can take 2-3 measurements and take the average, or drive not one, but three turns of the wheel and divide the resulting distance by 3.

The resulting value (in millimeters) is entered into the computer. Usually it is always entered first when setting up. Then enter all other parameters according to the instructions and you can go.
In conclusion, I would like to say: do not complex about the accuracy of computer calculations of the distance traveled.
The accuracy of the bike computer calculations depends on:
- tire type - these are slicks or winter toothy ones with high spikes
- type of road surface - on asphalt is always more accurate than on soft ground,
- real tire pressure during the trip,
- air temperature,
- the weight of the cyclist and the load he is carrying,
- accuracy of operation of the reed switch, etc.
And further. As mentioned in the bike computer setup article, the distance on the rear wheel is calculated more accurately than on the front.
Personally, I believe that an error of a few percent is not critical for an ordinary cyclist.
Possible malfunctions of the bike computer and the reasons for their occurrence
If the device starts to fail, for example, the speed out of the blue starts to jump sharply, check:
- Installation of a reed switch and a magnet on a spoke. Especially the distance between them and the position of the magnet relative to the reed switch. It can move and the reed switch will simply not count the wheel revolutions.
- Batteries. If they are discharged, the device begins to vibrate strongly.
- Reliability of fixing the wire contacts on the platform and at the reed switch.
Very often these methods solve all problems.
If they do not help, most likely there is a problem in the board or display, and it is best to simply change the device to a new one.
Good luck with your rides.
www.sportek.in.ua
Hello guys! I know for myself that, having acquired a bicycle, I immediately wanted to install a computer on it. And so after 2 days I received a parcel from the online store in the mail. At that moment I was happy, but at the same time the question arose: “How to properly configure this computer?”
Naturally, each computer comes with instructions for setting it up. But at that moment I still could not understand how to do it all right. And then I turned to Zhenya. It took us about 30 minutes and the eureka bike computer was set up.
Now I myself can set up any computer without any problems, and therefore I will share this knowledge with you. To begin with, it should be noted that there are two types of bike computers: wired and wireless.
Wired bike computers take a little longer to set up, but they provide accurate data. Wireless ones are easier to install, but they can show a speed of 99 kilometers per hour from other radio interference when the bike is not even moving.
By setting the wheel diameter, bike computers are divided into two main types:
1. Setting the bike computer for wheel diameter: 26, 27, 28 inches, (not exact setting, mainly on cheap Chinese computers).
2. Setting the bike computer for the circumference of the wheel in millimeters: 222,223,224 mm, (fine tuning of the bike computer).
Very often I meet cyclists who assure me that they were traveling at a speed of 60 kilometers per hour, but when I ride with them, it turns out that their bike computers are not working correctly, in the direction of increasing speed.
So how do you set up a bike computer? Before you can configure it, you need to install it. To do this, watch the following video.
Next, depending on the type of setting in the "ODO" parameter (in my case), select the desired diameter (28, 27, 26 inches) of the wheel, or wheel circumference in millimeters (222,223,224). With the diameter of the wheel, everything is easier - it is listed on the tire. But how to find out the circumference of the wheel?
To do this, take a simple thread and measure the circumference of the wheel. Then measure the length of the resulting thread with a tape measure. You can do it differently. Take the chalk and draw a line around the entire circumference of the wheel. Further on the asphalt, ride a bike. As a result, the remaining white line will be the circumference of the wheel.
To consolidate the above data, I suggest watching a video on setting up a bike computer.
Thank you for reading to the end 🙂 Do not forget to subscribe to blog updates and share the article with friends through social networks.
velo-travel.com
Types of bike computers
These accessories can be classified according to various criteria. But installation on a bicycle will depend only on the type of connection to the sensor: wired or wireless.
The first type of bike computer is much cheaper. The sensor is connected to the display with a wire that must be pulled and fixed on the fork and handlebar.
Its main disadvantages are that the wiring can interfere with the cyclist, cling to branches and, if the wire is damaged, the bike computer will stop working.
Wireless computers are much more expensive than their counterparts. They not only look better, but are also more practical than wired ones. Only these computers have their drawbacks.
The most important thing is the need to systematically recharge the sensor or change the battery in it. In wired, the sensor is powered from the bike computer itself.

Also, the installation process may be slightly supplemented depending on the functionality of the accessory. So, for example, if the bike computer provides for calculating the cadence, then you will need to install sensors on the cranks.
Correct installation
It is best to start installing the bike computer from the top - by installing the base on the steering wheel. It is on the mounting platform that the bike computer itself will be fixed in the future. You can install it either on the steering wheel itself or take it out.
There is no fundamental difference in this, it all depends on your own preferences. A small plus in favor of installing a computer on the go is that in this place the computer will be more secure.
In addition, it may be necessary to turn the bike upside down and in this position there will be no pressure on the base.
The base is fixed on the steering wheel with an elastic band. If its tension is not enough for the bike computer to be securely fixed, then you can additionally fix the mounting pad using double-sided tape.
If it’s a pity to stain the steering wheel with glue, then you can just put a piece of rubber to prevent the bike computer from sliding on the steering wheel or stem.

The next step is the laying of the wire, if, of course, there is one. Before installing the bike computer on a bike, you need to estimate the length of the wire.
If it is sufficient, then it is best to wind the bike computer wiring around the front brake hose or cable. In this case, there will be no need to fix it in many places and it will not interfere.
It is necessary to wind the cable up to the gorilla (the place where the front fender should be attached), and then stretch it to the leg opposite from the brake rotor.
If the length of the cable is small, then you will have to fix it on the frame. It is important that it does not hang anywhere and does not stick out. On the other hand, it is necessary to leave gaps in the area of \u200b\u200bthe steering cup so that the steering wheel can turn freely.
Fix wiring should be in the following places:
- On the steering wheel next to the mounting platform;
- On the steering wheel next to the stem;
- In the center of the takeaway;
- Near fork stem;
- On the crown of the fork;
- On the gorilla;
- Midway between gorilla and sensor;
- Near the sensor mount.
With this frequency of fixation, the wire will be securely fixed and will not hang out. It is important to note that it is not necessary to fix the wiring on the steering glass.
The final stage of installation is the attachment of the sensor and magnet. The distance from the wheel axle at which the sensor and the magnet should be attached must be specified in the instructions for a specific bike computer.
The sensor should be perpendicular to the wheel, and the magnet should look straight at the sensor. If the magnet or sensor is deflected to the sides, then the speed and, accordingly, the mileage indicators will not be accurate.
The magnet should not be too close or too far from the sensor, within 2-5 mm, but this distance should also be clarified in the instruction manual.

If a cadence sensor is provided, then it must be installed by analogy with the speedometer. The magnet should preferably be attached to the left crank, and the sensor should be attached to the frame tube: either lower or seatpost, depending on the model.
How to set up the bike computer is described in detail in each manual. It is impossible to talk about some universal method and the procedure for setting it up, since almost every model is individual.
The main indicator on which the correct setting of the bike computer depends is the circumference of the wheel. You can find it out from the table below, it should also be in the instructions for the bike computer.

It should be noted that it is necessary to take into account not only the diameter of the wheel, but also the width of the tire that is installed. After all, often, its height depends on the width. True, the error still exists.
The dependence of the width of the tire on its height is different for some manufacturers. So, for example, Schwalbe tires are slightly larger than similarly sized Continentals. It is almost impossible to take this into account in the table. Despite this, the error will be extremely small.
Those who need the most accurate speedometer readings can measure the circumference themselves in two ways. The first is measurement with a thread. It must be wrapped around the outer diameter, i.e. by protector.

The second way. It is necessary to mark the point of contact on the asphalt and the tire. Then drive exactly one turn so that the point marked on the tire touches the asphalt again and make a mark on it.
The distance on the pavement between two points will be a long circle. It is believed that the second method is more accurate, since the tire is deformed when driving.
During setup, you will normally need to set the date and time as well. On bike computers with a calorie counting function, you will need to enter your weight, height, age and gender. You should also not forget about the choice of units of measurement.
Outcome
Proper fastening and setting up the bike computer is the key to the accuracy of its readings. The article described the general installation and configuration procedure, which will vary depending on the specific model.
To fully trust what the bike computer shows, you must definitely read the instructions.
velife.ru
Recently, thanks to a good friend, I bought a bike computer:

Now it needs to be installed and configured somehow ... I started digging on the Internet, requests like “how to install a bike computer” and “how to set up a bike computer” led to funny manuals. I decided to collect some instructions from them. Although the kit has a completely normal instruction in quite understandable English.
The people write that any gopnik can install and a lot of brains are not needed:
First, let's decide on the installation location of the computer. The first thing that catches your eye is the takeaway - it stands in the middle, as if it was created in order for a computer to be slapped on it. But this, I must say, is not the best idea. A standard bike computer has a bunch of different additional functions that you also want to watch, but for this you need to switch modes, and pressing a button on a bike computer that stands in the middle of the steering wheel is completely inconvenient, especially on bumpy terrain. Therefore, we attach the bike computer right close to the grip (handle). I got it right under the trigger lever. It does not interfere at all and you can press the buttons without releasing the steering wheel.
The problem of protecting the wire is immediately solved - it is stupidly wrapped with electrical tape to the brake cable going from the grip to the front wheel.
I also thought about putting it on the steering wheel, but you see, it’s not a good idea ...
By the way, for the general case, there is this video:
Pretty understandable. Since my bike computer is popular among cyclists, I also found a translation of the instructions for it, it seems to be quite normal
Atinstallation and configuration of the cycle computer on the E-Trail electric bike.
1. Symbols displayed on the cycle computer display:
ODO- the value of the total mileage of the electric bike, counted from the moment the bike computer is turned on during the first trip on the electric bike (0 km) and until the value of 99999 km is reached);
DST– the distance traveled on the e-bike since the previous reset (you can reset this reading at any time) (in the range 0 – 9999 km);
MXS- the maximum speed recorded by the cycle computer during the current trip on the electric bike;
AVS- the value of the average speed recorded by the cycle computer during the current trip on the electric bike;
TM- the duration of the current trip in time on the electric bike (the time of stops is not taken into account, i.e. only the pure time the electric bike is on the road is shown);
CLK– indicator of the current time in hours, minutes, seconds (12h/24h);
Scan– the mode of scanning the parameters of the cycle computer and displaying them on the display screen, while the following measured parameters are reproduced: DST, MXS, AVS and TM (parameters are displayed in turn, the duration of each display is 4 seconds)
"+" "-" COMPARATOR- a parameter that reflects the deviation of the current speed of the electric bike (decrease or increase) relative to the average speed during the trip;
Freeze Frame Memory- fixing the measured parameters of the bike computer at a given time;
Temperature– outdoor temperature (from -10С to +70С)
2. Determining the wheel size and setting its value on the cycle computer display:
Before starting the cycle computer, it is necessary to reset its previous parameters. To reset the readings of the cycle computer, it is necessary to remove the flat rechargeable battery from the socket for a short time, located under the cover on the back of the display, and insert it back into the socket.
“2060” will appear on the display screen, the first right digit will flash. The figures indicated represent the circumference of the bicycle tire. For correct subsequent measurements of the parameters of the movement of the electric bike, it is necessary to set the circumference of the wheel of your electric bike. You can do this in the following main ways:
- select from the table;
| Tire size | Length district |
| 700s x 38mm | 2180 |
| 700s x 35mm | 2168 |
| 700s x 32mm | 2155 |
| 700s x 30mm | 2145 |
| 700s x 28mm | 2136 |
| 700s x 25mm | 2124 |
| 700s x 23mm | 2105 |
| 700s x 20mm | 2074 |
| 700s chamber | 2130 |
| 26″ x 1.75″ | 2035 |
| 26″ x 1.25″ | 1953 |
| 24″ x 1.9″ | 1916 |
| 650c x 23mm | 1990 |
| 16″ x 2.0″ | 1253 |
| 16″ x 1.5″ | 1206 |
| 650c x 20mm | 1945 |
| 16″ x 1.95″ | 1257 |
| 27" x 1-1/4" | 2161 |
| 27″ x 1-1/8″ | 2155 |
| 26″ x 2.3″ | 2135 |
| 26″ x 2.25″ | 2115 |
| 26″ x 2.1″ | 2095 |
| 26″ x 2.0″ | 2074 |
| 26″ x 1.9″ | 2055 |
| 26″ x 1.5″ | 1985 |
| 26″ x 1.0″ | 1913 |
| 20″ x 1-1/4″ | 1618 |
- directly measure the circumference of the wheel;
The table of wheel sizes and circumferences is approximate as shown above.
To select the circumference using the table, you need to find its diameter on the wheel tire, for example "26x1.25". In the table we find opposite the given diameter the corresponding circumference - 1953mm and enter it into the bike computer. To enter numbers, press the right button in sequence and set the desired value of the right digit in the circumference (in our case, "3"). Then briefly press the left button. At the same time, the second digit on the right side starts flashing. In the same way, right-click to set the second digit (in our case, "5") and similarly set the remaining two numbers "9" and "1".
The second more accurate way to measure wheel circumference is:
We draw a thin but thick transverse line on the tire with white chalk (tires must be pre-inflated to normal operating pressure). Next, you need to sit on an electric bike and slowly drive in a straight line for a distance of more than one turn of the wheel, so that the first and second traces of the chalk on the tire are imprinted on the asphalt or other hard surface (this operation is best done with an assistant holding you while driving). Next, you need to measure the distance between the two risks in mm on the asphalt with a tape measure and enter the numbers into the bike computer in the manner indicated above.
3. Selection of measured parameters on the display of the cycle computer.
Press the LEFT button on the cycle computer display to select the value of the desired parameter, then the RIGHT button to save the value (from 0 mm to 9999 mm). Press the RIGHT button to turn on KM/H mode.
Setting KM/H and M/H
Press the right button to select KM/H or M/H. Press the LEFT button to enter ready mode. Press the LEFT button to cancel and enter CLOCK mode.
CLK mode - Clock mode
In clock mode, press and hold the LEFT button for 3 seconds to select 12h/24h. Briefly press the LEFT button again to select 12h or 24h mode.
Press the RIGHT button to enter the TIME SETTING mode, when the number of hours indicator flashes, press the LEFT button to change the hour value.
To continue, press the RIGHT button to move to the minute setting, the minute indicator will flash, use the LEFT button to change the minute value.
Then press the RIGHT button to enter the SPEEDOMETER mode.

Setting Last Odometer Value
In ODO mode, press and hold the LEFT button for 2 seconds to set the ODO value, the initial value will be 0000.0.
When one of the digits starts flashing, press the RIGHT button to change the value, then the LEFT button to save and move to the next digit.
(After replacing the battery, the last parameter value can be entered according to the value it had before the battery was replaced).
Reset ODO parameter
Press the RIGHT and LEFT buttons simultaneously and keep them pressed for 3 seconds to reset the ODO parameters.
This will reset the wheel size and driving range. The time display will remain unchanged.
SPD - readings of the current speed (similar to the readings of the speedometer in a car)
The current speed is constantly displayed on the screen. The maximum possible value is 99.9 km/h, accuracy +/- 0.1 km/h.
“+” “-” readings of speed deviation from the average SPEED COMPARATOR
During the trip, the screen will show a “+” or “-” indicator, which means that the current speed is getting higher or lower than the average speed during the trip.
Odometer ODO - the value of the total mileage of the bike
In ODO mode, the total distance is displayed on the screen (value from 0.001 to 99999 km)
Press the LEFT button to enter the DST mode (Distance, distance traveled during the current trip).
DST (Distance traveled by e-bike during current ride)
In DST mode, the distance traveled during the current trip is displayed on the bottom line (value from 0 to 9999 km).
To clear the current trip values, press and hold the LEFT button for 5 seconds. At the same time, all the parameters of the current trip are DST (Distance traveled by the e-bike during the current trip), MXS (Maximum speed recorded during the current trip), AVS (Average speed recorded during the current trip), TM (Total value according to the duration of the current trip) will be reset to 0.
Press the LEFT button to enter MXS (Maximum Recorded Speed for Current Trip) mode.
MXS (Maximum speed recorded for the current trip)
The maximum speed for the current trip is displayed.
To reset, hold the LEFT button for 5 seconds in this mode (DST, MXS, AVS, TM will also be reset)
To go to AVS (Average speed for the current trip) press the LEFT button.
AVS (Average speed for the current trip)
Displaying the average driving speed per trip
To reset, hold the LEFT button in this mode for 5 seconds (DST, MXS, AVS, TM will also be reset)
To go to TM (Duration of the current trip) press the LEFT button.
TM - Duration of the current trip in time
TM - Duration of the current trip in time (time of stops is not taken into account, i.e. only the time of movement is taken into account). The parameter value is from 0:00:00 to 9:59:59.
To reset the parameter, press and hold the LEFT button in this mode for 5 seconds (the parameters DST, MXS, AVS, TM will also be reset)
To move to the next mode, press the LEFT button.
SKAN
The mode of scanning the parameters of the bike computer and displaying them on the display screen, while the following measured parameters are reproduced: DST, MXS, AVS and TM (parameters are displayed in turn, the duration of each display is 4 seconds)
To switch to CLOCK MODE, press the RIGHT button.
Sleep Mode - Sleep mode
If there is no signal from the cycling computer sensor for 5 minutes, the display goes into sleep mode, only the clock is shown on the screen.
Freeze Frame Memory - fixing the readings of the bike computer at a given time and
To fix the readings of the bike computer at a certain fixed time, you must press the LEFT button and all readings will be fixed. The display will show TM (Current Trip Duration) flashing. With the RIGHT button, you can move to other fixed parameters.
To exit the specified mode, press the LEFT button.
Purpose of the buttons of the bike computer
The RIGHT button is used to switch between ODO, DST, MXS, AVS, TM, SCAN (DST, MXS, AVS, TM and CLOCK) modes.
The LEFT button is only used to switch the fixed readings of the bike computer (Freeze Frame Memory)
There is even a video to control the clock (oh great YouTube), thanks to Alexey for the link 🙂
moy.bike
Types of bike computers
The bike computer is a compact device with which you can find out the speed, distance traveled and other useful parameters of the vehicle.
Outwardly, the device resembles a small speedometer, often with a black and white touch screen.
Any bicycle needs regular maintenance and replacement of faulty parts.
Thanks to a small computer, you can timely track any breakdowns and discrepancies in normal operation.
Traveling with such a gadget becomes more organized and convenient. You will always be aware of the path already covered, speed or even the weather.
Advanced models of bike computers can be used as GPS navigators for quick orientation in new areas.
There are two main classes of electronic gadgets for your bike:
The principle of operation of each of the varieties is to connect the electronic part of the device with sensors located on the wheels.
Thanks to this connection of the components, the speed, lap time and other options are determined.
Wired models are convenient and cheaper devices. However, their installation takes longer and the user will need detailed instructions.
Wireless computers can be attached not only to the steering wheel, but also to the hand.
There are options for devices, one part of which is attached to the bus, and a special application is installed on the smartphone to view the parameters.
back to menu
The main functions of the gadget
The bike computer may have a different set of functions depending on the model and type of gadget.
The main functions allow you to control the speed, distance and travel time. Also, the bike mileage is being measured.
In more modern models, there are modules for training, built-in terrain navigators.
Such devices are very reminiscent of modern smartphones, because they often have a mobile OS installed and it is possible to install additional applications.
There are models that allow you to measure the heart rate of an athlete. The main part of such computers is attached close to both sides of the steering wheel.
To measure the pulse, it is enough to hold both handles with your hands and wait for the measurement results to appear on the screen.
back to menu
Installing a bike computer. Main stages
Let's take a closer look at how to install a wired bike computer. Before proceeding with the installation, you should familiarize yourself with all the stages of the process in detail.
Incorrect installation of components can cause measurement deviations or failure of certain parts of the computer.
Installation of the gadget can be divided into the following stages:
Fastener installation
Most bicycle microcomputers are detachable. This means that for their installation, you first need to create a special platform for fasteners.
The most convenient place to place the gadget is the base of the right side of the steering wheel. If you are left-handed, choose the left side.
This position of the device will allow the cyclist to control the performance and quickly configure the computer even while driving.
Depending on the features of your vehicle, the standard placement of the electronic device may not be suitable.
Pay attention to a few more places for the location of the computer:
The installation site must be flat and fit the size of the gadget. We recommend using conventional disposable harnesses for fastening.
They can be tightened very tightly, which will allow the site not to lose shape. Note that each time you remove the computer, the platform may become unstable.
Tighten the harnesses continuously before remounting the cycle computer.
You can strengthen the site using the most common rubber backing. It will allow the gadget not to slip and creates a more even surface on any part of the bike.
Mounting the magnet and sensor
After creating a surface for the computer, you need to start mounting the two main elements - the magnet and the reed switch.
A reed switch is a sensor that allows you to control and change the state of an existing electrical circuit. In the instructions, you may come across the term "tight contact".
In the process of mounting the magnet and the sensor, accuracy is important, because it is the system of these two elements that will ensure the correct operation of the computer.
Such a limitation is mandatory and necessary to prevent the breakage of the magnet during the operation of the centrifugal force.
The sensor is installed using harnesses and a clamp on a part of the suspension fork in such a way that the brakes do not interfere with the resulting structure.
Fasten all parts only perpendicular to the wheel.
The magnet itself is attached to the spoke of the wheel. It is very important that the sensor and the magnet are as close to each other as possible. The distance between them should not exceed a centimeter.
The fastening of the magnet must be strong, because it will constantly be affected by the force of the rotating wheel and its vibration.
Sometimes the sensor and magnet are attached to the rear wheel. This should only be done if you cannot place them in such a way that the brakes do not interfere with the work of the parts.
Placing the wire
The most time-consuming part of the installation is the correct location of the wire that connects the sensor and the computer itself.
If the wire is placed incorrectly, this can lead to tangling in the spokes of the bicycle, and the appearance of the vehicle will be sloppy.
Based on the size of the bike and the distance between the previously installed elements, you need to determine the appropriate length of the wire.
Determine the length in such a way that after its installation, tension is not created between the parts of the computer.
Do not forget to add another 5-6 centimeters, given the possible error in measurements. If in the end the length turns out to be more than expected, it can always be cut off.
Start installation only after fixing the contacts.
The wire can be laid in one of two ways:
The first option will be convenient for standard type bicycles. Attach the wire to the harnesses and secure it to the frame area.
Please note that if the steering wheel is often twisted, this may cause the wire to break.
In the second case of installation, it is necessary to use a cable lap. If you secure the wire with black electrical tape close to the bike, it will not be visible and you will not accidentally hit it.
back to menu
Settings. How to determine wheel size?
After the physical installation of the bike computer, you need to configure the gadget. As a rule, after turning on the device, you will need to enter several parameters of the bike.
One of these parameters is the circumference of the wheel. In order not to measure and count everything yourself, use the data in the table:
Entering the correct value for the circumference ensures accurate calculation of all other computer values.
In addition to calculating speed and mileage, most bike computers operate on other indicators. Among them are a watch and a calorie counter.
To enter the correct time, go to the gadget settings and enter the time manually.
To start the calorie counter, enter your weight and height in the corresponding settings window. Most computer models use pounds instead of kilograms to denote weight.
If the calculation of the daily calorie intake seemed too small, try converting kilograms (kg) to pounds (lb) and enter the result into the program.
back to menu
Screen legend
Users who have encountered a bike computer for the first time may have difficulty understanding the operation of the gadget.
Since the screen of the device is small, there is a minimum of text on it and most of the information is presented in the form of symbols:
back to menu
geek-nose.com
Install bike computer not difficult and this task is within the power of even a stupid gopnik. Even a tool is usually not required. First, let's decide on the installation location of the computer. The first thing that catches your eye is the takeaway - it stands in the middle, as if it was created in order for a computer to be slapped on it. But this, I must say, is not the best idea. A standard bike computer has a bunch of different additional features which you also want to watch, but for this you need to switch modes, and pressing a button on the bike computer that stands in the middle of the steering wheel is completely inconvenient, especially on bumpy terrain. Therefore, we attach the bike computer right close to the grip (handle). I got it right under the trigger lever. It does not interfere at all and you can press the buttons without releasing the steering wheel.
Resolved immediately wire protection problem- it is stupidly wrapped with electrical tape to the brake cable going from the grip to the front wheel.
The bicycle computer sensor is installed on the fork leg from any convenient side. I put it on the right. At Vetta RT33 fastening by means of mounting clamps, which in my opinion is very cool. Because these clamps are almost impossible to break, they are easily replaced. The sensor is strongly attracted to the fork tube from the inside. You need to tighten it with all your might, because. if it slips from shaking, the computer will stop working. Since the spokes are not parallel to the fork, the sensor mount will be somewhere in the region of the axis, the optimal place is a couple of centimeters further than the crosshairs of the spokes, so that the magnet stands directly opposite the sensor and rests its body on the crossed spokes - then it will not be moved by centrifugal force.
The magnet is attached to the spoke, the closer to the sensor the better. I have a distance from the magnet to the sensor of the order of 2mm. Tighten the magnet firmly, but not excessively. Because there the thread is cut with a groove under the spoke, then from a strong tightening it can break or get stressed, and then jump off from the impact in an unknown direction. After tightening, I sealed the groove with silicone sealant. If the screw is unscrewed, then the magnet will definitely not be lost. The correctness of the installation is checked simply - just lift the wheel and spin. After a couple of turns of the wheel, the computer should show the speed. Did not show - catch on.
The reliability of the bike computer depends on the correct installation of the wire. To begin with, you can grab the wire with ties on the inside of the plug at an interval of twenty centimeters. Why from the inside? Yes, everything is simple, if it is from the outside, then all sorts of branches and other obstacles can easily break the wire. On top of the wire, you can stick a strip of adhesive tape to tightly attach the wire to the plug, then it will not move at all.
In the area of the crown, the wire is securely wound with electrical tape to the brake cable, through which it reaches the bike computer. With such an attachment, in order to damage the wire, you have to try hard, since it is protected from below by a plug, and from above by a powerful brake cable jacket.
It would seem that there to configure? But no, there are a couple of points. Every bike computer should have wheel size adjustment. In the worst case, you can choose one of the standard rim and tire sizes, in the ideal case, the bike computer will prompt you to enter the wheel circumference in millimeters. The bike computer counts the wheel revolutions, multiplying them by the circumference of the tire, so it is necessary to enter it, and not the circumference along which the magnet rotates. Usually a table of circumferences relative to the wheel and tire is written in the instructions for the bike computer. If it is not there, then the circumference can be measured with a tape measure or a tailor's centimeter. Just in case, I bring this table here. Also, any normal bike computer offers to enter the initial mileage. If this is a new computer, then leave zeros there, and if you just changed the battery or have already driven several hundred kilometers, then you can drive in the knurled one.
Some bike computers also have technical mileage. For example in my Vetta RT33 it is marked with a wrench. If you drive in, for example, 100 kilometers, then every 100 kilometers the wrench will light up. Reminding, for example, to lubricate the chain or service the fork.
| Tire size | Circumference |
|---|---|
| 700s x 38mm | 2180 |
| 700s x 35mm | 2168 |
| 700s x 32mm | 2155 |
| 700s x 30mm | 2145 |
| 700s x 28mm | 2136 |
| 700s x 25mm | 2124 |
| 700s x 23mm | 2105 |
| 700s x 20mm | 2074 |
| 700s chamber | 2130 |
| 26″ x 1.75″ | 2035 |
| 26″ x 1.25″ | 1953 |
| 24″ x 1.9″ | 1916 |
| 650c x 23mm | 1990 |
| 16″ x 2.0″ | 1253 |
| 16″ x 1.5″ | 1206 |
| 650c x 20mm | 1945 |
| 16″ x 1.95″ | 1257 |
| 27" x 1-1/4" | 2161 |
| 27″ x 1-1/8″ | 2155 |
| 26″ x 2.3″ | 2135 |
| 26″ x 2.25″ | 2115 |
| 26″ x 2.1″ | 2095 |
| 26″ x 2.0″ | 2074 |
| 26″ x 1.9″ | 2055 |
| 26″ x 1.5″ | 1985 |
| 26″ x 1.0″ | 1913 |
| 20″ x 1-1/4″ | 1618 |
If bike computer suddenly stopped working, then first of all you need to check the bike computer itself. To do this, you need to rhythmically close the contact plates on its body with any metal object - some kind of speed should appear.
If the bike computer itself is correct, then wire and sensor checked. To do this, take a regular tester, put it on a dial and connect to the outputs on the socket. After that, a powerful magnet is brought to the sensor. If everything is in order, the tester will beep. If not, then you need to look for a broken wire. Most likely it will be where it often bends, usually in the area of \u200b\u200bthe fork shock absorber. A broken wire is easy to ring if you stick thin needles through the insulation and ring it in pieces. There is another way to find a cliff, but it is more rough and risky. When my wire broke, I just took it by the ends (in no case should you take it by the sensor and the socket!) And pulled hard, but carefully. Where there was a break, the wire broke in two :). The broken wire must be stripped and twisted with a vein, it is even desirable to solder, and then insulate them separately from each other and then tightly wind them together.
If the computer is working and the sensor with the wire is intact, then Possibly a bad connection between the computer and the socket.. You need to wipe the contacts with a coarse eraser, and then rinse with acetone or alcohol.
The second type of failure is when the bike computer starts to lie - overestimate or underestimate the speed. Here, most likely, the position of the sensor and the magnet has gone astray. If the magnet moves slightly away from the sensor, then flying past the sensor it causes not one clear and confident operation, but a frequent bounce, which the computer can interpret as a very high speed (once the computer gave me a speed of 98 km / h when I was barely rolling) or work through time, which causes a strong underestimation of the real speed.
Once I had a strange glitch. When I was driving near me, the speed was shown correctly, but as soon as I got on the bike and went, the bike computer stopped showing the speed at all. The dial tone of the sensor showed that it is working. The wire also called. The problem turned out to be trivial - the wire broke inside, but not completely. And when I got on the bike, the fork was pressed through, the cables were slightly bent and the contact in the wire, which was tied to the cable, was broken.


vk.com
1. What is a bike computer.
2. What is the difference between bike computers. Advantages and disadvantages of each.
3. Installing the bike computer on the bike.
4. Ways to configure the bike computer.
5. The most common abbreviations on bike computer displays.
What is a bike computer
Such a concept as a bicycle computer appeared with the development of electronics. Initially, a counter was used to measure distance, and a mechanical speedometer was used to measure speed.

The invention of the bicycle computer made it possible to get away from the heap of inconvenient devices. Not only is it significantly more functional than previous devices, it is very light, has small dimensions, is easy to remove and is almost independent of the weather. You can safely ride without it, but once you install it and ride, it will be difficult to resist using it in the future. In addition to just useful and necessary information, the bike computer gives you the opportunity to surprise your “non-cycling” friends with the distance traveled and maximum speed.
How are cycling computers different? Advantages and disadvantages of each
Bicycle computers differ in the way data is transmitted/received.

The most common, due to the low cost and sufficient reliability. The principle of operation is simple: a magnet is attached to the spoke, a sensor is attached to the fork, which reads the number of revolutions of the wheel, the information is transmitted by wire to the monitor, which is installed on the platform with contacts attached to the steering wheel. It is important to set the correct wheel size. Here, too, there is a difference.
1. On the most inexpensive bike computers, you can only select the wheel diameter, which gives a rather large error, because the wheel diameter can be 26 inches, and the tire is from a 1.25 inch wide slick to a 2.4 toothy width.
2. More accurate information is obtained when the circumference is entered in the wheel size value. On many bike computers, the instructions have a plate with an approximate circumference corresponding to a certain diameter and tire width. However, the most accurate readings will be obtained if you measure the circumference of the wheel yourself.
pros
1) Low price.
2) Independence from interference from other devices.
3) Instantaneous actuation after the start of movement.
4) The battery charge may not run out for more than a year.
Minuses
The main disadvantage is the presence of a wire
1) It is easy to break, catching on something or falling.
2) If you have a cadence sensor, you will have to pull through the entire frame.
3) Unaesthetic appearance.
Wireless bike computer

It differs from the one mentioned above in the absence of a wire. Data transmission is carried out using a coded signal. It is configured in the same way as wired, it can have the same functions.
pros
1) No problem with wires because there are no wires.
2) Aesthetic appearance.
3) An encoded signal that allows you not to intersect with other bike computers.
Minuses
1) Each sensor requires a separate battery.
2) The battery life is significantly reduced.
3) Using a very bright headlight with a separate battery creates interference that interrupts the signal. The same effect can occur when driving under high voltage power lines.
GPS bike computer

"Advanced" version. It can read the speed both from sensors and from the GPS signal. If you plan to use a bicycle at home on the machine, then you will need to acquire speed and cadence sensors. The speed sensor will not interfere when riding, when there is no time to wait for a connection with the satellite, because the connection time can vary widely. The bike computer with GPS function gives you the ability to download tracks of routes (on advanced models and maps of the area) along which you plan to ride / train / hike. The functionality of such devices is so large that it requires certain software. In addition to the set of functions of the most advanced wired bike computer, there may be functions of air temperature, inclination of ascents / descents in percent, altitude, climbed / dropped heights, drawing a profile of the distance traveled, etc. Some devices have the ability to read the pulse.
pros
1) Amazing functionality.
2) Ability to connect to a PC with a detailed analysis of trip data.
3) The ability to share your tracks and training information with friends on social networks and special programs (for example, Strava).
4) When new updates are released, the opportunity to improve existing software, remove possible errors and eliminate shortcomings.
5) Ability to transfer data from a power meter.
6) Using built-in rechargeable batteries with USB charging.
7) As a rule, an informative display, which can display most of the necessary functions at once.
8) The ability to hide in your pocket in adverse weather conditions with the continuation of the recording of the workout.
Minuses
1) Short running time. The GPS signal, the screen, the sensors are actively eating up the charge.
2) Loss of GPS signal in forests among tall trees or biased speed and distance.
3) Relatively large sizes.
4) Extremely high cost.
3. Installing the bike computer on the bike
- we attach the table on which the bike computer monitor will be held to the steering wheel / stem using double-sided tape and nylon ties;

- if there is a wire, we lay it around the braid / hydraulic line of the front brake, fix it with a nylon tie or elastic band on the “gorilla” of the fork, and fix the sensor itself on the right side of the fork so that the distance to the magnet on the spoke does not exceed 5 mm;

- in the absence of a wire, we attach the speed sensor either to the fork or to the rear feather using nylon ties;
we attach the magnet to the knitting needle at a distance of no more than 5 mm;

- if there is a cadence sensor, we attach a magnet to the connecting rod using screeds and double-sided tape or to the steel pedal axle, and we attach the sensor itself using the same means to the lower feather (there are conjugated speed + cadence sensors, which are also attached to the rear feather);

4. Ways to set up a bike computer
The basic settings of the bike computer are to set the clock and enter the wheel size for the most accurate readings. And if you can find out the time from any passerby, then hardly anyone will give you information on the circumference of your wheel, and, by the way, the accuracy of all parameters depends on it. There are 3 easy ways to measure wheel circumference manually.
- we take a sewing centimeter with the ability to measure values \u200b\u200bmore than two meters, apply it to the tire and look at the value (the value in millimeters is recorded in the bike computer);

- in the absence of a sewing centimeter, we take a rope, apply one turn to the tire, make a mark on the rope, measure the resulting distance;
- make a mark on the wheel with a stroke or a thin thread, roll it a full turn on a flat surface, measure the resulting distance.
For the purity of the experiment and greater accuracy, it is better to repeat the steps 3 times and enter the average value into the bike computer.
5. The most common abbreviations on bike computer displays
Basic abbreviations (when resetting values, everything is reset to zero except the last two)
- SPD (speed) - movement speed;
— DST/Trip distance - distance traveled;
— Avg speed/AS (average speed) - average speed;
— Trip time/Exercise time - travel time/exercise time;
— Max/Max speed - maximum speed;
- ODO - odometer (distance traveled since the bike computer was installed on the bike);
— Full time - travel time since the installation of the bike computer.
A bike computer is a device designed to measure speed, mileage and additional parameters when cycling. There are two types of mechanisms - wired and wireless bike computers. They differ in cost and basic set of functions, but they assume the same principle of installation and configuration.
The principle of operation of the device
Before proceeding to the instructions for setting up the bike computer, you need to know the general principle of the device.
In general, the measurement process is quite simple:
- A special magnet is fixed in the back area;
- A sensor is installed on the fork of the bicycle. In inexpensive devices - Reed switch, and in premium - Hall;
- The rotation of the wheel affects the magnet, which sends a signal to the computer. As the wheel rotates, the device calculates the distance and speed of the trip.
Installation instructions
Mounting platform - a panel that has two contacts and a lock for mounting the device. The first step is to install the panel on one of the standard sections of the bike:
- Bracket (removal) of the steering wheel . The optimal place for a computer with large dimensions and several buttons for control;
- Rudder center – a safe place that is ideal for a compact device;
- The edge of the grips - allows you to place the bike computer close to your hands, which makes it easier to control the mechanism.
Regardless of the location of the platform on the steering wheel, care must be taken to avoid falling the computer.
In order to securely fix the platform in the steering wheel area, you can use disposable flagella, which require a strong tightening. This is due to the fact that when removing the device, the main load falls on the site. A rubber backing is used to ensure a strong hold. Such an element will prevent slipping on the surface of the steering wheel.
Sensor and Sensor Mounting
Installing the sensor and magnet is a complex process, in which errors are unacceptable. The acceptable distance between the system components and the wheel axle is 10 centimeters. This will reduce the measurement error caused by centrifugal force acting on the magnet.
The reed switch (sensor) is mounted on the suspension fork using flagella or metal clamps. Perpendicular arrangement of the Reed switch to the axis of the magnet is the most optimal solution for installing the sensor.
After mounting the sensor part on the spoke, you need to fix the magnet. We measure the exact distance from the sensor to the magnet. It should not exceed 2 mm, otherwise the error in the indicators will be large. We tighten the magnet so that the vibrations of the wheel do not displace it.
If the bike owner decides to mount the device on the rear wheel, then the main focus is on the length of the flagella. It is necessary to choose the length so that the contact between the elements is not lost due to wheel vibration.
Using the 2nd mounting option, when twisting the steering wheel, there is a risk of damaging the wire.
The advantage of attaching the sensor and magnet to the front is ease of installation and less risk of the wires breaking when the handlebar is twisted. If the computer is wireless, then by installing it on the front wheel, the owner significantly saves battery power.
The next step is to place the wire in such a way that the design looks aesthetically pleasing. It is important to correctly determine the length. This will avoid possible problems: hitting other structures, creating interference during movement, etc.
The length of the wire is determined as follows: we lead the wire to the bike computer without overloading the plug, with a margin of 10-20 centimeters. We fix the contacts and remove the rest. Installation is carried out by one of two methods:
- By steering column . The wire is fixed on special flagella. An overlap remains at the bottom of the frame;
- By brake line . It makes sense to lower the cable a little. It is not recommended to wrap the brake cable with wire. Such an action will not only spoil the view, but also make the dismantling of the structure difficult.
The way how to install the wireless type bike computer is easier. If the sensor and the magnet are placed in one housing, then to start work it is enough to lay a wire between them.
Deciphering indicators for customization
To make it easier for future device settings, you should pay attention to the decoding of the following indicators:
- Speed / SPD - speed at the time of the trip. Usually measured in miles/kilometers per hour;
- AVG / AVS – indicator of average speed (0-th speed is not taken into account);
- TM / Time - the duration of the entire journey;
- DST is the distance traveled by the cyclist since the last reset;
- ODO - mileage. To reset the indicator, a special RESET button is used;
- Scan - demonstration of indicators. When a function is selected, each parameter will appear in turn on the cycle computer screen.
Setting up the bike computer
The first thing to start setting up a bike computer is to determine dimensions ( circles) wheels. This value directly affects the correctness of measurements and calculations of the device.
There are two ways to calculate wheel circumference:
- Classical . For measurement, a thread wrapped around the wheel is used. The method involves small errors, because during the movement the chamber is compressed under the influence of pressure. . For this, two points are drawn. One on the tire, the other on the road. The owner drives one revolution, after which the distance between the points is measured.

To set up some models of bike computers, you only need to know the size of the wheel, without calculating the length. Read the instructions carefully.
To simplify the setting, below is a table of the ratio of marking and circumference:
In order for the computer to accurately show the results, it is recommended to use the following formula:
L 1 \u003d L 0 *S 1 /S 0, where:
L 1 - adjusted length;
L 0 - the given size of the wheel circumference;
S 0 - the distance shown on the cycle computer that the user has traveled;
S 1 - the distance measured by the owner himself. For example, a stadium circle or a straight track.
There is a circle equal to 300 meters. The user drives a distance with the device turned on. The bike computer gave the distance traveled equal to 305 meters. We substitute the parameters into the formula and get the corrected value.
The main functions of the cycle computer after setting up
The basic set of the bike computer includes 7 main functions:
- Current trip speed;
- Average speed (the possibility is not available in budget devices);
- Maximum speed during the walk;
- Distance traveled;
- Distance traveled since the computer was installed (odometer);
- Total travel time;
- Watch.
It is important to pay attention to the fact that the user can adjust the odometer parameters manually. This will avoid unpleasant situations when mileage is lost after replacing the battery.
In addition to standard features, advanced models have additional features:
- The number of calories burned - the indicator is calculated based on data on average speed, distance traveled and heart rate;
- The pulse is a useful feature for people who are not allowed to overload the heart.
Setting advanced features
In addition to the standard set of functions, many models have a number of additional features:
- Clock - are configured in accordance with the number of buttons available on the device;
- Calorie counter - you must enter data on your own weight.
When setting up, you need to learn the units of measure. Due to the fact that the circumference parameters in most devices are given in millimeters, weight values \u200b\u200bare driven in pounds.
Possible problems
Sometimes bike computers fail. They are fairly easy to diagnose and fix. Two types of problems are common:
- The device does not turn on;
- Invalid speed data.
IN first If so, the problem lies with the batteries. Their charge is depleted quickly enough, which requires frequent replacement. In many budget models, after the battery is depleted, the parameters go back to the base values.
Second the problem indicates that the magnet and sensor are installed incorrectly. During the trip, vibrations occur in the wheels, which causes the magnet to move. This prevents the sensor from reading accurate data.
To solve the problem, it is enough to lift the wheel and follow the cycle computer by passing the magnet near the sensor. If the sensor reads information every other time, then the magnet must be corrected.
If the problem occurs during the trip, and in a static state everything is in order, then the problem lies in the wire. It must be studied and, if a problem is found, repair or replace.
Video installation and configuration of the bike computer
Video instruction with a detailed analysis of the process of installing and configuring a Chinese bike computer:
A bike computer is a handy gadget that will be useful to all cycling enthusiasts. The device allows you to fully control the process of the trip, showing the results that the owner has achieved. This will allow drawing conclusions and adjusting the cycling program to increase the effectiveness of classes.
In contact with
Depending on the types of connection to the sensor, bike computers are classified into wired and wireless devices.
The positive aspects of wired devices are simplicity and ease of use, affordable price. Installing this type of bike computer requires a little ingenuity and skill.
As for wireless devices, they are released as a watch or they are a smartphone application. True, this option assumes the presence of an individual power source on the sensor itself.
The functionality of bike computers is also different. Speedometer indicators can be supplemented with modules that control training modes. Service distances are fixed with GPS coordinates. Pocket personal computers are in the top. How to choose your bike computer? The choice is determined individually in accordance with the desired design of the device and the acceptable cost.
How to install a bike computer
Mounting platform installation
First you need to install the mounting pad - a compact panel that has two contacts along with a lock to secure the computer. The platform is fixed closer to the standard sections:
- Steering wheel removal. The most favorable place for a large bike computer, which has a large screen and several control buttons.
- The central part of the steering wheel is the optimal and absolutely safe place to place the bike computer.
- The edges of the grips or the top of the levers are mainly used for attachment by gadget fans. The close location of the device to the hands allows you to easily control the buttons while maintaining the standard position.
Important! The platform on the steering wheel is quite easy to touch. Avoid dropping the device and handle it with care.
For fastening the site, disposable flagella are often used, requiring a very strong tightening. When a bike computer is removed or installed, a significant load is placed directly on the site. To ensure a stronger fixation of the harnesses, a rubber backing is used. Then the plastic will not slide on the smooth metal surface of the bike.
Installing the sensor and magnet
Particular attention should be paid to the installation of the magnet and the reed switch (sensor). Errors are not allowed here. The optimal distance between the entire system and the wheel axle is 7–12 cm. Compliance with these parameters will not allow centrifugal force to knock down the magnet.
The installation of the reed switch in combination with suitable wires is carried out directly on the suspension fork with flagella or metal clamps. The reed switch must be perpendicular to the rotation of the wheel. With some skill, you can achieve the ideal option - the reed switch is placed in a perpendicular position with respect to the axis of the magnet in close proximity to it.
After installing the sensor, we fix the magnet on the spoke. With absolute accuracy, we compare the distance from the reed switch to the magnet, which should not exceed 2 mm. Considering the further force of vibration of the wheel, we tighten the magnet to the maximum.
In some cases, the sensor and magnet are installed on the rear wheel, where mounting is somewhat easier. The main emphasis is on the correct adjustment of the length of the harnesses so that vibration does not lead to sensor slippage or loss of contact.
We place the wire. Careful placement of the wire has a rather aesthetic appearance, and also avoids unnecessary problems: touching neighboring mechanisms, interfering with repair and operation, chafing under load.
We determine the length of the wire as follows: without loading the plug, we draw the wire to the device with a 10–15 percent margin of length. We fix the contacts and cut off the excess. You can start installation in one of the following ways:
- By steering column. The wire is attached to the flagella, leaving a small overlap in the frame area.
- On the brake cable. Here it is appropriate to make the laps of the cable itself. If the flagella are replaced with electrical tape, it will turn out to hide all the wires. Do not wrap the cables with wire, otherwise the view will deteriorate and dismantling will become more difficult in the future.
Attention! If the steering wheel is twisted, there is a high probability of damage to the wire.
Installing a wireless bike computer is much easier. If the reed switch and the emitter are combined in one housing, it remains only to lay the wire between them.
Determination of wheel circumference
With the introduction of indicators of the circumference of a bicycle wheel, any setup of the bike computer should begin. The correctness of these values is very important for accurate measurements and correct device calculations.
The circumference of the wheel is quite simply measured with a regular thread that is wrapped around the wheel. Alternatively, a tailor's meter is used. This method involves some errors. The fact is that the movement contributes to the compression of the camera. Accordingly, the length of the wheel is somewhat reduced.
In order to measure the length of a particular wheel as accurately as possible, it is necessary to resort to its full load. A dot is put on the tire, the second is marked on the road. Then we pass the revolution necessary to measure the distance between these points. Some models suggest only adjusting the wheel size, and there is no need to calculate the length.
Setting up the cycle computer is made easier and faster in accordance with the indicators in the table.
| Marking | 16″ x 1.5″ | 16″ x 2.0″ | 6″ x 1.95″ | 20″ x 1-1/4″ | 26″ x 1.0″ | 24″ x 1.9″ | 650c x 2cm | 26″ x 1.25″ | 26″ x 1.5″ |
|---|---|---|---|---|---|---|---|---|---|
| Circumference (cm) | 120,6 | 125,3 | 125,7 | 161,8 | 191,3 | 191,6 | 194,5 | 195,3 | 198,5 |
| Marking | 650c x 2.3cm | 26″ x 1.75″ | 26″ x 1.9″ | 26″ x 2.0″ | 700s x 20mm | 26″ x 2.1″ | 700s x 2.3 cm | 26″ x 2.25″ | 700s x 25 mm |
| Circumference (cm) | 199,0 | 203,5 | 205,5 | 207,4 | 207,4 | 209,5 | 210,5 | 211,5 | 212,4 |
| Marking | 700s, chamber | 26″ x 2.3″ | 700s x 2.8 cm | 700s x 3 cm | 27″ x 1-1/8″ | 700s x 3.2 cm | 27" x 1-1/4" | 700s x 3.5 cm | 700s x 3.8 cm |
| Circumference (cm) | 213,0 | 213,5 | 213,6 | 214,5 | 215,5 | 215,5 | 216,1 | 216,8 | 218,0 |
How to set the clock and other indicators
Most bike computers, in addition to functions that record speed and distance, have other additional indicators. First of all, it is a watch that is configured according to the number of available buttons.
An equally popular indicator is the calorie calculator. For the correct calculation, indicators of own weight are entered. Units of measurement should also be mentioned. Given that the circumference is set in millimeters, the weights are entered in pounds.
Deciphering the main designations
Indicators of bike computers and units of measurement are very standard:
- The current speed is indicated by SPEED, SPD, where the number of miles / hour is indicated as Mph, and km / h as Kmh.
- The average speed at the end of the last reset is shown by AVS, AVG. Zero speed is usually not accounted for.
- How much in total the movement continued after the reset determines TM, TIME. Zero speed is not fixed.
- The distance designation (total distance since reset) looks like DST.
- The total distance (mileage) can be seen from the ODO.
- You can reset the distance indicators or any others with the RESET button.
- The mode that shows all the indicators in turn on the display is displayed as Scan.
Troubleshooting
If the device does not turn on, the reason for this is most often the lack of functioning batteries. Some models tend to run out of batteries pretty quickly. You can eliminate the constant replacement of batteries by reconfiguring the bike computer. Cost-efficient devices lose all settings as soon as the batteries are depleted. In some cases, the settings return to standard values.
Speed mismatch occurs due to inaccurate magnet and sensor settings. When driving over bumps, at high speed, at the moment of collision with any obstacles (grass), the magnet easily shifts, and the sensor fixes its passages through one.
Diagnosis is quite simple. Raise the front wheel and observe the device by passing the magnet in close proximity to the sensor. If the magnet is not recognized by the computer, it is enough to correct the position of the magnet.
If the problem remains while driving, you should look for the cause in the wire itself. The technique for studying and replacing it is absolutely identical to any electronics.
Summary
Installing a bike computer is a nice addition for cyclists. The device controls the progress made, it is convenient to use, allows you to navigate on any terrain, monitor the movement.
A bike computer is a very useful accessory that is very popular with different cyclists. Fans are just interested in tracking daily mileage and other indicators, and for a bike computer it is a means of controlling their training process.
But you can fully trust the data only if it is installed and configured correctly.
Types of bike computers
Also, the installation process may be slightly supplemented depending on the functionality of the accessory. So, for example, if the bike computer provides for cadence counting, then you will need to install sensors on.
Correct installation
It is best to start installing the bike computer from the top - by installing the base on. It is on the mounting platform that the bike computer itself will be fixed in the future. You can install it either on the steering wheel itself or take it out.
There is no fundamental difference in this, it all depends on your own preferences. A small plus in favor of installing a takeaway computer is that in this place the computer will be larger.
In addition, it may be necessary to turn the bike upside down and in this position there will be no pressure on the base.
The base is fixed on the steering wheel with an elastic band. If its tension is not enough for the bike computer to be securely fixed, then you can additionally fix the mounting pad using double-sided tape.
If it’s a pity to stain the steering wheel with glue, then you can just put a piece of rubber to prevent the bike computer from sliding on the steering wheel or stem.

The next step is the laying of the wire, if, of course, there is one. Before installing the bike computer on a bike, you need to estimate the length of the wire.
If it is sufficient, then it is best to wind the bike computer wiring around or the front brake cable. In this case, there will be no need to fix it in many places and it will not interfere.
It is necessary to wind the cable up to the gorilla (the place where the front fender should be attached), and then stretch it to the leg opposite from the brake rotor.
If the length of the cable is small, then you will have to fix it on. It is important that it does not hang anywhere and does not stick out. On the other hand, it is necessary to leave gaps in the area of \u200b\u200bthe steering cup so that the steering wheel can turn freely.
Fix wiring should be in the following places:
- On the steering wheel next to the mounting platform;
- On the steering wheel next to the stem;
- In the center of the takeaway;
- Near fork stem;
- On the crown of the fork;
- On the gorilla;
- Midway between gorilla and sensor;
- Near the sensor mount.
With this frequency of fixation, the wire will be securely fixed and will not hang out. It is important to note that it is not necessary to fix the wiring on the steering glass.
The final stage of installation is the attachment of the sensor and magnet. The distance from , at which the sensor and magnet should be attached, must be specified in the instructions for a particular bike computer.
The sensor should be perpendicular to the wheel, and the magnet should look straight at the sensor. If the magnet or sensor is deflected to the sides, then the speed and, accordingly, the mileage indicators will not be accurate.
The magnet should not be too close or too far from the sensor, within 2-5 mm, but this distance should also be clarified in the instruction manual.

If a cadence sensor is provided, then it must be installed by analogy with the speedometer. The magnet should preferably be attached to the left crank, and the sensor should be attached to the frame tube: either lower or seatpost, depending on the model.
How to set up the bike computer is described in detail in each manual. It is impossible to talk about some universal method and the procedure for setting it up, since almost every model is individual.
The main indicator on which the correct setting of the bike computer depends is this. You can find it out from the table below, it should also be in the instructions for the bike computer.

It should be noted that it is necessary to take into account not only the diameter of the wheel, but also the width that is installed. After all, often, its height depends on the width. True, the error still exists.
The dependence of the width of the tire on its height is different for some manufacturers. So, for example, Schwalbe tires are slightly larger than similarly sized Continentals. It is almost impossible to take this into account in the table. Despite this, the error will be extremely small.
Those who need the most accurate speedometer readings can measure the circumference themselves in two ways. The first is measurement with a thread. It must be wrapped around the outer diameter, i.e. by protector.

The second way. It is necessary to mark the point of contact on the asphalt and the tire. Then drive exactly one turn so that the point marked on the tire touches the asphalt again and make a mark on it.
The distance on the pavement between two points will be a long circle. It is believed that the second method is more accurate, since the tire is deformed when driving.
During setup, you will normally need to set the date and time as well. On bike computers, you will need to enter your weight, height, age and gender. You should also not forget about the choice of units of measurement.
Outcome
Proper fastening and setting up the bike computer is the key to the accuracy of its readings. The article described the general installation and configuration procedure, which will vary depending on the specific model.
To fully trust what the bike computer shows, you must definitely read the instructions.
Now it needs to be installed and configured somehow ... I started digging on the Internet, requests like “how to install a bike computer” and “how to set up a bike computer” led to funny manuals. I decided to collect some instructions from them. Although the kit has a completely normal instruction in quite understandable English.
The people write that any gopnik can install and a lot of brains are not needed:
First, let's decide on the installation location of the computer. The first thing that catches your eye is the takeaway - it stands in the middle, as if it was created in order for a computer to be slapped on it. But this, I must say, is not the best idea. A standard bike computer has a bunch of different additional functions that you also want to watch, but for this you need to switch modes, and pressing a button on a bike computer that stands in the middle of the steering wheel is completely inconvenient, especially on bumpy terrain. Therefore, we attach the bike computer right close to the grip (handle). I got it right under the trigger lever. It does not interfere at all and you can press the buttons without releasing the steering wheel.
The problem of protecting the wire is immediately solved - it is stupidly wrapped with electrical tape to the brake cable going from the grip to the front wheel.
I also thought about putting it on, but you see, it’s not a very good idea ...
By the way, for the general case, there is this video:
Pretty understandable. Since my bike computer is popular among cyclists, I also found a translation of the instructions for it, which seems to be quite normal.
Installing and configuring a cycle computer on an E-Trail electric bike.
1. Symbols displayed on the cycle computer display:
ODO- the value of the total mileage of the electric bike, counted from the moment the bike computer is turned on during the first trip on the electric bike (0 km) and until the value of 99999 km is reached);
DST– the distance traveled on the e-bike since the previous reset (you can reset this reading at any time) (in the range 0 – 9999 km);
MXS- the maximum speed recorded by the cycle computer during the current trip on the electric bike;
AVS- the value of the average speed recorded by the cycle computer during the current trip on the electric bike;
TM- the duration of the current trip in time on the electric bike (the time of stops is not taken into account, i.e. only the pure time the electric bike is on the road is shown);
CLK– indicator of the current time in hours, minutes, seconds (12h/24h);
Scan– the mode of scanning the parameters of the cycle computer and displaying them on the display screen, while the following measured parameters are reproduced: DST, MXS, AVS and TM (parameters are displayed in turn, the duration of each display is 4 seconds)
"+" "-" COMPARATOR- a parameter that reflects the deviation of the current speed of the electric bike (decrease or increase) relative to the average speed during the trip;
Freeze Frame Memory- fixing the measured parameters of the bike computer at a given time;
Temperature– outdoor temperature (from -10С to +70С)
2. Determining the wheel size and setting its value on the bike computer display:
Before starting the cycle computer, it is necessary to reset its previous parameters. To reset the readings of the cycle computer, it is necessary to remove the flat rechargeable battery from the socket for a short time, located under the cover on the back of the display, and insert it back into the socket.
“2060” will appear on the display screen, the first right digit will flash. The figures indicated represent the circumference of the bicycle tire. For correct subsequent measurements of the parameters of the movement of the electric bike, it is necessary to set the circumference of the wheel of your electric bike. You can do this in the following main ways:
- select from the table;
| Tire size | Length district |
| 700s x 38mm | 2180 |
| 700s x 35mm | 2168 |
| 700s x 32mm | 2155 |
| 700s x 30mm | 2145 |
| 700s x 28mm | 2136 |
| 700s x 25mm | 2124 |
| 700s x 23mm | 2105 |
| 700s x 20mm | 2074 |
| 700s chamber | 2130 |
| 26″ x 1.75″ | 2035 |
| 26″ x 1.25″ | 1953 |
| 24″ x 1.9″ | 1916 |
| 650c x 23mm | 1990 |
| 16″ x 2.0″ | 1253 |
| 16″ x 1.5″ | 1206 |
| 650c x 20mm | 1945 |
| 16″ x 1.95″ | 1257 |
| 27" x 1-1/4" | 2161 |
| 27″ x 1-1/8″ | 2155 |
| 26″ x 2.3″ | 2135 |
| 26″ x 2.25″ | 2115 |
| 26″ x 2.1″ | 2095 |
| 26″ x 2.0″ | 2074 |
| 26″ x 1.9″ | 2055 |
| 26″ x 1.5″ | 1985 |
| 26″ x 1.0″ | 1913 |
| 20″ x 1-1/4″ | 1618 |
- directly measure the circumference of the wheel;
The table of wheel sizes and circumferences is approximate as shown above.
To select the circumference using the table, you need to find its diameter on the wheel tire, for example "26x1.25". In the table we find opposite the given diameter the corresponding circumference - 1953mm and enter it into the bike computer. To enter numbers, press the right button in sequence and set the desired value of the right digit in the circumference (in our case, "3"). Then briefly press the left button. At the same time, the second digit on the right side starts flashing. In the same way, right-click to set the second digit (in our case, "5") and similarly set the remaining two numbers "9" and "1".
The second more accurate way to measure wheel circumference is:
We draw a thin but thick transverse line on the tire with white chalk (tires must be pre-inflated to normal operating pressure). Next, you need to sit on an electric bike and slowly drive in a straight line for a distance of more than one turn of the wheel, so that the first and second traces of the chalk on the tire are imprinted on the asphalt or other hard surface (this operation is best done with an assistant holding you while driving). Next, you need to measure the distance between the two risks in mm on the asphalt with a tape measure and enter the numbers into the bike computer in the manner indicated above.
3. Selection of measured parameters on the display of the cycle computer.
Press the LEFT button on the cycle computer display to select the value of the desired parameter, then the RIGHT button to save the value (from 0 mm to 9999 mm). Press the RIGHT button to turn on KM/H mode.
Setting KM/H and M/H
Press the right button to select KM/H or M/H. Press the LEFT button to enter ready mode. Press the LEFT button to cancel and enter CLOCK mode.
CLK mode - Clock mode
In clock mode, press and hold the LEFT button for 3 seconds to select 12h/24h. Briefly press the LEFT button again to select 12h or 24h mode.
Press the RIGHT button to enter the TIME SETTING mode, when the number of hours indicator flashes, press the LEFT button to change the hour value.
To continue, press the RIGHT button to move to the minute setting, the minute indicator will flash, use the LEFT button to change the minute value.
Then press the RIGHT button to enter the SPEEDOMETER mode.

Setting Last Odometer Value
In ODO mode, press and hold the LEFT button for 2 seconds to set the ODO value, the initial value will be 0000.0.
When one of the digits starts flashing, press the RIGHT button to change the value, then the LEFT button to save and move to the next digit.
(After replacing the battery, the last parameter value can be entered according to the value it had before the battery was replaced).
Reset ODO parameter
Press the RIGHT and LEFT buttons simultaneously and keep them pressed for 3 seconds to reset the ODO parameters.
This will reset the wheel size and driving range. The time display will remain unchanged.
SPD - readings of the current speed (similar to the readings of the speedometer in a car)
The current speed is constantly displayed on the screen. The maximum possible value is 99.9 km/h, accuracy +/- 0.1 km/h.
“+” “-” readings of speed deviation from the average SPEED COMPARATOR
During the trip, the screen will show a “+” or “-” indicator, which means that the current speed is getting higher or lower than the average speed during the trip.
Odometer ODO - the value of the total mileage of the bike
In ODO mode, the total distance is displayed on the screen (value from 0.001 to 99999 km)
Press the LEFT button to enter the DST mode (Distance, distance traveled during the current trip).
DST (Distance traveled by e-bike during current ride)
In DST mode, the distance traveled during the current trip is displayed on the bottom line (value from 0 to 9999 km).
To clear the current trip values, press and hold the LEFT button for 5 seconds. At the same time, all the parameters of the current trip are DST (Distance traveled by the e-bike during the current trip), MXS (Maximum speed recorded during the current trip), AVS (Average speed recorded during the current trip), TM (Total value according to the duration of the current trip) will be reset to 0.
Press the LEFT button to enter MXS (Maximum Recorded Speed for Current Trip) mode.
MXS (Maximum speed recorded for the current trip)
The maximum speed for the current trip is displayed.
To reset, hold the LEFT button for 5 seconds in this mode (DST, MXS, AVS, TM will also be reset)
To go to AVS (Average speed for the current trip) press the LEFT button.
AVS (Average speed for the current trip)
Displaying the average driving speed per trip
To reset, hold the LEFT button in this mode for 5 seconds (DST, MXS, AVS, TM will also be reset)
To go to TM (Duration of the current trip) press the LEFT button.
TM - Duration of the current trip in time
TM - Duration of the current trip in time (time of stops is not taken into account, i.e. only the time of movement is taken into account). The parameter value is from 0:00:00 to 9:59:59.
To reset the parameter, press and hold the LEFT button in this mode for 5 seconds (the parameters DST, MXS, AVS, TM will also be reset)
To move to the next mode, press the LEFT button.
SKAN
The mode of scanning the parameters of the bike computer and displaying them on the display screen, while the following measured parameters are reproduced: DST, MXS, AVS and TM (parameters are displayed in turn, the duration of each display is 4 seconds)
To switch to CLOCK MODE, press the RIGHT button.
Sleep Mode - Sleep mode
If there is no signal from the cycling computer sensor for 5 minutes, the display goes into sleep mode, only the clock is shown on the screen.
Freeze Frame Memory - fixing the readings of the bike computer at a given time and
To fix the readings of the bike computer at a certain fixed time, you must press the LEFT button and all readings will be fixed. The display will show TM (Current Trip Duration) flashing. With the RIGHT button, you can move to other fixed parameters.
To exit the specified mode, press the LEFT button.
Purpose of the buttons of the bike computer
The RIGHT button is used to switch between ODO, DST, MXS, AVS, TM, SCAN (DST, MXS, AVS, TM and CLOCK) modes.
The LEFT button is only used to switch the fixed readings of the bike computer (Freeze Frame Memory)
There is even a video to control the clock (oh great YouTube), thanks to Alexey for the link :)
4. Installing the bike computer parts on the electric bike.
Installing bike computer parts on an electric bike is not difficult, you just need to be careful and patient.
First of all, you must first fix the reed sensor (magnet) in the form of a cylindrical column on the outer spoke of the front wheel. The transducer is attached with a screw to it, so that you can move the transducer with little effort along the spoke to select the desired position.
At the same time, the end face of the sensor, with the magnetic part, must face the reader, which is to be fixed on the plug.

The reader (fixed) device of the bike computer is installed on the inside of the rack (pen) of the front fork of the electric bike with Velcro and additional fastening with two plastic clamps.
If there is a disc brake on the front wheel, it is better to mount the reader on the fork post opposite from the brake disc.
When choosing the mounting location for the reader, it is necessary to proceed from the fact that the distance between the end of the sensor and the reader during the rotation of the wheel should be within 0.2-0.3 cm (in this case, the end of the sensor should move opposite the central part of the reader).
Having set the distance within 0.2 - 0.3 mm, then it is necessary to finally fix the sensor on the spoke and the reader on the plug. At the same time, when the fixing plastic clamps on the reader and the fixing screw on the sensor are finally tightened, the distance between the reader and the sensor should increase to 0.5-1.0 mm. This will be the correct working distance between the sensor and the reader for the SunDDING cycling computer.
It is better to install the cycle computer display closer to the center of the steering wheel. The mounting platform of the display is fastened with Velcro and additionally fastened with two plastic clamps.
<>Before attaching the display mounting pad to the steering wheel, it is advisable to pre-lay the wire from the reader to the cycle computer display in such a way that with any steering wheel turns, this wire remains free and without tension. Further, the wire from the reader is additionally fastened with flexible plastic clamps in the right places.
We fix the display of the bike computer on the mounting platform.
Congratulations!
The operation of installing the bike computer on the electric bike is completed.
If before that you set everything correctly, then the bike computer will start to give readings when the front wheel of the electric bike rotates.
Here is such a weighty instruction for installing the SunDING bike computer.
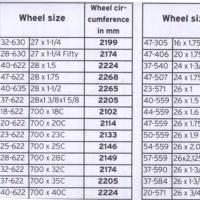 Installing a bike computer on a bike
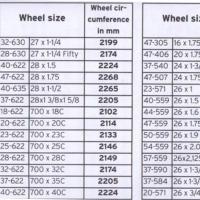 Installing a bike computer
 "Smart dust": how the smallest computer Michigan Micro Mote works
 SQL query language Ready-made sql queries
 PHP optimization is the hallmark of professional eAccelerator code: faster PHP code reloads
 Crossbrowser CSS3, or how to deal with Internet Explorer Css crossbrowser
 Yandex ranking algorithm Ranking algorithms