Installing a bike computer on a 26" bike. Installing a bike computer Video installation and configuration of the bike computer
There remains the last small but very important question of how to configure it.
In principle, there is nothing particularly complicated in setting up.
As for the issues of setting the time and other parameters, we will not dwell too much. To do this, just read the instructions and correctly press the buttons on the computer itself.
Most importantly, it is necessary to correctly enter the circumference of the bicycle wheel. And let's take a closer look at this issue.
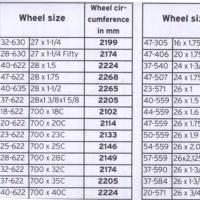
The instructions for any decent bike computer have a table with dimensions.
There are also quite a few of them on the Internet. And you can take values from there.
At the same time, the most important thing is to carefully look at the actual size of the tire on your bike. For example, not just 26 wheels, namely 26 x 1.5 or 26 x 1.95. These are different sizes. They differ not only in width, but also in height and, consequently, its outer diameter.
For example, a 26 x 1.5 (40-559) tire has a circumference of 2010 mm, while a 26 x 1.95 (50-559) tire has a circumference of 2050 mm. Those. 4 cm difference per wheel revolution.
If you have different tires on the front and rear wheels, and the rev counter is on the rear, then look at the markings on the rear tire.
There are a few more points related to the accuracy of wheel circumference tables:
Firstly. It happens that your tire size is simply not in the attached table.
Secondly. With the same size written on the tire, the circumference may be different. This is due to the fact that different manufacturers take into account the width and, accordingly, the height of the tire in different ways. It also depends on the type of tire and tread pattern - i.e. slick and toothy tires have different tire heights, although the width can be the same.
Third. Compare these few tables from the internet:


Not all of them for the same tire sizes have the same circumference values.
For example, size 23-622 (700x23C) has a circumference of 2096 and 2133.
Fourth. Well, the Chinese, there are the Chinese. How they write instructions, where they get the tables from, remains only on their conscience and your faith in their honesty and decency.
Therefore, how it relates to the data from these tables is a private matter for everyone. How important is the accuracy of the instrument readings to him.
It is because of all these nuances that for measuring the circumference of a wheel your bike, I personally recommend using the second method from the article.
For those who are especially lazy, here is a summary of it:
A second person is needed to accurately measure the circumference of your bicycle wheel. He will help. The owner inflates the desired wheel (front or rear, and best of all both) to the usual pressure, which most often rides and sits on a bike. If the pressure in the wheel is lower or higher, then the size of the circumference will also differ.
With a seated cyclist, measurements will be more accurate, as tire compression is taken into account during an actual ride. Your assistant will put marks on the pavement.
Then proceed according to the following algorithm:
- At the point of contact of the wheel with the road with chalk, draw a thin line on the side of the tire and the road. They must, of course, match. It can also be done directly opposite the nipple on the wheel - as a natural mark.
- Sitting on a bicycle, we ride it in a straight line so that the wheel makes one complete revolution.
- Where the line on the wheel touched the ground again, put a second mark.
- We measure the distance between the two marks - this is the circumference of the wheel.
- To improve the accuracy of calculations, you can take 2-3 measurements and take the average, or drive not one, but three turns of the wheel and divide the resulting distance by 3.

The resulting value (in millimeters) is entered into the computer. Usually it is always entered first when setting up. Then enter all other parameters according to the instructions and you can go.
In conclusion, I would like to say: do not complex about the accuracy of computer calculations of the distance traveled.
The accuracy of the bike computer calculations depends on:
- tire type - these are slicks or winter toothy ones with high spikes
- type of road surface - on asphalt is always more accurate than on soft ground,
- real tire pressure during the trip,
- air temperature,
- the weight of the cyclist and the load he is carrying,
- accuracy of operation of the reed switch, etc.
A bike computer is a very useful accessory that is very popular with different cyclists. Fans are just interested in tracking daily mileage and other indicators, and for a bike computer it is a means of controlling their training process.
But you can fully trust the data only if it is installed and configured correctly.
Types of bike computers
Also, the installation process may be slightly supplemented depending on the functionality of the accessory. So, for example, if the bike computer provides for cadence counting, then you will need to install sensors on.
Correct installation
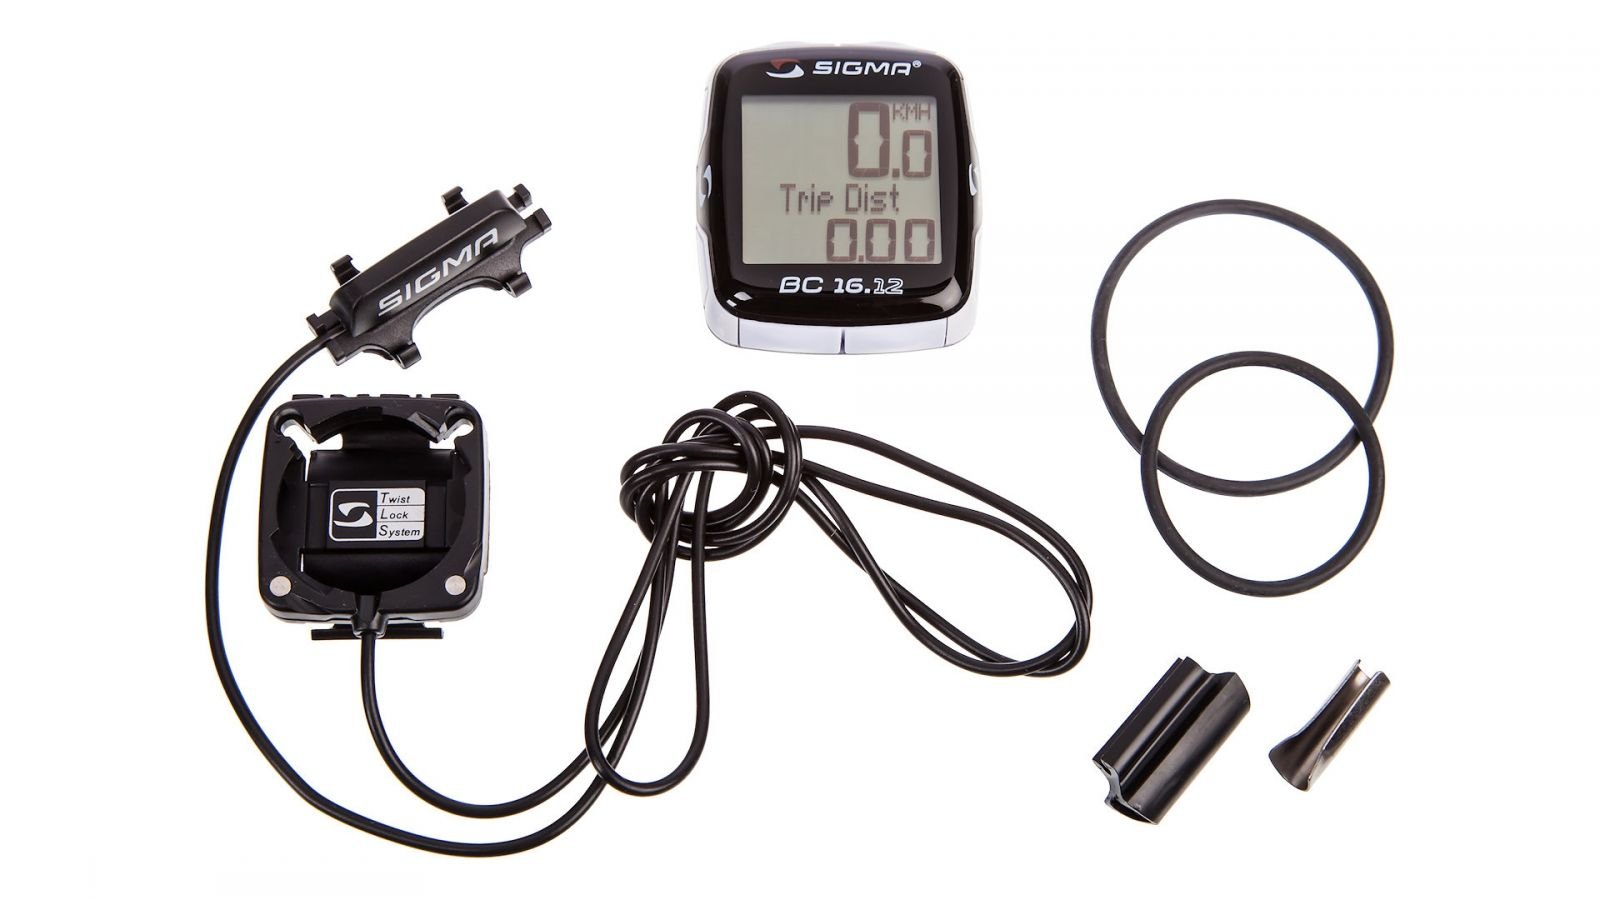
It is best to start installing the bike computer from the top - by installing the base on. It is on the mounting platform that the bike computer itself will be fixed in the future. You can install it either on the steering wheel itself or take it out.
There is no fundamental difference in this, it all depends on your own preferences. A small plus in favor of installing a takeaway computer is that in this place the computer will be larger.
In addition, it may be necessary to turn the bike upside down and in this position there will be no pressure on the base.
The base is fixed on the steering wheel with an elastic band. If its tension is not enough for the bike computer to be securely fixed, then you can additionally fix the mounting pad using double-sided tape.
If it’s a pity to stain the steering wheel with glue, then you can just put a piece of rubber to prevent the bike computer from sliding on the steering wheel or stem.

The next step is the laying of the wire, if, of course, there is one. Before installing the bike computer on a bike, you need to estimate the length of the wire.
If it is sufficient, then it is best to wind the bike computer wiring around or the front brake cable. In this case, there will be no need to fix it in many places and it will not interfere.
It is necessary to wind the cable up to the gorilla (the place where the front fender should be attached), and then stretch it to the leg opposite from the brake rotor.
If the length of the cable is small, then you will have to fix it on. It is important that it does not hang anywhere and does not stick out. On the other hand, it is necessary to leave gaps in the area of \u200b\u200bthe steering cup so that the steering wheel can turn freely.
Fix wiring should be in the following places:
- On the steering wheel next to the mounting platform;
- On the steering wheel next to the stem;
- In the center of the takeaway;
- Near fork stem;
- On the crown of the fork;
- On the gorilla;
- Midway between gorilla and sensor;
- Near the sensor mount.
With this frequency of fixation, the wire will be securely fixed and will not hang out. It is important to note that it is not necessary to fix the wiring on the steering glass.
The final stage of installation is the attachment of the sensor and magnet. The distance from , at which the sensor and magnet should be attached, must be specified in the instructions for a particular bike computer.
The sensor should be perpendicular to the wheel, and the magnet should look straight at the sensor. If the magnet or sensor is deflected to the sides, then the speed and, accordingly, the mileage indicators will not be accurate.
The magnet should not be too close or too far from the sensor, within 2-5 mm, but this distance should also be clarified in the instruction manual.

If a cadence sensor is provided, then it must be installed by analogy with the speedometer. The magnet should preferably be mounted on the left crank, and the sensor on the frame tube: either the lower one or the seatpost, depending on the model.
How to set up the bike computer is described in detail in each manual. It is impossible to talk about some universal method and the procedure for setting it up, since almost every model is individual.
The main indicator on which the correct setting of the bike computer depends is this. You can find it out from the table below, it should also be in the instructions for the bike computer.

It should be noted that it is necessary to take into account not only the diameter of the wheel, but also the width that is installed. After all, often, its height depends on the width. True, the error still exists.
The dependence of the width of the tire on its height is different for some manufacturers. So, for example, Schwalbe tires are slightly larger than similarly sized Continentals. It is almost impossible to take this into account in the table. Despite this, the error will be extremely small.
Those who need the most accurate speedometer readings can measure the circumference themselves in two ways. The first is measurement with a thread. It must be wrapped around the outer diameter, i.e. by protector.

The second way. It is necessary to mark the point of contact on the asphalt and the tire. Then drive exactly one turn so that the point marked on the tire touches the asphalt again and make a mark on it.
The distance on the pavement between two points will be a long circle. It is believed that the second method is more accurate, since the tire is deformed when driving.
During setup, you will normally need to set the date and time as well. On bike computers, you will need to enter your weight, height, age and gender. You should also not forget about the choice of units of measurement.
Outcome
Proper fastening and setting up the bike computer is the key to the accuracy of its readings. The article described the general installation and configuration procedure, which will vary depending on the specific model.
To fully trust what the bike computer shows, you must definitely read the instructions.
Rushing down the mountain so that the wind whistles in your ears - honking surprised drivers remain far behind you! At such moments, it is always interesting to find out how fast you are going so that you can, then proudly tell your friends. Previously, they used mechanical speedometers for this (you can still find them now), but now they use bicycle computers. This option is not only more reliable, but also has a lot more features. Usually, instructions for installing a bike computer come with the device, but in the event that it was not there or it was lost (or was not translated into Russian by a negligent supplier), then our article will help you!
The principle of operation of the bike computer
The principle of operation of the bicycle computer is simple: data on the length of the wheel is entered into its memory, and then it simply counts how many times the wheel makes a revolution per unit of time. The clock, as you understand, is built into it, but the computer itself will not guess how long your wheel is. Namely, the correctness of the data that the bike computer will show depends on how accurate this figure will be. Of course, it will be nice to see that your average speed is about fifty kilometers per hour, and in a day you, without straining at all, dashed off more than two hundred, but still it’s better if the data is true.
Determination of wheel circumference
There are several ways to determine the circumference of a wheel. The first is to look at the table below. The second way is to make a mark on the tire, drive exactly one revolution of the wheel in a straight line and measure the distance traveled. The third way is with the help of a tailor's centimeter (the wheel can be removed for convenience). By analogy, you can come up with a few more options. An error of a few millimeters is inevitable. In addition, the measurement accuracy during riding also depends on the degree of inflation of the wheels, tires, road surface, weight of the cyclist and cargo. After you have entered the data on the circumference of the wheel, you can proceed with the installation.
Tire Size Circumference (mm):
700sx38 - 2180
700sx35 - 2168
700sx32 - 2155
700sx30 - 2145
700sx28 - 2136
700sx25 - 2124
700sx23 - 2105
700sx20 - 2074
700s - tube - 2130
650sx23 - 1990
650sx20 - 1945
27"x1-1\4" - 2161
27"x1-1\8" - 2155
26"x2.25" - 2115
26"x2.1" - 2095
26"x2" - 2074
26"x1.9" - 2055
26"x1.75" - 2035
26"x1.5" - 1985
26"x1.25" - 1953
26"x1" - 1913
20"x1-1\4" - 1618
How a bike computer works
The bike computer consists of two main parts: receiving information and processing it. Information about the speed of rotation of the wheel comes from a reed switch (less commonly, a Hall sensor) fixed motionless, and a magnet rotating with the wheel. The data is processed in the computer itself, which is attached to the panel, which is fixed on the steering wheel. The bike computer is usually made easily removable - so that no one steals it while the bike is left unattended in the parking lot. Because the "brain" is the most expensive in the design. Everything else can be bought for a penny and assembled on the knee. Information from the sensor to the computing unit can be transmitted either by wire or without it. Wired bike computers are much cheaper and use less power. The advantage of wireless is only the absence of a wire. If it doesn’t bother you anyway, then think about whether it’s worth spending the extra money. And now let's go directly to the question: "How to install a computer on a bicycle?"
.png)
Installing the Wireless Bike Computer
Setting up a wireless computer is much easier than setting up a wired one. If you have disc brakes, then it is better to put the sensor on the right. If V-breaks, then from any side. Fix the sensor on the fork or the proposed mount (most often it is an elastic band), or ties. Place the magnet on the spoke opposite it, at a distance of a few millimeters. Spin the wheel: if the speed is shown on the display, everything is fine. If not, move the magnet along the spoke so that the distance between it and the sensor is minimal.
Installing a wired bike computer
If your bike computer is wired, then pull the wire to the handlebars, attaching it with cable ties or tape to the cables and frame. Remember that the steering wheel will not be stationary, so either do not attach the wire to the steering glass at all, or leave a loose loop so that it does not stretch when cornering. Also make sure that the wire does not rub against the tire.

Some install a computer on the stem. This is not the best option, because in this case it will be inconvenient for you to press the buttons while driving to view additional functions. Therefore, we recommend that you place it on the right (and if you are left-handed, then vice versa) on the steering wheel, closer to the handle, and it is better to leave the middle of the steering wheel for the headlight. Make sure you have access to all buttons, the screen is visible to you from the saddle.
.jpg)
Some models of bike computers are additionally equipped with cadence sensors - cadence. In this case, the magnet is fixed on the connecting rod, and the sensor is fixed on the frame. If here the data is also transmitted over the wire, then pull it next to the gearshift cable.

More advanced models also have heart rate sensors. Altimeter. Thermometer. In another article on cycling computers, we will talk in more detail about what features simple models have and what more expensive ones can boast of.
A bike computer is a device designed to measure speed, mileage and additional parameters when cycling. There are two types of mechanisms - wired and wireless bike computers. They differ in cost and basic set of functions, but they assume the same principle of installation and configuration.
The principle of operation of the device
Before proceeding to the instructions for setting up the bike computer, you need to know the general principle of the device.
In general, the measurement process is quite simple:
- A special magnet is fixed in the back area;
- A sensor is installed on the fork of the bicycle. In inexpensive devices - Reed switch, and in premium - Hall;
- The rotation of the wheel affects the magnet, which sends a signal to the computer. As the wheel rotates, the device calculates the distance and speed of the trip.
Installation instructions
Mounting platform - a panel that has two contacts and a lock for mounting the device. The first step is to install the panel on one of the standard sections of the bike:
- Bracket (removal) of the steering wheel . The optimal place for a computer with large dimensions and several buttons for control;
- Rudder center – a safe place that is ideal for a compact device;
- The edge of the grips - allows you to place the bike computer close to your hands, which makes it easier to control the mechanism.
Regardless of the location of the platform on the steering wheel, care must be taken to avoid falling the computer.
In order to securely fix the platform in the steering wheel area, you can use disposable flagella, which require a strong tightening. This is due to the fact that when removing the device, the main load falls on the platform. A rubber backing is used to ensure a strong hold. Such an element will prevent slipping on the surface of the steering wheel.
Sensor and Sensor Mounting
Installing the sensor and magnet is a complex process, in which errors are unacceptable. The acceptable distance between the system components and the wheel axle is 10 centimeters. This will reduce the measurement error caused by centrifugal force acting on the magnet.
The reed switch (sensor) is mounted on the suspension fork using flagella or metal clamps. Perpendicular arrangement of the Reed switch to the axis of the magnet is the most optimal solution for installing the sensor.
After mounting the sensor part on the spoke, you need to fix the magnet. We measure the exact distance from the sensor to the magnet. It should not exceed 2 mm, otherwise the error in the indicators will be large. We tighten the magnet so that the vibrations of the wheel do not displace it.
If the bike owner decides to mount the device on the rear wheel, then the main focus is on the length of the flagella. It is necessary to choose the length so that the contact between the elements is not lost due to wheel vibration.
Using the 2nd mounting option, when twisting the steering wheel, there is a risk of damaging the wire.
The advantage of attaching the sensor and magnet to the front is ease of installation and less risk of the wires breaking when the handlebar is twisted. If the computer is wireless, then by installing it on the front wheel, the owner significantly saves battery power.
The next step is to place the wire in such a way that the design looks aesthetically pleasing. It is important to correctly determine the length. This will avoid possible problems: hitting other structures, creating interference during movement, etc.
The length of the wire is determined as follows: we lead the wire to the bike computer without overloading the plug, with a margin of 10-20 centimeters. We fix the contacts and remove the rest. Installation is carried out by one of two methods:
- By steering column . The wire is fixed on special flagella. An overlap remains at the bottom of the frame;
- By brake line . It makes sense to lower the cable a little. It is not recommended to wrap the brake cable with wire. Such an action will not only spoil the view, but also make the dismantling of the structure difficult.
The way how to install the wireless type bike computer is easier. If the sensor and the magnet are placed in one housing, then to start work it is enough to lay a wire between them.
Deciphering indicators for customization
To make it easier for future device settings, you should pay attention to the decoding of the following indicators:
- Speed / SPD - speed at the time of the trip. Usually measured in miles/kilometers per hour;
- AVG / AVS – indicator of average speed (0-th speed is not taken into account);
- TM / Time - the duration of the entire journey;
- DST is the distance traveled by the cyclist since the last reset;
- ODO - mileage. To reset the indicator, a special RESET button is used;
- Scan - demonstration of indicators. When a function is selected, each parameter will appear in turn on the cycle computer screen.
Setting up the bike computer
The first thing to start setting up a bike computer is to determine dimensions ( circles) wheels. This value directly affects the correctness of measurements and calculations of the device.
There are two ways to calculate wheel circumference:
- Classical . For measurement, a thread wrapped around the wheel is used. The method involves small errors, because during the movement the chamber is compressed under the influence of pressure. . For this, two points are drawn. One on the tire, the other on the road. The owner drives one revolution, after which the distance between the points is measured.

To set up some models of bike computers, you only need to know the size of the wheel, without calculating the length. Read the instructions carefully.
To simplify the setting, below is a table of the ratio of marking and circumference:
In order for the computer to accurately show the results, it is recommended to use the following formula:
L 1 \u003d L 0 *S 1 /S 0, where:
L 1 - adjusted length;
L 0 - the given size of the wheel circumference;
S 0 - the distance shown on the cycle computer that the user has traveled;
S 1 - the distance measured by the owner himself. For example, a stadium circle or a straight track.
There is a circle equal to 300 meters. The user drives a distance with the device turned on. The bike computer gave the distance traveled equal to 305 meters. We substitute the parameters into the formula and get the corrected value.
The main functions of the cycle computer after setting up
The basic set of the bike computer includes 7 main functions:
- Current trip speed;
- Average speed (the possibility is not available in budget devices);
- Maximum speed during the walk;
- Distance traveled;
- Distance traveled since the computer was installed (odometer);
- Total travel time;
- Watch.
It is important to pay attention to the fact that the user can adjust the odometer parameters manually. This will avoid unpleasant situations when mileage is lost after replacing the battery.
In addition to standard features, advanced models have additional features:
- The number of calories burned - the indicator is calculated based on data on average speed, distance traveled and heart rate;
- The pulse is a useful feature for people who are not allowed to overload the heart.
Setting advanced features
In addition to the standard set of functions, many models have a number of additional features:
- Clock - are configured in accordance with the number of buttons available on the device;
- Calorie counter - you must enter data on your own weight.
When setting up, you need to learn the units of measurement. Due to the fact that the circumference parameters in most devices are given in millimeters, weight values \u200b\u200bare driven in pounds.
Possible problems
Sometimes bike computers fail. They are fairly easy to diagnose and fix. Two types of problems are common:
- The device does not turn on;
- Invalid speed data.
IN first If so, the problem lies with the batteries. Their charge is depleted quickly enough, which requires frequent replacement. In many budget models, after the battery is depleted, the parameters go back to the base values.
Second the problem indicates that the magnet and sensor are installed incorrectly. During the trip, vibrations occur in the wheels, which causes the magnet to move. This prevents the sensor from reading accurate data.
To solve the problem, it is enough to lift the wheel and follow the cycle computer by passing the magnet near the sensor. If the sensor reads information every other time, then the magnet must be corrected.
If the problem occurs during the trip, and in a static state everything is in order, then the problem lies in the wire. It must be studied and, if a problem is found, repair or replace.
Video installation and configuration of the bike computer
Video instruction with a detailed analysis of the process of installing and configuring a Chinese bike computer:
A bike computer is a handy gadget that will be useful to all cycling enthusiasts. The device allows you to fully control the process of the trip, showing the results that the owner has achieved. This will allow drawing conclusions and adjusting the cycling program to increase the effectiveness of classes.
In contact with
In the previous article, we addressed the questions of what and what to pay attention to.
Now let's look at how to properly install it on a bike.
If you bought a GSM bike computer or use a smartphone with the appropriate program for this purpose, then there are no special installation questions.
For a smartphone, in general, the easiest way is to buy a special compartment on top for its installation or additional mounts for phones.
GSM bike computers come with special platforms for mounting on the handlebars or stem. If necessary, they can also be found on the Internet.
In extreme cases, just put such a computer or smartphone in your pocket or bag - it will still count everything, just the results can only be viewed at a bus stop or after a trip.
The main installation questions concern only magnetic cycle computers.
They come in two types: wired and wireless.
The basic principle of operation of both types is to count the number of revolutions of the wheel. Then, knowing the length, number of revolutions and time, the computer calculates all other parameters: distance traveled, speed, travel time, etc. and so on. Some models count and remember up to 50 different parameters.
How are wheel revolutions calculated?
This is done by those included in the kit: a reed switch, installed, for example, on the leg of the front fork, and a magnet attached to the spokes of the wheel.
What is a reed switch and how it works.
Reed switch (sealed contact)- This is an electromechanical device in which contacts are hidden in a sealed flask that close an electrical circuit when exposed to a magnetic field.
When you turn on the computer and start driving, the reed switch contacts are open. At the moment the magnet, fixed on the spoke, passes by the fixed reed switch, the contacts close, and the computer counts one revolution of the wheel. The wheel turned further - the magnet left the reed switch. The magnetic field ceased to act on its contacts - the circuit opened.
Based on the understanding of this mechanics, there are basic requirements for the installation of a magnet and a reed switch.
Let's consider them in turn.
What should be the distance between the magnet and the reed switch
Depending on the sensitivity of the reed switch and the strength of the magnet, the distance between them should be from 2 to a maximum of 8-10 mm. See the instructions for your bike computer for more details. Usually placed at a distance of 3-5 mm.
The magnet should be centered on the reed switch unless otherwise specified in the instructions. If it passes the reed switch higher or lower, the counter will count incorrectly.
Similarly, when turning the magnet around the spoke. If he "turns away" from the reed switch, then the readings will become incorrect.
After installation, carefully test the accuracy of the reed switch counting the number of magnet passes and wheel revolutions. Just spin the wheel by hand and see if the computer counts correctly. Please note that when the wheel rotates, the magnet does not cling to the reed switch.

Where to put the magnet on the spoke: closer to the rim or to the axis?
Here the logic is simple: If you put the magnet closer to the rim, then it will fly past the reed switch, while moving, much faster than if it were located closer to the wheel axis. The angular velocity at the rim is much higher than that of the axle.
This means that at high speeds, the reed switch may simply not have time to work, and the computer will miss a wheel turn - it will start to give incorrect readings.
And the distance from the magnet installed in this place of the spoke to the leg of the fork with a reed switch can be much greater than the required 5 mm.
Further. When the magnet is attached to the spoke closer to the rim, the centrifugal force acting on it during movement increases sharply and the likelihood of external influence of branches, grass, dirt, etc., which can move or turn the magnet around the spoke in relation to the reed switch, and this, again will affect the readings.
Therefore, it is best to place the magnet at a distance of about 10-15 cm from the wheel axis. You need to look at the specific wheel and the geometric dimensions of the reed switch and magnet.
On which wheel to put the reed switch and the bike computer magnet.
You can put them both on the front, which is done most often, and on the rear wheel.
What is the difference between mounting a bike computer on the front and rear wheels?
In fact, the difference is that the computer installed on the rear wheel counts more accurately. The front you steer, it twitches more when driving around the city and rough terrain and therefore travels a little more distance than the rear. It is also, more than the back one, subject to external influence on the magnet, as mentioned above.
The difference in readings from the front and rear wheels during long trips can reach several percent. So if you need accuracy and there is a difference: you drove 20 or 20.5 kilometers, put it on the rear wheel.
If a good wireless bike computer is installed, which also counts cadence (cadence), then it can have both reed switches in one housing. You need to put it unequivocally on the frame feather at the rear wheel, so that it can respond to the magnet mounted on the connecting rod and allowing you to count the cadence, and on the spoke of the rear wheel to calculate the speed.

If the cadence and speed reed switches are made in different housings, then the cadence reed switch can be installed either on the down tube of the pen or at the bottom of the seat tube.
But at the same time, keep in mind that if you have a wired bike computer, then the wire to the reed switch will stretch through the entire bike. Therefore, first check if it is long enough to reach the rear wheel. And the wireless one should have enough range to communicate with the computer. This is usually not a problem for normal manufacturers, but some Chinese “noname” models work reliably only on the front wheel.
The reception range of wireless sensors is described in the instructions.
Where to install the bike computer mounting platform
Attach it to the steering wheel or stem.

Consider the pros and cons of the bike computer platform attachment points:

The main thing in this matter: the location of the bike computer should be convenient for the biker himself. To him all readings should be clearly visible and it should be comfortable to switch the mode buttons. Moreover, taking into account the fact that you need to do this during the trip. Those. when the bike shakes and shakes on our almost "ideal" roads.
How to lay a wire to a reed switch
After you have clearly decided where you will put the bike computer on the steering wheel and on which wheel to place the reed switch with a magnet, you can think about laying the wire.
The main task at the same time is to make everything aesthetically pleasing and reliable.
If the reed switch is installed on the fork, then it is best to run the wire along the front brake cable with the transition to the fork leg.
It can be passed along the plug by wrapping it around the leg or along its inner side, fastening the wire with electrical tape in the color of the bike, plastic fasteners or even transparent thin tape. The inner side of the leg is less exposed to external influences than the outer side and will better protect the wire from accidental breakage.
When switching the wire from the cable to the fork leg, do not forget to leave a small margin for turning the steering wheel. Check that it is not stretched with any turn.
Some bikers, passing the wire along the cable, also twist it around it. This is quite normal, but, in my opinion, not very beautiful. Still, it is better to attach it to the cable with black electrical tape or thin transparent tape. The wire twisted around the cable has a “bad habit” to slip, unwind and stray to the side.
The main thing when laying the wire is to check that it does not cling to anything and does not rub.

What is the best way to fasten the reed switch and the bike computer platform: with ties or rubber bands?
 The rubber bands that come with the kit for attaching the bike computer platform to the steering wheel or stem and the reed switch to the fork leg, in my opinion, are not always reliable. Especially when traveling through the forest or grass. A hooked branch can break it, which will lead to the loss of the reed switch.
It is better, nevertheless, to grab everything with reliable thin plastic ties used for tying wires, in which to cut off the protruding tips.
When the bike falls, the ties are definitely better able to withstand various external influences.
How to install a bike computer on a bike
- First of all, decide in which place of the steering wheel, there will be a platform with the computer itself.
- Decide on which wheel the reed switch with magnet will be installed - on the front or rear.
- Consider if you have enough wire. There are models in which the wire can be cut off by attaching it to the contacts on the platform. In cheaper ones, the wire is already soldered into the platform and has a well-defined length. Usually, it is only enough for installation on the front wheel.
- When everything became clear, start the installation by attaching the platform to the steering wheel. Just don't fasten it right away. First, just fasten to hold, and at the end of the installation, tighten all fasteners completely. The fact is that after laying the wire, it may be necessary to move it slightly to the right and left.
- If your computer has a non-variable length wire, lay it as you want: wrapping the cables and tubes of the frame and fork, or attaching it to the cables and pipes with electrical tape, tape or plastic ties. The main thing is that the wire does not hang out.
When laying the wire, leave a margin for turning the steering wheel. At the end of the gasket, install the reed switch and the magnet on the spokes as described above and check that they do not touch each other.
If there is a lot of wire left, you can make a couple of extra turns around the pipe or twist it into a small bay and secure it with tape or ties on the inside of the plug.
- If the wire can be cut, then first install a magnet with a reed switch, and then pull the wire from them to the fixed platform.
If the wire still remains after installation and it is a pity or impossible to cut it, then wrap it around the steering wheel and secure it with electrical tape, tape or ties.
- After completing the work, check how correctly the reed switch counts the wheel speed. To do this, just spin the wheel and see how the computer works.
Another nuance - read the instructions for the purchased computer - they often write a lot of useful information there.
Well, that's about all that is connected with the installation.
 Installing a bike computer on a bike
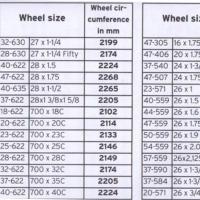 Installing a bike computer
 "Smart dust": how the smallest computer Michigan Micro Mote works
 SQL query language Ready-made sql queries
 PHP optimization is the hallmark of professional eAccelerator code: faster PHP code reloads
 Crossbrowser CSS3, or how to deal with Internet Explorer Css crossbrowser
 Yandex ranking algorithm Ranking algorithms