Installing OS X gives an error. How to reinstall the MacOS system on the MacBook computer. How to change the date in the OS X Installer
When installing OS X EL Capitan or OS X Yosemite, errors may appear:
"This Copy of The Install OS X El Capitan Application CAN't Be Verified. IT May Have Been Corrupted or Tampered With During Download or "This Copy of the Install OS X Yosemite Application CAN't Be Verified. IT May Have Been Corrupted or Tampered With During Download , so or "An Error Occurred While Preparing The Installation. Try Running Again » .
In Russian:
"Could not check this instance of the OS X Yosemite Instant (Mavericks). He could have been damaged or subjected to changes in the download process. "
Sometimes they can be solved by easy reboot and attempt to reinstall OS X again (or re-overwrite the distribution to the USB flash drive, if it is damaged), but if error messages appear permanently, you can solve the problem only to change the date on your MAC.
Change the date on Mac
You can do this without leaving the installation menu by using terminal commands. To do this, launch the "Terminal" and enter the command:
After that, the date set at the moment is displayed. It must be changed by setting the distribution date of the distribution.
Date and time are entered in a specific format: DD] HH] mm. It is described as follows: month Number of hours minutes of a second year introduced without spaces and, necessarily, in such a sequence.
For example, if you need to install the date and time on October 24, 2015, 18 hours 25 minutes, the team will look like this:
The meaning is to set the date, later the release of your distribution, but before the release of the next update. Experiment!
After that, close the "Terminal" and begin the installation process.
The new OS at the time of release turned out to be more stable than the previous one, but, unfortunately, it is not devoid of flaws. Some users encounter various problems after updating on OS X El Capitan. Here are five of the most common problems and ways to solve them.
1. Errors in the update process
Symptoms
After downloading the OS X El Capitan installer from the Mac App Store and its launch, an error occurs that interrupts the installation process.
The reasons
Most often, this occurs due to the fault of the current applications and processes that do not have the support of OS X El Capitan. Another reason is the incompatibility of applications with System Integrity Protection.
Decision
In this case, the usual reboot or shutdown / inclusion will help. Working processes will be completed, and the installer must earn it properly. In more launched cases, you will need to boot in safe mode, which will launch only vital components of the OS, without third-party extensions. To do this, when loading Mac, you need to hold the SHIFT key.
2. SPOTLIGHT problems
Symptoms
Spotlight has received even greater integration with the system and web services, so sometimes after installation there is an increased level of processor and resource consumption.
The reasons
For normal operation, Spotlight should index all the data, and usually malfunctions cause damaged databases created earlier.
Decision
The experienced makovods leave their computer alone on an hour and a half immediately after installation, giving Spotlight and the system to complete all the necessary actions. But, if it does not help, you will have to go to more radical measures and delete the database manually. To do this, run the "Terminal" and alternately enter the following commands:
Mdutil -ea mdutil -ai off mdutil -ai on
The first command will remove the existing database, and the second and third will turn off and immediately launch the service again. After that, Spotlight will create a new database and starts to index it. The process takes a certain time, so you have to wait.
3. Forwards Microsoft Office 2016 Applications
Symptoms
Word, Excel applications, PowerPoint or Outlook are emercted or freezed.
The reasons
Microsoft confirmed that due to the bug (or several) Office 2016 does not work on OS X El Capitan. Moreover, regardless of whether a clean installation or update was made.
Decision
At the moment, Microsoft works on this problem, so far nothing remains, except to use alternative solutions like Google Docs or Open Office.
4. Applications work incorrect
Symptoms
One or more of your applications perfectly worked in OS X Yosemite, but after updating on OS X El Capitan work incorrectly or do not work at all.
The reasons
In fact, the reasons may be weight. Most often, the problem is in software incompatibility, restrictions or features of the OS.
Decision
First of all, it is worth checking the compatibility of a specific application with OS X El Capitan, visiting the official developer website. Most of them are trying to prepare a compatible version to the release of the new OS X, but sometimes it may take some time, especially in the case of single-alone developers and small companies. As a rule, it is worth just waiting for a new version of the application.
5. Problems with user account configuration
Symptoms
During the installation process or at its final stage, the user is invited to enter a password from its account, but the system does not accept it, even if the password is entered correctly.
The reasons
The nature of this problem is not entirely clear, as it arises randomly in a small number of users. In some way, the installation process is interrupted, and it fails to complete.
Decision
As you already, probably guessed, another way, except for restarting the installation, no. You need to restart Mac or, even better, turn off and enable, and then re-run the installation process.
In this list, the most basic problems are collected, but they, of course, may be more. If you come across other problems and know their decision, be sure to write about it in the comments!
Apple's developers with each update of their operating systems (be it iOS or Mac OS) traditionally take care of increasing the stability of the work and security of these users of their devices. We are talking about regular updating of security systems, and to prevent the possibilities of penetration into the malware. However, oddly enough, it does not always play the hand to users.
We will analyze one of the similar situations with which any user of the new Mac OS Sierra operating system may occur. The fact is that this version of the OS software is configured so that the safety mechanism built into Mac OS does not allow installing applications From any sources - the user selection is limited to a set of programs from the Mac App Store and applications from developers, officially received permission from Apple. But very often useful software developers for Mac do not place their applications in the Mac App Store or simply do not have the status of the "installed" Apple developer. Accordingly, applications cannot be installed, without allowing the operating system to install applications from any source.
In all previous version of Mac OS, this restriction could be bypass resolving the installation of applications from any source In the security settings of the operating system.

Now this item is not there. But do not be upset - the ability to install programs from any sources in Mac OS Sierra did not disappear without a trace and in order to enable this feature, you must use the TERMINAL application command line.
What if Mac OS does not allow installing applications?
Run the Terminal program (you can find it by going to the "Utilities" folder in the list of installed programs via Launchpad, or in Finder) and enter the following command:
Sudo spctl --master-disable
Please note that before the team - "Master" go two signs "-", and not one long.
Then enter the administrator password and confirm the changes. After that, in the settings of the operating system, the item will again appear with the possibility of selecting permissions to install programs from different sources and you can set what is needed.
After you install the program you need, we recommend returning back security settings and select or "App Store" or "App Store and from installed developers" to save security settings for your poppy.
Have a good use of this feature!
Please put like and make a repost if our article helped you!
If you still failed to independently install the desired application on Mac OS Sierra, our experts will help to perform this operation. Contact our nearest service center.
How does Macos High Sierra work? Some users have a perfectly system, but there are those who have different problems with this version. This happens with significant updates for a large number of reasons. In this article, we collected the most common problems of Macos High Sierra and offered their possible solutions.
From users who updated to Macos High Sierra, a large number of error messages are received: starting with problems with installing the update itself and ending with rapid battery consumption, program errors, strange behavior, reading media, network problems, chart / display and deterioration in the whole . You may find a solution and your problem below.
Download errorsMacos. High Sierra.
Some users can even download Macos High Sierra through the Mac App Store. If you have this problem, first check that your MAC is connected to an Internet network with good speed.
Often the problem can be solved by closing the App Store and opening it again.
- Close Mac App Store.
- Open the Mac App Store and try download Macos High Sierra again.
It is possible to reboot and Mac itself, but it is necessary in very rare cases.
Problems with installerMacos. High Sierra.
Some write that you can't download the full MacOS High Sierra installer and instead are downloaded by a 20mb version, which in turn downloads already complete during installation. Thus, you do not need to create an installation USB disk for MacOS High Sierra.
To solve this problem, try installing Macos High Sierra using a third-party program.
Installation errorsMacos. High Sierra.
When errors occur with the installation, a message appears with an error, and the solution most often can be downloaded to the installer and attempt to start the installation again.
Can pop up different errors. For example, "The path /System/Installation/packages/osinstall.mpkg seems to be absent or damaged. Complete the installer to restart the computer and repeat the operation ", etc.
If you have such errors, delete the "Install Macos High Sierra.App" file from the / Applications folder / and download the installer from the Mac App Store again.
Restart Mac and try once again Mac OS High Sierra through the installer file. In most cases, it helps.
Macos High Sierra.not installed
When the MacOS High Sierra installation starts, the message "MacOS High Sierra cannot be installed" appears. Most likely, your Mac simply does not support this version of the system.
Installationmacos. does not end
Sometimes, during the installation, an error prompts that at the moment it is impossible to download important installation components, with the proposal to try to install the update once again later.
Solve this problem is easy: to follow the advice and try to install update later.
Installermacos. High Sierra. freezes on a black or white screen
A very rare MacOS High Sierra installer hangs on a completely black or white screen.
In this case, you first need to wait, and the error may disappear itself, even if you leave for a few hours.
If the screen is completely black, check that the brightness is turned on on Mac. Sometimes the installer for some reason darkens the screen, and you just need to add brightness.
If the installer is finally hung, you will need to try to install Macos High Sierra anew. Restart Mac and start the installation again, but a little later. If you have an installation USB disk, start the installation from it.
If the entire laptop is hung, you need to enter the recovery mode, restarting the Mac and climbing Command + R. After that, try to install an update again.
High Sierra. not installed, the system is not loaded at all
This happens in rare cases. When the update is not installed, and the system is not loaded, a gray screen appears. In this case, you need to reinstall system support, but first it is necessary.
- Turn off the Mac, turn on it again and immediately press the Option, Command, P, R keys.
- Continue to keep the COMMAND, Option, P, R keys until you hear the inclusion sound. This usually happens after 15 seconds.
If Mac does not boot and after reset NVRAM, you will have to reinstall the system. This can be done using the installation disk or recovery mode.
You can also restart Mac by pressing the COMMAND + SHIFT + Option + R keys and reinstalling MacOS via the Internet.
APFS s. does not workFusion Drive. or by ordinary discs
The APFS file system is not yet supported by Fusion discs or regular discs, but in the future support will appear with any update of the system.
If you have installed Macos High Sierra, and you use Fusion discs or ordinary HDD, in the future, be sure to install the update when a new version of the system is released.
Macos High Sierra.freezes
There are many messages that laptops with MacOS High Sierra hang and do not react to anything.
Some does not work the cursor or keyboard, but music or sounds continue to play. Most often it happens after starting the video on YouTube, Facebook, etc. In this case, the laptop must be reloaded. To avoid problems in the future, try installing another browser. It can be Safari, Safari Tech Preview, Chrome, Firefox or Opera.
Sometimes such an error occurs due to the incompatibility of programs or third-party services. You need to update all programs to the latest version.
External monitors do not work withMacos. High Sierra.
Sometimes after installing MacOS High Sierra, external monitors stop working. Some screen flashes with different colors.
If you encountered this problem, try it.
WindowsERVER uses a lot of RAM
This problem can be solved by disconnecting the transparency effect of Mac OS.
Install all the available MacOS High Sierra updates and other drivers associated with graphics.
Display distortion
Some users on the screens appear different distortions. This may be due to the new graphic engine MacOS High Sierra and other elements of the system or with drivers installed on Mac. Problems with graphics are most likely fixed in subsequent updates.
MAC does not come out of sleep mode
If such a problem occurs, you need to reset SMC or VRAM. Apple support advises users to simply reinstall MacOS via recovery mode.
Another way is to restart or turn off and re-enable Mac every time it does not leave the sleep mode, but it is too uncomfortable.
Problems withWi– Fi inMacos. High Sierra. 10.13
Some users fail to connect to Wi-Fi networks. Sometimes it helps just turn off and enable the feature.
- Turn off the Wi-Fi in the MacOS menu.
- Restart Mac.
- Turn on Wi-Fi in the MacOS menu.
The impossibility messages are also received to connect to networks with hidden SSID. In this case, you need to open an SSID (router name) in the router settings.
Not work some programs
Most applications that worked with Sierra should work with High Sierra, but with some problems still arise. Error messages in Final Cut Pro, Motion, Indesign, Logic, Compressor, Microsoft Office, Adobe Photoshop, etc. In almost every case, the problem will correct the installation of the latest version of the programs and systems.
It is best to update programs in the Mac App Store on the update tab or through the program yourself.
Also check that the program is compatible with MacOS High Sierra.
MACbecame work slow
If, after installing MacOS High Sierra, your Mac began to work slower than usual, it is likely to be associated with the background tasks of Siri, search, photo, icloud, etc.
Try just to leave the laptop included for a while and let it complete all the background tasks.
Many Mac, on the contrary, work faster from Macos High Sierra, especially when copying and moving files, and this is due to the new FFS file system.
If the work remains slow and after waiting, it is worth checking how much RAM consumes specific programs and services using a system monitoring program. Sometimes the system slows down some programs that consume many resources.
- Install all the available MacOS and all program updates.
- Create a new Mac account and use it if the problem has disappeared.
- Make a backup of Mac and reinstall MacOS High Sierra from it.
- Make a copy of Mac and install MacOS High Sierra re-through the installation USB drive.
- Roll into Macos High Sierra to the previous version using
He refused to load. Cmd + R. Does not help. How to be?
The beginning of the working day did not foretell anything bad. A cup of coffee, a good mood, the Power and MacBook key displays the following sad picture:

In the head immediately flashed a restless thought about the safety of data, the relevant version of the backup Timemachine. (which was not at hand) and the possible loss of information.
Attempt number 1. Loading in recovery mode
Being interested in the user and avid "makovod", I immediately tried to run MacBook in recovery mode by holding keys Cmd + R.. Instead of the familiar disk utility, the system met me by an attempt network recovery.

By choosing the Wi-Fi home network, I began to wait for the further development of events. A few minutes later the progress of Recovery OS X interrupted error -4403F..

Attempts to start the process re-led exactly to the same result. Reloading the router confirmed that with a network connection all in perfect order.
On trying to diagnose Mac, fighting the possible errors of the hard drive or tritely reinstall the system now it could not go and speech. Section S. Recovery HD., in which the toolkit for recovery is stored, ordered to live long.
Attempt number 2. PRAM and NVRAM reset
Mac computers were created by high-class engineers, therefore the correct organization of the entire system and the presence of "hidden hardware reserves" avoids a number of interruptions in its work. One of these reserves are memory sections. PRAM. and NVRAM. It stores these settings that are not reset even after disconnecting the computer from the power supply. To revive the fallen system, it was decided reset PRAM and NVRAM settings.
1. Turn on Mac.
2. After the white screen appears, quickly clamp the key combination Cmd + Option + P + R.
3. Hold to reboot and the MAC greeting sound.

PRAM and NVRAM reset completed.
Although they say that hope is dying the latter, she, lifeless and barely lively continued to fade in my mind. Reset PRAM and NVRAM on the error when loading the system did not affect. MacBook continued to test my nerves.
Attempt number 3. Reset SMS.
Having used to store all the necessary data "in the cloud" or on a removable carrier, the easiest solution of global problems has always been reinstalled by the system "from scratch". This case was special. I needed data stored in memory, and I needed a working Mac today.
In Mac, there is a so-called sMC System Controller. The stability of the entire system depends on the reliability of his work. Reset SMC settings can cure a number of problems, like:
- - constantly high speed of the cooler even with minimal load;
- freezing during system departure in CNA mode;
- Errors related to the operation of additional periphery or external monitors, as well as correcting the system loading problems.
To reset the SMC, follow these steps:
- Laptops with built-in batteries
1. Turn off the MacBook and connect the power adapter.
2. At the same time hold the keys Shit + Control + Option + Power And hold before changing the color of the magsafe adapter indicator.
3. Release all keys and press the key. Power.
- Laptops with removable batteries (old models)
1. Turn off the MacBook and disconnect the power adapter.
2. Remove the battery from the laptop.
3. Hold the key Power and hold at least 5 seconds.
4. Release POWER, insert the battery and connect the power adapter. Turn on the laptop.
- Desktops (IMAC, Mac Mini, Mac Pro)
1. Fully disconnect the computer from the power supply.
2. Wait at least 30 seconds.
3. Connect the power and expect another 5-10 seconds after that turn on the computer.
The above actions may become really productive and the system will start. In my case, the miracle did not happen.
Attempt number 4. Recovery using the boot flash drive
An attempt to revitalize the system through the above actions was not crowned with success. The only option remained - reinstall OS X using the boot flash drive. For this step, it will be necessary:
- another computer operating under the OS X operating system;
- uSB flash drive, not less than 8 GB.
Preparation of flash drive
1. In the Mac App Store app store, you will need to download the OS X Yosemite distribution system.
2. To create a boot flash drive, download the DiskMaker X utility (distributed free of charge). It will be needed to deploy the distribution.
3. Format the flash drive using Disc utility in Mac Os Extended (magazine).

4. After the distribution is downloaded, deselect the installed and run the utility Diskmaker X..
5. Select the system Yosemite (10.10). The utility will detect the distribution in the folder Apps. Click Use This Copy. (Use this copy).

6. Select the drive installed in the USB port and agree with the warning to complete the deletion of all data present on the flash drive.

7. The process of mounting the distribution with OS X Yosemite on the drive will begin.

The copying process takes about 10-20 minutes and depends on the speed of the USB flash drive. During mounting, dialog boxes and folders can occur on the screen. Do not pay attention.
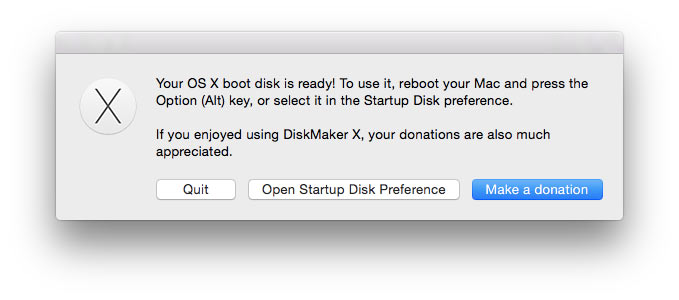
After successfully deploying an OS X Yosemite image, remove the drive.
System installation
1. Install the USB flash drive to the "Problem Mac" port, press the key. Power and clamp the key Alt..
2. In the list of available partitions to download, select OS X Base System. Pay attention to the lack of section Recovery..
.

3. Mac will boot in recovery mode. After selecting the main system, the installation menu will open. In the top menu you will find the standard list of utilities.
Use the disk utility and try to check the access rights to the system partition and correct the possible errors. If after rebooting the system still refuses to load, it will be necessary to separate the partition, the size of which will be at least 20 GB in order to install a new system. Detailed instructions for separating the disk you will find.
From the same menu it is possible to start the process of installing the system to the newly created section, and restore the system using the TimeMachine backup (see).

CAUTION! Be careful when the installation section is selected. Installation is required not on top of the old partition, but on the newly created.
After the installation is completed, you will get access to all data posted on the "spoiled" section with the old version of the system.
If you create an optional disk section failed
If for any reason you failed to create an additional disc partition for installing a new version of OS X, and the saving of the data remaining on the bit is still in priority, there is an OS X installation option using a previously created bootable flash drive to an external drive.
 Lighting devices based on alternating current LEDs find their niche and may come out beyond its limits.
 Requirements and rates for cable laying in Earth Scope of application, Definitions
 Automobile stroboscope from laser pointer
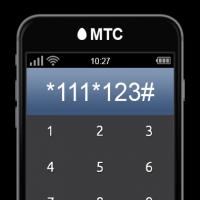 Order 20 UAH to the account. How to Borrow on MTS. Additional information on the service
 How to check the account replenishment
 How to get a loan on tele2?
 Responsiveness SSD on a miniature board What SSD Drive Buy