Using selections in SCD. Using selections in DCS How auto-filling of available fields in the data composition scheme works
Good day, my readers! Today we will continue to look at the basics of the layout system. In this series of articles, you learned what an access control system is and became acquainted with the main components of an access control system. We also looked at the input data for building a report and learned the main stages of running a report on an access control system. In addition, many had the opportunity to test their knowledge by passing a short test. Now you can take a look at the contents of the article and see what will be covered in it.
Data set - query.
- Unlike a regular query, there is no RESULTS clause in the data composition query. Instead, totals are generated on the “Resources” tab. On this tab, you select the fields for which you want to obtain final expressions. And on the “Settings” tab it is indicated in what section the results will be obtained, that is, appropriate groupings are created here and resources are calculated based on them. You can read more about this in the article.
- The next point concerns the selection settings. There are two execution possibilities.
- Through the report option settings. This can be done on the “Settings” - “Selection” tab. If we use this option, then it is the most flexible, since we can specify different types of comparisons that even the user can choose. Additionally, when using this option, filtering conditions are imposed in the query itself. If the report is based on a batch query using temporary tables, then the selection will affect all tables in the batch query where the selection field occurs.
- At the request level. If we use a query, then we won’t be able to use anything other than the equality operation.
The exception is the case when we need to perform a “hard” filtering of the data by a certain value. Let's say, by enumeration value. In the “Parameters” tab we can set a condition. If we enable the “Limit Availability” flag, the user will not be able to cancel this condition.
- It is also more correct to apply sorting at the level of report option settings.
- If you specify a sorting field in the request, then the user will specify another field in setting up his report version, then our setting made at the request level will have the lowest priority. The sorting set by the user in the report variant setup will be performed first. Therefore, if you need to set the sorting “by default”, then we use the settings of the report option in the Configurator.
- What if you need to set up “hard” sorting in a report so that the user cannot change it? Then we set sorting at the query level, and on the “Data Sets” tab we set up a field limitation. Select the required data set and check the box in the “Field limitation” - “Ordering” column.
Virtual table parameters.
- The construction of virtual tables of accounting registers, accumulation registers, and information registers depends on a given date. This can be either one date or an interval, such as for a table of balances and turnover. The SDS is created in such a way that if the report is based on a virtual table, then it is necessary to let the user choose for what interval or on what date to generate the report. SKD automatically adds the necessary period parameters to the layout diagram.
- If a virtual table of balances or a virtual table of information registers is selected in the query, then a parameter called “Period” is automatically added.
- If a virtual table of balances and turnover or a virtual table of turnover is selected in the request, then the parameters “Start of Period” and “End of Period” are automatically added.
- What to do if you need to get balances at the end of the period? There are two ways:
- Go to the “Parameters” tab and in the “Period” parameter in the “Expressions” column write the following:
&EndPeriod. We will also enable the “Limit availability” flag. - We completely get rid of the “Period” parameter and replace it with the “End of Period” parameter. Let's configure an optional virtual table parameter:
- Go to the “Data Sets” tab and click on the “Query Builder...” button.
- On the “Data Composition” tab in the upper left corner, click the button to open the “Virtual Table Options” dialog (this is a gray square button with a picture of a gear on the background of a small table).
- In the “Period” field of the dialog box we write: &End of Period.
- Now in the text of the data set request in the parameters of the virtual table, this parameter appears surrounded by curly braces:
- Go to the “Parameters” tab and in the “Period” parameter in the “Expressions” column write the following:
The curly braces indicate a data composition query language extension. This also indicates that this parameter is optional. This means that if it is not defined in the data composition schema, then the balances will be obtained as of the current date.
Query language extension.
These are special instructions that are enclosed in curly braces in the request body. These instructions indicate the fields and parameters that can be manipulated when setting up a report version. The data from the curly braces will be present in the layout diagram even if the AutoComplete check box is disabled.
When a query data set is created, by default the available fields of the data composition scheme are automatically filled in based on the created query (the “Auto-fill” checkbox is selected on the “Data Sets” tab).
How does autocomplete of available data composition schema fields work?
- Fields from the query selection list and their child fields become available.
- If we select from the accumulation register, then even register fields not included in the request become available in the data composition fields. But these fields are only available for selection (in conditional expressions)
and they cannot be used as output fields. - The parameters of the virtual tables “Period”, “Start of Period” and “End of Period” become
available for selection. - If a “hard” condition is specified in the request text, then this parameter will also be added to the “Parameters” tab.
If the AutoComplete checkbox is cleared, the fields of the data composition scheme are cleared, but the parameters enclosed in curly braces in the request text remain.
How to fill out the fields of the data composition scheme yourself?
Uncheck the “Autofill” checkbox on the “Data Sets” tab.
Click on the “Query Builder…” button. Let's create the following request:
SELECT Remainings. Nomenclature AS Nomenclature, Remains. Quantity AS Quantity RegisterAccumulation. Remaining Goods. Remaining(((&EndPeriod) ), ) AS Remaining
On the “Tables” tab we can set virtual table parameters for all tables.
Now on the “Data Layout” tab, select the “Fields” tab. Here we set the selection fields that
will be presented in the layout diagram.
The “And..” field means that child records will be included in the selection
fields of complex type, such as directories and documents, etc. If the field is such as a number, then it will be impossible to put a flag in the “And..” field.
Let’s select two fields “Nomenclature” and “Quantity”. For the “Nomenclature” field, set the “I..” flag,
so that child records are selected. You will get the following query:
SELECT Remainings. Nomenclature AS Nomenclature, Remains. Quantity AS Quantity (SELECT Nomenclature. * , Quantity) Accumulation Register. Remaining Goods. Remaining(((&EndPeriod) ), ) AS Remaining
In the new request, in curly braces, another SELECT section has appeared - this is the extension text that indicates the fields that will be available in the layout. The “Nomenclature.*” field indicates that the “Nomenclature” field and its child details, such as “Code”, “Name”, etc. will be available. So, we filled out the layout fields ourselves.
But now we can't use fields in layout conditions. If you go to the “Settings” tab and select the “Selection” tab, you cannot set conditions for any of the fields that we selected in the previous paragraph. Why?
Imposing conditions on virtual table parameters must also be specified on the “Data Composition” tab of the Query Designer. In the upper left corner, click the button to open the “Virtual table parameters” dialog
(this is a gray square button with a picture of a gear on the background of a small table). In the “Condition” field of the dialog box we write: Nomenclature. Now in the text of the data set request in the virtual table parameters, this “Nomenclature” parameter will appear surrounded by curly braces:
Accumulation Register. Remaining Goods. Balances(((&End of Period) ), ((Nomenclature) )) AS Balances
In the usual query language, specifying a parameter looks like this: Nomenclature = &Nomenclature. But in the query language extension it is written differently. Only the field name is indicated. Here we do not specify the operation of equality, inequality, or in hierarchy, since the user himself will select the desired operation in his settings.
On the “Data Composition” tab of the Query Builder, we see another tab, “Conditions”. It is needed to indicate in the query language extension the conditions for the WHERE clause. Select the “Quantity” field. This field is now available in the conditions on the “Settings” - “Selection” tab. And new lines appeared in the request text, enclosed in curly braces.
(WHERE Remains. Quantity)
If selection by the quantity field is specified, then this sentence will be inserted into the final request. Where the type of condition and comparison value will be determined by setting up the report option.
So, I think that's enough material for today. If there are any unclear points, do not hesitate to ask, because this is why commenting is possible. This material will be prepared to be pinned soon, so subscribe to updates on our website so you don’t miss out!
And in this series of lessons we will look at the functions of the SKD expression language, talk about the features of the layout system, and also analyze the basic settings of the layout fields. Good luck in understanding this difficult material!
At the end of the article I want to recommend you a free one from Anatoly Sotnikov. This is a course from an experienced programmer. It will show you on a separate basis how to build reports in the access control system. You just need to listen carefully and remember! You will receive answers to the following questions:Perhaps you shouldn’t try to surf the Internet yourself in search of the necessary information? Moreover, everything is ready for use. Just get started! All the details about what is in the free video lessons are on the author’s page softmaker http://www..pngsoftmaker 2015-12-07 14:51:12 2018-06-12 13:14:13 Data composition system (DCS). Part 2.
- How to create a simple list report?
- What are the Field, Path and Title columns on the “Fields” tab for?
- What are the limitations for layout fields?
- How to configure roles correctly?
- What are the roles for layout fields?
- Where can I find the data composition tab in a query?
- How to configure parameters in the access control system?
- It gets even more interesting...
Attention! This is an introductory version of the lesson, the materials of which may be incomplete.
Login to the site as a student
Log in as a student to access school materials
Data composition system 1C 8.3 for beginners: connecting data sets
- Write a report that displays customers and their favorite products. Each client has a favorite color, and each product has its own color - based on these colors, you need to determine the “favorite” of the product. For example, if Andrey’s favorite color is red, then one of his favorite foods will be tomatoes (they are red).
- Apply two sets of data in the report. The first set is data from the "Clients" directory table. The second is data from the “Food” directory table.
- Implement connection between these two sets, so that the report contains only the favorite products for each client.
Create a new report
Open the "Gastronom" database in the configurator and create a new report through the main menu:
Document type - "External report":

In the form of a new report, indicate the name “Lesson 6” and click the “Open data composition diagram” button:

Leave the default schema name:

Adding the first data set
In the diagram that opens, go to the “Data Sets” tab and select “Add Data Set - Query” using the green plus sign:

Call the request constructor:

We indicate the "Customers" table and the fields that need to be obtained from the request:


Adding a second data set
Add a second set of data:

Select it (DataSet2) and call the query constructor again:

We indicate the table of the "Food" directory and the fields that need to be obtained from the request:

The result was the following request text:

Please note that we now have two data sets in the report: Data Set1 and Data Set2. Each has its own request text and data.
Making names more descriptive
For clarity, let's rename DataSet1 to Customers and DataSet2 to Food.
Do this by double clicking on each of the sets:

We can use the data from each set in our report. We will access this data through fields.
Currently, the “Customers” set has the following fields: “Name” and “FavoriteColor”, and the “Food” set has: “Name” and “Color”.
We see that the names overlap and we can easily get confused. So let's change the field names to be more descriptive.
Select the “Clients” set and change the field names like this:

Then select the “Food” set and change the field names like this:

Calling the settings constructor
Finally, go to the “Settings” tab and click the magic wand to bring up the settings designer:

Report type - "List...":

Select fields for the report from both sets:

See why it was so important to change the field names? At the stage of data composition settings, we do not see which sets these fields are from. We only see their names.
Checking the report
We save the report and generate it in user mode:

Yeah. Okay, but not really. A so-called cross-join of two sets has occurred (you should be very familiar with this from the joins in queries that we studied in previous modules). Each record from the Customers table has a corresponding record from the Food table.
But from all these records we need to leave only those whose field “Customer’s FavoriteColor” is equal to the field “FoodColor”:

We connect two data sets
To do this, we will connect two sets of data (Customers and Food) using the fields Customer FavoriteColor and FoodColor.
Go to the “Dataset Links” tab and click on the plus button to add a new link:

We configure the parameters as in the figure below:
I'll make an explanation.
Source and receiver of communication. Well, everything is clear here. We indicate the first set (Customers) and the second set (Food) of data. I would like to draw special attention to the fact that communication will be carried out according to the principle outer left join(we covered it in the topic of requests in previous modules). Based on this, you need to choose which set will be the source and which the receiver.
Expression source. We indicate here an expression or simply a field from the source data set (we specified the ClientFavoriteColor field from the Clients set here).
Receiver expression. We indicate here an expression or simply a field from the receiver data set (we indicated the ColorFood field from the Food set here).
Thus, this connection will leave from the previous list only those rows for which the Customer's FavoriteColor field is equal to the FoodColor field.
Let's save the report and run it in user mode:

Great!
I'll make an explanation about the field " Communication condition", about which novice programmers so often hit their spears.
The connection condition is an auxiliary field. You can write expressions there involving fields only from the data set specified in the link source.
In this case, for all rows from the link source, this expression (link condition) will be checked before the link is made. And if this expression is TRUE, then an attempt will be made to establish links between this row and rows from the link receiver. If the expression is FALSE, then no such attempts will be made.
In my last article, I already wrote that 1C is a paradoxical platform. The data composition system is one of these paradoxes. SKD is designed for designing complex reports and involves replacing “manual” report programming with design in a multifunctional toolkit. The ability to use access control systems appeared in the eighth version, but it took a long time for version 8.2 to appear so that 1C could use it in its standard products. On the one hand, ACS is a multifunctional toolkit, using which you can create very complex reports without a single line of code. However, the access control system has a fairly high barrier to entry; learning and starting to fully use it “on the fly” is very difficult, because the interface is not entirely intuitive, and the most complete manuals for use are available only in the form of paid literature.
In the process of my study of SKD, a problem arose. It is necessary to obtain data from a third-party table of values using a query language and then operate this data as with similar data from database tables (reduction operations, grouping, and so on). In the classic format, we would create a query that receives information from the table passed to the query as a parameter.
Request = New Request(
"CHOOSE
| Table.Nomenclature,
| Table.Warehouse
|FROM
| &TK AS Table");
Request.SetParameter("TZ", TZ);
But with SKD everything is not so simple. Alas, it is impossible to perform the operation described above in the data composition system. However, the system has implemented the ability to load external tables of values.
Here it’s worth making a short digression and talking about Datasets. Data sets are sources of information from which the data management system receives data that it later compiles into a report. Data sets are divided into types, mainly using the “Query” type, in the body of which the programmer writes a query to the database. The "Object" type is used to load data from external objects. In both cases, the output is a certain set of fields obtained as a result of executing a request or loading an external object. Later, these fields can be manipulated on the “Settings” tab, along with detailed settings for the report structure. To interconnect different sets, the ACS provides the ability to indicate connections between data sets in the tab of the same name. These connections are a direct analogue of the left join in a classic query. However, it should be taken into account that queries in any data set do not “know” about the existence of other data sets; ultimately, the relationships between the data sets will affect the layout of the data according to the structure specified in the “Settings” tab.
Let's detail the problem down to an example. There is a standard report: Payroll statements for the organization of configuration ZiK 8. It is necessary that the types of calculations in the report be grouped into certain groups. Calculation View-Group correspondences are stored in an external value table. To load it into the main data layout scheme, we create a “data set object” with the name “Groups” (Figure 2). We make a connection with the “query data set” - “Accruals” by type of calculation (Figure 3). In the “request data set” - “Accruals” there is information for groups, we delete all entries. Afterwards, on the “Settings” tab we can use the “Group” field, the value of which is loaded from an external data source (Figure 4). In the report generation function, we supplement the loading of external data.
Function GenerateReport(Result = Undefined, Decryption Data = Undefined, OutputInReportForm = True) Export
//obtaining or forming the required table of “Groups” values and writing it to the variable of the same name
ExternalData = New Structure();//create and fill the external data structure
ExternalData.Insert(Groups);
UserPanelValue = TypicalReports.GetUserPanelSettingValuesofObject(ThisObject);
DefaultSettings = SettingsComposer.GetSettings();
TypicalReports.GetAppliedSetting(ThisObject);
TypicalReports.GenerateTypicalReport(ThisObject, Result, Decryption Data, OutputToReportForm, ExternalData);
SettingsLinker.LoadSettings(DefaultSetting);
Return Result;
EndFunction
If we were making a report from scratch, the report generation launch code would look like this:
ExternalDataSets = new Structure;
ExternalDataSets.Insert("Groups", Groups); //Groups - the desired table of values
DataCompositionSchema = GetLayout("MainDataCompositionSchema"); //our layout with data flow diagram
Settings = DataCompositionScheme.DefaultSettings;
LayoutLinker = newDataLayoutLayoutLinker;
LayoutLayout = LayoutComposer.Execute(DataLayoutSchema, Settings);
DataCompositionProcessor = newDataCompositionProcessor;
DataCompositionProcessor.Initialize(LayoutLayout, ExternalDataSets);
TabDoc = New TabularDocument;
OutputProcessor = New OutputProcessorDataCompositionResultInTabularDocument;
OutputProcessor.SetDocument(TabDoc);
OutputProcessor.Output(DataCompositionProcessor);
Read 9660 once
 Free way to get followers on Instagram without effort How to get followers on Instagram
 How to send a video to a friend in Odnoklassniki via message How to insert a file into ok
 What to do if “the object field is not detected” The object field is not detected full name
 Install CyanogenMod firmware using the CyanogenMod installer Impact on warranty
 Add an arbitrary phone number in the personal account of the mobile operator Kyivstar (Ukraine)
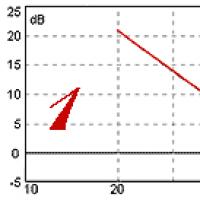 What is a slope of 12 dB oct
 Data roaming abroad