Archive brush tool in Photoshop. Smooth skin on the face using an archival brush. Restoring intermediate steps of history
Greetings Photoshop lovers!
Understanding how the History Brush Tool works allows you to create extraordinary effects in Photoshop. What exactly are the effects created by an archive brush in Photoshop? What is the operating principle of the tool? We will try to figure this out.
How the tool works
The operating system is simple and based on the “History” functionality, which is built into the program. After any action performed, the user can return to the original image. The essence of this return is the complete cancellation of the last action.
However, the History Brush only allows you to bring back part of the image. The tool is especially relevant when working with all kinds of filters that are available in Photoshop.
In order to see how the tool works, you first need to take any good quality image and apply one of the filters to it. Let's say it will be “Gaussian Blur”.
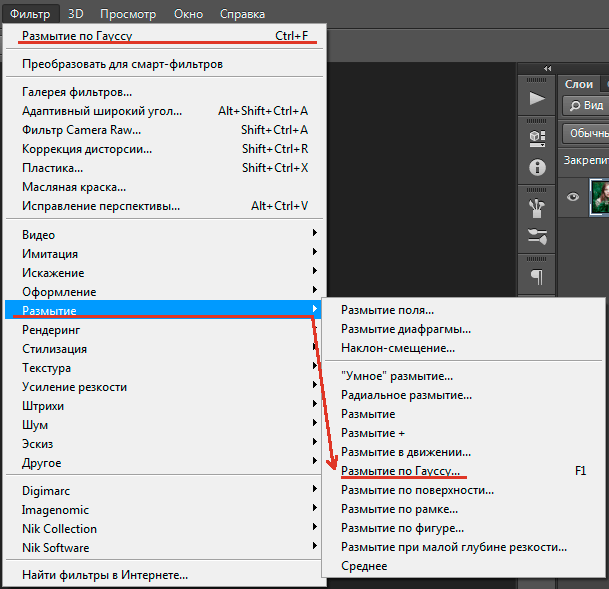
This filter makes the image blurry, all objects lose their outlines, and a foggy mask is applied to the entire picture.

Select the History Brush tool from the main panel or using the hotkey " Y».

Move the cursor over any area of the image and, without releasing the left mouse button, begin to “clean up” the picture. As a result of these actions, the original image will appear at the place where the cursor worked, which was clear before applying the blur filter.

The effect appears gradually, the more you work with the cursor in the selected area, the more accurately the original image will appear.
To achieve a good result, it is useful to choose a brush with soft edges, so as not to create a hard edge.
The History Brush tool has its own number of special settings in the auxiliary panel above the work area.
The most interesting of them are the brush options and the transparency scale.
Setting the transparency to 100% will reveal the original image as accurately and sharply as possible. By reducing this parameter, you can achieve the effect of revealing part of the picture through the general background.
The shape of the brush, as well as its size, is selected in a special window, which can be called up by right-clicking anywhere on the current image.
Combining different brushes and filters with this tool allows you to achieve a unique effect.
Tool Historical (Archival) brush (History Brush) is one of the simple but very useful Photoshop tools. The very name of the instrument already contains a hint that we will be dealing with something from the past.
The tool allows you to return to any state of the current document saved in the palette History. Let's assume that you have made a number of changes to the image and you need to return a small fragment to its original form. In this case, there is no need to change the entire image, just use History Brush to undo corrections selectively, reverting to the previous state at will.
Toolbar.
Tool History Brush can be activated through the toolbar by clicking on the tool icon, or using the shortcut key ( Y). Under one button with the tool History Brush tool is located. We will return to this tool later. To switch between two tools, just right-click on the icon and select the one you need, or use a keyboard shortcut Shift + Y.
Tool settings panel.
Let's take a look at the tool settings History Brush.
1 . Selecting the shape, size and hardness of the brush.
2. Turn on/off the brush settings panel.
3 . Mode. Change the pixel blend mode.
4 . Opacity. Opacity of the overlay image.
5 . Controlling brush opacity using a graphics tablet.
6 . Pressure (Flow). Adjusting the intensity of brush pressure.
7 . Airbrush Capabilities. Gives the brush the properties of an airbrush.
8 . Controls brush size using a graphics tablet.
Here are all the instrument settings History Brush. Now, as I promised above, a few words about the tool Art History Brush.
Art History Brush.
Tool Art History Brush works on the same principle as History Brush, but allows you to apply various artistic effects to the image. This tool puts a whole menu of different types of strokes at your disposal. Experimenting with different parameters Style, Diameter (Area) And Tolerance, you can imitate the painting texture with different colors and different artistic styles.
1 . Style. Selecting the shape of brush strokes.
2 . Diameter (Area). A value that determines which area will be affected by the brush stroke. The larger this value, the more pixels the tool will affect.
3 . Tolerance. The low tolerance value allows you to apply strokes without restrictions anywhere in the image. A high tolerance value limits the ability to apply strokes to areas that are significantly different in color from the foreground.
Tool Art History Brush in practice it is used very rarely.
Historical brush and palette History.
Take a look at the palette History and you will see a tool icon to the left of the open image thumbnail History Brush(to open the panel History, select a command Window > History). The presence of this icon indicates from what state the document will be restored when using the tool History Brush.

To the left of each subsequent step is an empty square. By clicking on the square opposite the name of the desired state, an icon appears History Brush. In this case, restoration of certain areas of the image will occur from the state of the document before this step.

Note: The history brush stops working after resizing the image.
This concludes my review of this tool. I wish you success!
PHOTOSHOP - LESSON 8. ARCHIVE BRUSH AND "HISTORY" PANELPhotoshop - Lesson 8: History Brush and History Panel
First, let's take a closer look at the History panel. If you do not see it in the main program window, then select from the menu: Window -> History. The panel itself looks like this:It lists all operations performed since the file was opened, the last command in the list is active (highlighted in blue).
There is a slider on the left side of the active line; if you drag it up one line with the mouse, this will cancel the last command. The canceled command line will turn gray and what the command did will disappear from your image. If you move the slider down, the command will take effect again, and you will see it in your image.
You can undo and redo up to twenty commands by moving the slider or simply clicking on the line with the last command you needed. If you no longer need the canceled commands, you can delete them altogether. To do this, drag the line with this command to the trash (it is located at the bottom of the "History" panel). The command will disappear from the panel and can no longer be returned to it.
At the top of the panel there is a field of images. You can save a snapshot of any image state in it. Currently this field contains one photo, taken by default when opening a file. The image line contains an icon of the given state of the image (in this case, untouched by editing) and its name.
The name of the first image is the same as the file name. Click on the photo icon, and the image will return to its original state (as immediately after opening).
As already noted, the last twenty commands are saved in the History panel. Using snapshots gets around this problem. Simply after completing each stage of image editing, you can take a photo.
You can save snapshots from any image state by placing them in the snapshots field. To do this, select the desired document state (line) and click on the camera icon at the bottom of the palette. A new snapshot will appear that matches the selected file state. During operation, you can return to this state at any time by selecting it with a mouse click.
Snapshots are very useful in your work, for example you can take a photo before and after applying a filter. Then select the first photo and try the same filter with different settings. By switching between images it is easier to select the optimal settings.
It often happens that we only need to partially transition to some state. This is why the “archive brush” comes to the rescue. Now we get to the main topic of the lesson. Left-click on the tool -archive brush-, the tool selection window will open:
- archival brush- Allows you to draw from any snapshot in the History panel. This allows you to return not the entire state of the image, but only part of it.
- archival art brush- also restores the image state from a history snapshot, but at the same time allows you to apply various artistic effects.
It is better to understand the meaning of these tools using examples.
Archive brush
Let's say we open this image:

 Suppose we need to add clouds to it. To do this, take the eyedropper tool (as in lesson 4) and click on the blue background, the main color will become blue. Now on the menu bar, click on Filters -> Render -> Clouds.
Now our image looks like this:


Please note that we have not created a new layer, we are editing an existing image.
If we now click on the "Open" line in the "History" palette, then our clouds will disappear, but we want them to remain, but the doves to be visible.
So we'll use the History Brush tool. In the "History" palette, check the box next to "Open". Let's take the "History Brush" tool from the toolbar (select a brush with a diameter of 100 and with jagged edges) and click it several times in the area where the pigeons are. The clouds will disappear where we click.


In other words, we can change our image in different ways and, if after that we want to return part of the image to its original form, then we will take the “History Brush” tool and erase everything unnecessary with it. The main thing is to indicate which state of the image to use as a source; for this, you need to check the box (in the form of the brush itself) next to it in the “History” panel and the layer on which we want to restore the image.
Archival art brush
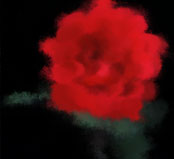
This tool cannot be called frequently used, but still consider an example of its use. Open a photo of a flower. I have this rose:

Create a new layer, name it "Background", fill it with white paint and set the opacity to 70%. This is an auxiliary layer, it will help us see what we are drawing.
Create another layer, call it “Rose”, we will paint on it.
Our image now looks like this:

Make sure the "Rose" layer is active and grab the Art History Brush tool from the Tools panel. Now let's configure its parameters in the options panel:
Click the triangle next to the brush to select it.

Now click on the triangle in the circle and in the submenu that opens, select the “Art History” brush set -> Add.
Now select the "Oil sketch" brush.

Now set the rest of the parameters: Mode - Normal, Opacity - 40%, Style - Short Touch, Diameter - 30, Tolerance - 0.
Now go over the entire canvas with the brush, just try not to overlap the strokes one on top of the other. It should look something like this:

Now change the following brush parameters: diameter - 30, style - compressed short, diameter - 10. And brush it only on the flower itself (mine is a red rose). It should look like this:
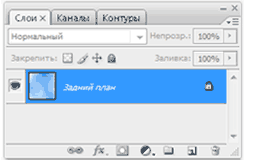
This is how we made an oil painting from a photograph using an archival art brush. Notice in the Layers palette, we actually painted this rose in the Rose layer:

You can turn off the -background- and -background- layers (click on the eye), we don’t need them anymore. That's all for today. Next time we will learn to draw various shapes.
First, let's take a closer look at the History panel. If you do not see it in the main program window, then select from the menu: Window -> History. The panel itself looks like this:
It lists all operations performed since the file was opened, the last command in the list is active (highlighted in blue).
There is a slider on the left side of the active line; if you drag it up one line with the mouse, this will cancel the last command. The canceled command line will turn gray and what the command did will disappear from your image. If you move the slider down, the command will take effect again, and you will see it in your image.
You can undo and redo up to twenty commands by moving the slider or simply clicking on the line with the last command you needed. If you no longer need the canceled commands, you can delete them altogether. To do this, drag the line with this command to the trash (it is located at the bottom of the "History" panel). The command will disappear from the panel and can no longer be returned to it.
At the top of the panel there is a field of images. You can save a snapshot of any image state in it. Currently this field contains one photo, taken by default when opening a file. The image line contains an icon of the given state of the image (in this case, untouched by editing) and its name.
The name of the first image is the same as the file name. Click on the photo icon, and the image will return to its original state (as immediately after opening).
As already noted, the last twenty commands are saved in the History panel. Using snapshots gets around this problem. Simply after completing each stage of image editing, you can take a photo.
You can save snapshots from any image state by placing them in the snapshots field. To do this, select the desired document state (line) and click on the camera icon at the bottom of the palette. A new snapshot will appear that matches the selected file state. During operation, you can return to this state at any time by selecting it with a mouse click.
Snapshots are very useful in your work, for example you can take a photo before and after applying a filter. Then select the first photo and try the same filter with different settings. By switching between images it is easier to select the optimal settings.
It often happens that we only need to partially transition to some state. This is why the “archive brush” comes to the rescue. Now we get to the main topic of the lesson. Left-click on the tool -archive brush-, the tool selection window will open:
- archival brush- Allows you to draw from any snapshot in the History panel. This allows you to return not the entire state of the image, but only part of it.
- archival art brush- also restores the image state from a history snapshot, but at the same time allows you to apply various artistic effects.
Archive brush
Let's say we open this image:
 Suppose we need to add clouds to it. To do this, take the eyedropper tool (as in lesson 4) and click on the blue background, the main color will become blue. Now on the menu bar, click on Filters -> Render -> Clouds.
Now our image looks like this:


Please note that we have not created a new layer, we are editing an existing image.
If we now click on the "Open" line in the "History" palette, then our clouds will disappear, but we want them to remain, but the doves to be visible.
So we'll use the History Brush tool. In the "History" palette, check the box next to "Open". Let's take the "History Brush" tool from the toolbar (select a brush with a diameter of 100 and with jagged edges) and click it several times in the area where the pigeons are. The clouds will disappear where we click.


In other words, we can change our image in different ways and, if after that we want to return part of the image to its original form, then we will take the “History Brush” tool and erase everything unnecessary with it. The main thing is to indicate which state of the image to use as a source; for this, you need to check the box (in the form of the brush itself) next to it in the “History” panel and the layer on which we want to restore the image.
Archival art brush
This tool cannot be called frequently used, but still consider an example of its use. Open a photo of a flower. I have this rose:

Create a new layer, name it "Background", fill it with white paint and set the opacity to 70%. This is an auxiliary layer, it will help us see what we are drawing.
Create another layer, call it “Rose”, we will paint on it.
Our image now looks like this:

Make sure the "Rose" layer is active and grab the Art History Brush tool from the Tools panel. Now let's configure its parameters in the options panel:
Click the triangle next to the brush to select it.
Now click on the triangle in the circle and in the submenu that opens, select the “Art History” brush set -> Add.
Now select the "Oil sketch" brush.

Now set the rest of the parameters: Mode - Normal, Opacity - 40%, Style - Short Touch, Diameter - 30, Tolerance - 0.
Now go over the entire canvas with the brush, just try not to overlap the strokes one on top of the other. It should look something like this:

Now change the following brush parameters: diameter - 30, style - compressed short, diameter - 10. And brush it only on the flower itself (mine is a red rose). It should look like this:

This is how we made an oil painting from a photograph using an archival art brush. Notice in the Layers palette, we actually painted this rose in the Rose layer:

You can turn off the -background- and -background- layers (click on the eye), we don’t need them anymore. That's all for today. Next time we will learn to draw various shapes.
Hello, dear readers!
Today I want to say a few words about such a tool as HISTORY BRUSH (Y) Traditionally, this tool is used like this: for example, you are working with an image and while working you don’t like something. There are two ways to return to the original result. Let's take a look at the palette History
 which is located at Window/History
 and let's see what these methods are. In the palette Story All actions that you perform with your document are recorded, from the moment you open it to the very last click. Depending on the settings, the program records only a certain number of steps, for example twenty, which are displayed in the palette Story. That is, if you clicked the brush thirty times on the photo, then the palette Story will only show the last twenty clicks. The rest, alas, “sank into oblivion”... So, I “created” something like this with my image:
  But I'm not happy with the result. You can, of course, use hotkeys CTRL+Z to undo one action or CTRL+ALT+Z to undo several. But it’s convenient if there are few actions, and if there are a lot... You’ll get tired of pressing! That's what a palette is for Story. So, the first way to return everything to its place is to simply go back a few steps to the moment when everything suited you. For example like this:
  But this, again, if there are few steps and the one that suits you can still be found. And if not?.. This is where you need History Brush
. You can do the following, firstly, click on the button to the left of the step name
But this, again, if there are few steps and the one that suits you can still be found. And if not?.. This is where you need History Brush
. You can do the following, firstly, click on the button to the left of the step name  Thus, you seem to say to the program: “I want to restore up to this moment and not one step further!” Then you do whatever you want with your drawing, and when you don’t like something, take it Archive brush and simply paint over the image as you would with a regular paint brush. By the way, the parameters for Archive brush the same as the regular one, only some blending modes are missing. So, take a brush, set it up to your liking and paint:
  See what's happening? Everything returns to the moment that we indicated to the program! Smart Photoshop, right? Well, what if we don’t tell Photoshop to what point to restore our image? Well, we won’t say it, we won’t say it that way. He will then decide that you are not satisfied with absolutely everything, except for that moment when the picture opened for the first time. Until this very moment, the program will restore everything that we have messed up. By the way, this moment, opening or creating a document, is considered the starting point for Archive brush.
But we need to remember. Archive brush does not work on a layer mask and does not work if, after specifying the starting point for the brush, you change the image size... Photoshop, although smart, loves precision. So, if the size was changed and you want to return everything back, use the first method, click a few steps earlier, or even clear the history completely using this drop-down menu:
See what's happening? Everything returns to the moment that we indicated to the program! Smart Photoshop, right? Well, what if we don’t tell Photoshop to what point to restore our image? Well, we won’t say it, we won’t say it that way. He will then decide that you are not satisfied with absolutely everything, except for that moment when the picture opened for the first time. Until this very moment, the program will restore everything that we have messed up. By the way, this moment, opening or creating a document, is considered the starting point for Archive brush.
But we need to remember. Archive brush does not work on a layer mask and does not work if, after specifying the starting point for the brush, you change the image size... Photoshop, although smart, loves precision. So, if the size was changed and you want to return everything back, use the first method, click a few steps earlier, or even clear the history completely using this drop-down menu:  And now let’s talk about how an archival brush can be used to decorate a photograph.
 STEP 1: open the image we need in Photoshop. For example this:  Press the keys CTRL+A to select the entire image, then... delete it with the key DELETE. Don't worry! Everything is correct!
STEP 2: create a new layer, SHIFT+CTRL+N, take History Brush.
I set the settings like this:  The set of brushes that I used is called “Finishing Brushes”; they are included in the standard set of the program. Now we just need to move the brush across the document from left to right, slightly moving away from the top edge. Like that:
  In this way we “reveal” what we seem to have removed. As a result, I got this:
 STEP 3: Let's change the brush shape to this:
  The size can be changed, or you can leave it as default 111 pixels. Swipe several times along the edges of the already developed image. It should look like this:
  All that remains is to add the inscription at the top. This is where you turn on your imagination. (On how to use the tool TEXT told
 Working with sound on the Macintosh platform (Mac OS X)
 Arduino and four-digit seven-segment indicator
 Ways to check debt for telephone and Internet from Rostelecom
 How to increase computer performance for minimal money
 Email - where you can create it, how to register a mailbox and choose the best of the free Email services
 SHA256 – hashing algorithm
 Install CyanogenMod firmware using the CyanogenMod installer Impact on warranty