Correct TP LINK TL WR841N router. Configure wireless connection. Setting up L2TP connection
Good day.
In today's next article on configuring home Wi-Fi Router, I would like to stay on TP-Link (300m Wireless N Router TL-WR841N / TL-WR841ND).
Quite many questions set on TP-Link routers, although in general, the setting is not much different from many other routers of this type. And so, let's look at the steps that you need to do so that you work and the Internet and local Wi-Fi network.
1. Connecting the router: Features
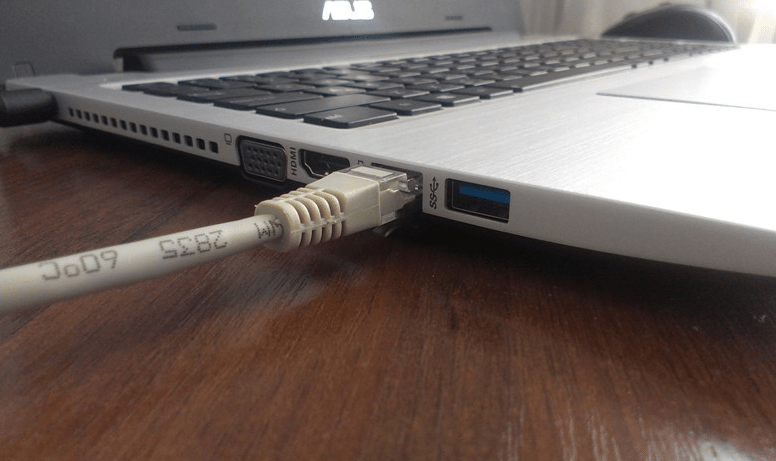
There are several outlets on the rear wall of the router, we are most interested in LAN1-LAN4 (they are yellow in the picture below) and Intrnet / WAN (blue).
So, using a cable (see the picture below, White), connect one of the LAN outputs of the router with a computer network card. The cable of the Internet provider, which comes from the entrance to your apartment, connect with the WAN output.
Actually everything. Yes, by the way, after turning on the device, you must notice the blinking of the LED + on the computer there should be a local network, while without access to the Internet (we have not yet configured it).
Now you need sii in settings Router. To do this, in any browser, dial in the address bar: 192.168.1.1.
Then enter the password and login: admin. In general, not to repeat, here is a detailed article about whether, by the way, all typical questions are disassembled.
2. Setting up router
In our example, use the type of PPPOE connection. What type of choosing to you depends on your provider, all information on the login and passwords, the types of connection, IP, DNS, etc. must be in the contract. We are now in the settings.
2.1. Configure the Internet (PPPoE type)
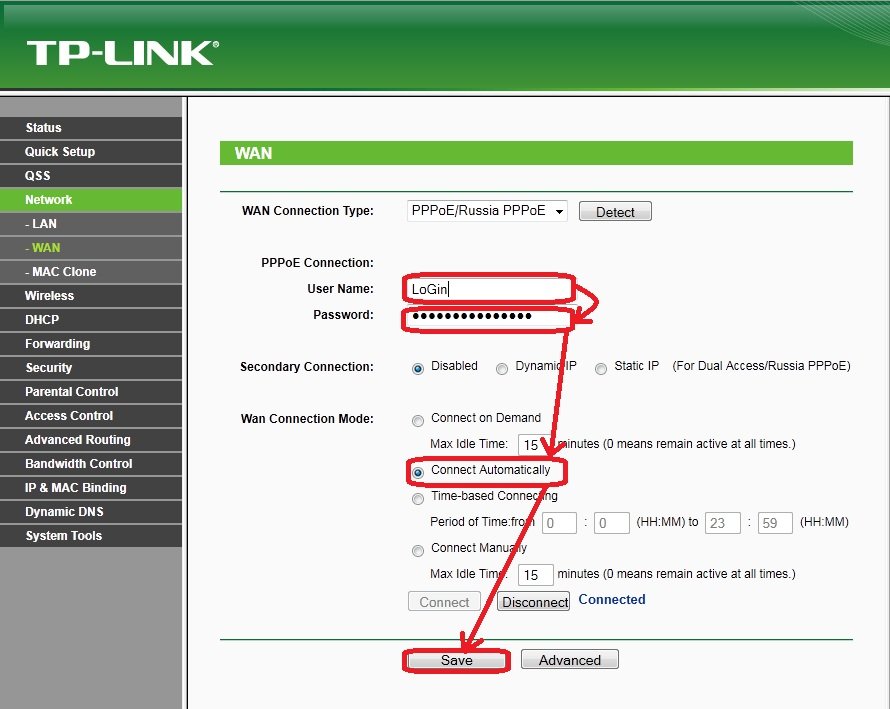
In the column on the left, select the Network section, the WAN tab. Here are key three points:
1) Wan Connection Type - specify the connection type. It will depend on it, what data you need to enter to connect to the network. In our case, PPPOE / RUSSIA PPPOE.
2) Username, Password - Enter the login and password to access the Internet by PPPoE.
3) Put the Connect Automatically mode - this will automatically connect to your router to the Internet. There are modes and manual connections (uncomfortable).
Actually, everything, the Internet is configured, click the SAVE button.
2.2. Configure Wi-Fi Wireless Network
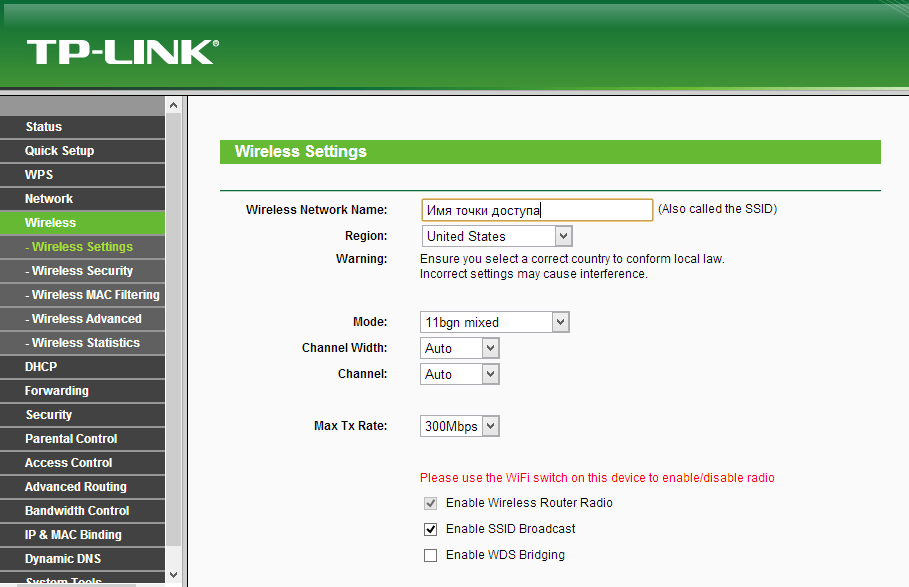
To configure the Wireless Wi-Fi network, go to the Wireless Settings section, then open the Wireless Settings tab.
Here you also need to pay for three key parameters:
1) SSID - the name of your wireless network. You can enter any name, then that you will be convenient then conveniently. By default, "TP-LINK" can be left and so.
2) Region - Choose RUSSIA (well, or yours if someone reads a blog not from Russia). This setting is not found in all routers, by the way.
3) Check the ticks at the bottom of the window, opposite the Enable Wireless Router Radio, Enable Ssid Broadcast (thereby you turn on the Wi-Fi network).
Save the settings, Wi-Fi network should start working. By the way, I recommend to protect it with a password. About this little below.
2.3. Enable password on Wi-Fi network
To protect the Wi-Fi network password, go to the Wireless section, the Wireless Security tab.
At the bottom of the page, there is the ability to select WPA-PSK / WPA2-PSK mode - select it. And then enter a password (PSK Password), which will be used each time you connect to your wireless network.
Then save the settings and restart the router (you can simply turn off the power to 10-20 seconds.).
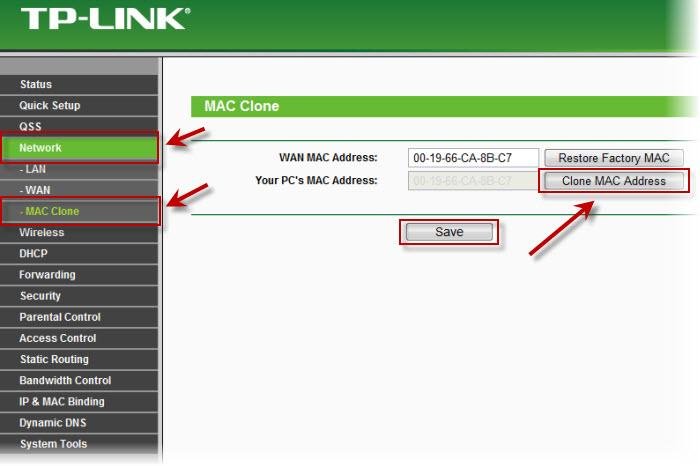
Important! Some Internet providers register MAC addresses of your network card. Thereby, if you change the MAC address - the Internet can be unavailable. When changing a network card or when installing a router, you change this address. There are two ways:
first - this is (I will not repeat here, in the article everything is described in detail; in TP-Link routers there is a special section for cloning: Network-\u003e Mac Clone);
second - Register your new Mac address from the provider (most likely there will be enough telephone call in those support).
That's all. Good luck!
Good afternoon dear readers!
Today I will tell you how to configure the TP-LINK router on the example of the TL-WR841N model (D)
My thoughts about this model:
I believe that this model has been very successful with TP-Link, as it is easy to set up, it has a good price / quality. It is perfect for an ordinary home user who needs simply to be the Internet and Wi-Fi. I advise you to take this model if you are the same simple user who is not required from the router. Many of my acquaintances have this model (on my recommendation) for more than 3 years. It works stably, its function performs on 5+
!
So, if you have already purchased this router, let's set it up. Our procedure:
- Setting the Wi-Fi network on TL-WR841N (D)
Connecting the router TL-WR841N (D) to PC
To begin with, connect the power supply to the router and stack it into the outlet. If you do not touch on it indicators (on the router), then turn it on with the back button.
You probably noticed the disk that comes in a set with the router, so we will configure without Its use.

The second end of the wire is inserting a laptop / computer network card from which we will configure the router.
If you did everything right, we can move to the next item.
Configuring an Internet connection (WAN Connection Setting) on \u200b\u200bTL-WR841N (D)
We need to go to the TL-WR841N (D) router settings. To do this, on the computer to which it is connected, open any browser, and in the address bar, go to the address 192.168.1.1 , or 192.168.0.1 . The username and password can appear. Specify admin. and admin. (standard password and username). By the way, how to enter the router settings, standard IP and standard login / password are shown from the bottom of the router on the sticker

So, we all entered the right, entered the login and password. We must open the Routher Settings page.
The most important thing is to customize the router to work with your Internet provider. If this is not done, or do wrong, then the Internet will not work through the router. The Wi-Fi network will appear, but without access to the Internet.
In the settings, go to the tab Network - Wan.. We are in the drop-down list Wan Connection Type. You need to select the connection type that your Internet provider uses. It may be: Dynamic IP, Static IP, PPPoe, L2TP, or PPTP. I personally have for example PPPoe (The most common type of connection).

Setting up PPPOE, L2TP, and PPTP
If your provider uses one of the above connection methods, we select the desired, and set the necessary parameters that the provider must be issued: username, Password, IP Address. It already depends on the type of connection and provider you have chosen.
The main thing is that you need to get from the settings on this page, so that this router connects to the Internet and began to distribute it. If the Internet works, then click on the button Save.and continue. If you can't configure, call your Internet provider, and check all the data from it that is necessary to configure the router.
If you have a customized high-speed Internet connection, then it is no longer needed. It is not necessary to run it. We now router will run such a connection. You can remove it at all.
It may also be that the provider makes binding on the MAC address (you need to specify the provider), in this case, you can clone Mac in the router settings on the tab Network - Mac Clone. Or, there you can change the Mac address of the router. You can also call the provider and ask to remove the old Mac from binding, and tie your new MAC address.
If the router connected to the provider and distributes the Internet, you can continue the setting. To check if the Internet distributes the Internet, just try to go to any site from a computer that you set up a router (which is connected to the router in the port Lan.)
Setting up Wi-Fi network on TL-WR841N (D) and installing a password on Wi-Fi
To configure Wi-Fi, you need to open the tab on the settings page. Wireless - Wireless Settings. On this page we need to be in the field Wireless Network Name. come up with and record a name for your Wi-Fi network, and in the drop-down menu of the Region choose the country where you live. The remaining settings, leave both in my screenshot below.
To protect our wireless network password, go to the tab Wireless - Wireless Security. There you need to highlight the type of security WPA / WPA2 - Personal (Recommended).
In field Psk password. Come up and write down the password that will protect your Wi-Fi net.

Save the settings by clicking the button Save..
Changing standard Admin user password
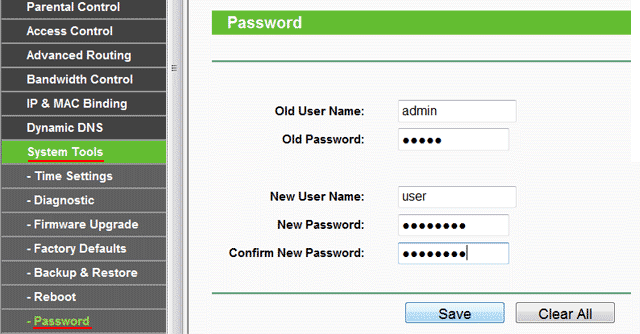
While we are in the settings TP-LINK TL-WR841NI advise you to immediately change the standard password, which is set to protect your router settings. Whatever all who will connect to your network, they could not enable the router settings and change them (for example, we gave a password from Wi-Fi to a neighbor / friend).
Open tab System Tools - Password. Specify first the old username and password (default - admin.). Then, below specify a new username (you can leave admin.) And the new password. I advise you to record this password somewhere to forget. Save the button settings Save..
That's all, the TP-LINK TL-WR841N router setting is completed.
It remains only to restart the router. This can be done by shutdown / power on, or from the settings, on the tab System Tools - Rebootneed to click on the button Reboot.
After setting up and rebooting, a Wi-Fi network will appear, with the name we set during the setup process. And to connect to a wireless network, use the password that we also installed when setting up the router.
I hope this article helped you! I did my best. If you are questions, ask them in the comments to the record. If you have an offer, you can direct them to the post
In the next article, I will tell you
Thanks for attention! To new meetings!
Select the router in the wireless network equipment market is quite simple. In most cases, buyers prefer budget representatives with a large set of useful functions. But it is not possible to use a wide range of services to be removed not to each owner of the router. From this article, the reader finds out how TP-LINK TL-WR841N is produced, because this model is considered the best on the computer market according to the "price-quality" criterion. Accordingly, interests in this wireless device have the highest user.
Computer Preparation and Connection
On how to physically connect a router to a personal computer or laptop, it is written in the first chapter of the instructions supplied in the kit. How professionals are assigned, only a cable of patchcord and ability to distinguish colors. But at the programmer level "make friends" the TP-LINK TL-WR841N router with a computer is not easy, especially in cases with individual network settings from the provider. Check it is quite simple:
- connect the provider cable in the WAN connector (blue);
- one patch cable connector Connect to the network input of the computer (RJ-45), and the second to any port LAN router (yellow color).
If access to the Internet has appeared on the PC, it means that you can safely begin the configurations of the wireless device. Otherwise you have to work your hands. Immediately it is recommended to prepare a ball handle and a sheet of paper, as well as find the contract of the provider on the Internet services (network equipment settings are specified).
Forced connection of PC to the router
If the TP-LINK TL-WR841N is not possible due to the fact that the computer does not see the device, the owner intervention is required. Opening the Computer Management Panel, you need to select "Network Management Center". The "Changing Adapter Settings" item will give the user to the list of all network devices that exist on the PC. The necessary interface will be highlighted by a yellow exclamation mark. You need to install on it and press the right key of the manipulator. Selecting "Properties", the user will fall in the network component management menu. The list needs to find the "TCP / IPv4" field, set the cursor and click the "Properties" button.

Manually prescribed parameters need to rewrite on a sheet of paper: IP address, mask, gateway and DNS. After that, you can safely install 2 button selection buttons opposite the "Get automatically" fields, click the "OK" button, and close all working windows. It is worth noting that after such manipulations with the network settings, in the list of network devices, the yellow indicator will disappear on the desired adapter and the inscription "connected without access to the Internet will appear.
Running the router control panel
Before you configure TP-LINK TL-WR841N, you need to run it in any browser (IE, Opera, Google Chrome, Mozilla Firefox). You must specify the IP router. By the way, the network address of the router, the login and password for authorization are prescribed on the sticker, which is attached to the bottom of the device. In most cases, IP "192.168.1.1", and the default login and password - "admin".

The connection procedure is quite simple, the main thing is not to hurry, because all the data must be entered only using English layouts, and the letters themselves are used only from the lower register (not capital). Successful connection will be completed by the user with the main window of the router control panel.
Connect to the Internet
Thin setting of the TP-LINK TL-WR841N router is not recommended by experts until the device has connections to the Internet. If with access to full order, then you can go to the next section, in the remaining cases you have to spend a few minutes to make data on the network. By default, the router offers after the first start to use the services of a virtual assistant, which using a pair of questions will independently configure the network. It is not necessary to refuse, because the intelligent system is able to significantly save time.

With the setting, everything is simple: if a static address was registered in the computer, you need to select the appropriate parameter and protrude the IP, mask, gateway and DNS. Otherwise, you need to use the data from the contract in which the provider indicated its own settings for connecting to the Internet. By making data, it is necessary to maintain the information and confirm the restart of the device. After 15-30 seconds, access to the Internet should appear.
Alternative with provider settings
All domestic providers that use their own settings create specialized firmware, which are compatible with most equipment present in the market. This is done first of all for the convenience of users, because the software download and install it is much more convenient to install it, rather than enter data manually. It is found on the official website of the provider and under the TP-LINK TL-WR841N router firmware.

Saving the file on the computer, you need to unzip it and place on any disk (it is desirable that the storage folder has an English name). Turning to the router control panel, you need to select "System Tools". In the "Firmware" field, you need to specify the path to the unpacked file and click the "Write" button. It is not recommended to interrupt the operation, as this can lead to a breakdown of the device. After the firmware, the router will independently reboot.
Surprising trouble
By installing the firmware of the provider, you can lose the rights of access to the TP-LINK TL-WR841N router control panel. Negative reviews are often found on this issue in the media. Change standard passwords love providers, providing parallel and mobile services. There is already a user to decide how to do it right, to configure the router independently, instruct the management of the provider's router or change the Internet service provider at all.

The second nuisance that can wait for the owner is to create public logins and passwords both to the router and to wireless networks. After all, the installation of TP-LINK TL-WR841N is made by thousands of users who theoretically can have the same provider. The same firmware is the same settings and passwords. Accordingly, the owner should take care of safety.
Simplicity and convenience
According to the Wireless Connection Settings, TP-LINK TL-WR841N router, media reviews are only positive:
- the control panel is Russified;
- in the right screen area, opposite each menu item there is a detailed description in Russian;
- configuration is convenient, since all the necessary items are assembled in one menu, and not scattered in different categories;
- it is possible to save configuration files to a local computer, which is quite convenient when using the router in several places.
It is not necessary to be a guru in the field of IT technologies to configure the Wi-Fi network. First you need to decide on encryption type. By default, this WPA Personal / WPA2, if the router is used at home. It will only be necessary to set the access password and the visible name of the Wi-Fi network and you can safely save the settings, reboot the equipment and proceed to your business.
Finally
As practice shows, the TP-LINK TL-WR841N router configure does not contain any pitfalls. There is a detailed instruction supplied included, which describes the physical connection of the device with a provider and a personal computer. If, after connecting the cable, the Internet does not appear, you need to use this article or contact the provider. Configure the same wireless connection and other equipment functionality will help the same instruction and many prompts that replete the router control panel.
Over the past few years, many decent devices have appeared on the computer market at a very low price. Most of them are positioned as honest Chinese brands of high quality with sales markets around the world. About one of these devices - this article. Wireless router TP-LINK TL-WR841N with huge functional and high performance. The device description is accompanied by an overview, quick customization instructions and includes reviews of owners and system administrators.
Meet the clothes
A very attractive bright green color box easily pays attention to the buyer's attention. The image of the device in the assembly and brief quickly will help make the right choice. TP-LINK TL Delivery Kit has everything you need for a complete setting and operation of the device. In addition to the access point there is a power supply, patch cord, two reinforcing antennas, disk with documentation and instruction.
The first acquaintance with the point of access to any owner will only bring pleasant impressions. Available for the TP-LINK TL-WR841N router The price of about 1000 rubles provides the buyer a powerful Wi-Fi device made of very high-quality plastic having a magnificent design and a well-thought-out cooling system. As it turned out, the entire body from all sides is littered with ventilation windows. Apparently, the Chinese taking into account the experience of their old devices hanging in the process of work due to overheating.

Tactical and technical characteristics
The TP-LINK TL-WR841N wireless router operates at a frequency of 2.4 GHz in class 802.11b / g / n networks. The control system functions on the ATHEROS AP81 core from 400 MHz and has a built-in 32 MB memory. The device has a built-in switch to four ports running in 100 megabit networks, and one WAN port for connecting the incoming Internet channel. In addition, the wireless router understands WPS technology, which allows without preliminary settings and authorization to connect devices via Wi-Fi. And if we consider wireless capabilities, then the manufacturer stated according to the 802.11n standard - 300 megabit per second with the support of two spatial streams (MIMO 2x2). Types of connection to the provider are in full for all technologies in the post-Soviet space: Static and dynamic IP, PPPoE and PPTP / L2TP with Dual Access support, manual entry MAC address, including cloning. Also supported by the gains in Russia IPTV.
Preliminary Routher Settings
Supplied with TP-LINK TL-WR841N The instruction describes the procedure for setting up and connecting the Wi-Fi access point. Still, many owners, judging by their reviews, assure that before activating the device, it is necessary to make a forced reset to factory settings. To do this, you need a sharp item like a selection to press and hold the RESET button for ten seconds located on the rear panel of the router. Naturally, at the time of reset, the access point must be connected to the power supply and at least one indicator should be shining on it. The result of an effective reset will be a change in the light indication on the device control panel.

Preliminary Computer Settings or Laptop
Configuring the TP-LINK router is possible only when the computer is ready to get the automatically desired IP address that provides a wireless device. Therefore, if the Windows system is configured by DHCP, then this item is worth skipping. The rest will have to produce small settings. To do this, find "Network Management" and select the "Change Adapter Settings" item. Press alternative mouse button on the active adapter and select the item "Properties". In the window that appears, find the "TCT / IPv4" string, put the cursor on it and select "Properties". If the strings of the opening windows continue to contain numbers, they need everything to rewrite them to a sheet of paper, including the names of the rows. After that, select the parameter in front of the "... automatically" fields. Save and exit settings.
Communication of two devices
According to the instructions supplied with the TP-LINK TL-WR841N router, the setting is carried out in steps:
- The router must be turned on, and the computer is in working condition.
- The provider cable must be connected to the "Internet" jack located on the rear panel of the device. If the provider does not require additional settings, the second right on the control panel will light up on the control panel, signing about the Internet accessibility.
- Patch cord is inserted with one end to the computer's network adapter, and the second is in any LAN port of the router. A green indicator appears on the control panel of the device, and the computer is connected to the network. If the provider does not limit Internet access, it will immediately be available on the user's computer.

First step in setting
Opening any browser on the computer, you must register an IP router without quotes "192.168.0.1" in the address bar. If the browser issued an error, it is necessary to register another address without quotes "192.168.1.1". Confusion in addresses is pond due to different firmware. Configuring the TP-LINK router begins with the appearance of the authorization menu, in which you want to enter a password and login. Oddly enough, they are identical - "admin". The result of the correct data entry will be opening the control menu of the Wireless Access Point. Not only system administrators, but many users recommend switching to the "Utilities / System Tools" menu - "Password / Password", located on the left panel of the control window, and change authorization data. Entering in the first two lines "admin", indicate in the third new login, and in the fourth and fifth - a new password. To enter, it is recommended to use English letters. Digital input is not prohibited.
Pressing the settings of the provider
If the Internet appears on the computer when connecting the router, then this item can be skipped, otherwise the provider provides services on your own protocol, and therefore it requires a fine configuration of the TP-LINK router. To do this, go to the "Fast Setup / Quick Setup" section, and following the data requests, make information recorded early to the leaf. In addition to this data, you must specify the connection type that only the administrator of the company providing the Internet services will be prompted. Very often, when drawing up a contract with the provider, the document is provided with information on connecting to the service. Also, all users are worth visiting the official website of their provider and see the "Equipment Settings" section. Many suppliers offer downloadable firmware with prescribed settings for different routers. Perhaps the provider there is a firmware for TP-LINK TL-WR841N. In any case, if there are some difficulties with the setting, it is better to contact a specialist. No one prohibits playing with the settings itself, because the router always can be reset to factory parameters.

Alternative control of the router
Many users will like the ability to control the wireless access point using a special shell Easy Setup Assistant, which can be downloaded from the manufacturer's official website. It will be needed to configure the TP-LINK TL-WR841N router driver under Windows, which is also offered for download. It will not hurt to get acquainted with the presence of fresh firmware under the device that can be installed. And for the firmware you need and step-by-step instructions, which is also present on the official website.
Reading about TP-LINK TL-WR841N Customer Reviews, you can detect a large negative to the developer on alternative control by the router using an assistant. Compared to the Web interface that allows you to get quick access to any configuration, the shell has limited capabilities in the form of an assistant and does not give the user to make its own data. Yes, and the assistant works only under Windows, which limits its abilities.
Wi-Fi Setup
Wireless network in the TP-LINK TL-WR841N router is configured - one pleasure. The menu is so comfortable and informative that the user should have problems:
- The SSID field proposes to enter the name of the network in Latin letters, which will be detected when searching for Wi-Fi.
- In the "Channel" field, you need to leave "Auto", "11 BGN Mixed" mode, and the maximum transfer rate can be set to a maximum.
- The authorization method is better to install universal - "WPA-PSK / WPA2-PSK", and encryption to set "AES". Such a choice will allow you to set a password consisting of numbers and letters of non-fixed length (from 8 to 64 characters).

In addition to the standard wireless network settings and LAN ports, the TP-LINK TL-WR841N router can boast a lot of useful features that will be interesting to advanced users.
- The demilitarized zone "DMZ" allows not only to prohibit access from the Internet to servers located on the user's local network, but also limit the computer of the child than and enjoy the constantly many parents.
- Very simple IPTV configuration will allow you to create a connection in a few minutes and enjoy watching movies in high quality transmitted through the provider's network.
- There is a menu to configure WPS. You can install a simple password, not like on Wi-Fi, and give it to friends wishing to use the Internet service, being visiting. Naturally, you need to press the "WPS" button to connect.
- When configuring Wi-Fi, you can determine the priority of transmitting streaming video "WMM", which will allow you to give the channel resources to view the film if it is engaged in torrent, for example.

Finally
Most about TP-LINK TL-WR841N customer reviews are positive. They mark a large set of functions, which is very often unsuppressed. The users did not leave a reliable and well ventilated design, the presence of an antenna amplifier, the convenience of control and ease of setting. The disadvantages include failures in when the torrent injection. disappears for a few seconds, and then smoothly rises. Many users recommend installing the download speed limit in half, and the problem will be solved forever. In general, the TP-LINK TL-WR841N router for 1000 rubles is more simply impossible to desire.
Now we will talk about configuring Wi-Fi router TP-LINK TL-WR841N. If you have a series TL-WR841N., then this article will be suitable for you. Consider in this article Connecting the router, configuring the Internet Wi-Fi, as well as show you how to change the password to a more difficult password for your network to be unauthorized user.
A few words about this model. This is the most successful TP-LINK model at a ratio quality price. For an undemanding user, the best router is nowhere to find and it works by the way very stable.
Connecting router

Connect the power adapter to the router and turn it into the outlet. If the lamps do not burn, turn it on through the button that is on the back side.
To blue ( Wan.) Connect the network cable of your Internet provider. If you are going to adjust the router through the wire, connect the cable one end to Lan. Port in any of the 4 connectors. Who is interested in a separate article as.  Another end to a computer or laptop into a network card connector.
Setting the router via Wi-Fi
If you want to configure the router via Wi-Fi, you can connect via a wireless connection that will appear after you turn on the router TP-LINK TL-WR841N.
In addition, you can connect via a tablet or phone and make setting without a PC.
Included with the router also includes a disk there is a utility for setting the router, but we will make a setting through the Web interface.
The Internet must be connected to the router, your PC, smartphone or tablet should also be connected via cable or Wi-Fi. If you do everything, it should be relying in the TP-LINK settings pane.
Customize TP-LINK TL-WR841N
 So, we open on our PC which is connected to TL-WR841N any browser and drive into the search string 192.168.1.1
or 192.168.0.1
. You will find a window where you will request a username and password of the user drive the standard data login and password admin..
So, we open on our PC which is connected to TL-WR841N any browser and drive into the search string 192.168.1.1
or 192.168.0.1
. You will find a window where you will request a username and password of the user drive the standard data login and password admin..  There are cases when the settings panel at the address 192.168.1.1
, or 192.168.0.1
does not open: still such a problem may happen when password admin. Not suitable. In this case, try reset all settings. From the back there must be a button Reset., put on it with something sharp, your router will reboot and return to the factory settings and try to adjust it again. In this case, we have prepared another article:
There are cases when the settings panel at the address 192.168.1.1
, or 192.168.0.1
does not open: still such a problem may happen when password admin. Not suitable. In this case, try reset all settings. From the back there must be a button Reset., put on it with something sharp, your router will reboot and return to the factory settings and try to adjust it again. In this case, we have prepared another article: Setup (WAN) internet
 Most importantly, set up a router so that he worked with your provider. If you do not do this, then the Internet through your router will not work.
 In the settings panel go to the tab Net-Wan. Next, select the connection type depending on which your provider uses if it uses ( dynamic IP.), You do not need to set any parameters just click "Save".
What if you have one of PPPOE, L2TP, and PPTP
 If you have one of the above connection types, you choose the necessary and prescribe the necessary parameters that your provider will tell you, then click "Save".
 The main thing is what you need to achieve in this window so that everything has earned, if everything happens we click to save. If there are difficulties at this stage, call your Internet provider and find out all the items to configure the router.
Configure the network and install the password on Wi-Fi
 We go into the tab Wireless mode - Setting up wireless mode in the window " Name Name"Enter the name of the network that you yourself will think of," Region"Where you live and click" Save ". Put the remaining settings as in the screenshot.
  In order for extraneous users to connect to you, you will need to open the Wireless Mode tab - Protection of the Wireless Mode and select the type of protected mode WPA-PSK / WPA2-PSK (recommended).
In field Password PSK. Come up and write down some kind of complex password that will protect your network from intruders, and save the settings.
Replacing the password admin to protect the personal office TP-LINK TL-WR841N
 So we almost configured our router remains to protect your personal account of the router from strangers so that no one can change the settings that you did.
 We go into the tab System tools - Password We enter the old login and password first, then come up with a new one and click "Save".
 That's all the setup is complete, after that reboot TP-LINK TL-WR841N by OTB / ON either from the settings panel.
 Causes of why Flash Player does not work, and troubleshooting
 The laptop itself turns off, what to do?
 HP Pavilion DV6: Characteristics and Reviews
 Format representation of a floating point numbers How negative numbers are stored in the computer's memory
 Computer fries and does not turn on what to do?
 Why does not work mouse on a laptop or mouse?
 How to increase or decrease the scale of the page (font) in classmates?