As "iPhone" connect to the TV "Samsung": learn to display video from the iPhone on TV. Like "iPhone" Connect to the Samsung TV: Learning to display video from iPhone on TV program for connecting samsung TV
Not rare After purchasing a TV with SmartTV, users are interested in how to connect the TV to a computer via WiFi. If you also have a similar problem, this article should help you.
Step number 1. Open the TV settings.
Usually connecting the TV to the Internet via WiFi is performed through the settings. Press on the "Settings" button on your remote control and go to the Settings section "Network Connection". It should be noted that in different models of TVs, this section of the settings may be called differently. For example, "Connection via Wi-Fi" or simply "Wi-Fi".
Step number 2. Connect to the WiFi network.
The next step is to connect to your home WiFi network. This process is not much different from connecting to a WiFi network on a computer or smartphone. In my case, the TV connection to WiFi begins with clicking on the "Configure Connection" button.
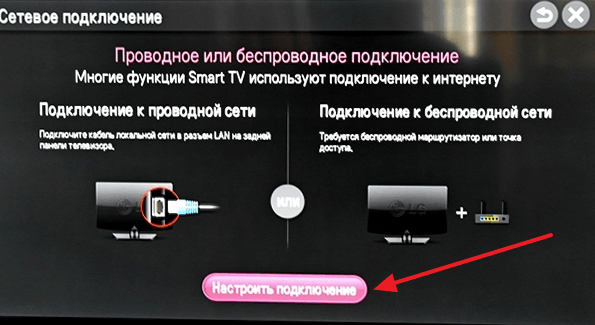
After that, a list of available wifi networks appears on the screen. Here you just need to choose the WiFay network of your router. In most cases, it will be the first in the list.

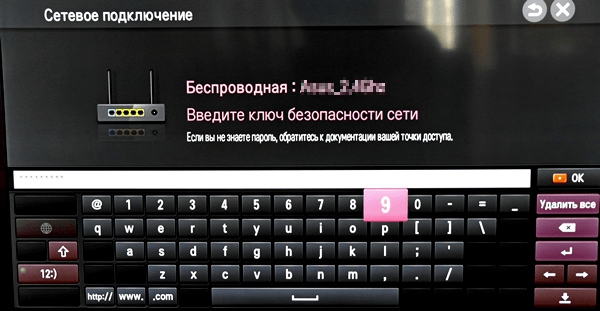
The next stage is the most important. You need to enter a password from the WiFi network. Try to enter the password as closely as possible. Since they are mistaken, when entering the password using the remote control, it is very easy.
If you entered the correct password, the TV will connect to WiFi and you will see a message that the network is connected.
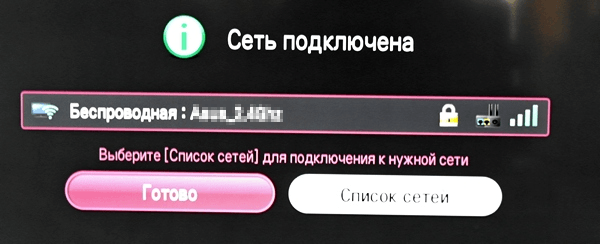
In order to verify that the WiFi connection works as it should, go to SmartTV and open the browser. Check if page is loaded. If you wish, you can measure the connection speed to the Internet.
Step # 3. Customize the DLNA server on the computer.
In order to watch the video from the computer on the TV you need to use the DLNA server. DLNA is a technology designed to transmit media content from one device to another using a local network. Now this technology is supported by almost all modern TVs.
First you need to choose and run the DLNA server on the computer. To do this, you can use the free program "Home Media Server" (). Install this program to your computer, run and go to the settings. Here in the "Media Resources" section you need to click on the "Add" button and select the folder whose access you want to get on the TV.

Next you need to set up parental control. To do this, select the folder that you just added to the program, and click on the "Change" button. In the window that appears in the Parental Control unit, you need to select green for the desired content type.

After that, close all windows by pressing the "OK" button to save the settings.
Step # 4. Connect the TV to the DLNA server.
The final step of connecting the TV to the computer via WiFi is the connection of the TV to the DLNA server. In order to find out how it is done for your TV model, see the instructions.
For example, we will demonstrate how this is done on LG TVs. First you need to click on the "SmartTV" button on the remote control and go to the "SmartShare" section.

After that, you need to go to the "Connected Device" tab and select a DLNA server that is run on the computer.

After that, in the folders "Latest", "Video", "Photos" and "Music" files will appear from the folder you need on the computer. On this, the TV connection to the computer via Wi-Fi can be considered completed.
All television screens are limited by the number of pixels. At the simplest TV, the screen has a resolution in 1920x215; 768 pixels, and more expensive - 1920x215; 1080 pixels. Almost all modern models are converted under their number of pixels a low reception signal. The same feature can also be done through special programs.
Instruction
You will need
- - a computer;
- - USB cable for connecting the PDA;
- - Bluetooth adapter (in case you are convenient to use the wireless connection of devices);
- - ActiveSync latest version.
Instruction
05/30/2019 at 18:27 (1 month ago)
Hello, tell me, please, if not difficult
Bought a couple of days ago, the 50UK6410, the network from the router (D-Link DIR-300) on the PC goes through the cable, on TV via Wi-Fi (TV is behind the carrier wall from the computer and router). The computer also installed the TL-WN751ND network adapter (via PCI). First, I tried to use Display Share, 4k the film with a volume of about 60 GB was reproduced normally, with the exception of some inadequate sound lagging, for sensations per second, which was then half removed by digging in the sound settings and the inclusion of the "BYPASS" function, but still a gentle lag It remains and caused discomfort. Then I decided to configure the DLNA, and here it is already all sad, the lag of the sound seems to be like, but it is impossible to look, constantly loads.
Through the external HDD, everything wonderfully started.
Help to understand which equipment is used when using these functions: computer network adapter or router? And whether their change will help (they are ancient) in solving the problem? Is someone reproduces 4K movies via Display Share via Wi-Fi without a sound delay? And what is the real speed of this so-called "LAN network" needed for playback without freeing whether it is equal to the division of the film on its timing, that is, for a film with a volume of 60 GB for 2 hours 60 * 1024 * 8 / (2 * 60 * 60 ) \u003d 68 Mbps
The problem with the audio delay through Display Share was observed even when broadcasting a stream with Twitch in FullHD, although it was not the same from the phone in 2 meters from the delay TV.
Thank you
05/30/2019 at 19:46 (1 month ago)
Hello. Heavy films are better to look with USB drives. Ensure that such films through some particular equipment will be played without loading and the audio delay I can not. It's all very individual. Up to how well your TV is catches a Wi-Fi network, which signal level. This strongly depends the connection speed.
As for your equipment. Computer All the same on the cable connected, or on Wi-Fi through TL-WN751ND? Or so and so everything is buggy? Router D-Link DIR-300, of course, very weak for such tasks. We need a more productive, gigabit, (with the speed of WAN / LAN ports up to 1 Gbit / s. At D-Link DIR-300 to 100 Mbit / s) with support for the 5 GHz band. Well, if the PC is connected via Wi-Fi, then it takes a Wi-Fi adapter with support for the 5 GHz band. TL-WN751ND is very weak, it has a maximum speed of up to 150 Mbps. If on the cable, then the computer should have a gigabit network card (maybe there is also installed if the computer is not very ancient).
TV LG 50UK6410 supports Wi-Fi in the 5 GHz band and 802.11ac standard. If the TV and PC connect to the router in the 5 GHz range (according to 802.11ac), then the speed will be much higher. Well, or PC on the cable through a gigabit card.
Only, whether there will be a stable Wi-Fi coating network in the 5 GHz range near the TV - this is a question. Since the coating in this range is usually slightly weaker compared to 2.4 GHz. It is already needed to look at the site. Much depends on the distance and walls (thickness, material).
You can connect all sorts of devices that significantly expand its functions. One of these devices is the phone. The current models are stuffed with a huge arsenal of programs that are "sharpened" to synchronize with TV. Multimedia Interfaces, Playgrounds, Internet Surfing, Online Communication: All this turns your TV to the home entertainment center. Experts give their recommendations on how to connect the phone to the TV via USB cable or wireless Wi-Fi adapter. Whether it is an old smartphone or a new iPhone 7 plus, there is always a simple and convenient way to connect it with a good larger screen. Absolutely all models will be able to reproduce the desired video.
Wi-Fi Wireless Connection
This is the most common way to synchronize a telephone with a TV. It is simple, convenient and does not require any in-depth knowledge. Absolutely each smartphone has Wi-Fi support, but in the TV, this module is only in modern models. Although it is possible to connect an external wireless adapter to outdated TV instances. If you are the owner of TV with Wi-Fi support, then connecting the phone to it without any cords, you will windowate in the wonderful world of the Internet and all sorts of applications on the big screen.
Connection via Wi-Fi Direct

For such a connection, it is necessary that the Wi-Fi Direct technology is present on the phone and TV. If you consider smartphones, you can find this feature in the settings in the "Wireless Connections and Network" tab. By clicking on the Wi-Fi Direct option, the device will ask to confirm its inclusion that actually needs to be done.
Tip! According to the same technology carried out. The whole process almost does not change!
Now you need to enable the same feature on the TV. Using the remote control, log in to the settings menu, select "Network", and in the window that opens, click on the Wi-Fi Direct string. After confirming the inclusion of the TV option, the TV will start searching for available devices in the wireless network area where your phone must decide. By selecting the device found, confirm the connection by clicking the "OK" button. After that, the phone will also ask to confirm the synchronization with the corresponding action. When both devices contact each other, you can view the entire content stored on the phone (photos, videos, documents, audio recordings) on the big screen.
Consider this procedure on the example of Sony BRAVIA:
- The undoubted advantage of such a method is its versatility. Wi-Fi Direct technology support multiple devices regardless of the price category and manufacturer's company.
Miracast technology technology

A fairly simple way to connect a smartphone to a TV via Wi-Fi, but only under one condition - both devices must support this technology. In fact, this function simply duplicates everything that happens on the phone screen and displays the image on the LED screen. Connection occurs directly, without the participation of Wi-Fi router, but if the TV is connected to the home network, then it is necessary to enable Wi-Fi Direct mode on it.
Not all manufacturers equally call the Miracast function, thus on different devices the following names:
- Chinese telephone models - wireless projector, wireless monitor, Wireless Display, Screen Mirroring;
- Smartphones of LG - Screenshare;
- Samsung - Allshare Cast;
- All phones on the Windows Phone platform - Project My Screen;
- Apple smartphones - AirPlay utility.
On the video told in more detail:
It would seem that such a connection is the perfect option for the full use of the TV screen as a desktop of the phone, but there is one significant drawback, and it consists in the fact that the quality of the picture is significantly lost while broadcasting media files. This nuance can be circumvented, since when playing content from a smartphone, there is a button in one of the corners of the screen, a marked HQ. By clicking on it, the image will improve, because the smartphone will switch to transmission transmission through DLNA technology (this feature does not work when using a web browser and games).
Wired USB connection

Perhaps the easiest way to "deal" devices among themselves. To find out how to connect the phone to the TV via USB cable, you need to prepare only one thing - your USB cord (preferably the one that walked with a gadget). In this way, almost any phone with internal memory can be combined. It will be about modern smartphones on any operating system. So, insert the cable into the corresponding connector on the TV, and connect it to the phone. In the TV settings, with the remote control, select the signal mode from USB, and on the phone confirm the device transition to the external drive state. Everything, now you can play all media files from your phone on your TV screen.
- The disadvantage of such a connection is the lack of using a browser, games and utilities.
Connection using HDMI cable

In principle, the entire process of connecting devices between themselves is similar to usb synchronization, but some differences are still available. First of all, you must make sure that the HDMI and Mini-HDMI ports are present on the TV and the smartphone, respectively. Now you will need to be connected to the connectors described above. If such a cord is already available, then the task is more simplified. After these manipulations, you need to turn on the HDMI mode on the TV (if there are several of these inputs, then you need to select the one in which the connection was made), a window appears on the phone to the device transition to the external drive mode to be confirmed.
The main advantage over other synchronization methods, HDMI gives the maximum image quality and audio stream, and also provides high multimedia data transmission speeds. Before connecting the phone to the TV via HDMI cable, it is necessary to consider the absence of charge. For this reason, you will have to additionally throw the charger.
Tip! If there is no special output for such a connection on your phone, you can use the Mini-USB Mini-HDMI adapter, the transmission quality will not change.
MHL and Slimport.

This type of connection requires a special connector from phones, and the TV will suit anyone that has an HDMI input. Most of the popular phone models are deprived of this kind of connectors, but still some manufacturers provide their children with such raisins. These include Samsung, Sony, LG and Nexus.
Differences between MHL and Slimport:
- MHL technology. The cable of this type has two types of connectors - eleven and five channels, and the first are preferable only for Samsung phones. MHL cables need an additional power supply, which is performed using a power supply connected via USB. This technology is able to broadcast a picture as up to 1080p (concerns modifications with version 2.0 interface). In the new Sony Xperia and Tablet models, a version 3.0 is implemented, capable of reproducing 4k quality;
- SlimPort technology. The main difference from MHL is freedom from an additional power source. The quality of the transmitted picture remains the same, but in the presence of a high-quality cable;
Pay attention to the final video clip:
Output
Now you know how to connect the phone to the TV via HDMI (USB) cable or wireless Wi-Fi adapter and you can choose a suitable way. Analyze each of them, compare with the capabilities of your TV and the phone to determine the optimal connection option. Remember, the quality relationship between connected devices can only be achieved when using original components. Good luck!
Hello everyone! After an almost two-week pause, I continue to an interesting and very laborious process of writing useful articles in the blog. Of course, I would like to more often please you with the release of a new material. But alas, it does not always work as we want it. But the main thing is not to give up, as they say, through thorn to the stars.
And today we will talk about how you can tie together the phone or tablet and smart TV Samsung. In fact, there are many different programs for this purpose, but we will only touch on one thing: small, downtime and comfortable.
So, meet - app AllShare for android devices. I will say right away that it works only on Samsung devices and immediately preinstalled into the system.
At the moment, AllShare is used on older versions of gadgets, since a new application is already used on modern smartphones and tablets. SAMSUNG LINK.. In our case, this does not change anything, unless different logos are:
From innovations in Samsung Link, you can only mark the ability to store files in "cloud" services, such as Dropbox. and Onedrive. But now we will not talk about it, because this topic will be a separate article. So that .
So, go directly to the study and configuration of the AllShare application for Android. Let's answer the main question - why is it at all and what can be useful for us? In fact, everything is simple, like a white day.
With it, you can watch multimedia files that are stored on your phone, right on the TV screen. With this process, this does not require any special settings and inconsimated actions.
You only need to touch the screen of your smartphone, or the tablet and everything is ready. If you do not believe the author of the article, watch the video:
Well, I propose to go to practice. The author of the article will be shown on the example of its modest, battal life and phone timeSAMSUNG GALAXY ACE (GT-S5830i):
As mentioned above, it is not necessary to install anything, the program is installed in the device initially, from the factory. I think this is a very convenient point for the user.
By the way, it is worth mentioning the moment that for the entire system to work properly, it is necessary that your TV and telephone (tablet) are connected to one local network. How to do it, described in detail and.
Now we run the application itself, it opens this uncomplicated window:
Here, as you can see, everything is very simple. You are offered only two options:
For the second option, it is necessary that the computer is installed on the computer. This is a program that performs the function of combining all Samsung's home devices to one network.
But now we are interested in exactly the first option. Therefore, if you want, you can click on the "Settings" button and see what's what:
As you can see, here it is also very simple, only a couple of points is available. There is nothing to comment on, so everything is clear. Go ahead.
Click on "Play file on another player" and select the desired content type:
As you can see, there was only one video roller. We put a tick opposite it and click the "Add to List" button.
In the next window, select the device where you want to display the selected file. In our case, this is a SAMSUNG UE40ES6100 TV:
If your device selection field is empty, click on the "Update" button to re-search.
That's all right. Now click on the play button and the video will start broadcast on TV:
As you can see, rewind and pause functions are available. The playback time is also displayed, there is the ability to adjust the sound level, etc.
While we dealt with the control, the file has already started playing on the TV:
By the way, this is my son Vladik, who will soon be nine months and whom I love very much. So get to know. 🙂
When you first start, it is possible that the TV will give a message about permission to access it, respond to the affirmative. Well, we looked at a way to start viewing files on a TV from the phone using the AllShare application for Android.
And now I will show you another way. But this time, the contents of the smartphone will already be viewed directly from the TV.
To do this, launch the Smart Hub menu and select Allshare Widget (Samsung Link):
In the menu discovered, we find our smartphone, or a tablet and click on it:
Well, on this article comes to completion. Let's sum up. What can generally say about the application AllShare for android.
I think that it copes perfectly with its main thing, and perhaps the only function - view files from the phone, or a computer on the TV.
Perhaps someone will say that the program is the rest of the functions and will be right. But are they needed for a beginner or an inexperienced user who is hard to make the first steps in configuring their home media network? I think it is unlikely.
The only minus that can be noted is that this application only works on Samsung devices. Naturally, this fact significantly narrows the range of users. But this is already a marketing policy that us, simple mortals, is not subject to us.
 Causes of why Flash Player does not work, and troubleshooting
 The laptop itself turns off, what to do?
 HP Pavilion DV6: Characteristics and Reviews
 Format representation of a floating point numbers How negative numbers are stored in the computer's memory
 Computer fries and does not turn on what to do?
 Why does not work mouse on a laptop or mouse?
 How to increase or decrease the scale of the page (font) in classmates?