The webcam in VKontakte does not work. Why is the webcam not working on my computer? Causes and Troubleshooting. When there is no disk
Not so long ago I wrote an article on how to call . And having learned that the administration of the VKontakte site also “fastened” such a function to my site, I decided to figure it out and explain to you, how to call vkontakte.
I want to say that I only tested the conversational option. The project at the time of this writing is in alpha testing, which means that you may have great difficulties in communicating. However, I managed to call and talk to my friend.
So, let's begin. To call, we need a VKontakte account. The next step is to update adobe flash player. How to do this, we wrote in the article.
And so after the above operations, we can finally try to call. To do this, go to the page to the person with whom we want to contact.

We are interested in the send message button under the photo. Recently, a button with a webcam image flaunts next to it, when you click on it, a window pops up in which we need to make some settings. (If you read a similar article about classmates, then you can handle it yourself)
We carry out the settings as shown in the figure below.

Click Allow and remember, and then close.
After all the settings, you should start connecting with the interlocutor. If it goes well, then you will hear, and maybe even see each other. The conversation window is very similar to the video view window. It displays, in the middle of the video or photo of the interlocutor, and at the bottom: the off button. microphone, incl. on or off video, volume control, and on the right side expand to full page.
And now I want to show how the window will look like if you get a call.

View of the "You are being called" window
It displays a photo, as well as two buttons to answer or reject. Click answer and enjoy!
That's all with you was nik-tut.
Ask questions in the comments.
Now I will teach you how to take photos from a webcam to publish them on Vkontakte.
What do we need
A computer with a connected webcam, or a laptop. Almost every model has a built-in camera. After that, all that remains is to go to the social network, and you can get to work.
How to take a photo from a Vkontakte webcam
Let's look at two options - they are very similar.
Update profile photo
Go to your page and hover over your profile picture. An additional menu will appear. In it, select the item "Update Photo".

You may be asked to manually launch Adobe Flash Player - do it.

Now you need to enable access to the camera. To do this, put the switch in the "Allow" item, and close the pop-up window.

We catch a suitable angle and press the button "To take a photo". The photo will be created. If it suits you, click "Save and Continue". If not, the Remove Snapshot button . And we do it again.

Now, from the final image, select the area that we want to use for the avatar (see). Select the desired area, then click "Save and Continue".

In the next step, we do the same for the thumbnail. When finished, click on the button "Save Changes".

A photo from the webcam will be taken and placed in the album "Photos from my page".
We take a picture from the webcam and send it in a message
Open a dialog with the desired user (see). Hover over the paperclip icon at the bottom of the screen. Select "Photo" from the drop-down menu.

In one of my previous articles, I wrote about a very useful feature in Odnoklassniki - video call. It allows you to call and chat with friends and acquaintances directly on your favorite social network, without having to install any programs on your computer or laptop, like Skype.
However, some users have encountered a problem when The webcam does not work in Odnoklassniki. Let's look at the possible reasons why the webcam does not turn on.
Why the camera does not work in Odnoklassniki
The main reason why the webcam in Odnoklassniki does not work is a problem with the Flash player. Either it is not installed, or the version is outdated, or you did not give permission to access the webcam and microphone when making a video call.
How to set up a webcam in Odnoklassniki
First of all, download and install Adobe Flash Player on your computer from the link:
https://get.adobe.com/flashplayer/?loc=en
After installing the Flash player, you can go to Odnoklassniki and try to call someone. Check if the webcam is turned on now or not.
If this is your first video call, 2 windows will appear just before the call (as shown below). Do all the same settings and the camera will work.

If the camera does not work not only in Odnoklassniki, but in other video communication programs, then most likely the fact is that there are no drivers for the web camera. You need to go to the website of the manufacturer of your computer or laptop and download the drivers there.
Reading time: 34 min
The webcam has become very popular due to its affordability and ease of use, but like any popular thing, it can have difficulties, the main of which is the failure of the hardware itself or, more likely, a software failure.
In fact, the equipment has any defects or breaks much less often than the drivers fail. In this regard, you first of all should do all the possible methods for solving system failures provided in the article.
The webcam is an integral part of laptops, netbooks and other gadgets of this type, so first of all, especially if you have an old computer, check if you have the camera turned on at all. It is not uncommon that the image capture device is locked, to activate it, you should press the appropriate button, if there is one, or the key combination Fn + F1-12, the required number varies depending on your computer.
Before you start solving the problem, you should analyze if you know what caused the non-working webcam, usually: you updated the drivers for it, installed or updated Windows to a newer version, there may have been mechanical damage. After that, you can start taking actions based on the information received.
Driver health diagnostics
Usually, driver failure is the most common problem, as an error can be created after any updates or even out of the blue. Here, first of all, especially if the situation arose for no apparent reason, simply restart the computer and webcam. Despite its simplicity, the method works and saved many users from lengthy diagnostic manipulations.
After that, if the reboot did not help, you should run diagnostics in the "Device Manager" - this is exactly the place where you can solve most of the problems with the equipment.
1. Go to the "Control Panel" for this, open the "Start" menu and find the item you need;
2.Now you need to go to the "System and Security" category;


First of all, you should search for your camera in the special section "Image Processing Devices". If it is not there, pay attention to whether you have unknown devices. You may find that it is not in any of the options, then click on the "View" tab and check the "Show hidden devices" box.

You can try, regardless of the result of the previous diagnostics, click on the “Action” tab and click on the “Update hardware configuration” option, after updating the problem may be solved.
Driver recovery
Now let's take a look at the problems in turn, if you have a webcam displayed in the corresponding menu, you should check if there is an "Enable" button in your webcam, if not, then:
1.Double click your device;

2.Go to the "Driver" tab;
3. Pay attention to whether the "Rollback" button is active, if so, then you can use it;

4.Click on the "Update" button and check if the necessary drivers exist, for example, in the webcam's memory.
In the event that you are unable to use the previous step, due to the designation of the camera as unidentified equipment, you should go to the website of the manufacturer of the laptop or the camera itself and download the necessary application. It is preferable to use the drivers that you can find on the website of the manufacturer of your computer, because sometimes, special programs or modified drivers are required for the camera to work. Also, some manufacturers, such as Lenovo, may require the Lenovo Settings app, go to the Camera tab and turn off Privacy Mode.
Before installation, it is better to remove the old version of the application from the computer; this is also done from the Driver tab in the Device Manager.
Restoring driver compatibility
Quite often, the driver of the webcam itself becomes outdated, as new versions of Windows are released and, therefore, there is no compatibility with these systems. In this case, you should use the website of the camera manufacturer, but it happens that there are simply no new drivers. Then the tool "Run programs designed for previous versions of Windows" can help you:
1.Open the search box, on the start menu bar;
2. Find the desired application by name, you can enter the word of the previous ones;

3.Run the function, preferably with administrator rights;
4. After a while, you will be presented with a list, find the desired element in it or use the "Not in the list" item and specify the path manually;
5.Select the option "Diagnostics of the program", and then specify the version of the system with which you want to be compatible.
There is a possibility, if you do not have a built-in webcam, that the USB port is not working, try changing it to another one. Visually check the integrity of the webcam and its cable, as there may be mechanical damage.
If you still have questions on the topic "Webcam does not work in Windows 7,8,10, how to solve the problem?", You can ask them in the comments
Today, the webcam is used by owners of personal computers and laptops for various purposes. However, it happens that the device unexpectedly fails and requires a speedy repair. In this article, we will tell you about methods for diagnosing and restoring the stable operation of the webcam.
It is worth mentioning that separately connected and built-in video equipment are initially varieties of the same device. At the same time, if in the first case it can be a matter of mechanical damage, then in the second case, the breakdown is more of a systemic nature.
An integrated webcam that has failed due to mechanical damage cannot be restored.
In addition to the above, there are also such circumstances that the webcam does not work in any specific programs or sites. In this case, most likely, the problem lies in the settings of the software or the Internet browser used.
Method 1: Diagnose system malfunctions
Before moving on to solving problems with video equipment, it is necessary to diagnose the device for operability using various methods. This is due to the fact that if the webcam does not work, for example, in Skype, but stably transmits the picture in other programs, then the problem, accordingly, lies not in the hardware, but in the specific software.
The easiest way to diagnose the camera is the Skype program, which provides not only the ability to make video calls to other people, but also a preview window for the image from the camera. We have considered this functionality of this program in detail in a special article on the site.

webcammax
This software was created to perform several other tasks than Skype, but it is still great for diagnosing a device for performance. Moreover, if the webcam works stably in this program, but does not perform well in other software, you can use the built-in image redirection functionality.
Other software
If for some reason you do not have the opportunity to use the software we have reviewed, we recommend that you familiarize yourself with the review of the most remarkable programs for recording video from a webcam, but ideal for diagnostics.
In addition to the above, you may well be interested in a full-fledged instruction on the topic of recording videos by using a webcam.
Online Services
This diagnostic technique consists in using special online services created to check equipment. At the same time, be aware that for the stable operation of each resource discussed in our instructions, you will need the latest version of Adobe Flash Player and an equally up-to-date Internet browser.
If there are problems with the webcam through these services, you should try to run diagnostics in other browsers.
Method 2: Set up the camera in Skype
Skype today is the main software used by PC and laptop users to communicate via the Internet. It is for these reasons that the correct approach to diagnosing a device and setting up Skype is extremely important, which we described earlier in a special article on the site.
Method 3: Set up the camera in browsers
When using any services on the Internet with webcam support, you may encounter the problem of no video signal. Of course, before studying the recommendations further, it is necessary to check the camera for performance using the previously described means.
- Launching literally any site that supports video and audio, you will be presented with a notification with the option to allow the use of a video device.
- It is not uncommon for users to close the said window by accident, leaving the camera locked by default.
- To provide the site with access to the webcam, click on the icon indicated by us on the right side of the browser address bar.
- Set selection to item "Always allow a site access to your camera and microphone", then click on the button "Ready".
- If necessary, switch the video and audio equipment you are using.
- After turning it on, refresh the page and check the operation of the device.
- If everything was done correctly, then the webcam will work completely stably.
In addition to the instructions above, there may be general web browser problems associated with an outdated version of supporting software or browser components. To bring the program you are using to a stable state, you must do the following.
Now all problems with the webcam on the sites should disappear.
Method 4: Activate the equipment
And although each camera, especially those built into a laptop, is integrated into the system by default, automatically installing the necessary drivers, there are still situations when various kinds of failures occur in the software. If you are faced with the problem of a non-working webcam, first of all you need to check if the operating system sees it.
In general, you can use other special programs like AIDA64 for diagnostics, but only if you wish.
- Right click on "Start" and find "Device Manager".
- As an alternative way to open, you can use the keyboard shortcut Win+R and in the opened window "Run" run the execution of a special command.
- Having opened the window in the list of sections, find the item "Image Processing Devices".
If you are using external video equipment, then you will need to expand another section "Sound, game and video devices".
- In the list of available equipment that appears, find your webcam and double-click on the line with it.
- Go to the tab "General", and if the webcam is turned off, enable it by pressing the button "Turn on".
- The system diagnostic tool will automatically run immediately and notify you of possible reasons for the shutdown. Click on "Further".
- As a result of the actions performed, provided that there are no obstacles, your webcam will be re-engaged.
- Make sure that after following the recommendations in the block "Device Status" there was a corresponding inscription.
In cases where the actions did not bring positive results, it is necessary to check the health of the drivers.
If the button initially had the desired label, then no action is required.
On this, with this technique for solving problems with a webcam, you can finish.
Method 5: Reinstall the drivers
This method is directly related to the previous one and is relevant only in cases where, after fulfilling the prescriptions, positive results have not been achieved. In this case, of course, in general, the camera should be displayed without problems in the Windows Device Manager.
Of course, if the camera has driver requirements, then you need to install them yourself. The corresponding software is usually located on the website of the manufacturer of your device.
To make things easier for you, we have provided articles on installing drivers for each popular webcam manufacturer. If necessary, use a special heading or search on our site.
After installing the updated version of the driver, be sure to restart your computer or laptop and, upon switching on, double-check that the webcam is working.
Method 6: Diagnose mechanical defects
The most common and most difficult problem, due to which the webcam does not work, is a mechanical problem. There are several ways to do this, the vast majority of which boil down to replacing the device.
Conclusion
Concluding the article, it is important to note that if you are using an expensive video device that has unexpectedly failed, but does not have system problems, be sure to seek help from specialists. Otherwise, the camera may be damaged more than it was originally, which will increase the complexity and cost of repairs.


 Donations in the VKontakte group: how to add the VKontakte Donations application
 Align tag content Insert content before the content of the selected object
 Bug fix: cannot modify header information - headers already sent by
 Why voice messages do not work in VK - reasons and what to do?
 Creating a VKontakte group
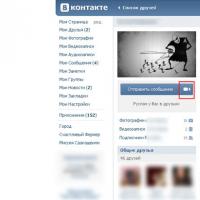 Why is the webcam not working on my computer?
 Why is the webcam not working on a laptop