How to restore windows 7 components. How to fix errors when installing Windows updates using built-in component repair
I haven't written anything for a long time exclusively to Windows 7. The reason for today's entry was the rarest case - Microsoft added a new feature to the old OS retroactively!
Experienced readers will immediately remember how, four years after the release of Windows 7, it became possible to clean up the WinSXS folder. Then some of the DISM functions were transferred from Windows 8+. Two years have passed, and another technology associated with the component store has moved to Windows 7.
Today on the program
Back to printed
From it you will learn:
- basics of the Windows servicing system
- steps to restore components in Windows 8+
- the difference between the old CheckSUR in Windows 7 and built-in recovery in Windows 8+
What's new in Windows 7 :)
Microsoft has published knowledge base article KB2966583 from which you can download the update package. After installing it and rebooting, Windows 7 gets virtually the same ability to restore components as Windows 8+.

As with newer OSes, recovery is implemented using DISM. The following command starts the process of checking the repository and repairing damaged components.
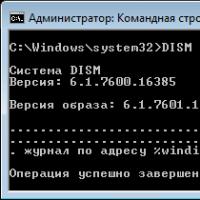
DISM /Online /Cleanup-Image /ScanHealth
However, Windows 7 has a number of features:
- there are no keys here /CheckHealth and /RestoreHealth, and the key does all the work /ScanHealth
- the command can only be executed on a running system, i.e. recovery of disabled images is not implemented
- there was an opportunity to check and restore Internet Explorer components, which was not in the old CheckSUR
The result of the command should be viewed in the log, as before, saved at \Windows\logs\CBS\checksur.log
================================ Checking System Update Readiness. Binary Version 6.1.7601.18489 2015-07-27 12:32 Checking Windows Servicing Packages Checking Package Manifests and Catalogs Checking Package Watchlist Checking Component Watchlist Checking Packages Checking Component Store Summary: Seconds executed: 149 No errors detectedI did not find any damage on the VM, but you can check it for yourself.
The KB article specifically mentions the ability to create a scheduled task to run a command. However, please note that you need administrator rights to run DISM, i.e. the task will not work under a regular account.
Discussion and Poll
If you have questions or comments on the topic of component recovery, feel free to voice them in the discussion. Please don't post the checksur log in the comment text - there is PasteBin .
However, I think that there will be few of them, so I want to turn the discussion into a different plane. There are only a couple of days left before the official release of Windows 10. There are no surprises for insiders and enthusiasts - we have been following the development of the OS for eight months. It is clear that almost all owners of Windows 8.1 will upgrade to Windows 10.
So I'm especially interested in how many people are willing to upgrade to Windows 10 from Windows 7 and earlier.
I already did a Windows 10 upgrade speed survey, but there was no breakdown for your current system, and now we will see it. If Windows 10 IP is your primary current system, please list the one that came before it.
Write in the comments why you will or will not switch to Windows 10! Don't forget to include how long and how you've been using Windows 10 preview.
Having problems with Windows 10 and can't fix it? Corrupted system files and the traditional sfc /scannow command doesn't work? See how to use the DISM feature to fix corrupted system files or restore them from the original system image without reinstalling Windows 10.
As a rule, in case of problems with system files, the SFC utility is used, which scans the hard drive for errors and corrects them. But still, this first aid does not always bring the desired results. Another DISM utility is available on the system, which we briefly mentioned in previous articles, which can fix problems with corrupted files in Windows 10. This time we will look at the full range of DISM functions, describe various use cases and show how to use it to repair corrupted system files from the original system image (component storage).
This feature is for fixing and preparing WIndows images such as the OS boot disk, system recovery tools, etc. Using these images, you can reinstall or restore your system in case of problems. When using the SFC utility to scan and repair a disk, problems with corrupted files are solved only with the help of the corresponding image from the component store on the hard disk. When this image is corrupted, the system cannot retrieve system files from the Component Store and therefore cannot restore them using SFC. It is in this case that the DISM utility will help us, which will solve the problem with recovery images and allow the SFC function to complete its work correctly.
How to use the DISM utility?
Restoring system files through the utility is not difficult. With this application, you can restore components in the same way as using SFC through the command line. To call the command prompt, press the key combination Windows + X and in the menu that appears, select "command prompt (administrator). Then in the console you need to enter the DISM command with the appropriate parameters.
Before the DISM command, we can add additional options with which you can check, scan, and restore images in various ways. Consider the most important combinations.
DISM with CheckHealth parameter
In the command line console, enter the following command:
DISM /Online /Cleanup-Image /CheckHealth
Using this option, you can quickly check the image and individual components of the system installation that are stored on disk for damage. This command does not make any changes - it is completely safe. CheckHealth provides information about the state of the operating system package. This is a very useful option when we want a safe way to check if any system file corruption has occurred in the component store.
DISM with the ScanHealth option
This setting is similar to CheckHealth, but takes a little longer due to a more thorough scan, but also does not fix anything. It should be used when the previous /CheckHealth option informed that everything is in order, but we want to make sure that this is certainly the case. Enter:
DISM /Online /Cleanup-Image /ScanHealth
Scanning may take much longer than with the previous option (approximately 10 minutes). If the scan stops at 20% or 40%, then you need to wait - it may seem that the computer is frozen - but in fact the scan is in progress.
DISM with the RestoreHealth parameter
If the first and second commands uploaded a message that the images are corrupted, it's time to restore them. For this purpose, we use the /RestoreHealth parameter. Enter the following command in the command line console:
DISM /Online /Cleanup-Image /RestoreHealth
The setting uses Windows Update to repair corrupted files in the Component Store. The scan and automatic repair procedure may take approximately 20 minutes (sometimes more). DISM detects a failure, builds a list of corrupted files, and then downloads them from Microsoft servers using Windows Update.
How to restore files from a specified source using the RestoreHealth parameter
Sometimes it happens that damage to the operating system is much wider and affects the Windows Update service. In this case, it will not be possible through the RestoreHealth parameter to repair damage in the image, because the system cannot connect to Microsoft servers. In this situation, you should perform another operation - specify the path to the Windows installer (installer), from which "working" files will be downloaded without using the Internet and the update center.
This requires the Windows 10 installer on DVD, flash drive, or ISO image format. The latter can be downloaded via the Media Creation Tool app for Windows 10.
Download the Windows 10 version (32 or 64 bit), run the application and follow the wizard to download the ISO to your computer. After the image is downloaded and saved, go to the explorer window and double-click on the ISO file with the installer to mount it. In the This PC window, check which letter was assigned to the mounted image (for example, the letter "E").
If you have a bootable DVD or USB drive with a Windows 10 installation, then you don't need to download anything - just insert the disc or connect external media, and see what letter was assigned to this drive in the "This PC" section.
After the drive with the Windows installation is detected by the system and we know the letter, it is time to use the appropriate DISM option, which will indicate the path to this media. To do this, enter the following command:
Dism /Online /Cleanup-Image /RestoreHealth /Source:wim:E:\Sources\install.wim:1 /limitaccess
Once again, note that if in our case, a DVD, flash drive or ISO image is assigned a different letter than "E", then change it in the above command. After pressing Enter, the corrupted component store files will be restored from the original Windows Installer to the specified path.
Fixing bugs in Windows
After you have completed all the above steps, now you need to use the SFC utility again to fix errors on the system from the restored Windows images. Enter in the command line window:
sfc /scannow
Sometimes it may be necessary to scan the system three times in order to completely eliminate all errors. SFC now has access to restored images in the component store and can fully repair corrupted system files.
In anticipation of the release of Windows 8 on sale, Microsoft released a large cumulative update KB2756872, which has never been done before for client operating systems. However, when installing the update, an unpleasant surprise awaited me - error 80073712.
Today I'll show you how to overcome this and a number of other errors when installing Windows updates using the new servicing feature - in-box corruption repair.
This entry opens a series of articles about what's new in Windows maintenance. And no, it has nothing to do with automatic maintenance via the scheduler. First, I will show how I solved the problem with installing the update, and then I will talk about the technology.
Today on the program
Troubleshooting Windows Update Errors Caused by Component Store Corruption
In the help of previous Microsoft OS for the error 80073712 there is a description that suggests that the cause is component store corruption. For Windows Vista and Windows 7, the System Update Readiness Tool (CheckSUR) was released to fix a number of Windows Update errors.
80070002 ERROR_FILE_NOT_FOUND 8007000D ERROR_INVALID_DATA 800F081F CBS_E_SOURCE_MISSING 80073712 ERROR_SXS_COMPONENT_STORE_CORRUPT 800736CC ERROR_SXS_FILE_HASH_MISMATCH 800705B9 ERROR_XML_PARSE_ERROR 80070246 ERROR_ILLEGAL_CHARACTER 8007370D ERROR_SXS_IDENTITY_PARSE_ERROR 8007370B ERROR_SXS_INVALID_IDENTITY_ATTRIBUTE_NAME 8007370A ERROR_SXS_INVALID_IDENTITY_ATTRIBUTE_VALUE 80070057 ERROR_INVALID_PARAMETER 800B0100 TRUST_E_NOSIGNATURE 80092003 CRYPT_E_FILE_ERROR 800B0101 CERT_E_EXPIRED 8007371B ERROR_SXS_TRANSACTION_CLOSURE_INCOMPLETE 80070490 ERROR_NOT_FOUND
To fix these errors in Windows 8 and newer operating systems, the CheckSUR utility is not needed, because everything you need is already built into the system! You can repair corrupted components using the PowerShell cmdlet (recommended method) or the DISM.exe utility.
Upd. 28-Jul-2015. Microsoft has released a special update that brings native component recovery to Windows 7, similar to Windows 8+.
Stage 1 - Recovering a Corrupted Component Store
Recovery can be performed without a Windows installation disc, but in some cases you may need it.
Recovery without an installation disc
In this case, the storage files on the local drive and Windows Update are used.
The state of the component store is indicated by the parameter Image Health State. Him Healthy means that everything is fine with the component store. For further diagnostics, go to checking the integrity of system files just below ↓ If the storage corruption is not fixed, you need to try to do it using the installation disk.
Recovery using the installation disc
When the system fails to repair any components, the original installation disc can help you.
- Right click on the ISO image and select from the menu To plug. Pay attention to the drive letter that the mounted image got.
- In PowerShell, run the command: Repair-WindowsImage -Online -RestoreHealth -Source:WIM:E:\sources\install.wim:1
Here, "E" corresponds to the letter of the mounted image, and "1" corresponds to the edition index in the image (the example uses a Windows 8 Enterprise image with a single edition).
- At the end of the procedure, make sure that the component store is in order (Healthy).
Stage 2 - checking the integrity of system files
Strictly speaking, this step has nothing to do with restoring components. However, Microsoft technical support recommends that after checking the integrity of the component store, you also check the integrity of system files. To do this, at the command prompt, run as administrator, run the command:
Sfc /scannow
One of my files got corrupted and SFC repaired it successfully.
Cases where the system failed to recover any files are beyond the scope of this article (I'll cover them another time).
Stage 3 - Installing the update
So, two commands restored the integrity of the component store and system files. It's time to try installing the update again.
As you can see, this time everything worked for me!
What is Windows maintenance and why is it needed
Benefits of Built-in Windows Component Recovery
Let's compare the key points of component recovery in different operating systems.
Windows Vista and Windows 7
Purpose of verification (working system and images)
The target of the scan can be either an installed system or an image in WIM or VHD format.
Checks a running system.
Checks the mounted offline image at the path specified after the parameter.
Checking and restoring storage
The Repair-WindowsImage cmdlet provides three parameters that perform storage validation to determine the status and restore components. The result of the scan may be:
- no damage (Healthy)
- the presence of damage that can be repaired (Repairable)
- the presence of damage that cannot be repaired (Not repairable)
However, the parameter functions are different.
-CheckHealth
Instantly checks if a corruption marker is present in the system registry. This token may appear during the operation of the maintenance system.
-ScanHealth
Checks storage for damage. This operation takes more time than a simple token check.
-RestoreHealth
Checks the vault for corruption and repairs it. This operation is the longest of the three.
Source of recovery components
To restore components, they need to be taken from somewhere. When the source not specified, the check automatically uses the local component store and Windows Update.
This point is not documented anywhere, and you should understand that when checking an offline Windows image from a different edition or version of Windows, the source must be specified.
In both cases, you can specify more than one source and even block Windows Update from doing so. The options below are for recovery only and therefore only valid in conjunction with -RestoreHealth.
As a source, you can use the path to:
- a running system that can be accessed over the network
- standalone image, and its preliminary connection is optional
Here, it is interesting to be able to specify the path directly to the publication in the WIM image without first copying it to a local disk and then connecting it. It is secret knowledge, not yet documented ;) This works thanks to the WIM auto-mount feature implemented in the last stages of development of Windows 8.
You can list multiple paths separated by commas. Additional sources are used only if there were no suitable components in the previous ones.
When a WIM image is used as the source, you must specify the image type and its index:
Source:WIM:E:\sources\install.wim:1
-Limit Access
Blocks access to Windows Update during the scan.
PowerShell command examples
I will give some examples of practical use of the Repair-WindowsImage cmdlet with different targets and sources of verification. You already saw the first two at the beginning of the article.
Restoring a live system storage using local files and Windows Update as a source:
Repair-WindowsImage -Online -RestoreHealth
Restoring a live system storage using Windows Update and a WIM image as sources:
Repair-WindowsImage -Online -RestoreHealth -Source:WIM:E:\sources\install.wim:1
Checking the offline VHD image storage. It first mounts to the C:\mount folder (this is very fast), and then it checks.
Mount-Windowsimage -ImagePath C:\vhd\Win8.vhd -Index 1 -Path C:\mount Repair-WindowsImage -Path C:\mount -ScanHealth
Restoring an offline VHD image storage using a WIM image as a source. First, the VHD is mounted to a folder, then the image is restored, after which the VHD is disconnected and the changes are saved.
Mount-Windowsimage -ImagePath C:\vhd\Win8.vhd -Index 1 -Path C:\mount Repair-WindowsImage -Path C:\mount -RestoreHealth -Source:WIM:E:\sources\install.wim:1 Dismount- WindowsImage -path C:\mount -Save
Results of verification and recovery
In addition to the results in the console, you can find a detailed report near the end of the %WinDir%\Logs\DISM\dism.log file
The first half of the above snippet shows specific components and the result of their recovery (success or failure), and the second half shows a summary of the operation, including the time it took to complete.
Checking System Update Readiness. (p) CSI Manifest Corrupt (Fixed) amd64_microsoft-windows-lpksetup_31bf3856ad364e35_6.2.9200.16384_none_7a23086df63cad13 (p) CSI Manifest Corrupt (Fixed) amd64_microsoft-windows-l..oyment-languagepack_31bf3856ad364e35_6.2.9200.16384_ru-ru_2422e0b40b0ac235 (p) CSI Manifest Corrupt ( Fixed) amd64_microsoft-windows-l..oyment-languagepack_31bf3856ad364e35_6.2.9200.16384_ru-ru_2a982e5d65c9a294 (p) CSI Manifest Corrupt (Fixed) amd64_microsoft-windows-l..oyment-languagepack_31bf3856ad364e35_6.2.9200.16384_ru-ru_53ea2a36610cb913 (p) CSI Manifest Corrupt ( Fixed) amd64_microsoft-windows-l..oyment-languagepack_31bf3856ad364e35_6.2.9200.16384_ru-ru_879ccd7f3842e229 (p) CSI Manifest Corrupt (Fixed) amd64_microsoft-windows-l..oyment-languagepack_31bf3856ad364e35_6.2.9200.16384_ru-ru_8e2bd9e9b9aeac5f (p) CSI Manifest Corrupt ( Fixed) amd64_microsoft-windows-l..oyment-languagepack_31bf3856ad364e35_6.2.9200.16384_c73545896a8993dd Summary: Operation: Detect and Repair Operation result: 0x0 Last Successful Step: Entire operation completes. Total Detected Corruption: 7 CBS Manifest Corruption: 0 CBS Metadata Corruption: 0 CSI Manifest Corruption: 7 CSI Metadata Corruption: 0 CSI Payload Corruption: 0 Total Repaired Corruption: 7 CBS Manifest Repaired: 0 CSI Manifest Repaired: 7 CSI Payload Repaired: 0 CSI Store Metadata refreshed: True Total Operation Time: 221 seconds.
As you can see, I had 7 manifests related to the language pack damaged, which became an obstacle to installing the Windows update. All damage has been repaired.
Of course, this material does not imply immediate practical application, although you can check the status of the Windows component store right now. Moreover, in three years of working in Windows 7, I have never had problems installing updates.
However, Windows Update errors related to storage corruption are not at all uncommon, even if only to judge by the OSZone forum. Therefore, it is important to know how to deal with them.
It seemed to me that part of the blog audience was frankly bored with a series of articles about the modern Windows 8 interface and applications. Of course, everything is primitive there, there are no technical subtleties, and most importantly, some people get the feeling that there is nothing new in Windows 8 besides Modern UI. This is not true…
I had been planning a series of posts about changes in Windows maintenance for a long time, and the problem with installing the update only forced the publication, at the same time forcing me to change the order of the articles in the series.
Did you have enough technical subtleties today? ;)
If not, the next post in this series will not only take you on a journey into the history of Microsoft's OS maintenance tools, but also a unique opportunity to try your hand at being a Windows r-collector! But before that, blog entries on other topics will appear.
This documentation has been archived and is no longer maintained.
Component Store Management
Many Windows users ask the question: "Why is the WinSxS folder so big?" This topic has been discussed on the blogs, but this section provides more information about the principles behind the component store (specifically the WinSxS folder) and then links to topics that describe ways to limit the size of the WinSxS folder.
The short answer is that the size of the WinSxS folder is actually not as large as it might seem at first glance, since Windows binaries located in other places can be taken into account when calculating it.
Windows Component Store and WinSxS Folder
The WinSxS folder is located in the Windows folder, for example: c:\Windows\WinSxS. This is the location for the Windows Component Store files. The Windows Component Store supports the functionality required to customize and update Windows. Here are some examples of using files from the Windows Component Store.
Using Windows Update to install new versions of components. This keeps the systems secure and up to date.
Enable or disable Windows features.
Add roles and features using Server Manager.
Move systems between different editions of Windows.
System recovery after damage or failed boot.
Removing problematic updates.
Execution of programs using parallel assemblies.
The Windows Component Store first appeared in Windows XP to support parallel builds. Starting with Windows Vista, the Component Store has been enhanced to track and maintain all the components that make up the operating system. These various operating system components keep track of objects such as files, directories, registry keys, and services. Specific versions of components are often packaged. Packages are used by Windows Update and DISM to update Windows. The components and packages used during the Windows Setup process are handled by the Windows Component Store. Determining the size of the Windows Component Store is complicated by the fact that many of the files used by Windows are located in directories outside of the Windows Component Store using the hard connection. In some cases, files for a particular version of a component are found both in the Windows Component Store and outside of it. By using hard ties Windows may give the impression of storing multiple copies of the same file without actually using up space for multiple copies.
hard ties
A hard link is a file system object that allows two files to refer to the same location on a disk. This means that multiple files can refer to the same data, and changes to that data in one file are reflected in other files. This makes it difficult to calculate the size of directories, as shown in the following example.
Directory A contains three files: 1.txt, 2.txt and 3.txt.
Directory B contains one file: 4.txt.
Files 1.txt and 2.txt are hard-linked and contain 1 MB of data.
Files 3.txt and 4.txt are also hard-linked and contain 2 MB of data.
In this example, you can see that hard links allow multiple files to refer to the same dataset.
What is the size of catalog A?
The answer depends on what you plan to do with directory A.
When reading files in directory A, the size of all read files will be the sum of the sizes of each file. In this example, it will be 4 MB.
When copying all files from directory A to a new location, the amount of data copied will be the sum of all the data involved in hard links to the files. In this example it will be 3 MB.
If you free up space by deleting directory A, the size will only be reduced by the size of the hardlinked files in directory A only. In this example, 1 MB can be freed.
Now back to the question of how much space the Windows Component Store takes up, specifically the WinSxS folder. The third answer in the directory A example comes closest to estimating the extra space used. Files that are hard-linked to the rest of the system are needed for system operations, so they don't need to be counted, and for files that are hard-linked to multiple locations in the Component Store, only disk space should be counted.
When working on the Windows 10 operating system, and any other, anything can happen. For example, while working, you notice terrible brakes. There is an idea that a virus or viruses have worked. When checking with an antivirus, there is a chance to find viruses, and when you clean them, it’s not a fact that there will be any changes, since they managed to screw up.
So, to check Windows files for integrity, you can run the utility sfc /scannow from the command line and if a message appears that "Windows Resource Protection found corrupted files but couldn't repair some of them" then this article will help you get rid of this error. If you have Internet access, you can use the article:.
When you scan the system for the integrity of components, if damaged files are found, they are replaced with working ones from . Maybe this folder has been deleted or the files in it are damaged, then you will see a message that "Resource Protection found corrupted files...".
How to Repair a Damaged Component Store Using Power Shell
Read where I repaired the component store using the following command:
| DISM /Online /Cleanup-Image /RestoreHealth |
For it to work, you need to be connected to the network, as the command contacts the update center and downloads the necessary files from there. It is possible that this command will not help either, then we will use a more powerful tool -.
Click on the search icon on the taskbar, and then enter the phrase "PowerShell", choose the item from the results Windows PowerShell, right-click on it and click on the option "Run as Administrator".

In the window that opens, enter the following command:
| Repair-WindowsImage -Online -RestoreHealth |

For everything to work, you also need the Internet. You need to wait a little while the files are downloaded, after which the component store will have a healthy state and the system will not bring you errors.
If everything went well, then in the results you should notice the line:
ImageHealth State: Healthy

It means that everything is restored.
What to do if there is no Internet to restore the component store?
In this case, you will need a boot disk, or a USB flash drive with Windows 10. Almost any image will do, it is desirable that there be a dozen. Can be downloaded from the Microsoft website.
After downloading the image, double-click on it, thus creating a virtual drive. See what letter he has in the explorer, for example, it can be F.
We return to PowerShell again and enter the following command:
Dism /Get-WimInfo /WimFile:R:\sources\install.wim
, where R: drive letter created by the image, with Windows 10 installation files. This command will determine what kind of system image is in the virtual drive.

| Repair-WindowsImage -Online -RestoreHealth -Source R:\sources\install.wim:1 |
Letter R is our drive, and the figure 1 – index of the image from the first command.
After restoring, try running the system file integrity check again - sfc /scannow, most likely you will see a message that everything damaged was successfully restored.
 How to Fix Windows Update Installation Errors Using Built-in Component Repair
 Free programs for Windows free download
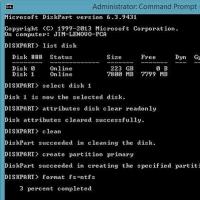 Proven ways to remove protection from the drive
 how to change windows startup ringtone how to set windows ringtone
 Nokia lumiya blacklist in classmates
 How to get a replacement phone under warranty
 Sony Xperia Tablet S - Specifications