We configure the internal microphone on the laptop. How to set up a microphone on a laptop. How to turn on and configure the microphone on a laptop On the laptop asus, correctly connect the built-in microphone
Good time everyone.
99.9% of modern laptops come with a built-in microphone (by the way, many users, without knowing this, buy a separate external microphone). True, its quality of work is far from always ideal, but nevertheless, it is quite enough for some one-time negotiations.
In this article, I'll cover (briefly) how you can enable it, and why it sometimes fails. I will also touch on the topic of connecting an external microphone. I think the article will be useful to everyone who wants to start conducting network negotiations ...
By the way!
If you have a problem with the microphone on your headphones (for example, no one can hear you), I recommend that you familiarize yourself with this instruction:
Turning on the microphone: what to look for
1) Check the condition of the microphone
This is the first thing I would recommend to start with. The fact is that for most of them, everything is in order with the microphone itself (i.e., it is physically sound), all drivers are installed and the software is in order - but the microphone does not work due to the fact that it is turned off! Or, simply by default, another device is selected as the microphone (which does not transmit sound) ...
How to check:

2) Is the microphone sealed ...
For security purposes, many users tape their laptop webcam (so that no one can spy on them). But along with the camera, the microphone is also glued - as a result, you simply cannot be heard.
The way out: either remove the sticker, or make it smaller so that it covers only the camera's "peephole".
Supplement on the topic! Can they watch me through a webcam? How to protect your device from hacking -

Pay attention also to the hole for the microphone: is it clogged with dust, is there any debris, etc.
3) Are the drivers installed on the microphone
Even if you bought a laptop in a store and did not reinstall the OS on it, it may be that some of the drivers are not installed on it. In general, of course, modern Windows 10 recognizes and installs drivers for most microphones (but still, what if this did not happen ..?).
To see if the driver is installed for your microphone, you need to use device manager ... The easiest way to open it is to press the keyboard shortcut Win + Pause Break, and in the menu on the left, select the link you are looking for.

To help! How to open Device Manager (including in Windows 10): several ways! -
In Device Manager, expand the tab "Audio outputs and audio inputs" and see if you have any devices named "Microphone". Please note that yellow exclamation marks should not be "lit" in front of them.
To try updating the driver: select the device, and then click on the icon with a green arrow in the menu (see screenshot below).


How will a device look like in the task manager for which there is no driver (as an example)
To help!
By the way, after installing the driver in control panels () in the "Hardware and Sound" section, a link to configure it should appear (e.g. Realtek Control Panel, Smart Audio, Dell Audio, etc.) .

Hardware and Sound / Clickable
In the driver's control panel (see a couple of screenshots below), you can fine-tune the sound (filters, surroundings, effects, etc.) and the microphone. By the way, check that it is turned on in the driver settings and its volume level is at maximum ...


Realtek, device type: headphones / microphone / line-in
4) If you want to use an external microphone
When connecting an external microphone (and many stop at headphones with a microphone) take a look at the audio outputs on the laptop. Now you can find 2 different options: headset jack (on newer devices), and classic (see photo below). The headset jack has a distinctive icon: headphones + microphone.
The bottom line is what if you connect a microphone with a classic plug to the headset jack (or vice versa) - most likely it will not work for you (although there are exceptions)... Please note that they even have plugs with a different number of contacts (the headset has 4).

If it so happens that you have a headset jack on your laptop (for example), and you bought ordinary computer headphones with a microphone (with a classic plug), then just buy an adapter. There are a lot of them now, and you can find them for almost all cases (one of them is shown in the photo below).

Addition!
If you do not know where to buy such adapters, I recommend using Chinese online stores. In them you can find all this necessary computer "trifle" at very low prices -
Additions on the topic are welcome ...
All the best!
As part of the functionality of Windows 10, setting up a microphone (both external and built-in) is easy. It is enough to carefully study the instructions and you can get a full-fledged working microphone.
Turning on the integrated microphone
To enable the built-in microphone on a Windows 10 laptop, proceed as follows:
Setting up the device
First, you need to check if the driver for the microphone is installed on the system.
For this, the following set of operations is performed:
If everything is done correctly, a green circle appears on the microphone icon, with a corresponding checkbox.
Turn on and configure your portable device
You can easily connect a microphone to a laptop into the corresponding jack (one for a microphone, the other for headphones). If after plugging in nothing is heard from the audio device, check if the jack is turned on / off.
Follow the steps:

How to remove noise?
Before removing the annoying noise in the microphone, it is necessary to check the device to find its weak points.
Fixing audio recording issues or connecting a new microphone in the latest operating system from Microsoft is easy. This is done using the standard functionality of the system; there is no need to use additional software. In this article, we'll take a closer look at how to set up a microphone on Windows 10 as a detailed step-by-step guide. Each stage will be accompanied by screenshots for clarity.
If your computer or laptop has an integrated sound sensor, but for some reason it does not work, you may just need to turn it on. In order to do this, we take the following steps.
- We launch the control panel. To do this, we will use the universal Windows search Click on the magnifying glass icon located in the lower left part of the taskbar, and enter the required query in the search field. Next, click on the result.

- We press on the inscription: "Equipment and sound".

- In the next window, select the section "Managing audio devices".

You can get to the same menu in another way.
- Right-click on the speaker icon in the system tray and select "Sounds".

- Go to the "Recording" tab, and right-click on our microphone, we need the "Enable" item. You can also turn off the device right there.

- Right-click on the microphone with our manipulator and select Properties from the context menu.

- We need the "Levels" tab. Use the two sliders to adjust the sensitivity as best you can.

- Also, when setting up the device, you can enable preview (you will hear what you say into the microphone through the PC speaker). To do this, go to the "Listen" tab and check the box marked with the number "2" in the screenshot to the active position. Click "OK" to apply the changes.

After that, the microphone will be turned on and will start working. The device can be used for any purpose, for example, Skype.
Microphone setup
First of all, you need to check if there is a sound driver in the system.
We do the following:
- Start Device Manager. To do this, right-click on the "Start" button and select the appropriate item.

- Expand the line with the name "Audio Inputs and Audio Outputs", then right-click on the desired device and select "Properties".

- Go to the "Driver" tab and look at the information provided in it. As you can see, we have installed the driver from Via HD Audio, therefore, everything is in order.

If you do not have a description of the driver, and a yellow question mark is lit opposite the microphone in the device manager, or an unknown device is displayed at all, you need to install the driver. First, find out the hardware version, and already look for the driver itself by it.
In order to find out the version of the sound card, press the Win + R hotkey combination and enter the dxdiag.exe command in the window that opens, then press "OK".

Go to the "Sound" tab. Here you can find out the version of your hardware. Use it to find a driver on the manufacturer's official website. It is better to download the driver for the microphone from there. When the program is downloaded, install it and restart your computer.

If all goes well, a green circle will appear next to the microphone in Windows 10 Audio Properties.

Setting up an external microphone
An external microphone can be connected to a computer or laptop, and this can be done without much difficulty. Use the jack next to the headphone jack to connect the microphone cord.
To set up the microphone, do the following:
- Open the Control Panel (we described how to do this in Windows 10 a little higher) and go to the "Hardware and Sound" section.

- Go to the sub-item, which we marked in the screenshot with a red frame.
![]()
- Now open the "Record", see here our microphone and click on its name with the right key of the manipulator. We need a Properties record.

- Go to the "Levels" tab. Here you can increase the microphone volume or, conversely, decrease it. Determine the level that is comfortable for you by testing and apply the changes with the "OK" key.

- In order to check how well the microphone works, we will not use pre-listening, but for a change we will use a visual indicator. Just close the microphone properties and go back one step. Next, start talking, and the indicator marked in the screenshot will display the volume level.

Adjust the device so that during a call the bar reaches the upper value, but does not rest against the last division. This will be the most comfortable microphone sensitivity level.
If the PC does not see the microphone, try updating its driver as described above, or check the integrity of the cable and plug of the device.
We remove noise when working with a microphone
Often, when working with a microphone, the user finds that his interlocutors hear a lot of noise or background. Below we will figure out how to fix it, but first we will learn how to test the microphone on Windows 10 to make sure that the problem is on our side.
We do the following:
- Open the standard system tool "Voice Recorder". To do this, enter the required query in the OS search bar and click on the result that appears.
![]()
- In order to determine whether your microphone is really phoning or the noise is manifested due to problems on the side of the interlocutor, we will record a test segment during which you will pronounce different phrases. We press the button "Record".

- When the necessary words are dictated, click on the icon for completing the recording.

- Let's move on to listening.

- If everything is in order, and you do not hear any noise, then the background is caused by problems in the operation of the speaker system of your interlocutor, but if you hear interference, you need to reduce the microphone sensitivity. To do this, run the properties of the sound icon in the system tray again and go to the properties of the microphone. There, using the sliders, we reduce the sensitivity of the device and again we carry out the test with sound recording. We do this until the background disappears and the sound is heard well. If your voice is low, try increasing the sensitivity.

Now you know what to do if the microphone on a laptop or PC with Windows 10 does not work, but if you have any comments or questions during the work, write them to us in the comments, and we will answer as soon as possible.
Almost all laptops today come with built-in microphones. If your computer has a working microphone, any user of any skill level can start and configure it.
For starters, you should check the presence of a built-in microphone on your laptop. The technical description for the product must indicate whether this device is present or not. If the laptop has a built-in webcam, then a built-in microphone is also provided. Check your laptop for sound card drivers and reinstall them. The drivers can be found on the World Wide Web or taken from the disc supplied with the sound card.

Open Control Panel, select Sounds and Audio Devices, open Audio, find Sound Recorder, highlight the default device. Open the "Volume" tab, find the mixer volume, go to "Advanced", then to "Parameters", check the "Microphone" box and click on Ok.

It happens that this technique does not help - the microphone is not detected. This means that it is software deactivated. Move the cursor over the volume label on the toolbar and activate it with the right mouse button. The "Record" window will appear. Move the cursor to an empty field and use the right mouse button to mark the "Show disabled devices" checkbox. After the microphone appears, turn it on with the mouse.

If the microphone does not function again after your efforts, check the sensitivity level of the device. Follow the operations of point 3, on the "Record" option of the "Microphone" device enter the "Properties" and check the settings on the "Levels" and "Improvements" tabs.

Open the "Advanced" subsection and mark the "Allow applications to use the device in exclusive mode" option. Maximize bit depth and sampling rate and monitor microphone performance. Change the bit depth and frequency if necessary.

Difficulties with the settings are also solved on the "Enhance" tab - sound amplification.

If after these operations the microphone does not turn on, it means that the sound adapter is broken. It is difficult for an untrained user to fix such a nuisance; take the laptop to the workshop for revision.
The microphone is basically. In general, now 99% of laptops are produced with a built-in microphone, but there will be no unnecessary verification. To do this, inspect the laptop case and read the data sheet. The documents for your laptop will definitely indicate whether it has a built-in microphone or not. Be aware that if your laptop has a webcam, then there is a microphone for sure. The microphone can also be seen through Device Manager.
Check the presence and settings of the microphone through the Control Panel of your laptop. In the Control Panel, open the "Sound" section, the "Recording" tab - if the microphone is built into your computer, it will be displayed there. Click the Properties button. Check if it is enabled, device settings in the tabs "Levels", "Improvements", "Advanced".
If the microphone as a device is present in the Control Panel, but you still cannot hear it, it may be that it is configured for a very quiet sound transmission. In this case, it is necessary to increase the sensitivity of the device. Go to the Control Panel again and open the "Sound" section. Open the "Properties" menu item for the Microphone device. In the "Advanced" tab, check the box next to "Allow applications to use the device in exclusive mode" and "Give priority to applications in exclusive mode". Then set it to the highest bit and sample rate. Then try testing the microphone. If everything is in order, your voice is clearly audible, it means that you have configured the device correctly. If you still can't hear you, try changing the bit depth and frequency again. Please note that the problem may also be in the audio gain, which is adjusted in the "Enhancements" tab.
Poor sound or poor sound quality is often work-related microphone connected to or built into the computer. Microphone problems are not always related to a factory defect. Most often, it is necessary to change some software settings on the computer, and thereby increase sensitivity device.
Instructions
Start Windows Mixer. Its speaker icon is in the lower right corner. If there is no mixer icon, it may be displayed
The built-in microphone is a must-have for almost any modern laptop. If earlier the owners of laptop computers had to buy a microphone separately, connect it to a laptop, adjust the sound, now this is not necessary. If your device already has a microphone, all that remains is to figure out how to set it up. The microphone settings are the same on all laptop models. Minor differences may be due to different operating systems.
Checking for a microphone
How to set up a microphone on a laptop? First you need to carefully read the instructions for your technique and make sure that there is indeed a built-in microphone.
If there are no instructions, use the Device Manager, where you can also find out about the presence of a built-in microphone. To do this, you need to perform the following combination: start - control panel - sound - record. If the laptop has a built-in microphone, then in the menu that opens, you will see this device. If you still don't have one, then you will have to buy an external microphone.
Configuring the built-in microphone
To configure the built-in microphone on a laptop with Windows XP operating system, first check if the drivers are installed on the sound card. If the system was installed recently, then it is quite possible that the sound drivers have simply not been installed yet. They can be installed from the disk that comes with the laptop, or simply downloaded from the Internet.
If the drivers are still there, but the microphone still does not work, try updating. Click the "Start" button, and then "Control Panel", where you will need to open the tabs in the following sequence: sounds - audio devices - sound recording. Now you will need to install the default device. Then decide on the volume and click the "Advanced" button.
Then a window will appear where you will first need to select "Parameters", and then "Properties". Put a tick next to the "Microphone" line and confirm your actions with the "OK" button. After that, a regulator should appear that can be adjusted to any volume level. On laptops with other operating systems (Windows7, Windows8, or Windows Vista), the setup procedure is almost the same. The only difference is that after you go to the "Control Panel", the tabs must be opened in the following sequence: sound - recording - microphone - properties: microphone - levels.
Configuring the microphone in Skype
For the microphone to work correctly, special utilities must be installed in individual programs. They can be easily found and downloaded on the Internet. There are utilities that can remove echoes or suppress noise. Others allow you to set the most comfortable distance from the user to the microphone.
Despite the fact that all the previous settings are correct, a number of users are faced with the same type of problems in Skype. For example, you cannot hear the interlocutor, or vice versa - the interlocutor does not hear you.
To set up a microphone in Skype, you need to open the following tabs: tools - settings - sound settings. In the Microphone column, select the default device. After that, during a conversation, a green bar will appear in the "Volume" column. Check the box next to "Allow automatic microphone settings". The sound will then become louder or quieter as needed. on how to establish a connection on Skype, is in the article -.
If all of the above methods did not help you set up the microphone, perhaps other methods will help you, which you will learn about from our instructions -. Also, useful information on this issue can be gleaned from the article -. Well, if the microphone works, but the volume is not enough, refer to the article - How to increase the microphone volume.
Modern laptops are equipped with a built-in microphone, which makes life much easier for their owners. Not so long ago, it was necessary to purchase a headset, and then connect it to a computer, configure, etc. Accordingly, you had to spend additional time, money, etc. Now it is easier to do, but the device does not turn on automatically either. Therefore, let's try to figure out which steps include setting up the built-in microphone on a laptop.
Where to begin?
First of all, you should check if this device is on the laptop. Despite the fact that most modern laptops are equipped with a built-in microphone, it is worthwhile to make sure once again that your technology belongs to this group. In order to make sure, you should carefully read the documentation for the laptop, which indicates this moment.
Alternatively, the microphone can be traced through the Device Manager menu. First go to Start - Control Panel. Here select Sound - Record. In the menu that opens, the device, if available, should be displayed. Next, let's take a closer look at what includes setting up a microphone on an asus laptop or technology from other manufacturers.
If several devices are displayed in the list, you can determine the one that we need by tapping on the case next to it. There are green bars next to the microphones icon. When you sound on one of them, vibrations will begin to be displayed. Therefore, this is the device we need.
Setting up the built-in microphone
Some utilities allow you to fine-tune your microphone. The choice of such programs depends mainly on the type of sound card that is installed on the laptop. For example, you can set the ability to suppress noise or get rid of the echo from the speaker. In addition, the optimal distance from the user to the device is set and much more. Such utilities are distributed free of charge on the Internet, and it is usually not difficult to download them. As you can see, setting up the built-in microphone is a simple and short-lived process. In order to use the device, it is enough to do just a few actions, after which it will work correctly the way you need it.
Most modern laptops have built-in microphones. Their functionality is enough for many users: you can communicate on Skype, dictate texts using speech dialing or use voice commands. Therefore, it is not necessary to purchase a separate headset, unless you need it for some special purpose. An article on how to turn on the microphone on a laptop Windows 7, 8, 10.
How do I turn on the built-in microphone on my laptop?
Turning on and off the built-in microphone is quite simple: with a special key on the keyboard. Therefore, if it seems to you that the microphone is suddenly out of order, check if you accidentally pressed this key. You can also use the familiar programmatic method.
Touching the key that is responsible for turning on / off the microphone is a common reason for its involuntary shutdown. How do I find this key on the keyboard panel? It has an icon depicting a microphone, or it says "mic". If you pressed it, but nothing happened, press and hold the Fn button, start the device again. If this method does not help either, read the tips below.
Turning on the microphone in the seventh version of Windows
- Turn on your laptop and wait for the OS to load.
- At the bottom right of the monitor, find an icon that looks like a speaker and right-click on it.
- Select the inscription "Recorders" from the drop-down list.
- Find your microphone in the list of installed devices, select it with the right mouse button and turn it on by selecting the appropriate menu item.
- Disabled the microphone on the laptop, how to enable (Windows XP)?
- Start the device and wait for the OS to load.
- Open the Start menu, select All Programs → Accessories → Entertainment → Volume.
- In the dialog box that appears, find the "Recorders" section.
- Open Options → Properties.
- Find your microphone in the list, select it and put a check mark next to it.
- Right click on the microphone image, then "Enable".
Another way to turn on the microphone on a laptop in Skype is to go to the Control Panel and select "Sound, speech and audio devices" (Windows XP). In the seventh version and Vista, a similar section is called "Hardware and Sound". In the parameters of the section, you can launch the microphone, as well as select the desired degree of sensitivity. If you do not have enough standard functionality to configure, install one of the popular programs for adjusting the microphone sensitivity (for example, Realtek Dispatcher).
If you are unable to start the microphone in this way, the reason may be that the sound card drivers are out of date. Download the latest version from the developers' web page, choosing the one that's right for your computer model.
Quite a large number of computer equipment owners use their equipment to communicate with other users. And for this purpose, it is important to know how to turn on the microphone on a laptop, since it is this device that allows you to speak with people in a voice, or record voice messages.
Indeed, sometimes a situation arises when this component is not available. Therefore, this article will consider the question of how to turn on the microphone on a laptop with Windows, given the fact that Microsoft's operating system is considered the most popular in the world today.
Instructions for solving this problem
So how do you enable the built-in microphone on a laptop? Most often, to achieve this goal, nothing super complicated is required - it is enough to follow the following recommendations:- Pay attention to the right side of the tray (the panel where the clock with the date and other important system icons are usually located).
- Right-click on the icon with the image of a sound device.
- A small additional menu is activated, where you should select the item responsible for the recording devices.
- In the new window, make sure that the "recording" section is activated. It should display the required device.
- Use the same right mouse button to activate it. Click on "OK" when finished.


This method almost always helps when looking for an answer to the question: turned off the microphone on a laptop - how to turn it on? That is, in a situation where everything is initially configured correctly, and the user just accidentally deactivated it.
Switching to external devices
Indeed, sometimes the user may not be satisfied with the quality of the recording equipment, which is included in the standard equipment. Or it is corny to use them it is inconvenient for a person. In this case, people often connect additional means of communication to the computer. And they have a problem - how to turn on an external microphone on a laptop?In fact, it is necessary to act in the same way as in the previous version, only with small nuances:
- After going to the "records" section, the user in the list can find several options that are allowed for use at once. That is, the one that was originally present on the computer, and the one that was recently connected. Naturally, the system initially gives priority to the first one.
- To achieve the desired result, you just need to deactivate the first and turn on the second device - by acting on them with the same right mouse button and selecting the required option.

Naturally, at the end of this operation, you should not forget to click on "OK" for the changes to take effect fully.
Automatic correction
In some situations, the above suggested instructions turn out to be ineffective due to the fact that some kind of failure has occurred in the system. Fortunately, the developers have implemented a tool in Windows to fix it automatically:- Through the "Control Panel" go to the "Equipment and Sound" section.
- In it, select the "Troubleshoot audio recording" item.
- In the proposed list, mark the option that requires automatic correction. Do not forget to use the "next" button after that.
- The operating system will automatically analyze the situation and offer a solution - a new window will open on the screen, where you should click on "Apply this fix".

After the automatic fix is complete, all that remains is to check the result.
Several important nuances
It is important to understand that for the operation of all components of computer equipment, special files are required - the so-called drivers. That is, when answering the question - how to turn on the camera and microphone on a laptop, you should first make sure that they are present and have been installed.This requires:
- Through the "Control Panel" go to the "Device Manager". In the tenth version of Windows, for this you need to click on start and just type in the name of the desired section on the keyboard, then use the proposed link.
- In the list of equipment, pay attention to two sections - "Cameras" and "Sound, game and video devices".
- Make sure they are functioning properly. That is, there should be no exclamation mark warning icon next to all names.
- If there is an icon, then right-click on the name of the problem component, go to its properties and select the procedure for updating drivers.

Usually everything happens automatically, but sometimes manual installation of drivers may be required. In such a situation, it will be necessary to find them on the Internet (by name / model of equipment), transfer them to the hard disk and initiate the installation of files. Most often, after this it is recommended not to forget about rebooting the system.
Well, and the last point - how to turn on the microphone in the headphones on a laptop? Repeat one of the above options. At this point, some users report that they are trying to check the gadget by recording a small message and trying to listen to it, but there is silence in the headphones. The reason for this trouble is most often the banal forgetfulness of the user, who made sure that the volume control in the system was set to maximum, but on the device itself he forgot to turn a special wheel responsible for the same function. 
 How to send on a megaphone waiting for a call
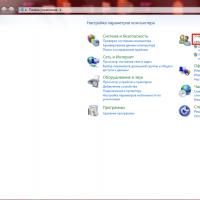 Setting a password on a computer How to set a code on a computer at startup
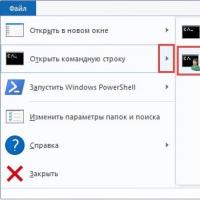 What is ESD format Open install esd
 How to format a mobile phone
 Information satellite systems named after academician M
 Independent rating of the best Russian blogs LiveJournal blogs in Russian top 50
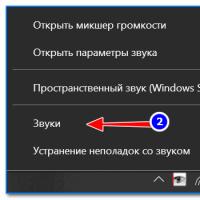 How to set up a microphone on a laptop