Formatting toolbar. Modes for displaying a document on the screen
Many complex programs. It allows you to quickly activate the commands the user needs without having to look for them in classic drop-down menus. But sometimes this part of the program may disappear as a result of a software or hardware failure. This article will try to answer the question of what to do if the toolbar has disappeared in Word and how to get it back.
Return of the toolbar in version 2003
This part of the interface disappears for two reasons: accidental disabling of an element and corruption of the settings file. In the first case, there are 2 ways to return the toolbar in Word. The first and simpler one is as follows:
- In any free space next to the menu bar, you need to right-click (right mouse button).
- In the long list that opens, select the disappeared combination of instruments.
The second method is a little more complicated. To use it to return the toolbar to its place, you need to:
- In the “Service” drop-down menu, select “Settings”.
- In the window that opens, go to the “Toolbars” tab.
- In the list on the left side of the window, check the boxes next to the required elements.
- Click "Close".

In the same window, you can create your own empty toolbar using the “Create” button. If the settings file is damaged, you will have to recreate everything again.
How to get the toolbar back in Word 2007
In all Microsoft Office programs from 2007 and later, the toolbar refers to the toolbar. She cannot fall into the abyss, as happens in the 2003 version. The reason is that it combines a standard menu bar and a toolbar. But the ribbon can be minimized if you left-click on any free space in the editor window. To get rid of this property, you need to:
- Right-click on the line where the tab names are placed.
- In the drop-down menu that appears, click on the “Collapse Ribbon” item.

The second way to return the toolbar in Word is as follows:
- On the Quick Access Toolbar (located near the Office button), click on the “Customize Quick Access Toolbar” button.
- In the menu that opens, select “Collapse Ribbon”.

There is also a hotkey associated with this function in Word 2007: Ctrl + F1.
The return of the toolbar in version 2010

In this version of Word, the toolbar disappears only at the user's discretion. Compared to the 2007 version, there are only 2 ways to hide the ribbon: a hotkey and a special button located on the right side of the window next to the help symbol.
Return of the toolbar in versions 2013 and 2016
The interface of these versions of the text editor is very similar to 2007 and 2010, but the functionality and customization options are very different. It provides the user with 3 feed display modes:
- Complete hiding (similar to Expert Mode in 3ds Max 8).
- Only the name of the tabs. Clicking on them expands the tool ribbon completely, and clicking on an empty space collapses it again.
- Tabs and all commands.
To select the most appropriate display mode, you need to click on the button with a rectangle with an upward arrow on it on the right side of the window (next to the window control buttons). It will bring up a small menu where you can select one of three modes.

In addition to controlling the display of the ribbon, in versions 2013 and 2016 there is the ability to customize it. Customization allows you to remove unnecessary tabs and create your own. This innovation leads to the problem of missing tabs. The method of how to return the toolbar in Word comes down to the following algorithm:
- Click the “File” button (replacing the round “Office” button).
- In the window that opens, select the “Options” sub-item.
- In the new window, go to the “Customize Ribbon” subsection.
- On the right side of the window, check the boxes next to the names of the missing tabs.
- Click OK to save the settings.
UbitMenu and ClassicMenu programs
Many users who have become acquainted with and mastered versions of the Microsoft Office 2003 and earlier software package do not like the interface of 2007 and subsequent editions of the programs. To eliminate this problem, third-party developers created the UbitMenu and ClassicMenu programs.
These apps add another tab to the ribbon interface called Menu. It completely reproduces the interface of the editor of version 2003 and older, namely: a menu bar and 2 control panels (standard and text formatting).
The main difference between these apps is that ClassicMenu simplifies the tool ribbon to 1 tab with a classic menu.

And UbitMenu adds a similar one between the existing ones.

It is also a free product and only supports Word, Excel and PowerPoint 2007 and 2010. The program itself is very small - it takes up less than 1 megabyte on your hard drive.
Classic Menu is a commercial development that supports several languages and later versions of the editor.
Most often, a toolbar or toolbar disappears due to the user's fault, and sometimes due to a software glitch. The ways to return the toolbar in Word are simple enough to quickly return the tools required for working with text back into view without bothering the system administrator.
If you recently installed Microsoft Office 2003, then when you launch the Word text editor you will see a standard window with default settings. But they are not suitable for everyone. After all, every user probably wants to customize Word 2003 for himself - in the way that is most convenient for him.
Well, as they say, I see the goal - I see no obstacles. There are quite a lot of settings in Word, but to get started, it’s enough to follow at least 5 simple steps. This instruction can be called universal, since the steps described below will certainly suit every user.
By default, when you first start Word 2003, the top bar (under the menu) will look like this:
As you can see, it consists of 2 parts - the standard one and the formatting panel. But the latter does not fit completely, so many buttons are simply not visible. To fix this, drag the format bar down. To do this, left-click on it and place it under the formatting panel.

It should look like this:

As you can see, the formatting panel contains all the necessary buttons that are constantly used when typing:
- font selection;
- bold, italic or underline;
- left/right or center alignment;
- numbered and bulleted list;
- font color.
If necessary, you can click on the small arrow in the right corner of the formatting panel and add new buttons (or remove unnecessary ones).

Autosave document
The second step that must be completed is setting up autosave for the Word document. The fact is that very often it happens that the text editor crashes. Or it freezes. As a result, you have to force close it - and the previously typed text may not be saved.
Sometimes the lights in the house are turned off - this also happens. And if you worked on a PC or an old laptop (without a battery), then the Word document may not be saved.
However, this problem is easy to solve. All you have to do is set up autosave for the document and you won’t care. Even if Word suddenly freezes (or the lights turn off in the house), most of the text will be saved.
My document is usually saved down to the last letter typed. The maximum that is lost is the last 1-2 sentences. I think this is a trifle compared to if the text had not been preserved at all.


Choosing your favorite font
The third step is to select a default font. If you don't like the standard Times New Roman, you can change it. To do this, click on the menu items Format - Font.

A new window will open where you can select a different font, its style and size. To save your changes, click OK.

Now when you start Word 2003, this font will be installed by default. And you don't have to change it every time.
Setting AutoCorrect options
The next step is to configure the AutoCorrect settings. When completing coursework, dissertations, or publishing texts on the Internet, you must adhere to certain rules. In particular, quotation marks should be French (“herringbone,” as they are called), dashes should be used instead of hyphens, and links should be in the form of hyperlinks.
All this is very easy to configure in Word 2003. To do this, simply select Tools – AutoCorrect Options from the menu.

Then open the “Autoformat as you type” tab and check the following boxes:

If necessary, you can select other items - for example, fractions or English ordinal values.
In the same window, go to the “AutoCorrect” tab and be sure to check the “Automatically correct spelling errors” checkbox.

This is a very useful option. If you accidentally misspell or spell a word incorrectly, Word can correct it. Provided he knows the word. For example, if you write “cashier,” Word will automatically correct it to “cashier.” You can check it yourself.
Toolbars contain groups of buttons for frequently executed commands. Like menu commands, tool buttons are grouped by functionality.
Clicking a button either leads to immediate execution of the corresponding command, or opens a dialog box in which certain parameters are selected for subsequent execution of the command.
Toolbars are dynamic interface elements, i.e. the user can at his own request set the displayed number of panels, their location in the window, composition and order of buttons.
You can find out the purpose of any button by hovering your mouse over it. A contextual hint will appear.
Two panels Standard And Formatting are installed by default, although they can also be changed or removed from the screen.
TO  panel buttons Standard allow you to quickly execute commands while creating any document.
The set of buttons includes:
Create file– creating a new document;
Open– opening an existing document located on one of the media;
Seal– printing the document;
Search files– search for files according to specified criteria;
Preview– viewing an electronic copy of a document before printing;
Spelling– enable spell checking mode;
Reference materials– calling a tool to get help;
Cut– cutting a selected fragment from a document and moving it to the clipboard;
Copy– copying the selected fragment and placing it on the clipboard;
Insert– pasting the contents of the clipboard into the cursor position;
Copy format– allows you to transfer the properties of the selected fragment to other fragments;
Cancel– canceling the last performed operations;
Return– return of canceled actions;
Borders panel– turn on/off the panel Tables and borders;
Insert table– insert a table into the document, the dimensions of which are selected in the drop-down menu;
Add Excel Table– inserting a table into a document as an embedded object MS Excel. Table sizes are selected from the drop-down menu;
Columns– location of the selected text fragment in the selected number of columns;
Drawing panel– turn on/off the panel Drawing;
Document outline– an additional field appears on the left of the screen in which the structural elements of the document (title, headings, subheadings, etc.) are displayed, provided that they are assigned the appropriate style;
Non-printing characters– enable/disable the display mode of non-printable characters (tab characters, spaces, ends of paragraphs, etc.);
Scale– selecting the scale for displaying document content in the working field;
Help: MicrosoftOfficeWord– opens a window with help information.
TO  panel buttons Formatting Allows you to apply character and paragraph formatting commands to selected text passages and includes:
Format panel– switch the tool on/off Styles and Formatting in the task area;
Style– assigning a style to a selected fragment of a document (body text, heading, etc.);
Font– selecting a font from the many installed in Windows;
Size– selecting the font size (if the required font size is not in the drop-down list, you can enter it manually);
Bold– thickened character style;
Italics– italic style of characters;
Stressed– underlining characters;
Left– alignment of paragraph lines to the left;
Centered– centering paragraph lines;
Right– alignment of paragraph lines to the right;
Width– alignment of paragraph lines to the left and right edges;
Numbered list– numbering of selected paragraphs according to the default format;
Bulleted list– marking selected paragraphs according to the default format;
Line spacing– setting line spacing in the text;
Decrease indent– used both to reduce text indentation and in multi-level numbering to raise a sublevel one level higher;
Increase indent– used both to increase text indentation and in multi-level numbering to create sublevels;
External boundaries– in the drop-down menu, select the type of border selection in the table, cell or group of cells;
Highlighting– in the drop-down menu, select the color of the space around the selected fragment;
Font color– select the color of the selected fragment symbols in the drop-down menu.
MSOfficeWord 2003 has a number of toolbars (Table 2.3) that can be displayed in the program window. To do this, follow the menu commands View Toolbar or right-click on the menu bar or any toolbar. A list of toolbars installed in the program will open. Clicking the mouse on the name of the corresponding panel will cause it to appear on the screen, and such a panel will be marked with a checkmark in the list on the left. To remove a panel from the screen, simply click on its name in this list again.
Table 2.3.DashboardsMS Office Word 2003
|
Toolbars |
Purpose |
|
|
Visual Basic– tools for accessing tools for creating and editing macros and Web scripts in the language MSVisual Basic for Application(VBA), as well as setting up security measures when running macros. |
|
WordArt– controls used to create logos and text elements that can be used to decorate printed products. |
|
|
|
Autotext– means of quick access to setting up AutoText functions, allowing the user to increase the speed of entering information. |
|
|
Database– controls typical for working with databases (sorting, searching, managing table structure, etc.). Can act as tables as a database Access, and own tables MSWord. |
|
|
Web Components– a set of ready-made components for creating controls for a Web page or electronic form. |
|
|
Web site– controls for navigation in Web data structures. Looks like the main toolbar of a Web browser Internet Explorer and allows you to use the Internet in a word processor window. |
|
Image Settings– controls for the basic functions of adjusting raster images (contrast, brightness, line type, fill color, etc.). |
|
|
|
Framework– controls for creating frames. Frames are special rectangular areas designed to display multiple Web documents. |
|
|
Review– controls for editing and commenting documents without distorting the source text. Changed data is saved in the same document as new versions. |
|
|
Drawing– controls and tools for performing simple drawing and graphic work. |
|
|
Merger– tools for working with merge documents containing constant and variable parts. Used when using a word processor, for example, for mass preparation of letters of similar content. |
|
|
Statistics– allows you to obtain information about the volume of the document (number of characters, words, lines, paragraphs, pages). |
|
Structure– tools for working with the logical structure of a document, allowing you to manage headings and the order of parts of the text. |
|
|
|
Tables and borders– controls for creating tables and decorating text blocks with frames. |
|
|
Forms– controls for developing standard forms. Allow you to perform basic functions when creating and editing forms that collect information and allow you to view reports. |
|
|
Panel eelements– a set of ready-made components ActiveX to create controls for Web pages and Web forms. |


The operations of removing toolbars, displaying them in the main program window, and changing the shape and size are quite simple:
|
Display |
Right-click on the toolbar or menu bar. In the context menu that appears, select the name of the toolbar you want to display. |
|
Removal |
Right-click on the toolbar or menu bar. In the context menu that appears, select the name of the toolbar you want to delete. To remove the panel, you can click the close button . |
|
Moving |
Click on an empty part of the panel (between the buttons) and drag it to the top, bottom, side border of the window, or to the central part of the working area. After dragging, the panel will have a title bar. To return the toolbar to its original location, double-click its title bar. |
|
Changing shape |
Place the mouse pointer on one of the toolbar borders, click the left mouse button and drag the border. |
M  You can also change the contents of toolbars - remove buttons or insert new ones. To do this, you can execute the menu commands View
Toolbar
Settings or right-click on the menu bar or any toolbar and select the option from the context menu Settings. This will open a dialog box of the same name (Fig. 2.2).
You can also change the contents of toolbars - remove buttons or insert new ones. To do this, you can execute the menu commands View
Toolbar
Settings or right-click on the menu bar or any toolbar and select the option from the context menu Settings. This will open a dialog box of the same name (Fig. 2.2).
For delete button follow these steps:
Make sure that the toolbar whose button you want to remove is displayed in the main program window.
Call up the dialog box Settings.
Place your mouse pointer over the button you want to remove and drag it from the toolbar.
For adding a button follow these steps:
Make sure that the toolbar to which you want to add the button is displayed in the main program window.
Call up the dialog box Settings and open the tab Teams.
On the list Categories select the command you want to add to the toolbar (commands appear in the list on the right). Go to category All teams All commands listed in alphabetical order apply.
On the list Teams Move the mouse pointer over the command you want to add, press the left mouse button and, without releasing it, drag the pointer to the desired toolbar, then release the mouse button. As you drag, a sign will appear below the mouse pointer. indicating that a command has been added to the toolbar.
If necessary, you can rearrange the toolbar buttons by dragging them from place to place.
The Microsoft Word text editor is very functional. In addition to typing and designing text, here you can create various figures, graphs and tables, and perform several simple actions with drawings. Where are all the tools necessary for this? That's right, on the Toolbar.
It is located at the top of the page of an open document, and with Word 2007 on it you see not only tabs, but also the main buttons that are used for work. In this article, we will figure out what to do if the toolbar in Word has disappeared, and instead of the usual view, only the main names at the top are visible. I’ll also tell you about the quick access panel and how to add all the necessary buttons to it.
If the Word document you opened looks like the screenshot below, then to restore the toolbar, just click on the small arrow pointing down in the upper right corner of the window.
After this, all the usual groups and commands will be visible again. And if you need to leave only a sheet on the page, then you can hide the top ribbon by clicking on the same arrow, only now it points up. This can be used if you need nothing to distract you while working with a document.

If you have Word 2013 or 2016 installed, then to display the toolbar you need to click on the button "Ribbon Display Options", which is located to the right of the file name, next to the minimize, full screen and close buttons.

After clicking, a small menu will open. The first item automatically hides the ribbon - the window expands to full screen and it hides; when you hover the cursor at the very top, it appears. When you click on the second item, only the menu items “Home”, “Insert”, “Design” and others will remain. If you choose the last option, then you will be able to secure not only the names of the items, but also the commands - this is actually what we need.

Now let's figure out what to do if it is not the control panel itself that has disappeared, but some tabs on it. Go to “File” at the top and select “Options” from the left list.

A window like this will open. Go to the tab "Customize the Ribbon".

For example, I didn’t have a tab on the toolbar. So I put a tick in front of it. To save the changes, click "OK".

After this, the item we need will appear, and you can use all the commands that are in it.

In Word, in addition to the toolbar, there is also a quick access panel. You can add icons to it for the commands you use most often. It is displayed either below or above the ribbon. By default, it has three buttons: save, cancel or return.
To customize it, click on the little black arrow pointing down and select from the list "Other teams".


Look for the desired command in the list, select it by clicking the mouse, and then click “Add”.

Everything that is in the area on the right will appear in the Quick Access Toolbar.

If necessary, all items can be arranged in the order that suits you. To do this, select one and change its position using the up/down arrows on the right. To ensure that changes made in Word are saved for all other files, select in the top field "For all documents". When finished, save by clicking on "OK".


Removal follows a similar principle. Open a familiar window, select an unnecessary command and click “Delete”. Save by clicking on “OK”.

That's all. Now you know not only how to get the hidden toolbar back, but also how to customize it and the quick access panel in Word.
Rate this article: - 230.58 KbToolbars
In MS Word 2003, the toolbars are not presented entirely on the screen, but only the most necessary buttons. A list of all toolbars available in Word can be called up using the menu command View -> Toolbars or by right-clicking (context menu) on the panels presented on the screen.
By default the panels are displayed - Standard, Formatting And Drawing(panel Drawing located below the document margin).
To display or hide a panel, you need to click on its name in the list of panels. Panels Standard And Formatting It is advisable to always leave it on the screen.
In Word 2003, toolbars are context sensitive - when you select an object in a document, a toolbar designed for editing it automatically opens. Each toolbar button has a tooltip.
Panel Standard contains tools for managing file operations, editing, and document display.
Panel Formatting contains tools for managing document formatting.
Customizing Toolbars
Word 2003 allows you to customize existing toolbars by adding or removing individual buttons. To do this, you can use one of two methods:
1. Click the arrow icon at the end of the panel. An addition to the presented part will open, in the lower section of which there is a command Add or remove buttons. If you click the arrow next to this command, the entire list of panel buttons will open. You can select the button you need by checking the box to the left of it.
2. In the list of panels, click on the command Settings. In the dialog box that opens Settings(Fig. 2.3) on the tab Teams select the desired category and view the buttons for that category.
Rice. 2.3. Toolbar settings window
To add a button, you need to drag the selected command from the right side of the window to the toolbar. The mouse button is released when the marker - | (vertical bar) appears on the toolbar. To remove a button, drag it with the mouse from the toolbar to the settings window.
Word 2003 allows you to create your own toolbar. to do this in the dialog window Settings on the tab Toolbars click on the button Create(Fig. 2.4).
Rice. 2.4. Toolbar settings window
Indeed, many who have seen the Microsoft Office 2007 package will agree that not only the appearance has changed, but also the logic of work in this package. Today and in several subsequent lessons we will try to figure out how to quickly switch to using Office 2007 programs and start working with it as efficiently as possible.
Let's get acquainted with the general principles of working in text editors.
Since the basic operations in many text editors are quite similar, let’s look at them first, because our newsletter involves teaching people of all levels of computer skills and ages how to use a computer. So if you already know these techniques, you can safely skip this section.
And so, let's look at the basic operations available in text editors.
1. Text selection. First, let's briefly talk about the purpose of this operation. When composing any text, you should adhere to such a simple rule as the one that says: “First you need to write the entire text, and then, starting from the head of the document, edit it.” In order to change the spelling, style, size, font type, copy individual words, text fragments, text formatting elements - it should be highlighted so that the text editor understands what exactly these operations need to be performed on. There are many different ways to highlight font. Today we will look at the most common ones.
1.1 Selecting text with the mouse. This method is the most common, and sometimes even the most effective. The principle of this selection is as follows: you need to move the mouse cursor to the beginning of the word/fragment of text that you want to select, press the left mouse button and, while holding it, move the cursor to the end of the word/fragment of text that you want to select to perform any actions .
(The figure shows what the highlighting of the phrase “basic operations” will look like in Microsoft Word 2007. In other text editors it may differ in color, but its essence and purpose do not change.)
I would like to immediately note that this method of selecting text works not only in text editors, but also in Internet browsers, email clients, and many other programs that display text on the screen as a set of font letters, and not as a picture. (for example, text as a picture is displayed if you scan a page with text - you will not be able to edit this text without a special program).
1.2 Selecting text using the arrow keys on the keyboard and the Shift key. This method is especially convenient if you need to highlight several letters from a word, or one specific formatting element. First (you can use the mouse) you need to place the cursor (click the left mouse button or move the blinking text editor cursor with the arrows on the keyboard) to the place in the text from which you will begin selecting the text, then you need to press the Shift key and, without releasing it, move the cursor with the arrows to the end of the word/text you need to highlight.
2. We have figured out how the text is highlighted, now we will consider in order why we need this, namely with basic operations that can be performed with selected text.
2.1 Copy, paste and move text. To copy text to the clipboard (see Dictionary ) and then pasting it in another place/another program, you must perform the following actions: select the text with which you want to perform the operation, then right-click on it and select “Copy” in the context menu that opens, then move the blinking text cursor editor to the place where you want to copy this text, right-click on it and select "Paste". If you need to transfer a piece of text, then instead of the “Copy” item, you need to use the “Cut” item from the context menu that opens.
2.2 Changing font size, type and spelling. Similar buttons, as in the above figure (fragment from MS Word 2007), are available in the vast majority of text editors. Some buttons may be missing, but their functionality can be accessed through the Format>Font menu in most text editors (this menu is not available as a view in Microsoft Office 2007 programs). As can be seen from the figure, using these buttons and pop-up lists we can perform the following actions with text (from left to right and top to bottom):
2.2.1 change the font;
2.2.2 change the font size;
2.2.3 increase the font size by one point;
2.2.4 reduce the font size by one point;
2.2.5 clear text formatting;
2.2.6 make the font bold;
2.2.7 make the text italic;
2.2.8 make the font underlined;
2.2.9 make the font strikethrough;
2.2.10 place the text in uppercase;
2.2.11 place the text in lower case;
2.2.12 change the case of the text according to a certain pattern (for example, each sentence will strictly begin with a capital letter, or all letters will be converted to capital letters);
2.2.13 change the font highlight color (default is white);
2.2.14 change the font color (default is black).
2.3 Formatting paragraphs of text. In the figure at the end of the paragraph you can see the main options for formatting paragraphs. Let me remind you that we perform any actions with the text after we select it. Now I give a description of the toolbar buttons in order. They are also very similar in many text editors. Again from left to right and top to bottom:
2.3.1 bullets (creating a bulleted list);
2.3.2 numbering (creating a numbered list);
2.3.3 multi-level list (creating a multi-level list, the simplest example of which you see in this article);
2.3.4 reduce the left indent (reducing the paragraph indent from the left margin of the page);
2.3.5 increase the left indent (increasing the paragraph indent from the left margin of the page);
2.3.6 sorting (sorting selected text or numeric data);
2.3.7 display of hidden formatting characters (tab characters, end of paragraph, soft hyphen, page or column breaks and other special characters that are not displayed when printing text on a printer - for this they are also called “non-printing characters”);
2.3.8 text alignment to the left;
2.3.9 text alignment in the middle;
2.3.10 align text to the right;
2.3.11 aligning text to the width of the page;
2.3.12 line spacing;
2.3.13 changing the background of the selected text or paragraph;
2.3.14 designation of text/table cell boundaries.
3. Creating tables. Despite the fact that the main specialization of text editors is working with text, the creation of not very complex tables and not very complex actions is included in the functionality of many professional editors. However, the process of creating tables in them is very similar, therefore, in order not to repeat it, it will be discussed using the example of the MS Word 2007 editor with explanations for users of previous versions of the MS Office software package.
Getting to know the tabs and toolbars of MS Word 2007
Yes, yes, exactly with tabs and toolbars, because... There are no familiar menus left in MS Office 2007, but they have been replaced by “intuitive” tabs. We intentionally indicated this phrase in quotation marks, because... In fact, it turns out that everything is not so intuitive. Now let's talk about everything in order.
1. Home tab.
This tab is somewhat like a hybrid of the Standard and Formatting toolbars. According to the new logic, the most necessary tools for carrying out standard operations with text are collected here. Here we see a block responsible for working with the clipboard, a block responsible for working with the display of fonts and their style, a block regulating the formatting of paragraphs (and table elements), a whole healthy “Styles” block, which actually contains templates styles for headings, subheadings, quotes, and some plain text formatting. Styles can be changed and you can create your own. Well, and the “Editing” block, which includes basic operations for automatically searching and replacing words and text fragments, as well as tools that allow you to use non-standard types of text selection and non-text elements.
2. Insert tab.
The sets of tools that are located on this tab combine such a great mission as inserting and embedding various text and non-text elements into a document.
Namely, in the “Pages” block we can insert a template of a ready-made title page of our document (if our document, for example, is some kind of report or research), it is possible to insert a blank page into the document (with breaks before and after), as well as page breaks themselves (in the vast majority of cases, page breaks are the forced completion of the current page with a transition to the next one).
The "Tables" block allows us to insert a table (and only insert it, since to edit it we will use the "Working with Tables" section that appears after inserting the table and the accompanying "Design" and "Layout" tabs - you cannot see this section until until you insert a table into the document).
The “Illustrations” block allows you to insert a picture from a file, a clip from the Clip Art collection, which is built into the MS Office package, as well as use Microsoft’s online resources. You can also draw various geometric shapes and insert various diagrams. The "Links" block allows you to insert links into your document, both to other documents and to certain positions in the current document.
The "Header and Footer" block allows you to insert header and footer (text that will be visible on all pages of the document) onto the page, as well as automatically enter document page numbers.
The "Text" block allows you to place various text elements, such as inscriptions, express blocks, signature lines, date and time, and many other elements that are not used in everyday life, but may occasionally be required to compose a beautiful and original document.
The symbols block includes an equation editor and a symbol table (extended keyboard layout, Greek letters and many other symbols not used when writing words). In other words, if you need to insert something into the text, then you should go to the Insert tab. This is logic that, if you understand, working with Office 2007 will become very convenient. At the end of this lesson, the main points will be given in If-Then format.
Description
In MS Word 2003, the toolbars are not presented entirely on the screen, but only the most necessary buttons. A list of all toolbars available in Word can be called up by the menu command View -> Toolbars or by right-clicking (context menu) on the panels presented on the screen.
 Voka TV is available on LG and Samsung Smart TV Voka tv reviews
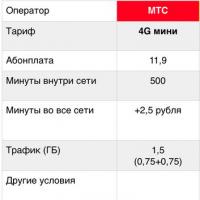 USSD commands for velcom subscribers (Legal entities)
 How to remove velcom voice box
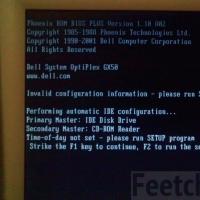 Windows won't boot on laptop after BIOS update
 Non-optimal mode on Samsung monitor
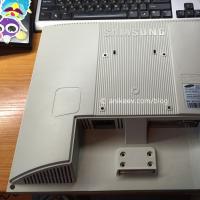 Non-optimal mode on Samsung monitor
 What is TPM and how to use it on Windows What is a TPM module