How to pull the processor from the computer. How to clean your computer from dust. He can earn faster. Two PC Cleaning Options: Express and Deep
Suddenly, the computer stopped turning on, the opening showed the presence of a swollen electrolytic capacitor on the 24-in-in-motherboard power circuit. I had to do the replacement of the condenser.
When I removed the motherboard, it was extremely surprised by its strong deflection in the processor installation zone. I put a ruler and realized that if you do not take urgent measures, then you will soon have to buy a new system unit.
Why the motherboard begins
I have already known cases of maternal fee due to the deflection. Since the conductive tracks on the motherboard are very narrow and thin, they stretch and microcracks are formed in them. From temperature drops due to linear expansion of materials, gradually microcracks are converted into cracks. The track is broken, and the fee ceases to work. Initially, the computer begins occasionally hang, then increasingly and more often and occurs when it ceases to work forever.
Repair this motherboard is not subject to seven layers, and it is almost impossible to find a broken track. It is necessary to replace a new, and additional costs arise, since the processor modules installed on the old motherboard, memory modules and other cards are not installed on the new motherboard, as there are no longer the necessary connectors. In practice, you have to buy a new system unit, although the old one was quite suitable for your tasks.

When studying a radiator clamping device to the processor, it became clear that the deformation of the motherboard occurs because of the illiterate (or made intentionally) of its design. The radiator presses to the processor, and the hooking holes to create a radiator clamping force to the processor are also on the printed circuit board on the removal from the processor installation site. Thus, the processor on the fee presses in one direction, and the engagement points of the radiator in the opposite. This leads to the deformation of the motherboard.
To eliminate the deformation, it is necessary that the current and counteractive forces that are applied to the motherboard from different sides were on the same axis, this requirement and was the starting point of upgrading the design of the pressure radiators, which does not deform the motherboard.

As you can see, plastic retainers are replaced by spring-loaded screws, but not only in this distinction. In the design, a metal plate and a dielectric spyer was applied. Screws are screwed into the plate, and the plate spa is resting instead of installing the processor. Thus, the conditions for the deformation of the motherboard are excluded.
Modernization of the processor radiator mounting system
In the photo you see the upgraded clamping device in the assembled form. Its design is so simple that it is possible to repeat it with almost any person with minimal materials processing skills.

First, a metal plate made of steel or aluminum alloy measuring 85 × 85 mm with a thickness of 3 mm is manufactured. The thickness of the plate is due to the necessary mechanical strength. Dimensions are valid for the pressure of the Gigabyte GA81915P-G motherboard. Symmetrically in the corners of the plate are drilled by four holes with a diameter of 3.5 mm at a distance of 72 mm around the perimeter from each other and the thread of the M4 is cut into them.

Next is made by a square plate from a dielectric size of 50 × 50 mm with a thickness of 1.5 mm. The thickness of the plate is determined by the gap, which must be ensured to exclude the touch of the metal plate of the lads on the motherboard. I cut out of foil glass with metal scissors.

It remains to glue with any suitable glue or double-sided tape plates of each other and the design is ready. Before gluing, you need to attach to the place of the processor soldering and see whether there will be no paks or sealed radio elements. If you interfere, then in the insulating plate you need to make a sample or drill in the point of touching the hole. The plate should lie on the board with the entire plane. After gluing, it is necessary to apply the resulting combined plate and check whether the metal part there will be no places of electrolytic capacitors. They are usually a lot around the processor. All protruding legs need to be trimmed by side. It remains to choose the screws, springs and washers.
The finished springs on the compression of the desired diameter and stiffness could not be found and had to modify the most appropriate spring for stretching. Of course, it is possible to do without springs, putting plastic washers, but then it is difficult to get the perfect fit of the radiator to the surface of the processor. Springs I made from one spring from stretching grounding wire of a monitor kinescope. Such springs are used in any kinescope TV. The inner diameter of such a spring has 5 mm, the diameter of the wire is about 0.5 mm.

In order to stretch the spring, you need to turn two screwdrivers in its rings at the ends or take two pliers and attaching a little effort very slowly to the sides until you feel that the metal "succumbed." Let's release the spring and see what happened. Spring winding step should become about 1 mm, if less, the operation is repeated. In the case of a missing, the kinescope is usually four springs, so there is something to be trained. The stretched spring is cut with nipples on segments of eight turns.
It remains to pick up four screws with a thread M4 20 mm long.

I used beautiful screws that are tightened by the clamping clamps of the deflection system on the neck of the kinescopes. But any, it is only necessary to put standard washers on each side of the spring.

The fastener kit for upgrading the pressure of the processor radiator is prepared. Everything is ready to install a new fixture device, but first need to dismantle the old one.
How to remove the processor radiator fixed on clips
To install a prepared new CPU radiator device, a radiator is required to remove. The radiator is fixed on the eye using four plastic clips. To be released, they need a screwdriver with a flat sting inserting each clips into the slot, and it turns its movable part counterclockwise by 90 °.

Then with hand pressing the radiator from above, take turns to pull out the moving parts of the clips up. Fixing pins will come out of the gap between the latch paws, and the radiator will easily come up.

On the left in the photo pin spread the latches, and they are securely fixed in the board. In the center. Mobile black detail clips raised up. On the right pin freed the latches, they no longer engage for the fee, and the radiator can easily be removed. Next, the clamps are removed from the sinks of the radiator fastening, they are no longer needed.
How to remove the cooler from the processor radiator
Coolers on processor radiators are usually attached in two ways: - with the help of latches and screws.
How to remove the cooler from the processor
enshrined with latch
After the radiator is removed, it is necessary to disappear from it the cooler and clean the ribs of the radiator from dust. The cooler also needs to be cleaned of dust and, if necessary, lubricate the bearing with graphite lubricant.

To remove the cooler from the radiator, you need to squeeze a screwdriver with a flat sting, located diametrically oppositely two rather tight latches.
How to remove the cooler from the processor
fixed with screws
On some modern motherboards, the processor radiator is attached using four long screws in the manner described above when modernizing the attachment.

The fee is not deformed, but if necessary, lubricate the noisy cooler have to be removed and the radiator, since the cooler to the radiator is fixed with the help of common screws.

For the convenience of installing the cooler and the radiator on the screws, grooves are made in which the curly locking washers are recorded, and in order to remove the lubrication cooler first need to be removed.

To do this, it is necessary to place a radiator with a cooler on the edge of the table in such a way that the wines can move freely along the axis, without resting in the surface of the table. Next, you need to put on the screw a wooden bar or plywood, so as not to spoil the thread, and put several shots hammer.

When removing the washers, it is necessary to be attentive so that the springs do not flush, otherwise they will later look for them. The cooler is removed and you can proceed to its purification from dust and lubrication.
Installing the cooler on the radiator is made in reverse order. Springs are put on the screws, they are running through the coolers and radiator mounting holes. Next on the screws are put on lock washers and plant on the previous place.

To put on the locking washer on the screw, you need to pick up a cut of a tube or a nut that freely puts on the entire length of the screw.

Next, the vice must be adjusted in such a way that there is a slightly larger distance between their sponges than the diameter of the screw. The hammer blows on the head head are clogged into the lock washer, until it sees into the groove.
If there is no vice at hand, you can take a tube or several nuts. The length of the tube or the total thickness of the nuts should be slightly larger than the length of the screw from the beginning of the thread to the protrusion.
You can not wear locking washers on the screws, but in this case, install a radiator with a cooler to the processor will be very uncomfortable.

The processor radiator and the cooler are collected and remained only to install them on the motherboard processor, without forgetting evenly smeared on the surface of the processor and the radiator an old thermal column (if it is not dried) or apply fresh.
How to apply thermal conducting paste
The old thermal conducting paste from the processor and the inverted surface of the radiator is required to completely remove, as it is thickly thick and if you install the radiator without replacing the paste, then the heat removal efficiency by the radiator from the processor will be lower.

The processor is better not to remove from the bed, but if you need it, it is enough to take the lever towards the lever and raise it up, further open the clamping frame and remove the processor.

The thermal conducting paste is made on the basis of silicone and is well removed by cotton cloth. Enough pressing the fabric to the surface is pretty lost.
Before applying a new thermal conducting paste, you need to check the made device for fastening the radiator, install the radiator and attract it with screws. If everything fell well, you can start the final installation of the radiator on the processor. Since the contacting surfaces of the processor and the radiator have good flatness, it is enough to apply a thin layer of thermal conducting paste on them. Requirements for the uniformity of application are not presented, since the paste has a soft consistency and when fitting well spreads well.

I applied screwdriver blade. Thermal conducting paste can be purchased at any store selling computer equipment. Sold in tubes or syringes. For applying, one millilita will be enough.
Installing the radiator on the processor
Now you can start installing the radiator. We put the radiator on the processor, orient it in such a way that there is access to the latches of the cooler, then if it is necessary for lubrication or replacement, it will be possible to remove the cooler without removing the radiator. The holes in the radiator fastening legs must be strictly over the holes in the motherboard.
It remains to spin four screws, and the radiator will be installed in its place. To ensure uniform pressure, it is necessary that the ends of all the screws oppose the metal plate to the same length. To create the necessary force of climbing the radiator to the surface of the spring processor, no less than half of its length should be compressed.

After the installer on the cooler radiator and connect it to the motherboard, the upgrade of the radiator clamping device to the processor on the motherboard can be considered complete.
If the system block does not provide for cooling the air supply processor from the environment, then I recommend it to quarrel a little, improving the processor cooling system by description in the site article
The disassembly of the system unit for the purpose of the maintenance of the procedure is sometimes complex. Especially if it comes to removing the cooler from the processor. The procedure itself is quite simple, but in the process there may be difficulties, especially with different types of fasteners.
Removal procedure
If you learn possible nuances, we are talking about, then the procedure does not seem so difficult. One should only remember that all actions should be done carefully. The main rules of disassembly is always: "Do not try to apply effort, especially if the" iron "resists them." Following such a rule will avoid unnecessary mechanical damage. To remove the cooler from the processor, you will need:
- Turn off a computer.
- Disable network filter and power cables.
Important! It will not be superfluous to give a computer stand 10 minutes Before further disassembly. This is connected immediately with two factors: heating and residual charge in capacitors. The first is just unpleasant. The second can cause tangible harm to the user and even components, with poor power supply insulation.
Note! In general, completely disconnect the wires and remove the RAM to remove the cooler from the processor is not necessary, but for the first 10-15 removions it is necessary. So that the hands are accustomed to the operation and could not harm the surrounding components.
- Remove yourself cooling Fan Together with the radiator from the processor. Almost always they are supplied assembly and removed together.
The procedure for removing the cooler with AMD or Intel processors depends on the method of its implementation and may require both minimal effort and tremendous physical costs. Each of the cases will consider separately.
Fastening cooler
The fastening is defined which algorithm for further action should be applied. Colding the cooling fan can be as follows:
- latches (different ways);
- screws;
- grooves;
- hybrid options.
Therefore, consider each of the types separately with the mention of the necessary tools.
Stalls
Latches are considered a common option for coolers. on a socket 775 (Intel)
Although there are also in other specifications. Budget fans are attached to the latches. These latches are the main vulnerable place for such cooling systems. 
To remove the cooler from the processor on the latches, you will need turn counterclockwise 4 mechanisms (you need to turn on the circle ¼). Holding for the iron part to pull the cooler.
If a stasters are blown away (They are very tender and effort to open bordered with effort to break) better contact the service center. Without proper experience, it is almost impossible to remove or install back the cooler with a damaged zag.
Screws
To remove such a cooling system requires twenty (Cross or corresponding screwing screw). Or an alternative tool like a thin plier to unscrew the screw. Showing prudence and caution can be cope with a knife, risking less than when opening a latch with bare hands. 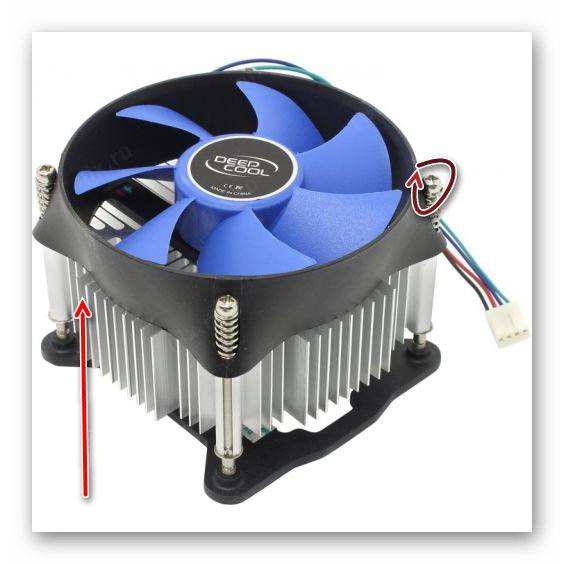
4 bolts are twisted (They are not removed from the fan body), after which the liberated element can be calmly removed.
Groove
Method of fastening characterized by processorsAMD. And their cooling systems. The design looks as follows and is characterized by a lever: 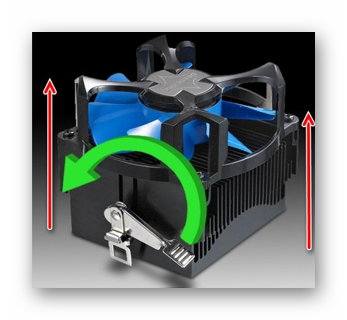
This lever will need to turn to free the cooling system, after which it can be pulled out.
Combined method
Combined fasteners are found in the so-called brand computers, where latch combined with bolts (less often meets immediately). The cooling system is made as simple as possible and is less susceptible to damage during disassembly. 
The disassembly algorithm repeats the actions for each of the corresponding types. Observes order: first screws, then latches. 
Liquid cooling systems are significantly more complicated. At the same time, for each model, the procedure is unique, so it is not possible to describe the overall procedure. 
Cooler is a cooling system that contributes to the correct operation of the system elements to which it is installed. Basically, they are installed on processors, chips and power supplies.
If you need to replace one of the items, you must first understand how to remove the cooler from the processor.
Rules for extracting cooler
It is worth noting that one algorithm for removing the cooler does not exist, it all depends on the manufacturer of the ventilation system, as well as the method of its attachment. But here's general recommendations:
- Before removing the fan from the processor, you must open the system unit and remove its side parts. In this case, it will be more convenient to work on the extraction of the cooler.
- Next, you must carefully examine the cooler, as there may be different fasteners. For example, if the system contains Intel CPU equipment, then to remove the cooler it is worth turning four pins in the direction indicated on them. In case an AMD CPU is installed on the processor, then the lever should be signed, pressing which will allow you to remove the cooler. Those who have established a non-standard system must use a screwdriver. Thus, it will be possible to remove the radiator from the processor.
- After the fasteners are disconnected, it is necessary to slightly raise the cooler and remove it from the system unit.
When the fan is removed, you can proceed to remove the processor. You can learn about this in the article.
The cooler is a special fan, which sues cold air and spends it through the radiator to the processor, thereby cooling it. Without a cooler, the processor can overheat, so when a breakdown, it must be replaced as soon as possible. Also, for any manipulation with the processor, the cooler and the radiator will have to remove for a while.
See also: How to replace the processor
- common data
common data
Today there are several types of coolers that are attached and removed in different ways. Here are their list:

Depending on the type of fastening, you may need a screwdriver with the desired section. Some coolers are soldered together with radiators, therefore, the radiator will have to disconnect. Before working with components of the PC, you must disable it from the network, and if you have a laptop, you need to extract the battery.
Step-by-step instruction
If you work with a regular computer, it is advisable to put a system unit in a horizontal position, in order to avoid a random dropping out of the maternal card components. It is also recommended to clean the computer from dust.
Perform these steps to remove the cooler:

If the cooler is spanned together with the radiator, then do the same thing, but only with the radiator. If you can not disconnect it, that is, the risk that the thermal paste is dried down at the bottom. To pull the radiator will have to warm it. For these purposes, you can use the usual hairdryer.
As you can see to dismantle the cooler you do not need to have any in-depth knowledge of the PC design. Before turning on the computer, be sure to install the cooling system in place.
We are glad that you could help you solve the problem.
Survey: Do you help this article?
Well nolumpics.ru.
How to remove the cooler and how to install the processor and cooler. Competent installation
Greetings to you friends on your blog, today we will talk about the cooler. We can say that each user of a personal computer knows
what such a cooler and almost every user had to remove the cooler to clean from dust or install a new one. Consider the process How to remove the cooler how to install a cooler and processor.
A little about cooler
Cooler is a radiator designed to cool the heated device. It consists of thin metal plates and fan.
When the plate is loaded, the plates are heated, the air flow guided by the fan cools these plates due to which prevents the heating of the system.
Coolers are different: noisy, silent, weak, powerful. Basically, the quality of the cooler is estimated by noise levels. A good cooler is considered to be the cooler with the noise level fluctuates in the range of 20 decibels, it's how to listen to a person who spelled in a whisper at a distance of 1 meter from you.
The process of removing the cooler
This article will be useful to especially beginners, when cleaning the cooler from dust, which is necessary to produce at least once a month and when replacing the thermal paste.
Before proceeding, you must completely disable the processor from the power supply. Each system unit from the side has a removable cover, we unscrew two screws on the rear panel and remove the lid.
As we said above, the coolers are different not only in terms of power and comfort but also by appearance. Some models are attached to the motherboard with one latch,
and others sit on four legs watch the picture below
In my case, the cooler is attached to one latch. Gently remove the cooler and disconnect the wires. In particular, when removing the cooler, the processor adhesive under it and removes along with the cooler.
Separate the processor from the cooler gently without sharp movements. Make sure that the legs on the processor in no case are not deformed, otherwise the computer will not turn on.
And now it is necessary to clean the cooler from dust. For this we need a brush or compressed air. You still need to check the thermal cooler, if it is completely dry, then it is necessary to change it to a new one to avoid overheating of the system.
The process of installing the cooler.
First of all, you need to install the processor. Here you need to be attentive and very careful. The process and the processor nest has labels to correctly put the processor in place. We look at the picture
We raise the handbrake at 90 degrees, insert the processor and lower the handbrake to the previous position.
In no case do not put pressure on the processor, otherwise, you deform the micro-leg on the processor. If for some reason you deformed the leg,
you do not need to panic, we will try to fix it to your previous place. We take the processor and look at that series of legs where we produced deformations,
and we will try to make it so that the leg was not fired from a number of other legs. This process is produced on the other hand. If you do not understand what we are writing comments.
Everything is now a processor we put in place. And now it is necessary to put the cooler fixing the processor center from the cooler.
If you are all done correctly, the cooler sits smoothly. When installing the cooler, in no case prescribe otherwise the processor receives damage.
Last destination Barcode Connect the wires to the fan on the former connector.
That's all friends, now in your hands there are competent instructions how to remove the cooler how to install a cooler and processor.
If you can't do something or have any questions, write in the comments or subscribe to my blog due to what you get free remote help.
I hope the information was useful to new meetings yet!
life-Pc.ru.
Remove cooler
This article will tell how correctly and safely remove the cooler from the processor. Trying to tear the fan accurate to the CPU great chance to damage the "heart" of your computer. How to avoid this? I will try to describe the correct algorithm and possible situations, drove.
How to remove the fan from the processor: an algorithm of action.
1. The computer before starting must be completely disconnected from the network. This is understandable, another thing: Is it worth waiting for full cooling?
Give cool radiator - opinions are diverged.
On the one hand, this is true: CPU can warm up to 90 degrees, burn hands. But at high temperatures of the thermalcaste, which is between the processor and the fan of more than militia; In other words, in a dry condition, the process of removing the cooler can be a real problem. But it does not work for all types of thermal paste. CCT-8 will not roll: it is still a color at any temperature.
I advise you to remove the fan when the radiator has not yet cooled. When touching it, the hand will be warm, but not hot.
2. Turn off the power of the cooler.
To do this, pull the plug strictly vertically.
Any loosening is unacceptable. Break the needle.
3. Remove the fan mount.
The fastener type depends on the motherboard and each specific device. On some computers are used brackets, on others - some latches. At first, it seems to be a problem, but in fact - nothing over complex.
If there are bolts, then unscrew them counterclockwise.
4. Above was the prelude, now we will perform the action. When everything is disconnected, pull out the cooler with the radiator. And here they will come. PROBLEMS.
With 90% probability of the CPU in the literal sense of the word adhesion to cooling. Because of the thermal paste. Be extremely careful: loosen up and down, go to the right, clockwise, etc. Gradually increase the strength and amplitude. Hurry or immediately, excessive efforts are prohibited.
Do not be surprised and not scared if you pull out the processor from the native socket.
P.S. Turn on the computer without a fan is to kill the processor. With warranty and control shots. Do not do it this way. Also before assembly, do not be lazy to change the thermal colon, good luck!
aswin.ru.
How to remove the processor from a computer?
 What is a computer processor? Many PC users, and especially beginners, the processor is called the entire system unit. And it is not true at all. The processor is a small part (a little less than a matchbox) of the computer, which is located in the system unit and is fixed on the motherboard. The main task is to process information. The more powerful the processor, the faster it works ("thinks") computer.

Many of us are constantly arguing over one important issue: What is the most important part in the computer? Some argued that this is the keeper of all information - a hard disk, others spoke about RAM, without the presence of which we would not be able to manage files that are located on the hard disk. But the answer to this question lies on the surface and is very simple. The most important, integral part of the computer is the processor. Thanks to the operation of this block, we can synchronize each installed device in the computer, and the stable and correct operation, completely depends on the performance of the processor. But in the end, the processor, like any other element of the computer, is taking off its set time, and it's time for its replacement to more improved.
Processor Removing Instructions
In order to find out how to remove the processor, you must carefully read this mini-instruction:

1. To begin with, turn off the system unit from the network (in the photo it is an even power cable). But it is better to turn off all connected devices and put the system unit on the side, as in such cases it will work more convenient.
Do not forget: you need to turn off the computer from the network, pulling the power cord from the outlet.

2. After it is necessary to remove the side cover from the body.

Turning off the power processor

Turning off fan power
3. Disconnect all running wires to the processor and fan. These wires give them food.

4. Remove the fan with the radiator - the cooling system.

5. Now you can remove the processor, but first of all, it is necessary to explore its design. As a rule, the attachment methods are made in the form of clamping levers located on both sides. When you press, they begin to be returned from each other, thereby freeing the processor from the whole structure. On the processor itself, there is also a pressure lever, it should also be left, after which I remove the processor.
6. Installation of the processor is performed in the reverse order. Please note that with the correct reciprocal position of the processor over the socket (its place), he should stand there without any difficulty. After secure it with a lever.
7. It should be remembered that before installing the cooler and the radiator, it is necessary to apply a thermal chaser to the surface of the processor, which will reliably protect it from all overheating.
Removing the fan processor

Dust is the main enemy of the computer, most often fans suffer from her. As a rule, there are three fans in the computer. One is on the video card, the second in the power supply, the third is a fan, a cooling processor. If it breaks the dust strongly, the processor cooling degree will significantly fall, which will affect the computer performance.
Before you need to deal with the mounting type. There are two types: latches and screws. If it is a latch, pull out two lever and remove it. When mounting in the form of a screw, you must use a screwdriver, carefully spin and remove the fan. As a rule, the cooling system of the processor consists of a fan and radiator and is a single collapsible block.
How to remove the radiator?

The radiator exists in order to disperse the heat released by the processor. Over time, the radiator loses its properties due to the dust accumulated on it and also needs removal and cleaning. Before removing the radiator from the processor, it is necessary to establish what kind of fastening it, they are the following type:
- on latches using a clamping bracket or piston (the most common mount);
- on thermoclane (mostly can be found on not expensive devices).
If the radiator with a piston fastening, then the process of removal does not deliver labor. It is necessary to squeeze the piston mustache on the back of the board and click on it, having done a similar operation with all the latches, you release the radiator. Next, we remove it and change to the new one, or you can simply replace the thermal paste.
If the radiator is pressed with brackets, then you need a screwdriver. The main task here is to beaten from the harden of the bracket. This procedure requires the use of physical strength, but should be extremely careful because the screwdriver can damage the device.
Removal from radiator glue is a very complex and dangerous operation, as you can easily damage both the processor and fee. The only exit is to warm up the thermocons. But this should be extremely neat, because overheating can become fatal for chipset.
Now you have become familiar with how to properly remove the processor from the computer's motherboard, and the fan with the radiator.
tOPRAT.RU.
How to remove the processor?

Most people borrowing a computer work on it until they buy a new one or the old one, but the computer also requires some maintenance, for example, the replacement of the thermal paste on the processor and removal of dust from the system unit, which ultimately may even exclude the option with breakdown. When replacing the thermal paste, it will be necessary to disassemble the cumbersome design from the cooler and the processor, and then we will look at how to remove the cooler from the processor, and how to remove the processor from the motherboard.
A person inexperienced can all seem like a damn difficult when he sees all sorts of latches holding a cooler on the motherboard. But it is generally most often found two types of fastening, one is used for AMD sockets, another for Intel sockets.
In the case of using massive coolers, fastening and can turn out to be screw.

Regardless of the method of fastening the cooler, the order of work will not change. First, turn off the computer, even the power cord from the outlet, and turn off the processor fan, disconnecting the cord from the motherboard.
The next step is dealt with the latches of the radiator, disconnecting it from the motherboard. Here it may notice the trouble, if the thermal paste has not changed for many years. She could completely dry and finish glue the processor cover to the base of the radiator. There is no big strength to apply it, but you need to start turning slightly and dismissed the radiator from the scene.
Now we need to free the processor by pressing the fastening of the socket. There are also two options, fastening the socket from AMD and Intel.
After the fastening of the processor is pressed, pull it very simple, for this you do not even need to make any effort.
Perhaps it will be interested in: Intel Core i7 processor, what is better? What is the best AMD or Intel processor manufacturer? The best AMD processors for games What processor is the best for games?
Hello everyone! Today I will tell you how to solve the problem when the radiator starred with the processor. When repairing personal computers, laptops and servers, it is often necessary to carry out prophylactic cleaning from the dust with the replacement of the thermal paste.
As known, the dried thermalcase can strongly close the processor with the radiator. Especially acute this problem rises for old computers on Socket 478 and other pin connectors. It turns out when you want to remove the radiator to replace the thermal paste, the radiator is removed with the processor.
What to do if the radiator starred with the processor
Of course, the most reasonable way to separate the radiator is neat rotation of it along the plane of the motherboardWhen the processor is still in a socket.
However, such a focus does not pass with cooling, in which the radiator mounting system has a restrictive frame or near the socket is closely condensers - there is no need to turn the radiator.
Remove the radiator from the processor easier if pull the radiator up along with the processor. It turns out such a picture.
How to apply a new thermal
Install the processor in place in the socket. In my case, cleaning the insides of the server was required, so a two-processor system is visible in the photo. With the second processor, I entered, as with the first one - everything went well.
 Cellular - what it is on the iPad and what's the difference
 Go to digital television: What to do and how to prepare?
 Social polls work on the Internet
 Savin recorded a video message to the Tyuments
 Menu of Soviet tables What was the name of Thursday in Soviet canteens
 How to make in the "Word" list alphabetically: useful tips
 How to see classmates who retired from friends?