How to find headers and footers in excel. Removing headers and footers in Microsoft Excel. How to remove footers
Headers and footers are text placed in the top and bottom margins of an Excel sheet. Headers or headers and footers can contain headings or technical information about the document.
This feature is not often used, so many users do not know how to remove headers and footers in Excel. If you also encountered a similar problem, then we suggest that you read this article. The information will be relevant for users of all modern versions of Excel, including Excel 2007, 2010, 2013, and 2016.
When users ask how to remove headers and footers, they often mean not the headers themselves, but the display mode of the Excel document in which they are displayed. The fact is that if the “Page Layout” display mode is enabled in the Excel document, then instead of one solid sheet, the user will see a paged sheet. At the same time, at the top and bottom of each page, where headers and footers should be, the inscriptions will be displayed: "Header" and "Footer".
If you have just such a problem and want to remove the display of these inscriptions, then you just need to change the page display mode to "Normal". To do this, go to the "View" tab and click on the "Normal" button.

You can also switch to normal display mode using the small buttons in the lower right corner of the Excel window (next to the zoom slider).
How to remove footers
If you really have headers and footers that appear at the top or bottom of the page when printed, and you want to remove them, then on the contrary, you need to turn on the “Page Layout” mode. To do this, go to the "View" tab and change the page display mode from "Normal" to "Page Layout".

After switching to the "Page Layout" mode, you need to double-click on the header and footer with the left mouse button.

As a result, the header will be highlighted, and you can remove it from the page using the Delete button on your keyboard.

After that, in place of the header and footer, the inscription "Header" will appear, which will not be displayed when printing. In order to continue working with the document, you can return to the normal display mode (tab "View" - "Normal").
Another way to remove headers and footers
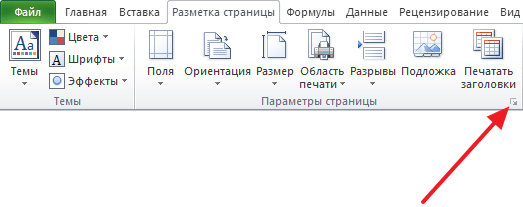
In addition, there is another way with which you can remove headers and footers from the pages of an Excel document. In order to use this method, you need to go to the "Page Layout" tab and click on the "Page Setup" button.
This will bring up the Page Setup window. Here you need to go to the "Headers and Footers" tab.

On the "Headers and Footers" tab, click on "Create Header" or "Create Footer" (depending on which header you want to remove).


At the end, you need to close the "Page Setup" window by clicking on the "OK" button.

This way you save changes to the headers and footers.
Headers and footers is information that is automatically inserted on each page of the document, such as the title of the document or its section. As soon as you press the button Headers and footers, the view of the document on the screen will change, the cursor will blink in the window called Page header, and a tab appears on the ribbon Working with headers and footers(Fig. 4.44).

The header may look different. You can select it from the button list Page header, or you can specify in the Header Elements group what you want to see on each page of your document. On fig. 4.44 the header will have the page number, date and current time. When you've played enough with the header, in the group Transitions press the button Go to footer.
Open button list Options, and you'll see that you can set a custom header for the first page and different headers for odd and even pages. For example, in fig. 4.45 the author and date are selected as the header.

In order to bring the document on the screen to your usual form after a set of headers and footers, on the tab View click the Normal button.
We will talk about the View tab in more detail in the corresponding section. In Group Text there are three more buttons. With their help, you can add an object to the table word art, a signature line and embed an alien object into the table (insert an object from another file so that it can be changed in the program in which it was created).
27.10.2012Printable Excel sheets often have elements at the top or bottom of the page. They contain company logos and details, date and time of document formation, page numbers, etc. These elements are called headers and footers in Excel. Let's learn how to work with them.
Page layout
When working with a file, headers and footers can only be seen when the sheet is displayed in Page Layout mode. You can select this mode on the "View" tab in the "Book View Modes" block.
Add text - page title. For example, let's specify the name of a travel company for a table-report on hotel bookings for a period. To do this, select the menu item "Headers and Footers" in Excel in the list of commands "Text" on the "Insert" tab.
The sheet will immediately be displayed in layout mode, and we will see the selected fields for the text at the top and bottom of the page. Here you can insert the required information. Both headers and footers are divided into three parts, each with a separate text or object added. Thus, on the top left, you can add, for example, a company logo, in the center - the name, and on the right - details. Likewise at the bottom of the page.
It should be noted that the ampersand (&) is a service character. Therefore, if the text you want to add contains this character, enter 2 characters in a row. That is, in the text "Horns & Hooves" write "Horns && Hooves".
After completing the input and changing the headers and footers in Excel, click in any cell to exit the edit mode. If you don't want to save your changes, press the Esc key.
From the "Page Layout" tab, you can call up the options window. To do this, click on the button to open the form in the lower right corner of any of the tab toolbars: “Page Setup”, “Fit” or “Sheet Setup”. The window that opens contains 4 tabs, of which we are interested in Headers and Footers.

This form allows you to customize the page headers and footers as much as possible, including or excluding them. To get started, click the Create Footer (or Header) button. Here you can not only enter the necessary text, but also format it.
The same window allows you to make settings: set special headers for even and odd, first and next pages, scaling and aligning margins, and also remove headers and footers in Excel. The same settings are available on the panel for working with headers and footers in the Design tab. The tab is only available in header editing mode.

Built-in elements
MS Excel offers pre-installed and ready-to-use inline elements and even entire headers and footers. They are available for selection in the menu, respectively, the top header and the bottom "footer" in the menu for working with headers and footers.

The most appropriate text containing the page number, date, name or file path is selected from the list. If none of the options is suitable, you can arbitrarily combine the necessary elements using the buttons on the "Header and Footer Elements" panel in Excel ("Designer" tab), adding not only the serial number, but also the number of pages, the date and time the file was generated, the name and file path, sheet name or drawing.
After working with the headings, you can click anywhere on the page to switch to editing the rest of the information on the sheet. At the same time, you will continue to see headers with footers. If you need to switch to the normal view of the sheets, just turn on the normal mode on the "View" tab, "Book View Modes" toolbar.
Sometimes it becomes necessary to remove the header and footer in Excel. For example, if the file came from outside, and for work and subsequent use, the information contained in the headers is of no value and is even undesirable.
To remove headers and footers, switch to page layout mode using the appropriate button on the View tab. Excel will display the normally hidden information. The second way to display headers and footers is to use the tool of the same name in the Text panel of the Page Layout tab.
To delete one or more blocks, select the required one and press the Delete or Backspace key on the keyboard. If you need to completely remove the header, footer, or both, this can be done in design mode by selecting "none" in the "Headers and Footers" panel in the menu, respectively, of the header or footer.

Now you know how to insert headers and footers in Excel, make settings and remove them if necessary.
A header or footer is any information that is printed in the top or bottom margin of a page. If the table is large and is located on several sheets, and a header and footer is specified in this table, then it is visible on each printed sheet of the document. Distinguish between header and footer. The header is above the printable area, the footer is below.
Headers and footers are usually used for page numbering. The header can also contain other information, such as the file name of the document or the date it was printed.
It is convenient to work with headers and footers in the Page layout mode. To switch to this mode, open the tab View -> Book View Modes and click on the Page Layout button.

To enter information in the header or footer, click in the header or footer field.


The header field is divided into three areas: left, center and right. Each of the areas can contain any information, including text and commands that ensure that the header and footer is filled with important information.
The text in the header field is entered and formatted in the usual way, like any text.
For example, in order for the page number to appear in the center of the header when printing a table, you must place the cursor in the central area of the header and click on the Design tab -> on the Page Number button.

As a result, the line &[Page] will appear in the header field, which, as soon as work with the header is completed, will be replaced by the page number.

Excel allows you to quickly enter commands in the header area. To do this, you need to place the cursor in a specific place in the header and click on the appropriate command button located on the Design tab -> Header and footer elements.

| Button | Team | Command result |
| 0021 | &[Page] | The page number is displayed in the header field |
| 0022 | &[Pages] | The header field displays the total number of pages in the table |
| 0023 | &[Date of] | The header field displays the current date |
| 0024 | &[Time] | The header field displays the current time |
| 0025 | &[Path]&[File] | The header and footer field displays the full path of finding the book, starting with the drive name, all subfolders, including the name of the book itself |
| 0026 | &[File] | Only the file name of the book is displayed in the header field |
| 0027 | &[Sheet] | The header field displays the name of the sheet in the workbook |
| 0028 | &[Drawing] | An image is displayed in the header field |
| 0029 | If an image is inserted in the header field, then the format of the image can be changed |
In the header field, you can specify the font that will be used to display the header, the size of the letters, and the color of the characters. To do this, use the Font tab in the Home menu.
Printable Excel sheets often have elements at the top or bottom of the page. They contain company logos and details, date and time of document formation, page numbers, etc. These elements are called headers and footers in Excel. Let's learn how to work with them.
Page layout
When working with a file, headers and footers can only be seen when the sheet is displayed in Page Layout mode. You can select this mode on the "View" tab in the "Book View Modes" block.
You will be interested:
Add text - page title. For example, let's specify the name of a travel company for a table-report on hotel bookings for a period. To do this, select the menu item "Headers and Footers" in Excel in the list of commands "Text" on the "Insert" tab.

The sheet will immediately be displayed in layout mode, and we will see the selected fields for the text at the top and bottom of the page. Here you can insert the required information. Both headers and footers are divided into three parts, each with a separate text or object added. Thus, on the top left, you can add, for example, a company logo, in the center - the name, and on the right - details. Likewise at the bottom of the page.
It should be noted that the ampersand (&) is a service character. Therefore, if the text you want to add contains this character, enter 2 characters in a row. That is, in the text "Horns & Hooves" write "Horns && Hooves".
After completing the input and changing the headers and footers in Excel, click in any cell to exit the edit mode. If you don't want to save your changes, press the Esc key.
Page settings
From the "Page Layout" tab, you can call up the options window. To do this, click on the button to open the form in the lower right corner of any of the tab toolbars: “Page Setup”, “Fit” or “Sheet Setup”. The window that opens contains 4 tabs, of which we are interested in Headers and Footers.

This form allows you to customize the page headers and footers as much as possible, including or excluding them. To get started, click the Create Footer (or Header) button. Here you can not only enter the necessary text, but also format it.
The same window allows you to make settings: set special headers for even and odd, first and next pages, scaling and aligning margins, and also remove headers and footers in Excel. The same settings are available on the panel for working with headers and footers in the Design tab. The tab is only available in header editing mode.

Built-in elements
MS Excel offers pre-installed and ready-to-use inline elements and even entire headers and footers. They are available for selection in the menu, respectively, the top header and the bottom "footer" in the menu for working with headers and footers.

The most appropriate text containing the page number, date, name or file path is selected from the list. If none of the options is suitable, you can arbitrarily combine the necessary elements using the buttons on the "Header and Footer Elements" panel in Excel ("Designer" tab), adding not only the serial number, but also the number of pages, the date and time the file was generated, the name and file path, sheet name or drawing.
After working with the headings, you can click anywhere on the page to switch to editing the rest of the information on the sheet. At the same time, you will continue to see headers with footers. If you need to switch to the normal view of the sheets, just turn on the normal mode on the "View" tab, "Book View Modes" toolbar.
Removing headers and footers
Sometimes it becomes necessary to remove the header and footer in Excel. For example, if the file came from outside, and for work and subsequent use, the information contained in the headers is of no value and is even undesirable.
To remove headers and footers, switch to page layout mode using the appropriate button on the View tab. Excel will display the normally hidden information. The second way to display headers and footers is to use the tool of the same name in the Text panel of the Page Layout tab.
To delete one or more blocks, select the required one and press the Delete or Backspace key on the keyboard. If you need to completely remove the header, footer, or both, this can be done in design mode by selecting "none" in the "Headers and Footers" panel in the menu, respectively, of the header or footer.

Now you know how to insert headers and footers in Excel, make settings and remove them if necessary.
 How to open RTF? How to open a .RTF file? What's in RTF files
 How to set the background and text color on a web page?
 How to make a background in an open office presentation How to change the background of a presentation in openoffice
 Data Validity Check
 Deleting, rearranging, and adding slides
 What to do if there is no sound on the computer
 Installing animated themes in Yandex