While working in Word, for some reason the top panel with functions is hidden. How can I get her back? What to do if the toolbar has disappeared in MS Word The toolbar in Word does not work
In this article
Constantly displaying the feed
You can set up your Office programs so that all Ribbon tabs and commands appear at all times.
Showing only the tab row
In Office programs, you can display only ribbon tabs in order, on the one hand, to free up space for the document, and on the other hand, to maintain the ability to quickly switch between tabs.

If you click the tab, the commands will appear and you can perform the necessary actions. When you return to the document, all commands will be hidden again.
Collapse or expand the ribbon
If necessary, you can collapse the ribbon to create more space for the document you are creating. To hide the ribbon, double-click any tab on it or press CTRL+1.
To show the ribbon again, double-click any tab or press CTRL+F1.
If the feed is not displayed at all
If the ribbon is completely hidden and no tabs are visible, it may be set to auto-hide. click the More icon
In the upper right corner of the screen. This will temporarily restore the tape.
When you click on a document sheet, the ribbon will be hidden again. If you want to display the feed permanently, follow the steps above to pin it.
additional information
Customize the Ribbon in Office
Rolling up the tape
If necessary, you can collapse the ribbon to create more space for the document you are creating. To do this, click the arrow Collapse arrow in the upper right corner.
To show the ribbon again, click the arrow again.
additional information
Customize the Ribbon in Office
Rolling up the tape
The Ribbon cannot be removed or replaced with the toolbars and menus that were available in previous versions of Office. However, you can minimize it to free up screen space.
Constantly rolling up the tape
Click the button
Select an item from the list Collapse the ribbon.
To use the minimized ribbon, click the tab you want, and then choose the option or command you want.
For example, if the ribbon is minimized, you can select text in a Word document, open a tab home and then in the group Font select the desired font size. Immediately after this, the tape will roll up again.
Temporarily folding the tape
To quickly collapse the ribbon, double-click the name of the active tab. To restore the feed, double-click the tab again.
Tape recovery
Click the button Customizing the Quick Access Toolbar
Select an item from the list Collapse the ribbon.
Keyboard shortcut: To collapse or expand the ribbon, press CTRL+F1.
support.office.com
Customize the Quick Access Toolbar - Office Support

Notes:
You can only add commands to the Quick Access Toolbar. You cannot add the contents of most lists to it, such as indentation and spacing values or individual styles available on the ribbon. However, you can customize the feed the way you like. For example, you can create your own tabs and groups for frequently used commands.
Intended action:
How to add commands to the Quick Access Toolbar
Add a command that is not on the ribbon to the Quick Access Toolbar
Removing a command from the Quick Access Toolbar
Change the order of commands on the Quick Access Toolbar
Grouping commands by inserting a separator between them
How to move the Quick Access Toolbar
Customize the Quick Access Toolbar using the Options command
Restoring the Quick Access Toolbar to default settings
Export a customized Quick Access Toolbar
Import a customized Quick Access Toolbar
Reasons for the appearance of the green ball icon

Note: In the 2007 Office system, you can click the Microsoft Office Button and then right-click one of the commands. A context menu will open containing the “Add to Quick Access Toolbar” command. In Office 2010, after switching to a tab File this option is not provided.
Add a command that is not on the ribbon to the Quick Access Toolbar
Click the button Customizing the Quick Access Toolbar and select the menu item Other commands.

On the list Select commands from select item Commands not on tape.
Find the command you need in the list and click the button Add.
Removing a command from the Quick Access Toolbar
Right-click the command you want to remove from the Quick Access Toolbar and select Remove from Quick Access Toolbar.
Change the order of commands on the Quick Access Toolbar
Customizing the Quick Access Toolbar.
In the window Customizing the Quick Access Toolbar click the team you want to move and click the arrow Move up or Move down.
Grouping commands by inserting a separator between them
Commands can be grouped using a separator to make the Quick Access Toolbar appear to contain sections.
Right-click the Quick Access Toolbar and select Customizing the Quick Access Toolbar.
On the list Select commands from select element Frequently used commands.
Select <разделитель> and press the button Add.
To place the separator in the desired location, use the arrows Move up And Move down.
If you are not happy with the current location of the Quick Access Toolbar, you can move it to another location. If you feel that the area next to the program icon is too far from the work area, you can move the panel closer. When the panel is located below the ribbon, it somewhat limits the size of the work area. Therefore, if you want to expand it, it is better to leave the Quick Access Toolbar where it is by default.
Click the button Customizing the Quick Access Toolbar
Select an item from the list Place under the ribbon or Place above the ribbon.
Customize the Quick Access Toolbar using the Options command
Using the command Options You can add commands to the Quick Access Toolbar, remove them, and change their order.
Open the tab File.
On the menu Reference select item Options.
Click the button Quick Access Toolbar.
Restoring the Quick Access Toolbar to default settings
Right-click the Quick Access Toolbar and select Customizing the Quick Access Toolbar.
In the window Customizing the Quick Access Toolbar click the button Restore default settings and select a team Restore Quick Access Toolbar Only.
Export a customized Quick Access Toolbar
Ribbon and Quick Access Toolbar settings can be exported to a file that other employees can import and use on their own computers.
Open the tab File.
On the menu Reference select item Options.
Click the button Quick Access Toolbar.
Click the element Import and export and select a team Export all settings.
Import a customized Quick Access Toolbar
You can import a settings file to change the current appearance of the Ribbon and Quick Access Toolbar. Importing settings allows you to ensure the same appearance of Microsoft Office applications for all employees or simply on different computers.
Important: When you import a Ribbon settings file, any previously configured Ribbon and Quick Access Toolbar settings will be lost. If you may need to restore your current settings, you should export them before importing the settings file.
Open the tab File.
On the menu Reference select item Options.
Click the button Quick Access Toolbar.
Click the element Import and export and select a team Importing a Settings File.
For more information on how to customize the Ribbon, see the articles Customizing the Ribbon.
Reasons for the appearance of the green ball icon
The green ball icon appears when a custom group or command has been added to the Quick Access Toolbar after customizing the Ribbon, but has not been assigned an icon.
This icon is used in the following cases:
when adding a user group to the Quick Access Toolbar;
so that you can distinguish the user-customized ribbon from the default ribbon.
Add an icon representing a custom group or team
Open the tab File.
In Group Reference select team Options.
Click the button Customize the Ribbon.
In the window Customize the Ribbon on the list Customize the Ribbon select the added user group or team.
Click the element Rename and then in the list Symbol click the icon.
In the dialog box Renaming click the button OK.
For more information on how to customize the Ribbon, see the articles Customizing the Ribbon.
In this article:
Moving the Quick Access Toolbar
Adding a command to the Quick Access Toolbar
Moving the Quick Access Toolbar
There are two options for placing the Quick Access Toolbar.
In the upper left corner next to Microsoft Office button
(default location)
Below the ribbon, which is a Microsoft Office Fluent user interface element
If you don't want the Quick Access Toolbar to appear in its current location, you can move it to another location. If you find the default location near Microsoft Office Button
The distance between the work area is too large to be comfortable, you can move it closer to the work area. The location below the ribbon captures in the work area. Therefore, if you want to increase your work area, you can save to the Quick Access Toolbar in the default location.
Click the button Customizing the Quick Access Toolbar
Select an item from the list Place under the ribbon or Place above the ribbon.
Adding a command to the Quick Access Toolbar
You can add one of the commands that appear on the Microsoft Office Fluent ribbon to the Quick Access Toolbar.
The size of buttons that represent commands cannot be increased using Microsoft Office settings. To do this, you can only reduce the screen resolution.
The Quick Access Toolbar cannot be displayed as multiple lines.
You can only add commands to the Quick Access Toolbar. You can't add the contents of most lists to it, such as indentation and spacing values or individual styles available on the ribbon.
To display the command you want to add to the Quick Access Toolbar, select the appropriate tab or group on the ribbon.
Right-click the command, and then select Add to Quick Access Toolbar.
Notes:
support.office.com
How to Pin the Toolbar in Word
For writers, copywriters, and office workers, working in the Word text editor takes a lot of time. It is much more convenient to type texts if bookmarks and their contents are customized for a specific user. Not everyone knows how to pin the toolbar in Word. Setting up command buttons and tools is not a very difficult task.
Pin a new tab
On the new tab you can place the tools and quick access buttons you need for your work.
- To pin a new tab to the toolbar, click “File” and select “Options” at the bottom left.
- In the text editor options that open, select “Customize Ribbon”.
- The Customize Ribbon and Keyboard Shortcuts window appears. In it, click the “Create tab” button at the bottom. This window can be opened faster by right-clicking on the ribbon and selecting “Customize Ribbon...” from the context menu.

In Word 2010, a completely blank tab appears on the ribbon called New Tab. Now you can fill it with the necessary buttons and commands using the ribbon settings.
Adding buttons and commands
You can choose the combination of commands in a new tab at your discretion, regardless of their location in other tabs.
- Open the ribbon settings; on the left you can see a list of buttons and commands used when working with text.
- The right column contains buttons already displayed on the ribbon tabs; you can edit and pin new tools in each. To do this, a “New Group” is created in each tab.
- In the left column, select the required command, for example, “Create,” and in the right column, select the placement location. In our case it is “New Group (Custom)”. Word highlights the selected items in blue.
- Next, click the “Add” button in the middle of the page.

New commands can be seen on the ribbon tab; the fewer new tools, the larger they are.
You can move a tab to the right in “Ribbon Settings...” by clicking on it with the left mouse button and dragging it up or down.
Quick Access Toolbar
You can pin toolbar buttons that you use all the time to the Quick Access Toolbar. Moreover, add not only the items proposed by the developers, but also other text editing tools.
- Having opened the context menu of the Quick Access Toolbar, select “Other commands”
- A window with two columns will open. On the left you can select the required tool, on the right you can see the Quick Panel buttons.
- Having selected the required item on the right, click the “Add” button.


The more tabs and icons, the smaller they are, and they become inconvenient to use. Before you pin the toolbar in Word, you need to think through the functionality of the new commands.
windowsfree.ru
How to get the toolbar back in Word
The Microsoft Word text editor is very functional. In addition to typing and designing text, here you can create various figures, graphs and tables, and perform several simple actions with drawings. Where are all the tools necessary for this? That's right, on the Toolbar.
It is located at the top of the page of an open document, and with Word 2007 on it you see not only tabs, but also the main buttons that are used for work. In this article, we will figure out what to do if the toolbar in Word has disappeared, and instead of the usual view, only the main names at the top are visible. I’ll also tell you about the quick access panel and how to add all the necessary buttons to it.
If the Word document you opened looks like the screenshot below, then to restore the toolbar, just click on the small arrow pointing down in the upper right corner of the window.
After this, all the usual groups and commands will be visible again. And if you need to leave only a sheet on the page, then you can hide the top ribbon by clicking on the same arrow, only now it points up. This can be used if you need nothing to distract you while working with a document.
If you have Word 2013 or 2016 installed, then to display the toolbar you need to click on the “Ribbon Display Options” button, which is located to the right of the file name, next to the minimize, full screen and close buttons.
After clicking, a small menu will open. The first item automatically hides the ribbon - the window expands to full screen and it hides; when you hover the cursor at the very top, it appears. When you click on the second item, only the menu items “Home”, “Insert”, “Design” and others will remain. If you choose the last option, then you will be able to secure not only the names of the items, but also the commands - this is actually what we need.
Now let's figure out what to do if it is not the control panel itself that has disappeared, but some tabs on it. Go to “File” at the top and select “Options” from the left list.
A window like this will open. Go to the Ribbon Customization tab.
For example, I didn’t have a “Developer” tab on the toolbar. So I put a tick in front of it. To save the changes made, click “OK”.
After this, the item we need will appear, and you can use all the commands that are in it.
In Word, in addition to the toolbar, there is also a quick access panel. You can add icons to it for the commands you use most often. It is displayed either below or above the ribbon. By default, it has three buttons: save, cancel or return.
To customize it, click on the little black arrow pointing down and select "More commands" from the list.
Look for the desired command in the list, select it by clicking the mouse, and then click “Add”.
Everything that is in the area on the right will appear in the Quick Access Toolbar.
If necessary, all items can be arranged in the order that suits you. To do this, select one and change its position using the up/down arrows on the right. To ensure that changes made in Word are saved for all other files, select “For all documents” in the top field. When finished, save by clicking "OK".
Removal follows a similar principle. Open a familiar window, select an unnecessary command and click “Delete”. Save by clicking “OK”.
That's all. Now you know not only how to get the hidden toolbar back, but also how to customize it and the quick access panel in Word.
« Previous entry
Next entry »
comp-profi.com
Customize the ribbon and toolbars in Office for Mac
In Office 2016 for Mac, you can set Quick Access Toolbar options and customize the Ribbon to your liking. You can change the default tabs that appear or create your own tabs and groups for frequently used commands.
Note: However, you cannot rename standard commands and change the icons assigned to them or their order.
Customize the Ribbon

Here's how to customize your feed:
Renaming tabs: to rename a tab, for example home, Insert or Constructor, select it in the field Customize your feed and select
> Rename.
Add a new tab or group: To add a new tab or group, click
Under the field Customize your feed and select Create a tab or To create a group.
Removing tabs: Only custom tabs can be deleted. Select a tab in the field Customize your feed and click
Customizing the Quick Access Toolbar
If you just need to quickly access a few commands, use the Quick Access Toolbar. These are icons that always appear above the ribbon, no matter which tab is selected.

Customize the Ribbon
Office application used:
Word
Changing the tab order
And select item.
Note: Tab home impossible to move.
Click the button Ready.
Hiding tabs
On the right side of the ribbon, click
And select the item Change the order of ribbon tabs.
On the tab, select a command
Click the button Ready.
Show hidden tabs
On the right side of the ribbon, click
And select the item Ribbon options.
In chapter Settings
Show or hide groups in tabs
The commands are distributed into logical groups, which are located on different tabs. Some groups are hidden by default, but can be made visible.
On the right side of the ribbon, click
And select the item Ribbon options.
In Group Settings do one of the following:
On the right side of the ribbon, click
And select the item Change the order of ribbon tabs.
Select a team Reset.
On the right side of the ribbon, click
And select the item Ribbon options.
In chapter Are common
PowerPoint
Changing the tab order
On the right side of the ribbon, click
And select the item Change the order of ribbon tabs.
Drag the tab to the desired location.
Note: Tab home impossible to move.
Click the button Ready.
Hiding tabs
The following steps allow you to hide a tab until the user can see it again. The tab will remain hidden even if you close and reopen the application.
On the right side of the ribbon, click
And select the item Change the order of ribbon tabs.
On the tab, select a command
Click the button Ready.
Show hidden tabs
On the right side of the ribbon, click
And select the item Ribbon options.
In chapter Settings, select the checkbox for the tab you want to display.
Restore the default order of ribbon tabs
On the right side of the ribbon, click
And select the item Change the order of ribbon tabs.
Select a team Reset.
Hide or show group names on the ribbon
By hiding group names, you can free up additional workspace.
On the right side of the ribbon, click
And select the item Ribbon options.
In chapter Are common Do one of the following:
Excel
Do one of the following:
Changing the tab order
On the right side of the ribbon, click
And select the item Change the order of ribbon tabs.
Drag the tab to the desired location.
Note: Tab home impossible to move.
Click the button Ready.
Hiding tabs
The following steps allow you to hide a tab until the user can see it again. The tab will remain hidden even if you close and reopen the application.
On the right side of the ribbon, click
And select the item Change the order of ribbon tabs.
On the tab, select a command
Click the button Ready.
Show hidden tabs
On the right side of the ribbon, click
And select the item Ribbon options.
In chapter Settings, select the checkbox for the tab you want to display.
Restore the default order of ribbon tabs
On the right side of the ribbon, click
And select the item Change the order of ribbon tabs.
Select a team Reset.
Hide or show group names on the ribbon
By hiding group names, you can free up additional workspace.
On the right side of the ribbon, click
And select the item Ribbon options.
In chapter Are common Do one of the following:
Show or hide the toolbar
A check mark appears next to the names of the toolbars currently displayed.
When you open an Office application, the same toolbars that appeared the last time you used the application appear.
If you don't see buttons on the standard toolbar, click
At the right end of the toolbar. If you are using Office on Mac OS X 10.7 (Lion), this button does not appear on the standard toolbar.
On the menu View hover over element Toolbars, and then select the toolbar you want to show or hide.
Notes:
Docked or floating toolbar
Some toolbars can be docked directly below the standard toolbar. A floating (undocked) toolbar can be positioned anywhere on the screen.
If a panel does not have a checkbox Pin, it cannot be docked under the standard toolbar. In this case, any floating panel can be manually dragged and docked under the menu bar.
If the standard toolbar is displayed, it must be docked.
On the menu View select item Toolbars, and then - Customizing Toolbars and Menus.
Go to the tab Customizing Toolbars and Menus.
In column Show The toolbars currently displayed are indicated.
In chapter Pin Check or uncheck the desired toolbar.
Notes:
Add or remove buttons and commands on the toolbar or menu bar
On the menu View select item Toolbars, and then - Customizing Toolbars and Menus.
Go to the tab Customizing Toolbars and Menus.
Check the box Show opposite the toolbar you want to change.
Go to the tab Teams.
Do one of the following:
Customize the name or appearance of a menu command or toolbar button
On the menu View select item Toolbars, and then - Customizing Toolbars and Menus.
Go to the tab Customizing Toolbars and Menus.
In chapter Show
In chapter Pin Check the box next to the toolbar with the button or command you want to change.
Important: You can change the properties of toolbar buttons or menu commands only when the toolbar is undocked. You cannot change the properties of buttons or menu commands on the standard toolbar.
On the toolbar or menu bar, double-click the button or command that you want to change.
Make the necessary changes.
Almost all users who have at least once opened the Word editor remember the program’s workspace: at the top there is a control panel with various sections and functions. After analyzing the sequence of user actions, the developers grouped the commands into separate blocks, thereby making it easier to find the required option. In this article we will tell you how to pin the toolbar in Word if it is “hidden” under a document.
The hidden tape mode is especially convenient to use on netbooks and laptops with a small screen. It allows you to increase the view of the page and not be distracted by unnecessary details.
Proven methods:
id="a1">- Method number 1: you can pin the toolbar in Word by double-clicking on the panel, and you can display it again in the same way.
- Method number 2: near the quick access panel, which is responsible for saving the document and canceling actions, you will see an arrow, clicking on which will open the context list. By checking the box next to the “Collapse Ribbon” command, you will hide the panel, and by removing it, you will display it again.
- Method number 3: right-clicking on any empty field will bring up a short list of commands, including “Collapse Ribbon”.
The state of the ribbon remains after closing the document, regardless of which of the listed methods you used. In the collapsed position, the menu will open commands when you hover the mouse over the required tab, and then “hide” the commands again.
Developers from Microsoft, starting with Office 2007, have radically changed the familiar application interface. Instead of the familiar list of menus, a whole ribbon appeared in Word.
At one time, many copies were broken in disputes about how convenient this innovation was. But the firm position of the designers of the most popular office suite, who included a similar interface in all newly developed programs, made all conversations pointless. I just had to calm down and learn to work with a new tool.
The ribbon has many customizable options. And one of them is the ability to collapse the menu into a small line when there is no mouse selection.
The function is convenient in principle, but for some it is a source of unnecessary irritation during operation. The ribbon constantly disappears from view; the user has to make unnecessary mouse movements to open it and select the necessary tool.
Knowing the features of Microsoft applications, it is clear that to change a parameter you need to check or uncheck the box. Let's look for where she could be.
Let's try right-clicking on the collapsed toolbar.
We now have a context menu that looks like this.

Now if you try to uncheck the “Collapse Ribbon” item, it will appear on the screen and remain there, even after clicking on the free space of the document.
The context menu will look like this.

As a result, the tape does not disappear anywhere, and you can concentrate on preparing the necessary document.
P.S. If you want to quickly learn how to work on a computer, master all the intricacies, without spending months and years of your time on training, then I recommend you my video course on DVD
Instructions
In the latest versions of the Office software package (2007 and 2010) from Microsoft, the menu bar located at the top of the application window and called the “Ribbon” is used as the main tool for performing most operations. If you do not see this panel in Word, Excel, Power Point and others, move the cursor to the upper left part of the window in the area with the “Save”, “Undo Entry”, “Repeat Entry” buttons.
Click on the icon on the far right with the arrow pointing down. In the menu that opens, click the last item: “Collapse Ribbon.” The response to this action will be the appearance of the main panel in your usual place.
If you “lost” the bookmarks bar, which is also located at the top of the window as a separate menu bar, press the keyboard shortcut Ctrl+Shift+B - the bookmarks bar will immediately appear. The same action can be performed by clicking on the wrench icon, and then selecting the “Bookmarks” and “Show bookmarks bar” menu items.
In the Opera browser, any panel that the developers placed at the top of the window can be hidden and displayed again using the appropriate command. The list of commands can be accessed by clicking the Opera button in the upper left corner of the window. Select the “Toolbars” item in the menu and check the box next to the panel you need (addresses, tabs, etc.) to restore it to the working application window.
If you have a Firefox browser, you can restore or hide any menu bar by clicking the Firefox button and selecting Settings. And Internet Explorer users just need to right-click in a free area of the bookmarks bar and check the box in the context menu for the panel that you want to restore.
The toolbar in Photoshop contains the designer’s main tools: brushes, lasso, stamps, etc. It is almost impossible to work without it; if for some reason it disappears, then in order to return it, follow these steps.
Instructions
You will see a list of all Photoshop panels that . Find it under the name “Tools” and left-click on it. A rectangle with images of various tools will appear: brushes, pipette, pencil, eraser, etc.
Grab the panel with the left mouse button by the header (the top empty field), drag it to a convenient location on the screen.
That's it, enjoy your work.
Toolbars are the most important control tools for any running program and are necessary for every user. Toolbars can disappear for a variety of reasons, depending on the settings of the application itself. In this case, we are looking at restoring the toolbar of the Microsoft Office application.

You will need
- - Microsoft Office 2003
Instructions
Select the “Settings” item in the “Tools” menu and call the context menu of the menu to be restored by right-clicking to perform the operation of restoring the initial parameters of the selected menu.
Use the Reset command and click the Close button in the Settings dialog box you opened earlier.
Return to the Tools menu and go to Customize to restore the original set of buttons and toolbar menus.
Go to the “Toolbars” tab of the dialog box that opens and specify the panel to be restored in the “Toolbars” field.
Select the Always Show Full Menus check box on the Options tab of the Customize dialog box to restore the toolbar display to its original settings, and click the Reset button on the Toolbars tab to apply the selected changes.
Return to the Tools menu and go to Settings to restore the original settings for the built-in toolbar button or menu command.
Go to the "toolbars" tab and apply the checkbox to the desired toolbar box.
Call the context menu of the toolbar button to be restored by right-clicking and specify the “Reset” command to restore the initial operating parameters.
Go to the menu containing the desired command and call the command’s context menu by right-clicking.
Select "Reset" to restore the initial settings of the selected command.
Return to the “Tools” menu and go to “Settings” to perform the operation of restoring the standard sets of toolbar buttons and commands of the selected menu.
Go to the "Options" tab of the dialog box that opens and click the "Reset" button.
note
Restoring a custom toolbar using the Reset button is not possible.
Helpful advice
Clicking the Reset button restores all built-in submenus of the selected toolbar menu.
Sources:
- Restore buttons, commands, and toolbars to their original settings
When a malfunction occurs in the operating system, not necessarily in Windows, the functionality of some programs sharply declines. For example, sometimes several panels disappear in the Firefox browser, making it difficult to navigate to a web page even using search engines.

You will need
- - Internet browser Mozilla Firefox.
Instructions
When you launch your browser, you may find that the navigation bar, address bar, etc. are missing from the displayed panels. There are times when, due to a “lucky” coincidence, absolutely all the panels disappear. In such cases, you should not panic, reinstall your Internet browser, or, much worse, update the operating system version.
Almost all program presets can be changed through the settings menu, but what if this menu is not displayed. In the latest releases of the browser, this defect has been corrected, and when you press the Alt key, the top line of the menu appears. Once you release the key, the menu will disappear again.
Therefore, you need to hold down the Alt key, click on the “View” menu and select the “Toolbars” item. In the list that opens, you need to check the missing panels at the top of the browser. You can also change the arrangement of panels and individual icons by selecting the “Customize” item in the “Toolbars” menu item.
In the window that opens, you will have access not only to panels, but also to other icons (commands) that are not added to the browser by default in order to save space for displaying Internet pages. For example, if you use information from pages to quote in forums, Internet messengers or other means of communication, you can display elements of working with text (commands “paste”, “cut” and “copy”).
If you don’t remember exactly which panel was located and where, just click the “Restore” button in the open window and all panels will return to their previous location. You can also change the display of existing icons by adding captions to them or removing the icons, leaving only the text (the “Show” drop-down list). To finish working with the toolbar settings, click the “Close” button; restarting the browser is not required.
The taskbar contains the most important elements of the Windows graphical interface - the operating system main menu button, the notification area and icons of open application windows. The user can change the position, size and some aspects of its behavior. Sometimes this leads to not the most convenient options for placing the taskbar and it has to be returned to its original position.

Instructions
Before manipulating the taskbar, make sure it is not docked in its current position. To do this, right-click on the free space on it. In the pop-up menu there should not be a checkmark in the line “Pin the taskbar”, and if there is one, remove the checkmark by clicking on this inscription.
If the taskbar is positioned along the left, right, or top edges of the screen, you can simply drag it back down. Do this using the left mouse button, hovering over the free space of the panel.
In the latest versions of the operating system - for example, Windows 7 - it is possible to select the desired position in a drop-down list instead of dragging. It is placed in a separate window with settings for the properties of the taskbar and the Start menu - open this window by selecting “Properties” in the taskbar context menu. Select one of the four placement options in the list under “Taskbar position on screen” and click OK.
Sometimes, to return the taskbar to its place, it is enough to move the mouse pointer to the bottom border of the desktop. In the settings of this graphical interface element, you can set the command to hide it to save work space. In such cases, the panel pops up from the edge of the screen only when you move the mouse pointer to it or press the Win key. To cancel this setting, uncheck the “Automatically hide the taskbar” checkbox - it is placed in the same settings window, the call of which is described in the previous step.
Has the toolbar disappeared in Microsoft Word? What to do and how to get access to all those tools without which working with documents is simply impossible? The main thing is not to panic, just as it disappeared, it will return, especially since finding this loss is quite easy.
As they say, everything that isn't done is for the best, so thanks to the mysterious disappearance of the Quick Access Toolbar, you can learn not only how to get it back, but also how to customize the elements that appear on it. So let's get started.
If you are using Word 2012 or higher, you just need to click one button to return the toolbar. It is located in the upper right part of the program window and looks like an upward arrow located in a rectangle.

You press this button once, the disappeared toolbar returns, press it again - it disappears again. By the way, sometimes you really need to hide it, for example, when you need to concentrate entirely on the content of the document, and so that nothing unnecessary distracts.

This button has three display modes; you can select the appropriate one just by clicking on it:
- Automatically hide the feed;
- Show tabs only;
- Show tabs and commands.

The name of each of these display modes speaks for itself. Choose the one that will be most convenient for you while working.
If you are using MS Word 2003 - 2010, to enable the toolbar you must perform the following manipulations.
1. Open the tab menu "View" and select "Toolbars".
2. Check the boxes next to the items that you need to work.
3. Now they will all appear on the Quick Access Toolbar as separate tabs and/or tool groups.
Enable individual toolbar items
It also happens that not the entire toolbar “disappears” (is hidden, as we have already figured out), but its individual elements. Or, for example, the user simply cannot find some tool, or even an entire tab. In this case, you need to enable (configure) the display of these very tabs on the quick access panel. This can be done in the section "Options".
1. Open a tab "File" on the quick access panel and go to the section "Options".

Note: In earlier versions of Word, instead of a button "File" there is a button "MS Office".
2. In the window that appears, go to the section "Customize the feed".

3. In the “Main Tabs” window, check the boxes next to the tabs that you need.

- Advice: By clicking on the plus sign next to the tab name, you will see lists of groups of tools that these tabs contain. By expanding the “pluses” of these items, you will see a list of tools presented in the groups.
4. Now go to the section "Quick Access Toolbar".

5. In section "Select commands from" select item "All teams".

6. Go through the list below, when you find the required tool there, click on it and press the button "Add" located between the windows.

7. Repeat the same step for all other tools that you want to add to the Quick Access Toolbar.
Note: You can also remove unnecessary tools by clicking the button "Delete", and sort their order using the arrows located to the right of the second window.
- Advice: In chapter "Customize the Quick Access Toolbar" located above the second window, you can choose whether the changes you make will be applied to all documents or only to the current one.

8. To close a window "Options" and save your changes, click the button "OK".
Now the quick access panel (toolbar) will display only the tabs you need, groups of tools and, in fact, the tools themselves. By properly setting up this panel, you can significantly optimize your working time, thereby increasing your productivity.
 Signing Firefox extensions
 How to make and connect a Bluetooth adapter for a car radio with your own hands Bluetooth aux adapter for a car radio
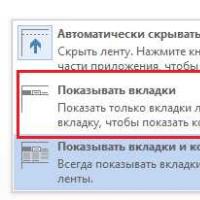 While working in Word, for some reason the top panel with functions is hidden
 Similar to the query conditions
 Using selections in DCS How auto-filling of available fields in the data composition scheme works
 Long arms: remote computer control from Android devices
 Paid courses on making money on the Internet - free!