How to disable firefox digital signature. Signing Firefox extensions. What happens?
In light of the latest events related to the release of Mozilla Firefox 48, which caused confusion among some users due to the mandatory presence of a signature for extensions, people faced with this problem were faced with a choice: either:
- do not use unsigned extensions (bad option);
- use unbranded assemblies;
- go in a roundabout way, trying to disable checks by any means, some of which are suggested in the following comments:
- sign the required extension yourself.
For this we need:
- account on addons.mozilla.org
- installed nodejs version >= 0.10
- npm version >=3.0.0 (npm up npm)
- jpm for nodejs (npm install jpm).
So, your account has been registered, the software environment has been installed, you can get started.
We take the experimental extension and unpack it into a separate folder; in our case, we use a copy of the repository located at https://github.com/dillbyrne/random-agent-spoofer.
We get the following directory structure:
test\
lib\
doc\
data\
.gitignore
LICENSE
package.json
README.md
If you are using a ready-made extension, then in the root of the folder where it is unpacked, you need to delete the files “bootstrap.js” and
“install.rdf”, they are created by the assembly program, and when modifying already signed add-ons, also the “META-INF” folder. Because Since we are dealing with an add-on that has not yet been assembled, this is not required. The next step is to edit the “package.json” file, located again in the root of the directory of the unpacked extension. In our case, its beginning looks like this:
{
"name": "random-agent-spoofer",
"title": "Random Agent Spoofer",
"id": "jid1-AVgCeF1zoVzMjA@jetpack",
"description": "Allows the use of various browser profiles (including useragent ,platform, oscpu, accept headers and other options), which it can randomly switch between after a chosen period of time has expired",
"author": "dbyrne",
...
}
If it contains the “id” parameter, it must either be changed or deleted. Otherwise, we will receive an error when we try to sign that we are not its owner.
Next, we command the following “spell” to assemble the extension into an archive:
Jpm xpi --addon-dir<путь к папке куда распаковали>
Or simply:
Jpm xpi if the current directory is the root of the unpacked extension.
The output should be a file of the assembled extension.xpi, which we will sign.
Now let’s prepare our api key, for which we registered at addons.mozilla.org. It can be seen at addons.mozilla.org/ru/developers/addon/api/key in this form:
JWT Publisher: Where Jpm sign --api-key If everything goes without errors and the automatic check is passed, then in the current directory we will receive a signed extension, which is what we needed. Useful links: Thank you all for your attention, good luck! In light of the latest events related to the release of Mozilla Firefox 48, which caused confusion among some users due to the mandatory presence of a signature for extensions, people faced with this problem were faced with a choice: either: So, your account has been registered, the software environment has been installed, you can get started. We take the experimental extension and unpack it into a separate folder; in our case, we use a copy of the repository located at https://github.com/dillbyrne/random-agent-spoofer. If you are using a ready-made extension, then in the root of the folder where it is unpacked, you need to delete the files “bootstrap.js” and If it contains the “id” parameter, it must either be changed or deleted. Otherwise, we will receive an error when we try to sign that we are not its owner. Jpm xpi --addon-dir<путь к папке куда распаковали> Or simply: Jpm xpi if the current directory is the root of the unpacked extension. The output should be a file of the assembled extension.xpi, which we will sign. Now let’s prepare our api key, for which we registered at addons.mozilla.org. It can be seen at addons.mozilla.org/ru/developers/addon/api/key in this form: JWT Publisher: Where Jpm sign --api-key If everything goes without errors and the automatic check is passed, then in the current directory we will receive a signed extension, which is what we needed. Useful links: Thank you all for your attention, good luck! In light of the latest events related to the release of Mozilla Firefox 48, which caused confusion among some users due to the mandatory presence of a signature for extensions, people faced with this problem were faced with a choice: either: So, your account has been registered, the software environment has been installed, you can get started. We take the experimental extension and unpack it into a separate folder; in our case, we use a copy of the repository located at https://github.com/dillbyrne/random-agent-spoofer. If you are using a ready-made extension, then in the root of the folder where it is unpacked, you need to delete the files “bootstrap.js” and If it contains the “id” parameter, it must either be changed or deleted. Otherwise, we will receive an error when we try to sign that we are not its owner. Jpm xpi --addon-dir<путь к папке куда распаковали> Or simply: Jpm xpi if the current directory is the root of the unpacked extension. The output should be a file of the assembled extension.xpi, which we will sign. Now let’s prepare our api key, for which we registered at addons.mozilla.org. It can be seen at addons.mozilla.org/ru/developers/addon/api/key in this form: JWT Publisher: Where Jpm sign --api-key If everything goes without errors and the automatic check is passed, then in the current directory we will receive a signed extension, which is what we needed. Useful links: Thank you all for your attention, good luck! Problem: when installing a panel (toolbar) from Google for Firefox 3.5.x, the following error pops up: Firefox could not install the file at "http://dl.google.com/firefox/google-toolbar-win.xpi" Let's look at 2 solutions to this problem: 1 solution: Certificate Definition The first thing you must do is define a certificate for this .xpi file. Download the extension. Unzip this extension. Find the file ./META-INF/zigbert.rsa. Find in it a line like: .Class 3 Public Primary Certification Authority Now we know that the .xpi file is signed by VeriSign. Establishing trust in a certificate Launch Firefox. Settings -> Advanced -> Encryption View Certificates -> Certificate Authorities Find the VeriSign certificate. Click on the Change… button Check the box as in the picture and restart the browser. 2nd solution: Settings -> Advanced -> Encryption OCPS (Online Certificate Status Protocol) Settings button. Check the box, see the picture. Restart Firefox. Likewise for plugins, themes, etc.
jpm documentation: developer.mozilla.org/en-US/Add-ons/SDK/Tools/jpm
Signing Api: olympia.readthedocs.io/en/latest/topics/api/signing.html
As you may have guessed, we will talk about the last method here. If we do not plan to distribute extensions through the official catalog, then we can obtain the signature without manual checks, i.e. simply and easily.
https://geektimes.ru/post/279132/#comment_9480372
https://geektimes.ru/post/279132/#comment_9480382
For this we need:
We will consider the signing process using the “Random Agent Spoofer” extension as an example. This extension contains a list of user agents that become outdated quite quickly, and the add-on is not updated often. In turn, in the official repository, files with the data we need are updated regularly and there is a natural desire to put them into use.
We get the following directory structure:
test\
lib\
doc\
data\
.gitignore
LICENSE
package.json
README.md
“install.rdf”, they are created by the assembly program, and when modifying already signed add-ons, also the “META-INF” folder. Because Since we are dealing with an add-on that has not yet been assembled, this is not required. The next step is to edit the “package.json” file, located again in the root of the directory of the unpacked extension. In our case, its beginning looks like this:
{
"name": "random-agent-spoofer",
"title": "Random Agent Spoofer",
"id": "jid1-AVgCeF1zoVzMjA@jetpack",
"description": "Allows the use of various browser profiles (including useragent ,platform, oscpu, accept headers and other options), which it can randomly switch between after a chosen period of time has expired",
"author": "dbyrne",
...
}
Next, we command the following “spell” to assemble the extension into an archive:
jpm documentation: developer.mozilla.org/en-US/Add-ons/SDK/Tools/jpm
Signing Api: olympia.readthedocs.io/en/latest/topics/api/signing.htmlCatalog of add-ons for Nvda in the "nvda-addon" format. There are 199 add-ons in the catalog (Nvda-addon). The catalog was updated: October 10, 2019 ... in the Nvda.ru catalog you can download new and old versions of NVDA screen reader programs. Download on.. . RHVoice speech synthesizer with voice modules in eight languages in three versions: Nvda-addon For the screen program... Archive of outdated or stopped working add-ons for Nvda Updated: July 1, 2019. In the current... NewFon speech synthesizer in the form of Nvda -addon + Sapi5 for the Nvda screen reader. Updated March 06... Using the dictionaries presented on the page, you can improve the pronunciation of Vocalizer speech synthesizers. The dictionaries are not suitable... Second generation Vocalizer Expressive2 speech synthesizer packages for the Nvda screen reader in the form one... Sets of speech synthesizers on the Sapi5 engine which can also be used in the Nvda screen access program. Here... Vocalizer Expressive2 speech synthesizers (Second generation) for the Nvda screen access program in the form of add-ons. The quality of the synthesizers... Speech synthesizers Acapela group in the free Nvda screen access program for the blind and visually impaired, you can... Ivona2 speech synthesizers in the Nvda screen access program can be used one at a time via Microsoft Sapi5 ... Speech synthesizers for the Nvda program in the form of "nvda-addon" add-ons from different developers. Captain Old/NewDirect...
As you may have guessed, we will talk about the last method here. If we do not plan to distribute extensions through the official catalog, then we can obtain the signature without manual checks, i.e. simply and easily.
https://geektimes.ru/post/279132/#comment_9480372
https://geektimes.ru/post/279132/#comment_9480382
For this we need:
We will consider the signing process using the “Random Agent Spoofer” extension as an example. This extension contains a list of user agents that become outdated quite quickly, and the add-on is not updated often. In turn, in the official repository, files with the data we need are updated regularly and there is a natural desire to put them into use.
We get the following directory structure:
test\
lib\
doc\
data\
.gitignore
LICENSE
package.json
README.md
“install.rdf”, they are created by the assembly program, and when modifying already signed add-ons, also the “META-INF” folder. Because Since we are dealing with an add-on that has not yet been assembled, this is not required. The next step is to edit the “package.json” file, located again in the root of the directory of the unpacked extension. In our case, its beginning looks like this:
{
"name": "random-agent-spoofer",
"title": "Random Agent Spoofer",
"id": "jid1-AVgCeF1zoVzMjA@jetpack",
"description": "Allows the use of various browser profiles (including useragent ,platform, oscpu, accept headers and other options), which it can randomly switch between after a chosen period of time has expired",
"author": "dbyrne",
...
}
Next, we command the following “spell” to assemble the extension into an archive:
jpm documentation: developer.mozilla.org/en-US/Add-ons/SDK/Tools/jpm
Signing Api: olympia.readthedocs.io/en/latest/topics/api/signing.html


 Signing Firefox extensions
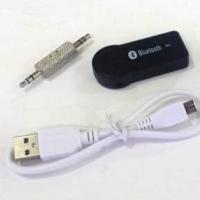 How to make and connect a Bluetooth adapter for a car radio with your own hands Bluetooth aux adapter for a car radio
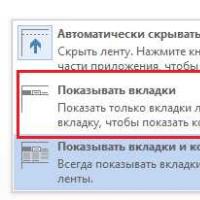 While working in Word, for some reason the top panel with functions is hidden
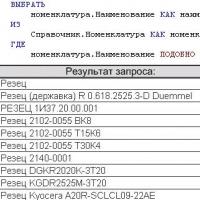 Similar to the query conditions
 Using selections in DCS How auto-filling of available fields in the data composition scheme works
 Long arms: remote computer control from Android devices
 Paid courses on making money on the Internet - free!