Encryption failure android what to do tablet. Disable encryption on the tablet. Encryption and its meaning
Do you use your Android smartphone (tablet) to take personal photos, read important emails, shop online with your credit card, edit and transfer important documents? If your answer is yes, then you should consider encrypting your device.
Unlike iPhones, Android devices do not automatically encrypt data stored on them even if you use a password to unlock the device, but if you are using Android Gingerbread 2.3.4 or higher, then encryption is easy to enable.
Encrypting your phone means that if your phone is locked, your files are encrypted. Any files sent to and received from your phone will not be encrypted unless you use additional methods.
The only difference between an unencrypted and an encrypted phone from the user's point of view is that you will now have to use a password to unlock the phone (tablet).
If your phone is not encrypted then the password is just a screen lock. In fact, in this case, the password simply locks the screen - that is, it does nothing to protect the files that are stored on the device. So, if attackers find a way to bypass the lock screen, then they get full access to your files.
In case the phone is encrypted, the password is the key that decrypts the encrypted files.
That is, when the phone is locked, all data is encrypted, and even if attackers find a way to bypass the lock screen, all they find is encrypted data.
How do I enable encryption on an Android device?
1. Open the Settings menu.
2. In Settings, select Security> Encryption (Encrypt device).
3. As required, you must enter a password of at least six characters, at least one of which is a number.

As soon as you set the password, the process of encrypting your files will start. Encryption can take an hour or more, so you must turn on the charger before encrypting it.
Once the encryption process is complete, you're done! Make sure to save your password in a safe place as it will come in handy every time you want to access your phone. Please note that if you forget your password, there is currently no way to recover it.
In fact, encrypting Android devices, along with the obvious advantages, also has significant disadvantages:
- Imagine that every time you want to call, you need to type a complex password. I wonder how soon you get tired of this?
- You will not be able to decrypt an encrypted device, it is simply not provided. There is only one way to decrypt - reset the phone to factory settings. In this case, of course, all your data will be lost. It will look especially interesting if you forget to make a backup beforehand.
Thus, today there is a difficult choice - either you encrypt your device and put up with huge inconveniences, or you get usability, but at the expense of security. Which path will you choose? I do not know. Which path would I choose? I can't answer either. I just do not know.
Vladimir BEZMALY , MVP Consumer Security, Microsoft Security Trusted Advisor
› news
Android encryption failed: what to do?
On modern phones and tablets, we store a lot of important and even confidential information. It can be personal photos, correspondence, audio recordings, logins, passwords, bank card details and more. Often, users do not think about how to protect such data until, for example, they lose their gadget. In the worst case, it falls into the hands of intruders who will gladly use your information for their own purposes. Sometimes this is the whole point of stealing your phone. How do you protect your personal data?
Encryption and its meaning
To protect data, a common screen lock password is most often used, for example, a graphic lock or a numeric password. But this method is often unreliable. If you wish, such protection can be bypassed and then all your personal data will be at a glance. Encryption is a more powerful way. The user himself will not feel much of a difference, but if the gadget is lost, even if the attackers can somehow bypass the lock password, they will not have access to your data. This encryption is done quite simply:
Explay Fresh - Hard Reset on Smartphone
"Settings"; "Security" and "Encryption".
After that, you will need to enter the code and wait for some time until all the data is encrypted, this can take quite a long time, especially if their volume is large. It happens that over time you may see the message Encryption failure Android, what should I do in this case?
What to do if the tablet / smartphone does not turn on or is frozen
Encryption failure: how to fix the problem?
In order to avoid such problems, you should always back up your data. For example, Google cloud can become a reliable storage, this is the best option for all Android users. If you have not done this and have seen a message about encryption failure, the main thing is not to rush to click on the "Reset phone" button.
First, take out the external memory card, the data on it is not encrypted, this is provided for by the policy of the OS developers. Only then can you press this button, but be prepared for the fact that you may lose personal data.
Only in rare cases, after rebooting the system, the failure is eliminated; for other outcomes, it will be necessary to rollback until the failure was detected.
Be careful about encrypting your data so you don't fall victim to your own vigilance.
On modern phones and tablets, we store a lot of important and even confidential information. It can be personal photos, correspondence, audio recordings, logins, passwords, bank card details and more. Often, users do not think about how to protect such data until, for example, they lose their gadget. In the worst case, it falls into the hands of intruders who will gladly use your information for their own purposes. Sometimes that's the whole point. How do you protect your personal data?
Encryption and its meaning
To protect data, a common screen lock password is most often used, for example, a graphic lock or a numeric password. But this method is often unreliable. If you wish, this and then all your personal data will be at a glance. Encryption is a more powerful way. The user himself will not feel much of a difference, but if the gadget is lost, even if the attackers can somehow bypass the lock password, they will not have access to your data. This encryption is done quite simply:
- "Settings";
- "Security" and "Encryption".
After that, you will need to enter the code and wait for some time until all the data is encrypted, this can take quite a long time, especially if their volume is large. It happens that over time you may see the message Encryption failure Android, what should I do in this case?
Encryption failure: how to fix the problem?
In order to avoid such problems, you should always back up your data. For example, Google cloud can become a reliable storage, this is the best option for all Android users. If you have not done this and have seen a message about encryption failure, the main thing is not to rush to click on the "Reset phone" button.
First, take out the external memory card, the data on it is not encrypted, this is provided for by the policy of the OS developers. Only then can you press this button, but be prepared for the fact that you may lose personal data.

Only in rare cases, after rebooting the system, the failure is eliminated; for other outcomes, it will be necessary to rollback until the failure was detected.
Be careful about encrypting your data so you don't fall victim to your own vigilance.
In pursuit of more and more security of data on phones, software developers decided to resort to the most cardinal method - encryption. But, as always, a lot of pitfalls and nuances have appeared, so you need to think three times before encryption. What troubles can there be, what this type of protection gives and what can you lose if Android encryption fails?
What is encryption and how does it work
User actions
If you encounter this message and are unsure of what to do when Android encryption fails, start by rebooting.
Just do not press the button under the inscription under any circumstances! You need to reboot the device by distorting the battery. If you have a non-removable battery, use the special button combinations for this action. Every self-respecting manufacturer is obliged to equip a device with a non-removable battery with such a combination - check this on the developers' websites.
We carry out this operation several times: if the result is the same, then most likely you will lose absolutely all data from the device. It will not be so painful for owners of smartphones with the ability to expand memory with cards: Google does not encrypt data from them and you can remove the USB flash drive by saving the files.
To prevent any error in functions, you can simply not include them. If you are wondering how to remove encryption on Android, then there is good news: it is disabled by default if you are not the owner of the Nexus line from Google. There the feature is enabled by default and can only be demolished by flashing it.
In other cases, it is better not to enable encryption at all: the speed of work is reduced, all background activity is turned off (do not even set an alarm), and if you forget your password, say goodbye to the data.
Let's get back to the problem. If a hard reboot did not help, you need to try to do it programmatically, already with the removed flash drive.
Step by step instructions
To fix the encryption error in Android, press the restart button on the screen; you can't go wrong, since she's there alone. As in the case of the hardset, we do this several times to give the dongle a chance to boot correctly. If our efforts are in vain and nothing came of it, we need to try to restore the device.
The first method (if you have USB debugging enabled). With the power and volume down keys held down (the key combination may vary depending on the brand and model of the phone or tablet), we connect the phone to the computer. It must have a running proprietary program on it. If you're lucky, you will be able to easily restore the default settings.
The second method (if there is a recovery). When loading, we enter the standard CWM (methods vary, check for each developer), point with the navigation buttons in this menu (volume keys) to the item "wipe data / factory reset" and select it with the power button.
Then we agree to delete all user data by clicking on "Yes - delete all user data" with the same key.
After that, you can reboot the restored device by selecting the "reboot system now" item.
Not a single way helped
We use the most radical method only in the most severe cases, when there is no enabled debug mode or when the device is not displayed. This is a flashing of the device.
Firmware instructions
To flash a device, we need to download the required firmware and upload it to a USB flash drive. Then we repeat the entire second recovery method, only we also delete the items "Cache" and "Dalvik".
The world's most popular operating system is known for its instability. Every Android user at least once met with this or that error, but not everyone found a solution. It is definitely not worth changing your device right away because of this. Next, we will analyze the main errors on Android and how to solve them. Often there is no error, but there is only a small number of certain functions, which can be solved by a couple of simple steps.
Sometimes Android can display system errors when running. There is nothing wrong with that
This section contains problems that are usually easy or not necessary to fix. Often the device itself may not even be the cause. But there are also those that made users nervous.
Out of memory
This cannot be called a mistake, but rather a limitation of the capabilities of your device. Yes, indeed, on old, and on new, devices, the internal memory sometimes ends abruptly. The problem is solved very simply.
If you use applications such as Instagram, VK, then the cache that they accumulate very quickly and in large quantities is definitely to blame.
- We go to "Settings", select the item "Applications".
- Often, those that occupy the most memory are immediately displayed to the top. We click on them.
- We select the item "Clear cache".
 The error "not enough space in the device memory" is okay, it can be easily eliminated
 This cleanup can free up to several gigabytes of free space. You can also completely erase the data in the application, but then you have to "login" again.
Overflowed memory may cause errors under different numbers. For example, error 919, when the application cannot turn on due to lack of space.
On some devices (far from all), some programs can be transferred to a memory card. This will free up even more space. This is done from the same item in the settings. It is better to often monitor the availability of free space so that the gadget always works properly and without brakes.
Wi-Fi Authentication Error
Also one of the most common Android issues. Although in reality, very rarely, the problem lies in the device. More often it is caused by a router, or rather, its incompatibility with your device. The problem is solved quite quickly.
The first method, the most obvious, is to simply check if the entered password is correct. After all, authentication is nothing more than checking the security key. Therefore, try to forget the problematic network and then re-enter the password.
If everything is in order with the password, and Wi-Fi still does not want to connect, then the reason clearly lies in the settings of the router. The fact is that its data encryption type may be older than that used on an Android device, or the device does not support any network standard.
In this case, you need to go to the router settings.
- We open the browser. In the address bar, enter "192.168.1.1" or "192.168.0.1".
- In the window that appears, enter the username and password: most often these are admin and admin. If you have others, then enter yours.
- Now you need to find the Wi-Fi security settings. Here we set the mixed encryption type or network authentication "WPA-PSK / WPA2-PSK2 mixed", and also select the automatic selection of the network standard.
After doing that, the problems with the Wi-Fi connection should be gone.
Syntax error
The error is that the file that installs a particular application is wrong or was not launched correctly. In addition, a crash may occur during installation, which also results in a syntax error.
The fix is pretty easy. First, make sure the file you downloaded is in apk format. Since it is files of this format that are the installers of applications on Android. Second, delete that downloaded file and re-download it and then reinstall it. It makes sense to try downloading the file from another site. This usually clears up the error.

loading error
It often happens on old devices, on new ones this problem no longer arises. It consists in the fact that the standard download manager fails, which makes it difficult to download anything from the Internet. The error is easily fixed.
All you need to do is download the new download manager. ES Explorer can be great for these purposes. It has a nice built-in download manager.
Android AOSP keyboard
This keyboard itself is not the best. In addition, it is not very well optimized on some firmwares, which leads to errors. It is easy to solve them.
- Disable voice input in the keyboard settings.
- Reset the settings, erase the cache and data of the application that is responsible for the keyboard.
- Just download any other keyboard from the Google Play Market.
Errors with Google Accounts
There can be two errors: the account does not want to sync or does not want to be added. The first can be present on both old and new devices, and the second is gradually becoming a thing of the past. Fixing all this is not so difficult.
- Check the quality and stability of the Internet connection: the mobile network or Wi-Fi should work normally, otherwise the reason may lie in them.
- If an account has already been added but is not syncing, just disconnect it, restart your device and sign in again.
- If your account refuses to connect, first make sure your username and password are correct.
- Turn off two-step sync in your account settings.
- Turn on automatic syncing and background data transfer, and then restart your device.

Netalpha virus
A new problem facing Android users. This malware makes it difficult to work with the phone and does not allow itself to be removed. The problem is quite serious, since it involves only two solutions, one of which is very radical.
- Reset the system to factory settings. More details on how to do this are at the end of the article.
- If you are rooted, you can download Lucky Partner and uninstall the ill-fated app.
Com.android.snap
It occurs when using various applications: popular photo editors, instant messengers. This inscription often appears on a black background, which is very distracting, and programs can simply close.
Malware is thought to be causing this glitch, so many advise to simply install an antivirus. However, you can do without it using systemic methods.
- We go to the settings menu, to the "Applications" item.
- We find the application "com.android.snap" there.
- We delete its data, clear the cache and stop.
- You also need to uncheck the "Send notifications" checkbox.
After that, the program will stop annoying, and you will no longer see this inscription on the black screen. If an antivirus is installed on the device, then you can remove the bug with it. But, as practice shows, this error rarely happens on devices with antivirus software.
Besides com.android.snap, there is also com.android.systemUI. What unites them is that they are Trojan-type viruses. Accordingly, the program is neutralized in the same way.
Com.android.phone
If the system says that the com.android. phone an error has occurred, then the problem lies in the program that is responsible for making calls on your tablet or smartphone. The error appears for various reasons. Therefore, the methods of solution will be different for everyone.
- Try to uncheck the automatic date and time synchronization via the Internet in the settings, and then put them back. After that, restart your phone and set the correct date and time yourself.
- Wipe data and delete the Phone app cache.
- You can just download yourself any "dialer" that will replace the standard one, since the app store is full of them.
Android.process.acore
If an error occurs with android.process.acore, then the problem is no longer associated with either the "dialer" or with viruses. Here the reasons may be the following:
- the necessary system files are missing;
- the work of some system application has been stopped;
- there are several applications on the device at once that perform almost the same functions, and they are not synchronized correctly with system applications

The difficulty of solving a problem depends on the reason for its occurrence. Most often, it is solved by simply deleting all contacts through the device settings. If you sync all contacts with Google before that, you won't lose anything at all.
There is an option to reset the settings of all applications through the corresponding menu item. It also often cures the problem without losing data. If you have Wi-Fi optimization apps installed, you should try to uninstall them too. Often the reason lies precisely in them.
Adroid.process.media
The Android Media Process error occurs for two reasons: Media Storage or Download Manager. Both are solved quite simply. There are two general methods that will almost always work flawlessly.
The first way
- Clear cache and data from Google Services Framework and Google Play Market apps.
- Stop the Google Services Framework (you need to do it in this order).
- Clear the cache of this utility again.
- Open Google Play, find the problematic application. After receiving the error message, click OK.
- Restart the gadget, restore the disabled Google services.
Second way
- Stop syncing your Google account completely. This can be done from the account settings: in the "Synchronization" item, uncheck all the boxes.
- Erase the data and stop the Gallery utility.
- Likewise, disable the "Boot Manager".
- Reboot your device.
After applying one of these methods, the problem goes away.
Invalid batch file
The error often occurs when updating an application. If this happened during the update, you need to clear the cache for this application. In addition, you can try to manually download the apk file of the program and reinstall it. If this does not help, delete your Google account, reboot the device and log in again.
PACKADGE FILE INVALID
- We delete the cache and data of the problematic application.
- Go to Google Play and install it there.
- We clean Google Play data and Google Service Framework.
- We update the application via mobile internet, not Wi-Fi.

Installation unssuccesful error
- We reinstall the problematic application.
- We clear the cache and delete the Play Market data.
- Disconnect the memory card from the device.
- Delete the .android_secure folder.
- We reinstall the application.
Error number ...
These errors can be more serious. However, they are often solved in a few simple steps. It all depends on the number of this very error. Moreover, Google gives a minimum of information about solving various errors.
11, 101, 504, 506, 491, 495, 413, 941, 921, 920, 481, RH01: problems with Google Play and account
These applications or account and are solved by practically the same methods. "Error code 11" Android can issue when the Play Market is running. Often there are problems with specific numbers with this particular Google service. Error 11 has been noticed frequently when installing or updating WhatsApp.
Another popular error, due to which the Play Market also does not want to download the application, 504. It occurs on Android due to the same reasons as other problems with downloading programs, so the methods of elimination are identical. The same goes for other errors.

Problems are solved in several ways, and each of them is suitable for most similar errors.
- We set the correct time and check the Internet connection.
- We check the amount of free internal memory: it should be higher than the amount of programs that have problems loading.
- After that, try simply restarting your phone or tablet. Google Play Market errors on Android are often solved in this way.
- We reset the settings. In the way indicated above, open the Play Market application window, then clear the data and cache. After that, go to the Application Store again. Alternatively, you can also uninstall all updates in the same window, which will return the program to its original form when you buy the device.
- You can do the same with Google Play Services if the previous method didn't work. If this does not help, then you can try to do a similar operation with the Google Services Framework.
- The problem may also be the disabled Google Accounts app. We go into its window, if we see that it is off, then turn it on. The "Boot Manager" should also be enabled if it was disabled.
- Trying to log out and log back into your Google account. This is done from the settings. There we find the item "Accounts" and select Google.
24
Error 24 occurs when installing an application on Android, when some failure occurred, and some of the files have already been installed. Or you had this application before, you deleted it, and then decided to download it again. The problem is solved quite quickly.
- We launch any file manager.
- We find the directory "sdcard / Android / data / data", in it the files related to this application. They will contain the name of the program in the name, so it will be easy enough to distinguish them from the rest.
- We do the same in the data / data directory.
After that, the error should disappear, and the application should be installed without any problems.
498
This error occurs when loading any application. There may be several problems, but they are fairly easy to solve.
- Check your internet connection.
- Clear the cache of several programs, and the first thing is Google Play.
- Wait a couple of hours. It is possible that the reason lies in the Google servers. If so, they will fix it quickly.
After that, the error should disappear.
923
- We remove the Google account and several unnecessary programs, clear the cache.
- We clear the system cache:
- We go to Recovery (the ON button and the volume control button and hold).
- Choose Wipe Cache Partition.
- We reboot the device.
- We reboot the device.
- Log in to Google again.
403
There is a so-called Dalvik cache. In connection with its filling, we again do not want to install certain programs. To solve the problem, we clear the data and turn off the "Google Accounts" first, and then the Google Play Store.
Rh01 / rpc: s-5: aec-0 / RPC: S-3
The system cannot receive information from the server. To fix the problem, you need to do the same as for other similar errors.
- Clear cache and remove unnecessary unnecessary applications.
- Erase data and stop Play Market and Google Services Framework.
- As described in the previous error (403), delete the cache via Recovery.
492
Content from Google Play is not loaded again.
- We clear the data and stop the "Google Play Services".
- We do the same with the Google Play Market.
- Delete the dalvik cache if the problem is still present. However, this can only be done if you have root access.
- If there is no root-rights, then you just have to do a complete rollback of the system.
911
Also does not allow downloading applications.
- We clean the data, cache, stop the Google Play Market.
- Try connecting to a different Wi-Fi network or use mobile data to download the app.
Rpc: aec: 0]
Problems retrieving data from the server. Deleting all synced accounts can help. Then we clear the cache and Play Market data, and then reboot the smartphone or tablet.
Similar is the RPC error: S-3. In the case of it, you only need to delete your Google account, after which you can try to connect another or the same one.
927
This malfunction is independent of our device. The reason lies in the fact that the program is being updated by the developers. Therefore, if we want to install or update it, we cannot do this. It's just worth trying to install it again in 30 minutes or later.
A way to solve any mistakes
And finally, a method that is suitable for fixing any problems. But you should always resort to it last. This . A full reboot of the Android system will delete all user data, so the most important thing is to first drop it onto a memory card or save it to cloud services.
- Open the settings.
- We select the "Reset and Restore" item, on different devices it can be called differently and can be found either in the settings menu itself, or in the "System" item.
- Click "Reset".

After that, the device returns to the factory settings, all problems disappear.
Now you know how to fix the vast majority of errors on Android. There are much more of them, but the rest of the problems have similar solutions, especially errors in Google Play services, are so rare that there is no data about them yet or have already been fixed by the developers.
 Analysis of legacy code when the source code is lost: do or not?
 Windows does not load after installing updates Laptop does not turn on after updating windows 10
 How to crack a password: an overview of the most common methods
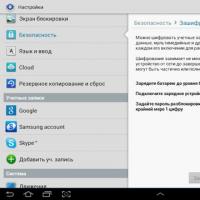 Disable encryption on the tablet
 Creation of a light bulb. Edison's light bulb. Who Invented the First Light Bulb? Why did Edison get all the glory? Incandescent lamp device change history
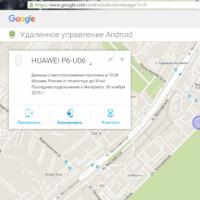 How to quickly find your phone on google, wherever it is
 The electric incandescent lamp was invented in russia