Skin brush in Photoshop. Skin - apply the texture. Skin texture fill
Welcome to site site! Friends, on our site you can find a lot of interesting and useful things for yourself, your loved ones and children. We offer a huge range of brushes, frames, styles, shapes, icons and many other additions to your photography.
Photoshop frames
Photoshop frames are especially popular, with which you can decorate your photo without any effort. You just need to find a suitable frame, insert your photo, which will serve as a creative decoration for your workplace or family album. Also, you can create a fun room for your baby. A large selection of children's frames will help you with this. Even novice users can master these types of frames.
We draw your attention to the frames for wedding photos, for family photos, vignettes, for lovers, "for you", congratulations, calendars, Great Easter, February 23, Happy New Year, birthday, Valentine's Day. You can download all these frames from this link
Download templates for photoshop
It's time to talk about the main section of our site - "Photo Templates". First of all, it is popular among girls of different age categories. After all, a girl always strives for charm and beauty. It is in this section, dear girls, that you can be in the image: a stranger in the moonlight or vice versa, a good fairy. You just need to follow this link. Let's not forget about our dear men, because our site has also prepared many interesting templates for them, in the image of which a man will feel himself: a hardworking gardener, a musketeer, a knight, a pilot, a biker, a cowboy, a king, an iron man, a German officer, a race car driver, etc. .p. And all this absolutely free, just click on the mouse button and .
Dear users, the administration of our site has prepared a surprise for your children: the section "Templates for children". Your child will feel like: a sweet bunny, a little one, a pirate, a duckling, a spider, a king, an elf, etc. Click the mouse faster and follow the link and get a lot of fun.
We recommend paying attention to the section "Icons". We offer a large selection of not only "frames", but also "icons". You can use this section for different purposes - from ordinary amateur photography to a large-scale design project. Here you can find a lot of exciting things!
Our site does not stand still, we are constantly developing, filling the site with useful information and, of course, listening to the opinions of users. You can leave all your comments and suggestions in the "Feedback" section. Site administration!
Today we will talk about skin texture, more precisely about creating perfect skin in Photoshop from scratch. There are cases - when it is necessary to retouch a high-quality portrait, but at the same time the original photo leaves much to be desired - there are no micro-contrast and details. Simply put, the skin is blurred, the person looks like a wax figure.
Most likely, in this case, no "frequency expansions" and other manipulations with the original image will help. The only thing left is to recreate the skin texture. There are a lot of ways (offer your options and suggestions in the comments), today we will consider one of them (as part of this lesson, we will retouch only the face. Neck, palms and ears another time). Let's start.
First you need to find and download or make different types of perfect skin textures, it is with them that we will work in Photoshop. I have prepared and collected several examples for you, how to find and prepare such textures - I will tell you another time. You can also download the original psd file from this lesson that I worked with, all layers are saved. You can download examples of textures on my website.
Initially, we have a portrait of this quality:
Perfect Skin in Photoshop can look realistic only in one case - if we take into account the anatomical features of the human face, its shape and geometry, as well as the heterogeneity of the texture of even the most ideal skin. Simply put, the skin on the nose is different from the skin on the forehead and cheeks and you can’t just fill everything with one texture (or noise). To make it easier to navigate, I will divide the entire face into conditional zones - cheeks, nasolabial triangle, nose, areas around the eyes, forehead and chin. For each zone, there are suitable textures that you have downloaded. My biggest problem areas are the nose and around the eyes. The nose usually has smooth skin and large pores. The eyes are a fine mesh of mimic wrinkles.
Below I have indicated approximate areas, the geometry and texture of which will need to be paid attention to, it’s scary drawn right?)))
Let's start with the right cheek. To do this, open texture 2, which will create a new perfect skin in Photoshop, in the border area of the nose - lower eyelid - cheekbones. Transform it (rotate it 90 degrees counterclockwise and reflect it horizontally), as a result we get:
The left and top of our texture is the area near the nose and eyes. Right-lower, this is the cheek.
Scale it down and apply a free transformation (Ctrl + T), roughly repeating the contours of the face:
Let's adjust the texture. Let's name the created layer "right cheek". Select it (Ctrl + click on the layer) and apply a black and white adjustment layer to it:
You may have noticed that the texture data is not perfectly gray, I left it that way on purpose. By adjusting the colors in the black and white panel, or using the presets in the same panel, you can select different textures from the original layer. I chose the Infrared preset - it turned out to be the most saturated.
Select both layers (left cheek and black and white) and merge them. Change the blend mode to Linear Light:
Invert our texture (Ctrl + I) and reduce the opacity of the layer to 45%, we get the result:
Rename our layer black and white to right cheek again, add a layer mask to it and use a large brush with zero hardness to go around the edges, thereby weakening the transitions from texture to image.
I decided not to philosophize and applied the same texture to the left cheek. Make a duplicate layer of the right cheek (Ctrl + J), drag it to the left side of the face (V) and flip the texture horizontally (Ctrl + T, context menu - Flip Horizontal), then rotate it counterclockwise and resize, we get something like this:
As you can see, the upper part of the texture is superimposed on the lower eyelid, the lower part closes the gap between the nose and the upper lip. Again, with a large soft black brush, remove unnecessary overlay on the nose, outside the face and soften the borders.
Draw the forehead
For the forehead, I chose texture 5, it is softer and the pattern is quite suitable. Open it, move it to the forehead area, apply a Black and White adjustment layer to it, play with the Black and White presets (change the texture), change the blending mode to Linear Light, invert the image (Ctrl + I) and reduce the opacity. In general, I will not repeat the same thing, see above. These steps will be repeated for each area of the face. Only the choice of texture and the fit of the layer will change. In this case, I rotated 45 degrees clockwise and in Free Transform mode (Ctrl+T) made the following changes:This is necessary in order to repeat the lines of the forehead. The photo shows that the girl raised her eyebrow, and along the lines of the forehead in the original photo, you can see the direction of the curvature of our texture. After we put our skin texture on the forehead, add a layer mask to it, invert it (ctrl-i) and paint over the forehead with a white brush, thus drawing it. Reduce the opacity to an acceptable level (I have 50%). You can see that this instance of the skin, no matter how perfect it is, is quite heterogeneous in texture, so we muffle too “textured” areas with a large white brush with an opacity of 10-15%. As a result:
In a similar way, we select the appropriate texture for a specific area of the face.
Change the texture with black and white (one texture can have several different skin patterns)
Fitting the texture to the geometry of the face (rotation, size, free transform)
We impose it on the face (blend modes, opacity, if necessary - inversion)
Using masks, we combine textures with each other and apply them to the necessary areas of the image, removing the excess.
Here's what our textures look like without blend modes:
What happened to me:
The result is certainly far from ideal. The quality of the final photo depends on the perseverance and painstaking work with masks, selection of textures, etc.
In this article, you will learn about an amazing skin texture creation technique in Photoshop CS6. If you need to retouch, smooth the skin and remove unwanted spots on the face, then it will be useful for you
Skin Editing in PhotoshopOften when processing leather in photographs, you can lose its texture. This method will help to create a believable skin texture using several tools.
Quick navigation:
- # Description
- # Create a new layer
- # Skin texture fill
- # Layer transformation
- # Applying a filter
- # Overlay texture layer
- # Create a mask
- # Applying skin texture with a brush
- # Final touches
1 Description
We'll be using a technique that won't destroy the texture of the photo and will give you more options when applying the skin texture. You can adjust and edit the new skin texture on the fly by switching between layers.
For this article, we'll use the Texturer filter, which allows you to place a texture on top of a photo and control the direction of the light. In this method, we will use the default settings to achieve the skin texture effect.
Required time 10-15 minutes
Follow these steps to create realistic skin in Photoshop.
2 Create a new layer
Create a new layer and name it "skin texture". From the top menu bar, select "Layers-New-Layer" (Layers-New-Layer) or by pressing Shift + Ctrl + N Then, in the window that opens, click OK
 Create a new layer
On the right side of the layer menu, rename the new layer to skin texture
Rename the layer3 Skin texture fill
Selecting a layer skin texture Go to the Edit menu and select Fill. "Editing-Fill" (Edit-Fill up) or by pressing Shift + F5
 Filling
In the window that opens, select the line "use" 50% gray and then click "OK"
 choose 50% gray
4 Layer transformation
Right click on layer skin texture and choose "Convert Into Smart Object"
Converting to a Smart ObjectA smart object is a container that contains one or more layers, and it allows you to make changes without changing the texture of the photo itself.
5 Applying a filter
From the top menu bar, select "Filter-Filter Gallery" (filter-filter gallery) Next, in the window that opens, select the tab "Texture-Texturizer" (Texture-Texturizer) and in it we select the texture "Limestone".
Setting up the texturerThis filter allows you to apply custom or pre-installed textures. For this image, we will use pre-installed textures.
Then use the sliders to change the scale and relief. Use the settings that best suit your skin. Don't forget to set the texture to the same lighting side as in the photo. Then press the button "OK".
6 Overlay texture layer
Select the "skin texture" layer and from the drop-down list, choose a blend mode "Soft light". This blending mode makes the 50% gray invisible and only shows the highlights and shadows created by the filter.
Choosing soft light7 Create a mask
This effect applies to the entire image. To hide the contents of a layer, hold down the Alt key and click on the layer mask icon (located at the bottom right under layers) to make a mask that hides everything in the layer.
Create a layer mask8 Applying the skin texture with a brush
Now on the left side of the toolbar, select "Foreground Color" white.
Set color to whiteOn the right in the layers menu, select the "skin texture" layer and click on the "layer mask thumbnail" (black square) to make it active.
 Activate the layer mask
Finally, using the Brush tool, press B, set the following options:
- Opacity(Opacity): 20%
- pressing(Flow): 20%
- Rigidity(hardness): 100%
 Choose the size yourself, depends on the resolution of the photo
Now let's start painting the photo with a texture using a brush. The first results can be seen immediately, just click the eye icon on the layers panel.
 Checking the Texture
9 Finishing touches
In the process, you will have to calibrate the skin texture settings more than once, just double-click on the "filter gallery" in the layers menu.
Quick texturizer callTo emphasize the texture of the skin in Photoshop, it is best to lower the brightness of the image a little. At the bottom right, under the "layers panel", select the half-filled circle icon, then select "brightness / contrast" and set the brightness of the photo to be acceptable in your opinion.
Lowering the brightnessFor a more pronounced skin texture, you can use additional settings. On the right in the layers menu, a little to the right of the "Filter Gallery", click on the "Overlay Options" in it, select the best option.
Changing texture settingsDon't put high hopes on skin texture mapping in Photoshop for all your photos. This method is very specific and will be useful for high-resolution photographs.

 Stylish radio - pepper fm
 In defense of swaddling: on the development of the baby's sense of touch When the child stops being afraid of the pens
 Social network Instagram: registration on the service, installation of applications
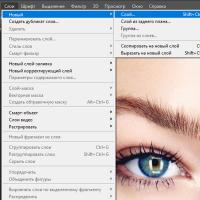 Skin - texture
 Special characters for Nick: stars, hearts, crowns, etc.
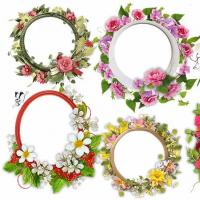 Frames with flowers for girls on a transparent background
 Download templates for photoshop