Tablet as a photo frame program. Turning an old tablet into a photo frame. Installation and setup
Today in my review an interesting little thing is a digital photo frame. I like to take pictures, but somehow it didn’t start to look at photos in the family. With the advent of a new gadget, I caught myself thinking that in a few days I managed to revise my family history for 5 years and more than once. I put the frame on the desktop, and willy-nilly, periodically distracted from work, I stare at the screen. Productivity has decreased a little, but the device was satisfied. I suggest that you familiarize yourself with the characteristics and operation of the device in more detail.
Description of technical characteristics and scope of delivery
- Color silver
- Diagonal 10.1"
- Resolution1024x600
- Screen format 16:10
- Remote control YES
- tft display type
- Adjust screen brightness, contrast, saturation
- Working position landscape
- Slideshow YES
- Slideshow + Music Mode YES
- Watch YES
- Alarm clock YES
- Calendar YES
- jpeg image format support
- Playback of video formats/codecs avi, mpeg1/2, mpeg 4(divx4.0, divx5.0, xvid)
- Playback of audio formats/codecs mp3, wmaBuilt-in acoustics YES
- Support sd/sdhc/mmc memory cards
- USB Interface (Type A) YES
- USB Interface (Type Mini-B) YES
- Auto power on YES
- Auto power off YES
- External power supply
- Weight 380 g
- Dimensions 253.7x167.5x8mm
The packaging has quite a gift look, neat, strong, colorful.

The kit includes:
- digital photo frame
- Power adapter
- Remote control
- User manual in Russian
- Warranty card

Description of appearance and operation
Undoubtedly, I liked the interesting appearance of the frame in a practical metal case. It's not plastic, especially if it's black, which is terribly dusty. On gray metal, dust is absolutely invisible. Frame dimensions - 24.8 cm * 15.8 cm. The thickness of the top and side bars of the case is from 12-15mm, the bottom - 22mm. Dimensions of the working area 21.8*12.3cm. The screen, as you noticed, is elongated, however, such dimensions are convenient when starting the "calendar" mode, for example. When both a photo presentation and a large-format calendar fit perfectly on one screen. Not necessarily the image will be stretched to full screen, you set the format of the displayed information yourself in the frame settings. In terms of weight, I like weighted gadgets, unless, of course, they are intended for stationary use, without carrying and wearing. This gadget is weighty, 447gr. But it is stable, and just like that you can’t brush it off the table.
In general, a solid thing, with high-quality assembly and materials.

Front view: In the front center of the bottom panel, the manufacturer has built in an infrared sensor eye of a fairly large size. It is worth saying that the frame responds unconditionally to all requests from the remote control, the signal is good, it is not lost even if some kind of obstacle is placed in front of the frame. My gadget is located on the computer desk, so some small things appear in front of the screen from time to time, but this does not affect the actions from the remote control, and there are no problems at a distance either. The main thing is that the remote control should be directed to any point of the frame, it reacts even from behind the device. The signal catches at a distance of 5-6m.
There are no function buttons or holes on the ends of the device.

Rear: All physical controls are organized on the rear on a cylindrical plastic stand. Which, by the way, also serves as a speaker. There are 2 of them here. So, on the stand there are: a power button, a menu button, play / pause, 2 buttons - flipping through tracks. A detailed description of the operation of each button is described in the user manual in Russian. However, looking ahead, I will say that the photo frame will not work without a remote control, some moments, for example, launching the calendar with one button, silent mode, menu navigation, are organized only using the buttons on the control panel. Unfortunately, the volume cannot be changed directly from the device either.


As for the most interesting screen display. The picture is clear, bright, especially if you select the playback mode in the original format. Good color reproduction, viewing angles are excellent on the right and left, top and bottom - not so hot. I put the frame in the brightest room on the south side. On a bright sunny day in a room without curtains and tulle, the picture is good. This is despite the fact that the screen brightness is set to only 50%.


About software. The system supports the Russian language, starts up very quickly, within a few seconds. During the photo mode and music playback at the same time, there are no crashes or slowdowns. The variety of supported formats pleased, as well as the presence of an alarm clock, turning the device on / off according to a schedule. There is no need to write files to the root, the device sees the contents of the folders.
Device menu


Briefly about the operation of the modes: 3x zoom can be used in photo playback mode. Ability to delete files from the media. At the request of the remote control - the "calendar" mode - the frame reacts instantly, changing any other mode. A calendar, the current date with the day of the week, a clock and a slide show with the previously set settings appear on the screen. Slideshow mode is classically interval, the maximum delay is 3 hours.

About sound. Speakers, indeed, as the manufacturer promises, 2. The sound at minimum volume is an excellent background. Weak at most. But guys, let's not quibble, this is a photo frame, not a column. The speaker doesn't buzz. Sound? Normal sound for a non-specialized device. Thanks to the existing headphone jack, music while you view a photo or video will not disturb others. The sound in wired headphones is a little better and louder.
After working 16 hours a day without a break, the frame, and more specifically, the stand, barely warmed up. If to speak about autonomy, a wireless version would be interesting.
Remote control description:
The remote control is miniature, with classic buttons for controlling the player, plus 3 buttons for launching photo, music and video modes. Frame control is organized both by push-button and by means of a remote control. But it is the remote control that performs many requests, so its failure or loss will deprive you of the following actions with the frame: the lack of movement through the settings menu, the launch of the calendar and some others. As for touch control, I miss it here. But this would increase the cost of the device.
Conclusion
If you say that the tablet is the head of everything. Not true. The house has 2 tablets, a laptop, 3 desktop computers, not to mention TVs, but ... they are not a replacement for this gadget. Looking at family photos has become a good indicator in a few days. This device fits perfectly as an interior decoration, has good functionality, and most importantly, the quality of pictures and recordings is excellent.
I apologize for the sound quality. It looks like the microphone is covered. I will repair.
Advantages
- Interesting appearance
- Practical metal case, high-quality assembly
- Excellent display of information
- long wire
- sustainable
- Multifunctional (video viewer, calendar, clock, alarm clock, music player, slideshow with music, auto start/shutdown, delete files)
- External speaker, audio jack
- Variety of readable formats
- Remote control with a signal at 5-6m, and even a closed sensor on the frame reacts
- Works with both USB stick and SD card
- Ability to delete files (with confirmation)
- Doesn't heat up during extended use
- Reads info from media even from folders
- Stable software operation
Flaws
- Frame menu control is not possible without a remote control
- Vertical viewing angles
We will need:
- an old tablet (in my case, Texet TM-7029, but it can be almost any)
- charger for it
- thin wires
- screwdriver
- soldering iron
- solder, rosin
- multimeter
- resistors (may not be needed, depending on your tablet, the value also depends on the tablet)
- convert DC-DC voltages (may not be needed, depending on your tablet, the value also depends on the tablet)
- drill
- metal drill 6mm
Step 1 Nutrition.
This is the most difficult and responsible step. Old tablets have many problems. One of them is an old battery that does not hold a charge. There are several ways to solve this. The easiest is to leave the battery inside, connected, and supply power through normal charging. But there are pitfalls here. Firstly, over a long service life, the connection socket breaks and no longer provides a reliable connection. Secondly, aesthetically, I personally do not like the look of the charging wire sticking out from the side. Thirdly, a complete battery failure is possible and then the tablet simply will not start. As you already understood, an individual approach is needed here.
I will only talk in detail about my Texet TM-7029, and for the rest I will give options for what can be done. So, in my case, the connection connector is broken and the wire does not stay in the socket, the battery is weak, but still alive. We disassemble the tablet.

I tried desoldering the battery and supplying power through its connection marks. The tablet started up, but gave an error and turned off. Therefore, I decided to leave the battery, and connect the power through the micro USB socket, as charging should be done. The micro USB socket is soldered on the back of the board. Unsolder the battery and speaker wires. We unscrew all the screws holding the board. It is not necessary to disable the screen and touchscreen cables. We turn the board over and see that the socket contacts are very small. You can unsolder the socket and solder the wires to the pins, then it will be much easier, but I wanted to leave the ability to connect to a computer, and so I found a capacitor with a multimeter to smooth the power on this line, and soldered the wires to it:


I will give advice for owners of other tablets. You can also try:
Disconnect the battery, connect the native memory, it turned on - excellent, we test stability in different load modes. If it cuts out under load, you can try to take a more powerful adapter, or replace the wire with a shorter / solid one, since the material, length and cross section of the supply cable are of great importance and can easily create conditions under which the device will not be able to take more than a certain current.
Most modern devices charged via USB understand whether the computer is in front of them, or native / non-native memory. And this understanding comes to them via the data bus D+ D-. In this regard, the device will take a certain current, namely up to 500mA from a non-native memory and USB, and up to the adapter rating from the native one. Accordingly, the use of the device via USB without a battery becomes impossible. Regarding the inclusion of the "native" memory mode, there is information that:
most android devices need to short circuit D+ D-
some Samsung apply both to D+ and D- by 2.5v
Iphone and on D + and on D- for 2v. iPad D+=2.5v and D-=2v

So, some people think (or just do) that the external power adapter can be "plus or minus" put on the corresponding contacts instead of the battery, and there's nothing wrong with that. This is not entirely true. In most cases, power from the battery goes first to the power controller, as well as from external power goes there. Not too lazy to find and open the datasheet for the microcircuit of this controller, for example AXP209, it says in English and white that the power from the battery should not exceed em ... 6.3v, and it will burn out at 11v. maximum. And on the controller of another tablet, no more than 4.5V is written ... you can’t guess, besides, sometimes power from the battery can go straight to other nodes. And it is not known how those nodes will react to your 5v, instead of the ones set no higher than 4.3v. In general, here you need to look.
In addition, it is possible that from your charger the voltage reaching the contact pads of the battery sags on the wires, or just under load, then, in general, everything is in order) The main thing is to make measurements.
As for the choice of the maximum current of the power adapter, then for good you need to put an ammeter in the gap of the battery plus and see how much the device actually eats in different modes. In general, an honest two or three amperes with a power reserve should come up.
If the backlight blinks and the sound crackles, try soldering a capacitor between the plus and minus of the battery contact pads on the device itself (the larger the capacity, the better), maybe two. One, for example, 3000 microfarads - the second 0.1 microfarads.
As another option, you can connect power to the battery pads through a DC-DC converter, setting the converter to 4.2 V.
In general, everything can be beaten even easier: put a silicon diode with a current margin on the plus from the adapter, the voltage drop on the silicon diode during direct connection is 0.6-0.7v, it turns out just the "battery" voltage.
We connect the soldered wires with a wire at the end of which is a UBS connector.
The main thing is not to reverse the polarity. You can take a wire from an old phone and cut off the plug to connect to the phone. Most often, the wires differ in color. Red is a plus, black is a minus, cut off the rest shorter and insulate.
Step 2 Lid
It is necessary to provide ways of fastening or setting our tablet. To wall mount our tablet, you need to drill a hole in the back cover. We use a 6 mm metal drill for this. First you need to measure the middle and only then drill. And do not forget to cut a notch for the power wire. If the lid is metal, like mine, we cut it with scissors for metal, if the plastic is just with a knife.

If there is a flipper case for it, you can just put it on. For example like this:

Step 3 Programs
The functions of our tablet are completely dependent on the installed programs. One of the options is a table clock with the weather. I use the free Tablet Clock program for this. You can download it via Google play at the link:
Usage Tips:
When you first start, select the city for which to display the weather.
If your tablet has a navigation bar, it will be hidden when you launch the app. In this state, tapping anywhere on the screen will return that string without affecting the application in any way.
Clicking the alarm icon will bring up the system alarm setting window.
A timed press brings up the application menu (same as the device menu button if there is none).
Clicking on the weather switches to two different types of forecast - for the day and for the week.
If your device does not have a light sensor, but has a camera, preferably a front one, turn on the brightness control using the camera in the settings - the illumination will be measured by the camera every 30 seconds. If you run the application without a connected charger with this mode, the battery life will be reduced.
The time and date format is taken from the system.
If you want to reduce the brightness even less than your device allows, change the R, G, B values in the text color settings to lower ones. For example, if for green (# 00FF00) put 80 instead of FF, the brightness will be 2 times lower.
You can choose to rotate the screen in the settings.
Another option is a digital photo frame. The application is called - Digital Photo Frame. It's also free. It also has musical accompaniment. You can download it from Google play using the link.
But what to do with an old tablet after acquiring a novelty? If you can’t sell an obsolete “tablet”, then make a photo frame out of it! The Dayframe program is designed for this.
What is all this for?
You have seen photo frames more than once in stores selling electronic goods. These are the same tablets, but with the most truncated functionality. Such devices are designed to display photos and animations continuously. It is easy to guess that you can turn a real tablet into a photo frame. There are several applications for this, the best of which is called Dayframe. The utility is distributed free of charge, it works on Android 4.2 and higher operating systems.
The application is able to turn your old tablet into the most advanced photo frame. We must not forget that the "tablet" can be connected to the network via Wi-Fi. This allows the utility to borrow images not only from internal memory, but also from third-party services. For example, the Dayframe app supports Dropbox, Flickr, Tumblr, Google, and even 500px. Not forgotten by the developers and more popular services - Twitter, Facebook and Instagram.
You may find this advantage far-fetched. But it's not. In a conventional photo frame, the source of pictures is a microSD memory card. This means that to download new photos, you need to connect the device to a computer or take out a memory card in order to insert it into the card reader. With a tablet and Dayframe, everything is much easier. You can synchronize the application with one of the specified services, and then update it. You can also send photos to your tablet using email. Theoretically, you can update photos on a tablet computer in just one and a half to two minutes.
The Dayframe program can also come in handy for owners of brand new tablets. Especially if you use the device in the office. The application can be programmed to wake up when idle. So you can regularly remind yourself of your beloved family and various pleasant moments. You return to the office after a lunch break, and your beloved wife is looking at you on the tablet. Well, isn't it wonderful?
Installation and setup
And yet, in the first place, the Dayframe application was created to turn an old tablet into a good photo frame. This is what we will do now. The first step is to download the app from Google Play. It weighs only 11 MB.
After installation, you will have several options for where the program will borrow images for their subsequent display. Options include the standard Gallery and many of the online services listed in the preface. It is not necessary to immediately select any services, this can be done at any other time. It's best to work on adding photo sources gradually. So you will understand which service is most convenient to use.
Selection of a large number of sources
Most Dayframe users list only one image source. But to display a large number of photos, it is still better to use several sources. And it doesn't have to be your pictures. For example, you can display images taken by the best photographers around the world on a photo frame. To do this, use the 500px service. In this case, you can clarify which category of pictures you are most interested in. This Internet service collects photos from popular publications, the choice here is very rich.
An old tablet can be turned into a photo frame not only for yourself. Give a "pill" with Dayframe installed to your grandmother or mother. At the same time, connect your Instagram or Twitter accounts to the application. As a result, the photo frame will display the pictures that you upload to these social networks.
Also, the application can select images from any services for the keywords you specify. This is also very convenient if you want to view photos of flowers, landscapes and other interesting images.
Timer
An electronic photo frame is better than a conventional one in that the images on it change regularly. There are many settings in Dayframe that change the cycle of displaying images.
The program is endowed with a large number of timers. As a result, you can teach the utility to display images only during business hours. This is very useful for those people who are using the program on a new tablet computer. You can also associate a particular group of photos with a specific timer.
In the future, it is possible to create separate playlists for specific times of the day. But for now, this feature is disabled. Now the developers are only testing it, promising to implement this feature in future updates of the program.
Additional settings
If you installed Dayframe on an old tablet, then the interaction buttons and useful information may get in your way. In this case, their display can be disabled in the settings. Then only photos and nothing more will be displayed on the photo frame you created.
You can also specify in the settings when exactly the Dayframe program should be activated. For example, an application can automatically launch when the device is in a Wi-Fi coverage area. You can also force the Dayframe to turn off at a certain battery level.
Such a wonderful program from the developers turned out. But to create a photo frame from an old tablet, you will need not only it. Do not forget that the device must somehow stand on the table. To do this, you can use the now popular covers-stands. Also, for some tablets, special docking stations have been created, which are also great for these purposes. Some craftsmen are even able to build a wall mount
New Android devices appear with enviable regularity. The old ones slow down and can no longer cope with modern games and resource-intensive applications. It is a pity to give or throw them away, but no one wants to buy them.
It's time to dust off your old tablets. Using the Nexus 7 tablet as an example, I will show you what to do with an old tablet. How can you not quite standardly use an old tablet in various scenarios. In this article, we will not dwell on banal readers and recipe books for the cook, but move on to a higher level.
Additional monitor
It is unlikely that a small tablet will be very convenient as an additional monitor, but it can be used to display important information. The market has an iDisplay application that allows you to solve this problem. It costs as much as $ 17.99, but you can always find a broken version on the well-known site (of course, just to get acquainted with all the functions and decide whether you need a program or not).
iDisplay works in cooperation with the backend for the computer: getidisplay.com. After installing both applications, we connect the device to the same Wi-Fi network (in the future, the developers promise support for connecting via USB), and you can proceed.
The tablet can be configured as a second display or as a mirror of the main display, while the remaining battery charge is displayed in the corner. There is full touchscreen support (tap to click, hold to simulate a right button click). Pinch-to-zoom also works, while a kind of mini-map appears in the upper right corner, by which you can understand the current position of the approximate area and move it. From the menu, you can call up the keyboard or launch the application. The screen resolution and the ability to display Windows system sounds are configured (it is worth noting that the application was originally developed for connection with the Mac and, accordingly, has clients for iOS). In general, for viewing serious content, the solution is unlikely to fit, but to display additional information / menu / window when the main screen is occupied, it is quite suitable.
Monitor from an old tablet. iDisplay settings and operation
Information panel for the machine
All that is needed for this is to choose the most convenient holder for the tablet in the car (I personally prefer the mount in the CD slot, no one uses it anyway) and put the program to your taste on the tablet. Again, the choice is quite large.
It is worth trying Android Auto, the one that is pre-installed on various cars. It's only for phones, but you can always find the latest installer on apkmirror.com. Important notifications, navigator tips, and music controls appear on the main screen. And at the bottom there will always be shortcuts to launch Google Maps, phone and Google Play Music.
 Information panel for the car from the old tablet. Home screen and navigation in Android Auto
 Also in the market you can find AutoMate and Car dashdroid. The first shows nearby places, weather forecast and speed limits, has voice control, as well as integration with Torque, which will allow you to view data from car sensors using an additional device that works via OBDII.
The second has support for audio players (Spotify, Play Music, Pandora, Poweramp, and more), voice control, and a customizable home screen.
But, in my opinion, a tablet running Car Launcher AG fits most harmoniously into the interior. Customizable buttons for radio, music player, navigation, browser. Shows speed and parking time. Displays weather, Wi-Fi and Bluetooth status, current music control and brightness settings.
 Information panel for the car from the old tablet. Car Launcher AG Interface
 Of course, there are more serious options for using the tablet in the car. On the thematic forums, there are many projects of full integration with the car media system, in addition to the head unit as a head unit with the operation of the buttons on the steering wheel. But that's a completely different story.
Mini TV for kitchen
There are many applications for watching TV in the market, everyone will find something to their liking. They have the same principle of operation: in fact, this is a shell with which you can feed IPTV playlists of your provider or found in open sources (usually in the form of M3U or XSPF).
An example is IPTV, which also supports multicast streams via UDP proxy, has channel categories, playlist history, TV programs in XMLTV and JTV formats. The LAZY IPTV client is also popular, which has a little more features: support for vk-video/YouTube links; playback of playlists of Internet radio through the built-in player; playlist auto-update; export playlists and favorites to a file in various formats; reminders of programs from a TV program; search for channels in all playlists; parental control system.
 TV from an old tablet. List of IPTV channels
 Another technology for watching broadcasts is the Peer-to-Peer Torrent Stream Controller software. After the first launch, you will be prompted to download and install Ace Stream Engine, which is necessary for work. At the time of writing, it contains 929 channels, divided into categories. The application also allows you to launch any torrent file and start browsing without waiting for a complete download.
Budget system video surveillance
There can be several scenarios for using video surveillance, but let's focus on the “baby monitor” option in a local Wi-Fi network. The tablet can be used from two sides: as a monitor with a network or IP camera (for example, hang over the front door or monitor the car from a window or balcony) or it can act as such a camera. I don’t have a separate IP camera, so I’ll show you how the tablet works in conjunction with the Nexus 5.
Image reception
Let's put IP Webcam on the phone. It can send video to the network in different formats, supports viewing through a browser and allows you to configure the inclusion and recording in case of motion detection. After starting, we direct the smartphone camera to the right place, lock the screen and connect the smartphone to the charger.
 Video surveillance from an old tablet. IP webcam settings
 We will receive an image on the tablet through tinyCam Monitor. After installation, we call the menu with a swipe on the left and find the item "Scan network". After scanning the cameras available on the network, and there may be several, add the one you need by clicking the corresponding icon in the corner. Then we go to the "View" tab, wait for the connection and look at the picture from the phone.
Tablet as a camera
Everything is very simple here: we change the applications in places and watch what is happening on the phone. If you need to complicate the task and watch the stream outside the home, it is easier to use a special service, such as Ivideon. After a simple registration, it will give you access to connected cameras through a browser. The IP Webcam described above just has integration with Ivideon (turned on in the settings).
Ivideon has a handy application that will allow you to connect to cameras from anywhere in the world. One of the notable features of the program is push notifications when movement is noticed in the camera's field of view. At the same time, you can watch a ten-second video taken when motion is detected. A paid subscription activates the recording of the entire stream from cameras to the cloud. To be able to stream from a regular webcam, you must additionally install an Ivideon server.
Watching the video stream via the mobile network and Ivideon push notifications
Solution for true geeks. We put the server part on the computer, the Remote System Monitor program on the tablet, come up with a password on the computer, connect from the tablet and look at the complete information about the computer's hardware, including:
- temperature (processor, video accelerator, hard drives, etc.);
- CPU and GPU load;
- use of RAM, video memory and paging file;
- voltage display;
- complete information about hard drives, including the speed of writing / reading;
- fan speeds and the ability to control them (if provided);
- network data transfer rate.

Photo frame from an old tablet
The tablet can be easily turned into a photo frame to display the desired photos or albums. There are enough programs in the market for this. For example, Photo Slides - a simple photo frame, many settings, in beta support for . Settings include photo display duration, refresh rate, effects, select to display only photos that match current orientation, clock over photo, run only when external power is connected. In the paid version, you can additionally select a moving panorama, set up a scheduled launch.
For those who want to see photos, including from social networks, there is the Dayframe application (Photos & Slideshow). It can display photos from Facebook, Dropbox, Flickr, Instagram, Tumblr, Twitter, 500px, Google+ and Google Photo.
If SIM card support is not available in all tablet models, then Wi-Fi and Bluetooth are built-in everywhere. Therefore, we download music to the tablet or, for variety, we simply install one of the many streaming services such as TuneIn Radio, SoundCloud or Spotify Music. Then it's a matter of technology: either via Bluetooth to the speaker, or via mini-jack to any device with an audio input or speakers.
Voice assistant from an old tablet
The tablet can easily be turned into a poor man's Amazon Alexa. It is enough to put it on the charger, deactivate the screen off and ask questions through Ok, Google. You can also use Russian assistants - Dusey's assistant or Yandex's Alice. If Google is suitable mainly for simply searching for information on the Internet and voicing it, then the last two programs support a much wider range of commands.
Dusya can make reminders, translate text, read news, count, control smart home and home theater, set timers and alarms, search for public transport routes, has access to VKontakte and integration with a tasker. Well, with the help of scripts (they can be installed through the application itself), it will be possible to significantly expand the built-in capabilities of the assistant. For example, play with the bot in cities, find and play music from VK, write a message on WhatsApp and Viber, call a taxi, listen to a random joke or riddle, and so on. Well, one of the most useful features will be voice notifications from other programs.
Alice has a smaller set of features, but there are useful ones among them: launching music, playing games, searching for information, and also managing a computer.
List of functions and directory of Dusi scripts
Do you want to always be up to date? There is nothing easier. Set any weather forecast and news feed you like, add widgets to the screen and don't forget to enable the "Keep the screen on while charging" option in the developer settings (I remind you that they will become available if you tap seven times on the number in the "About tablet" menu assembly).
Retroconsole
And finally, a little nostalgia. If old by today's standards, tablets and phones can't handle today's games, they can still serve as a tool to take you back to the nineties. There are many different NES emulators on the market (we have a better known Dendy clone), SEGA, GameBoy, PS and other emulators.
Most emulators already contain games, others require you to download game files or archives first. Well, for a more comfortable game, you can use the Sixaxis Controller, which allows you to use the Sixaxis and Dual Shock 3/4 joysticks. By the way, a Chinese clone bought on eBay worked fine for me.
If your first "console" was a stationary computer, then you can install DosBox Turbo, which supports Voodoo Graphics, IPX Networking, PCI Devices and Windows, including DirectX. This means you can take DOOM, Quake, Warcraft 2, Starcraft 1, Fallout 2, Diablo 2, Age of Empires 2 and other classic masterpieces with you on the road.
Minimum requirements: Dual-core 1.2 GHz, Adreno 220 / Nvidia Tegra 2, 256 MB RAM (but 1 GB is better), 2 GB of free memory. A full list of supported games can be found on XDA.
Conclusion
In this article, I showed what can be done from an old tablet. Of course, these are not all possible applications of old devices. For all the options, a few articles would simply not be enough, but I hope I once again directed you to an interesting path and a feat of experimentation. How do you use your old tablet or phone?
Some time ago, digital photo frames were quite popular. The idea that you can put a small screen on your table that will not only replace your favorite framed photo, but also be able to showcase entire albums of pictures, was liked by a lot of people. The advent of tablets has somewhat curtailed this boom, especially since there are applications that can easily turn any tablet into a “smart photo frame”.
Daydream for Android gives you the convenience of using your tablet to share beautiful photos. Moreover, the source of these pictures can be both your personal photos from social networks and photo hosting sites (Facebook, Instagram, Twitter, Flickr, Tumblr, 500px, Dropbox, and Google+), as well as local device folders. In addition, (and this feature will be the favorite of many) you can enjoy an endless stream of the best photos from popular photo services.
Immediately after starting the program, you will be asked to indicate your interests, on the basis of which the photo feed will be formed.

After that, you get to the screen with thumbnails of photos. By dragging this screen to the left, you can change the order or sources of photos. Click on the arrow in the top right corner to start the show.

Photos are displayed in full screen with a beautiful panning effect. Above the image, you see a clock (clicking on it brings up the alarm setting dialog) and brief information about the author of the picture. By default, each frame is displayed for 10 seconds, but you can change this value in the settings. There you can also authorize Daydream in your social media accounts if you want to contemplate not the beautiful work of the masters of photography, but your pictures from Facebook, Instagram or Google+.
Daydream turns your tablet into a spectacular photo frame that can load and showcase the work of the best photographers in the world in the background. Now your tablet, even in moments of inactivity, will work to please your aesthetic needs.
 How to delete queries in the Yandex search bar
 AMD Catalyst Control Center: installation and configuration Setting up for viewing video and photos
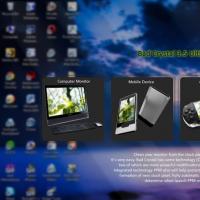 How to fix a dead pixel on a monitor
 Understanding Telecommunications Systems Using Telecommunications Systems
 Kinds and types of computers. Types of computers. Manipulator "Computer mouse"
 Turning an old tablet into a photo frame
 Safely hide Android apps from the list of programs