What is the best way to partition a 1 TB hard drive. How to Partition a Hard Drive Using Windows Utilities and Special Programs? What to do if the disk is not formatted and the system partition cannot be created in unused space
Partitioning a disk into several partitions is a very common procedure among users. It is much more convenient to use such a HDD, since it allows you to separate system files from user files and manage them with convenience.
Partitioning a hard drive in Windows 10 into parts is possible not only during system installation, but also after it, and for this it is not necessary to use third-party programs, since such a function is available in Windows itself.
In this article, we will show you how to partition the HDD into logical partitions. This can be done in an already installed operating system and when reinstalling the OS. At its discretion, the user can use the standard Windows utility or third-party programs.
Method 1: Using Programs
One of the options for dividing the drive into partitions is the use of third-party programs. Many of them can be used both in running Windows and as a bootable USB flash drive, when partitioning the disk while the OS is running does not work.
MiniTool Partition Wizard
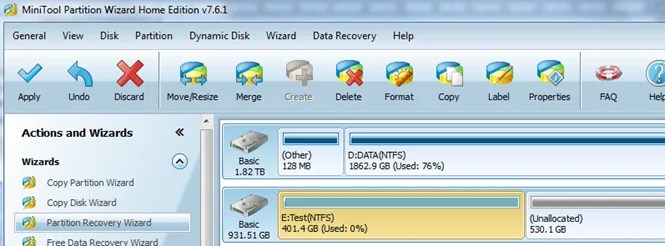
A popular free solution that works with different types of drives is MiniTool Partition Wizard. The main advantage of this program is the ability to download an image with an ISO file from the official website to create a bootable USB flash drive. Partitioning a disk here can be done in two ways at once, and we will consider the simplest and fastest.

The letter of the new volume can later be changed manually via "Disk Management".
Acronis Disk Director
Unlike the previous program, Acronis Disk Director is a paid option that also has a lot of functions and can partition a disk. The interface does not differ much from MiniTool Partition Wizard, but it is in Russian. Acronis Disk Director can also be used as bootable software if you cannot perform operations in running Windows.

EaseUS Partition Master
EaseUS Partition Master is a trial program, like Acronis Disk Director. Its functionality includes various features, including disk partitioning. In general, it is similar to the above two counterparts, and the difference mainly comes down to appearance. There is no Russian language, but you can download a language pack from the official site.

Method 2: Built-in Windows Tool
To complete this task, you must use the built-in utility "Disk Management".

Method 3: Partitioning the disk when installing Windows
It is always possible to divide the HDD when installing the system. This can be done using the tools of the Windows installer itself.

Now you know how to partition HDD in different situations. It is not very difficult, and in the end it will make working with files and documents more convenient. The fundamental difference between using the built-in utility "Disk Management" and there are no third-party programs, since both options achieve the same result. However, other programs may have additional functions, such as file transfer, which may be useful to some users.
So you are faced with the question of how to partition a hard drive. The reasons may be different, for example, you purchased a new HDD to increase the permanent memory of an existing computer or bought a new laptop, but without a preinstalled system, and you yourself have to install the Windows shell, or you simply did not have enough volume of the system disk partition for newly installed programs ...
The main ways to divide hard disk space
Regardless of the reasons that prompted you, you want to partition the hard disk yourself, but you have no idea how this is done in practice. Here we will try to help you by telling you not only about the basic methods of how to properly partition a hard drive, but also pointing out certain nuances and difficulties that you may encounter during this difficult work.
Consider how to divide a hard disk of any kind (HDD or SSD) in three ways, namely, using:
- standard utilities running Windows installed on your computer;
- special programs for working with various storage devices;
- Windows PE bootable shell.
So, let's get down to it and try to follow the sequence of actions exactly, otherwise, this can lead either to a repetition of operations for a new drive, or the loss of important data when working with existing storage media.
Partition the disk with the standard Windows utility
This way of working with drives is not very difficult and, most importantly, does not require third-party programs. It is suitable for dividing both the main drive "C" and for dividing the external HDD into partitions. All versions from Windows XP to Windows 10 have this utility for working with storage media.
So, to work directly with hard drives, you need to open the standard Windows shell utility, and it can be called on the desktop in two ways:
In the opened window “ Disk management»Should include all information storage devices currently connected to your computer, including flash memory.
Hover the mouse cursor over the desired partition and right-click the context menu for this disk. And here, depending on what we want to do, we decide on the team needed in the future.
Divide the disk into two
If this is one main drive "C", then this is an easy way to divide your hard drive into two and with one hundred percent certainty not to lose system information. To do this, we perform the following actions:

That's it, the main disk is divided into two partitions.
Partitioning the disk
But how to divide a hard drive into partitions, in the case of a new, just purchased drive, working with this standard utility is also not difficult, but the algorithm of actions will be slightly changed. The sequence of actions will be as follows:

It is worth remembering here that the disk system MBR allows you to create no more than 4 partitions per hard drive.
Working with disks using special utility programs
The most popular among users are the following universal software utilities for working with various storage devices, namely:
- Acronis Disk Suite;
- Paragon Partition Manager Professional;
- AOMEI Partition Assistant Technician Edition.
These utilities are specially adapted to perform almost all basic operations with HDD, SSD and other storage media. They have a fairly straightforward interface designed to work with both specialists and ordinary users.
Partitioning a disk using such universal utilities, we will analyze it using the example of a program AOMEI Partition Assistant, which can be installed on a computer as a standard application, or used from portable mode.
And also for comparison, we will show the operation of the utility in two modes when dividing the main disk into two and splitting the new hard disk into several partitions.
We open the program and see a window with extensive information on all connected storage media and their sections.

Divide by two
The algorithm for partitioning the main hard drive "C" consists of a set of sequential commands:

After rebooting, after completing all the operations, the system will boot, but with the main disk divided into two parts.
Sharing a new disk
As a rule, the new HDD will represent unallocated space and will be visible only in the program window.

First, be sure to clearly designate the disk with which we will work by hovering the mouse cursor and getting the corresponding color gradation of the position. But in case of an error, you can lose all important information on a randomly selected existing storage medium.

The algorithm for working with other universal programs for resizing various storage media is very similar to the example above. The only significant difference will be the program interface and menu layout.
Partitioning the primary disk using the Windows PE bootable shell
If you decide to install a new operating system or completely update the old one, and the existing sizes of the main HDD partitions do not suit you or do not meet the necessary requirements, then it is better and easier to reformat by going into the computer from a special simplified shell.

If desired, various versions can be downloaded from the Internet, and they are freely available there and are equipped with a set of all necessary portable programs for working not only with storage media, but also have a whole set of various useful utilities. For example, you can take the distribution kit from the site https://diakov.net/8305-adminpe-30.html, which does not require additional registration from the user.
Having booted to USB or CD / DVD media, we boot the system through the key to call the menu, in which there is a choice of the boot device. As a rule, this is the F11 function key, after pressing which, we select our media.
After loading the portable one, a desktop appears, almost completely repeating the familiar Windows shell, but already with preinstalled software modules.
We open a universal program for working with various storage devices and work according to the above example in the background and without unnecessary reboots.

The main advantage of the shell is that the software modules are not connected in any way with hard disks, which allows you to perform all possible operations to reformat them in any possible way without any restrictions.
Conclusion
In this article, we learned how to partition a PC or laptop drive in different ways. Examples were considered: how to divide a hard drive into 2 parts, and how to create partitions on a hard drive. You can partition an external hard drive in the same way. Just plug it into your computer and follow the same steps.
Related Videos
This material will discuss how to partition a disk into partitions in the operating system Windows 7, 8, 10. Many people prefer to perform this operation through third-party applications, but it is much easier to do it with standard tools. This is true for some operating systems. For example, Windows 7, 8 and 10. XP does not have a standard disk partitioning tool. The main advantage of this option is that all actions take place in the explorer, that is, you do not need to buy, download, install anything.
This material will be especially useful for people who recently bought a laptop or computer where there is one disk with Windows installed. At the end of the article, there will be instructions on how to partition a disk using the third-party utility Partition Master Free. It will come to the aid of those who, for some reason, cannot partition the disk into the required number of partitions using standard tools.
There can be many reasons for this, ranging from simple convenience to security. For example, if it becomes necessary to reinstall the Windows operating system, then for a clean installation it is necessary to format the disk, and this will entail the deletion of all data. Of course, you can transfer all important data to other media, but, firstly, this is not very convenient, and secondly, it is not always possible. In other words, keeping everything in one place is not rational.
The most correct option is to create a small-sized system disk on which the operating system and programs will be stored in the future. It is also important to create an additional disk that will store all the basic data: photos, documents, videos, music, etc.
How to properly split the D drive into 2 parts when installing the system?
Partitioning a disk is easiest when installing an operating system. To do this, you need to load a disc or flash drive, select the required language, accept the terms of the agreement and select the "Full installation" item. In the window that opens, you will see if there is free space that is not used by any of the partitions. There will also be a button "Disk settings", which must be pressed. After that, a panel with tools for working with disk space will appear.
The panel allows you to format, create new and even delete old sections. For example, if there was unallocated space on the disk, then you can turn it into a partition using the "Create" button. Further, the user will only need to enter the size of the future section and press the "Apply" button.
If there is one large partition, from which you need to create two separate ones, then you need to separate the necessary volume from it, which will be transferred to unused space. And then you need to make a new section from this space and click "Create".
There is nothing to describe in more detail, because the Windows developers made this tool outrageously simple. For clarity, we suggest watching the video:
What if the disk won't format and can't create a system partition in unused space?
If a disk partition refuses to be formatted or changed, then most likely this indicates bad sectors. The Victoria program, which can be downloaded, allows you to evaluate broken sectors. The latter usually appear due to the distortion of reception and transmission of various kinds of information. In addition to detecting defects, the utility allows you to hide them using three available tests (in the program, you must select the "Remap" parameter in the "Tests" section). Not always, but in some cases, the program allows you to bring the hard back to life by correcting this situation.
Partitioning a hard drive in Windows 7, 8, 10 using standard tools
To do this, go to Start - Computer - Control or right-click on the icon My Computer - Management - Disk Management... Further, the user will see a picture typical for many computers - there is only one C drive in the system (it can be labeled D, E, F, this is not important) and the second System Reserved partition. The last disk is for storing Windows boot files. It is hidden from the user and you should not perform any manipulations with it.
Disk management
Here you can see all the information about the hard. Standard toolkit for working with disks allows you to perform the following tasks:
- split a disk from one into several partitions;
- increase the size of existing partitions;
- shrink, attach, and delete volumes.
The functionality of the standard tool is comparable to most of the capabilities of third-party programs. The illustration shows that the disk has a size of 250 GB and two partitions. Only four partitions can be made with the MBR record: three key ones will be marked with a dark bluish color and the last, additional one, will act as a logical one.
For the example of drive C, all operations will be performed. Please note that before splitting it will be important to defragment it.
We proceed to dividing the volume (drive C) into two parts. To do this, you need to right-click on it, in the drop-down menu, click on the item "Shrink volume". After that, you will need to specify which size you want to compress. If it is a 250 GB hard drive, the answer will be "available space for compression - 200 449 MB". Here, the user needs to be careful, because repeating this action can be difficult. If you specify a compression size of 150,000 MB, then approximately 149 GB will be taken from drive C for a new partition. For the system disk, in most cases, a volume in the range of 50-100 GB will be sufficient.
As mentioned above, "Compressible Size" is the volume of the user-created partition. Here you need to hover your mouse over the freed space and right-click on the Create Simple Volume menu.
The Create Simple Volume Wizard will now open. You should click next and agree with everything that is asked. Here you can also select the future drive letter. If the user has a C drive in the system, then you can create a D or F drive. In the process, it is strongly recommended to give preference to the NTFS file system. Do not worry about formatting the new partition, because all existing data was left on the C drive, and not on the new one, which is just in its infancy.
That's all. In this way, you can create sections on your own and not resort to the help of specialists. However, it should be noted that partitioning a disk using standard tools is a simple way, but not always universal. If the standard tool refuses to work, then in this case it is better to install Acronis Disc Director or Partition Master Free.Partition Master Free
Above, an option was described with which you can partition a disk using standard tools. Unfortunately, it does not always work, so we offer you the option of partitioning the disk using the Partition Master Free program.
Ease Partition Master is a great tool with a very good interface, but its main advantage is that it is distributed free of charge. If we talk about functionality, then everything is simple: the user can fully work with sections, that is, format, split, resize, delete sections, etc.
You can download the application from the official website http://www.partition-tool.com/landing/home-download.htm or the Russian version http://files.wom.com.ua/E/EaseUSPartitionMaster/EaseUS%20PM%2010.0% 20RUS.zip
As mentioned above, the program is distributed free of charge, but during the installation, the user will be offered to install paid software, which is unlikely to be needed. You should wait until the end of the installation process and click on the "Finish" button.
Completing the installationEaseUS. You need to run the program and select "Ease Us Partition Master Free". Now the user will see the program interface, as well as all available disks (in our case, the disk size is 150 GB).
The program shows that there is only one section (C: \). Now you need to select it in order to take disk space from it (in our case, it is about 90 GB) using the "Resize / Move" button. For most users, two partitions will be enough, but if necessary, you can create no more than four (remember that you cannot create more on a disk with an MBR structure).
After that, a window will appear where you need to pay attention to the Partition Size (the size of the compressed partition) and Unallocated After (the size of the future partition). There will also be an item "Optimize for SSD". Be sure to disable it if you plan to work with a solid state drive (HDD).
After taking the space, a new partition (unrecognized space) will appear, weighing about 90 GB. Select it and click on the "Create" button. In the window that appears, the user needs to specify the volume label, that is, the future name for the disk, and also set the drive letter. The rest of the settings can be left unchanged.
Now a new section will appear in the program window. You should check all the settings, and if everything suits you, then click "Apply". After that, a window will appear, which says that drive C will be compressed, and instead a new partition will be created from this space.
Now, if you open My Computer, you can see a new Local drive with the letter E (approximately 90 GB in size).
That's all, the program did an excellent job. That is, the size of the C drive was reduced and a new one was created from the freed space. However, the reader was acquainted with only a part of the possibilities offered by the free version of the Partition Master Free program.
Let's look at this acute-angled question today: how many parts are best to break a hard drive for convenient and safe work? How to partition the hard drive of your computer or laptop correctly?
Let's start with the most important thing - Yes, the hard drive must be broken down unambiguously!
What for?
The answer is really simple - to lose a minimum of files in the event of a malfunction in the Operating System. The fact is that when reinstalling Windows OS, or any other, you need to completely format the area of the disk where it will be located. That is, if you have only one area of your hard drive (for example, Drive C), then it will have to be completely formatted with loss of ALL data.
Division options
I recommend divide the hard disk into 2-3 areas. But not more... Indeed, in fact, if there are more than 3 areas, then they will be small, and there will not be much sense in them when storing large data (unless, of course, you have a hard disk less than 500-700 GB). In what proportion? See your needs realistically: how much space do you need for videos, music, games, images, etc.? How much space do documents take? How many users with personal information?
Attention, this method is perfect for disks with a total volume
Divide the disk into 2 areas: one is systemic, and the other is everything else. And for system - 30-50 GB, so that only those operating systems can fit there, but also programs. But, you must admit, this is not always convenient.
I recommend the next method for 700+ GB hard drives!
Division by 3: one - system, the second - "multimedia disk" - a disc for music, films and documents, the third - for games, images, temporary files and everything else. Wherein System should be about 50-60 GB, because in addition to the OS, there will also be programs. "Multimedia disc" - 150-200 GB... Everything else is for the third disc.
Personally, my disk is split according to the second plan:
Those. 40 GB are allocated for the system + programs (+ 10-15 GB is possible), for "multimedia" - 150 GB - quite enough, and 460 GB for games, images + there is a storage of temporary files from the Internet.
So far, no complaints! Good luck!
Similar news:
 System software
 Video course "Computer for beginners"
The hard disk of a computer is a means of storing data for the system and the user in particular. Sometimes, it is necessary to divide information into some large sections to avoid confusion. It is recommended to install the system on one partition, and user files, programs, etc. save to others. When buying a new PC, most often, the hard disk is not divided into local disks (partitions), so you need to carry out this operation yourself. Let's take a look at how to properly partition your hard drive. For example, we will use Windows 7, which is the most stable among the current versions (Windows 8, 10).
Before starting the partitioning process, we recommend that you read the following tips:
- Allocate at least 50-60 GB of free space for the OS, otherwise you will not see normal system operation. Of course, if you already have a 100-200 GB hard drive, then that much space is too troublesome to allocate, but for systems starting with the "seven", you need enough memory.
- It is also better to take care of the path for saving files for the browser and torrent client, it is better to set the file upload paths for them not on the system disk (by default), but on another more capacious partition. You should also understand that desktop content takes up space on the system drive.
- If you have a hard drive up to 1 TB - divide into 3 partitions, if from 1 TB to 2 TB - divide into 4 partitions, more than 4 TB - into 5 partitions. This is explained by the fact that by downloading large files to the hard disk, optimal partitioning will allow it to be written correctly.
- Do not use up all the available hard disk space. It is necessary to leave some "reserve" space to restore damaged clusters.
If you listen to these tips, you can configure the partition of the hard drive once and not worry about it again until you decide to expand the memory on your computer.
How to partition hard drive in Windows 7?
To partition the hard disk, we will use the standard Windows operating system tool. It is called "Disk Management". To open this utility, you need to do the following:
Now let's move on to how to partition a hard drive in Windows 7. The instruction is as follows:

How to partition hard drive Windows 8, 10
Using Windows 7 as an example, we looked at the partitioning process. There will be nothing fundamentally new in the "eight" and "ten", so you can use this procedure for this system as well. The only exception, we will slightly tweak the tips to get the job done correctly:
- Leave (add) at least 70-80 GB of information for the system disk. Starting with the "seven", the system writes information about the current state to the local disk so that you can use the system restore if necessary. In addition, after many updates (including up to 8.1, 10), large files are generated that are protected by the system;
- Divide the disk into multiple partitions, do not leave 2 partitions. So it will be more convenient for you to handle files that are written to the hard disk, logically structuring them into sections.
How to partition hard drive in Windows 7, 8, 10 using third-party programs
What if you don't trust the standard local disk tool? We suggest using a third-party application Partition Wizard... This application is free, does not require a lot of space and is stable. Of course, its functionality is far from Acronis Disk Director, but it will be just right for partitioning a hard disk.
So, first download it, and then install it in a convenient place on your computer. When the program is installed, run it and wait while it loads the necessary information about your system and hard drive.
The unallocated section will be labeled "Unallocated". Click on it with the right mouse button and click "Create".
When you run this command, you will need to provide the following information in the next window:
- Section title;
- Partition type (for example, logical);
- Drive letter;
- File system type;
- Volume.
Please note that in the case of the program that is built into the system - "Disk Management", these operations are performed in different windows, but here, for convenience, everything happens in one window. For example, we have created a new "Test" section with 400 GB on board. After creation, the file system looks like this:
This process can be repeated as many times as you like until you run out of free, unallocated space. Please note that it is very important to leave very little free space so as not to harm the hard drive. To create another new section, just repeat the instructions. Don't forget to save your progress with the Apply button.

As you can see, the process of dividing a disk into sections is not complicated, but very simple, if you approach the solution of the issue with instructions from our site.
 The best programs for reading and editing: do without Photoshop psd extension than open
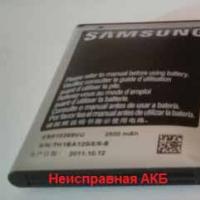 Why is my phone charging slowly?
 How to add a folder to an exception in Kaspersky How to add exceptions to a program in Kaspersky
 Installing Kaspersky Security Center Installing the Administration Server kaspersky security center 10
 How to take a screenshot on a computer: All possible ways How to take a screenshot of a photo
 Screenshot - what is it and how to make a screen Ways to take a screenshot on a computer
 Free renewal of the Kaspersky Anti-Virus license Suspension of protection from Kaspersky Gadget