How to save all images from MS Word document. Extracting an Image from a Microsoft Excel Document Extracting Content from an Archive
When using a computer in everyday life, a situation often arises when we want to save a photo or picture from the Internet to our computer. But how to do that?!
A picture on the Internet can be saved in any of the cases, even when the content of the site is copy-protected or the right mouse button is blocked. In this lesson, you will learn and learn how to save any pictures and photos from the Internet.
: any Internet browser
Also, when saving from different sites, there are several different obstacles that we will look at in this lesson:
These are the main difficulties that you may encounter when saving a picture or photo from the Internet.
In this tutorial, the Google Chrome web browser will be used as an example. In other browsers, the principle may be similar.
Copying an image from a website
For example, we have a site on the page of which we want to copy a picture to our computer:

Rice. 2. Button to save the picture to the computer
After pressing the button " Save picture as..."A dialog box will open in which you need to select the path (folder) where we want to save our picture or photo from the site. After you have chosen a place to save, in the same window, left-click on the "Save" button.
Now the picture or photo is saved to your computer. This completes the "" method, then we will consider more complex situations.
Saving a picture that doesn't have a "Save picture as..." option
This option also works for pictures or photos on the site that cannot be saved in the standard way. Save picture as...". The reason for this may be: a prohibition using a script to save or copy material, on the site page our picture is laid out as a layer (

In this example, the picture is placed as the background picture of the layer. To save this image, right-click on the desired image and select the "View element code" element in the pop-up menu:

Rice. 4. View element code element in Google Chrome
After clicking on this item, an additional window will appear in which the program will immediately select the element we need:

Rice. 5. Layer with a picture or photo that needs to be saved
On the right, in this window, there is an additional section with tabs "Style, Computed ...", in which we can see a link to an image or photo:


Rice. 7. Button to open the image in a new Google Chrome window
After that, the program will open a new tab (window) with the required picture:

Rice. 8. Picture opened in a new window or tab
At this stage, the section Saving a picture that doesn't have a "Save picture as..." option» is completed, now we can save pictures or photos on sites where there is no save button. Next, we will consider a more complex and rare option: saving a picture or photo from a page on which the right mouse button is disabled.
Saving a photo when copy-protecting a page
Suppose we have a picture or photo that we want to save to our computer:

According to the already established procedure, we right-click on it in order to save it, but as a result, we do not have a pop-up menu with the basic operations of copying, printing, and other useful actions. There is a way to 100% copy pictures or photos from such pages of the site.
As described above, this lesson uses the Google Chrome browser and all examples will be given based on the features of this particular browser. Other modern browsers have roughly similar features. In this lesson, you will understand the logic of solving this problem, even if you have a different browser.
To start copying a picture from a protected page, press the key on the keyboard " F12". After pressing this key, we will open an additional window, referred to as " Developer Tools»:

Rice. 10. Google Chrome Developer Tools

Rice. 11. Google Chrome Network Tool Tab
After that, to make it easier to find the picture we need, click on the icon with the image of the funnel (“ filter”), after that a line for sorting elements on the page will become available to us:

Rice. 12. Button for filtering elements of the Google Chrome browser
Now we need to use the left mouse button to click on the button " images” so that only pictures and photos are displayed in the field below:

Rice. 13. "Images" button to filter images on the page
Our filter is ready to find and save the picture we need to the computer. After that, you need to refresh the site page (key " F5" on keyboard). After the page has been refreshed, in the " network» Data about downloaded images will appear:

Rice. 14. The "Network" tab displays all the pictures on the current page
In this list, scrolling up and down with the mouse wheel, we will find our picture in a reduced version:

Rice. 15. In the general list we find our picture
Now all that remains for us is to open this picture in a new window to save it to our computer. To do this, right-click on the name of this picture (the name of the picture is shown to the right of the thumbnail) and select " Open link in new tab
Also, do not forget that you should not abuse the copying of pictures or photos from sites, since each picture or photo can have an author and they have copyright.
Sometimes, while working with a text editor, there is a desire to take possession of the picture, install it on the desktop or use it in another document. To do this, you need to save the image from the Word in jpg format. The following methods will help to save the picture.
Save via context menu
You can extract a photo from Word in the following steps:
After completing the steps, by opening the folder that was previously selected for saving the photo, you will find the saved picture in jpg format.
Save by copying
If you need to insert a picture from the Word, for example, into a graphics editor, be it Photoshop or Paint, the old copying method will help.

Extract from archived file
When there are many pictures in a regular Word document, it will take a huge amount of minutes to manually save each one separately. To simplify the saving of drawings, you need to save the Word document to your computer in the "Docx" format. After all, this Word format is considered as a Zip file, any picture will be saved as a regular object in the "jpg" format, and the text is saved as "XML". To open a Word file in the "Docx" format, you will need an archiver program called "WinRAR". Let's take a closer look at this method step by step.

Thanks to the above methods, getting and saving drawings from Word will not take much time.
I was finishing work on another article here just now (I just had to insert a couple of pictures) and ran into a problem. It was necessary to make a screen (capture) of the monitor screen and save it as a picture in JPG format.
Well, I did the old fashioned way, hit PrintScreen, fired up Word, Ctrl V, pasted the image into a text editor. It remains only to press the right mouse button. And select the option - "Save as picture".
And nifiga!
I was surprised to find that there is simply no such option in the 2007 version of Word. It is in Word 2010 and even in Word 2013, but not in Word 2007.
What to do?! Is it lost or is there a way out?
First of all, if you want to capture an image from the monitor screen, then you need to "shine" it. There is a special Printscreen button for this. Press it and your current image on the monitor is automatically copied to the clipboard.
Method 1 Saving a picture via Microsoft PowerPoint
For me personally, the fastest and easiest way to save a picture from Word is the following.
Go to Microsoft PowerPoint and by pressing the Ctrl-V combination, insert the image.

Method 2 Save the picture as a Web page
The method is more time consuming, but no less effective.
Open Word. Paste an image from the clipboard.
Then, go to the upper left corner of the editor, click on the round button, then select "Save As", select the save path (name it), and save the document as "Web Page".

Then look for the appropriate folder in the place where you shoved it. Open it up and voila!

Two pictures will appear before your eyes. One in PNG format (that's what you need) and one - small in JPEG format.
Yes, it's inconvenient, of course, that the image is saved in PNG format. But this is not a big problem, because. you can always convert it to JPEG.
Method 3 Saving pictures from Word using Paint
This method is similar to Method 1, but sometimes I fail to put it into practice.
When you have captured the image from the monitor screen, feel free to go to Paint. And, using the cherished key combination Ctrl-V, just paste this picture into a graphics editor.
But there is a small nuance here. Sometimes Paint, for some reason, reduces the size of the image. As a result, the pictures are kept very small. It is simply impossible to examine the text on them later.
Therefore, I prefer to use Method 1.
I don’t even consider other ways to save pictures from Word, because nobody needs them.
When working with text documents, it is often necessary to save a picture from Word to JPG format. If you also faced this problem, then this article should help you. Now we will describe several ways to save pictures from Word.
Method number 1. We save the picture through the context menu.
After that, a window will open in which you need to select a folder to save the picture, a JPG file type and enter its name for the picture. After that, you need to click on the "Save" button.

As a result, the image you saved in JPG format will appear in the folder you selected.
Method number 2. Copy the picture.
If you need to transfer an image from a Word document to a graphics editor, such as . Then, the easiest way is to simply copy the picture and paste it into the desired program. To do this, right-click on the desired image and select "Copy". You can also just select the picture and use the CTRL-C key combination.

After the picture is copied, you need to go to the graphics editor and paste it using the "Paste" command or the key combination CTRL-V. After inserting the picture, you can save it as a JPG or in any other format.
Method number 3. Extract pictures from a DOCX file.
If you need to save a large number of pictures from one Word file, then the previous methods will not be very convenient, since they require a lot of manual work. But, there is another option. You can save your document in DOCX and . This is possible due to the fact that the DOCX format is a ZIP archive in which the text is saved as XML, and the pictures as regular JPG files.
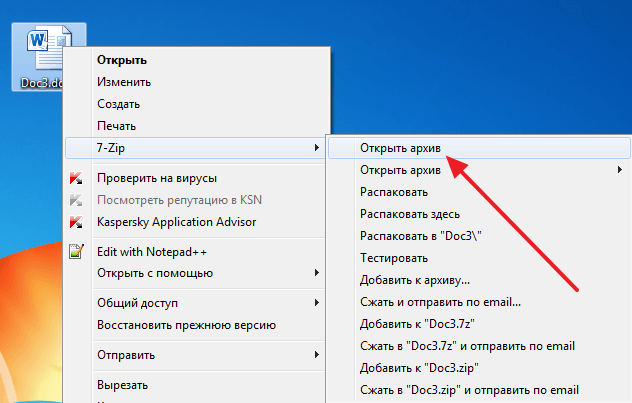
In order to open DOCX as an archive, you will need a . For example, you can use the free 7zip archiver. After installing it, you need to right-click on the DOCX file and select the menu item "7-zip - Open archive".
Please note that if you do not have the "Open archive" menu item or you cannot install the archiver, then you can change the file extension from DOCX to ZIP and open the file manually. In this case, the file will open even without an archiver, since the Windows operating system can open ZIP files like regular folders.
After that, the 7zip program will open the DOCX file as an archive. In this archive, you need to go to the folder /word/media/.
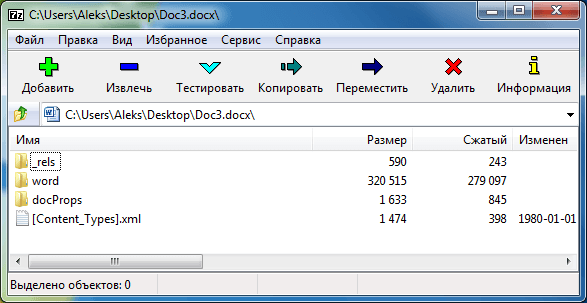
This folder will contain all the files from your document. However, they will be saved in JPG format.
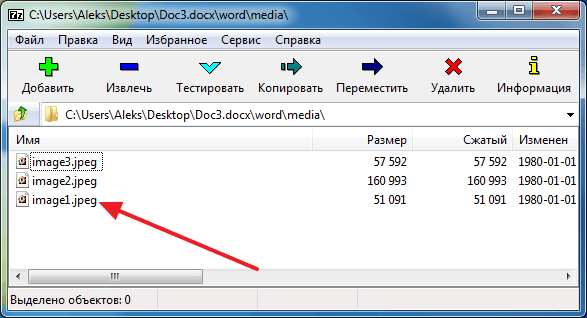
In order to extract files from the archive, you just need to drag them from the 7zip program to any folder. For example, on the desktop. You can also use the "Extract" function. To do this, click on the "Extract" button and specify the folder where you want to transfer the JPG files.

After selecting a folder and clicking on the "Ok" button, the JPG files you need will be unpacked.
Pictures and pictures embedded in an Office file are saved in the file. But you can save the drawing as a separate file so that it can be used elsewhere.
Saving an image as a separate file
In PowerPoint on a computer for photos, shapes, charts, SmartArt graphics, digital ink, and text boxes, use the following procedure.
In Word and Outlook the steps below only apply to photos.
In Excel this feature is not available.
Right-click the drawing you want to save as a separate image file and choose Save as picture.
Listed type
In field File name enter a new name for the picture, or simply accept the suggested file name.
Image file formats
File format | Description |
|---|---|
|
Format |
|
|
Format |
|
|
Format without loss of quality with each correction and saving of the file. |
|
|
Device independent bitmap |
|
|
Windows Metafile |
Graphic format "vector" with 16 bits |
|
Enhanced Windows Metafile |
Graphic format "vector" 32-bit |
|
Format |
Images can be resized without loss of image quality. The files support lossless data compression. |
This feature is available in Word, PowerPoint, and Excel. It is suitable for photos, shapes, charts, SmartArt graphics, digital ink, and text boxes.
Saving a drawing or other image as a separate file
Listed type file, select the desired format.
In field " where" Navigate to the folder where you want to save the image.
Image file formats
File format | Description |
|---|---|
|
Format |
Allows you to improve the quality of graphics on websites by making parts of the picture transparent and adjusting the brightness. |
|
Format |
Best for drawings with rich colors, such as scanned photographs. |
|
PDF |
A portable format that can include text and images. |
|
gif |
Provides support for 256 colors and preserves image data when the file is compressed. |
|
BMP |
Pictures created in either program appear exactly the same in the other program as they do in the original. |
Note: This page is translated automatically, so it may contain inaccuracies and grammatical errors. It is important to us that this article is useful to you. Was the information helpful? For convenience also (in English).
 How and where to connect your home phone yourself
 Rolsen is the largest electronics manufacturer in Russia
 Changes in the tariff "go to zero
 Yota (mobile operator): reviews, tariffs, connection
 How to find a tablet if it is lost or stolen How to find a stolen android tablet
 Review of the smartphone HTC U Ultra: think for me
 What can be made from an old mobile phone: a couple of original ideas What can be made from a broken cell phone