How to enter street tp link. How to enter the settings of the TP-Link router: step by step instructions. Entering the settings of TP-link routers
TP-LINK is one of the leading manufacturers of network equipment. We will provide detailed information on how to connect or reconfigure a TP-Link router. The procedure for connecting the device, setting up for wired and wireless networks, changing the password, and updating the firmware will be covered. The information received will allow you to easily configure your home network in TP-Link routers.
What data is needed to connect the router
To change the parameters of the router itself, you will need two things: a browser and a password with a login for access. The latest data can be found on the label attached to the body of the device. As a rule, the standard login and password is the English word admin.
To use the Internet, you will also need authorization data, which you must obtain from your provider. However, they must be spelled out in the contract for the provision of services. They must be entered in a router or a specialized program, if such is provided by the provider. Be sure to find out the type of connection (PPPoE, L2TP, PPTP, and others) for proper setup. When using dynamic IP, you need to know your IP address, subnet mask, and the like. If all these parameters are already in hand, you can connect TP-Link.
How to connect the device to a network, PC or laptop
The procedure does not cause great difficulties, while it is performed for 5-10 minutes. Follow the steps of the following instructions one by one:

Models with Wi-Fi can be configured "over the air". This is true if you do not have the opportunity to connect the router to the computer via LAN. This completes the wiring. Further, the process continues in the web interface.
Login to the web interface
Manipulations with the modem are performed only in the web interface. You can get into it from a computer with a network cable connected or via Wi-Fi on a wireless model. Attention! You can use the interface at any time, even when the Internet is not working. Follow the steps below to sign in:
Router settings
Let's move on to the most interesting thing - changing the parameters of the router. There are more than 10 different sections in the main window. Most of them are not needed by the average user. Internet activation occurs in a maximum of two sections. Next, we will describe in detail how to set up a TP-Link router, how to create a wired connection, set up Wi-Fi, change the login password and other useful things.
Connecting to a wired network

The router has a quick setup feature. Beginners are recommended to use this section. Click the "Next" button and follow the installer's prompts:

When setting up other types of connections, fields for entering a login and password will appear. Here you need to enter the data that the provider will give. The user can change the settings in the "Network" section. In some TP Link models, next to the choice of connection type, there is a "Define" button that will help you find out your type. Based on the WAN, the corresponding characteristics are already configured. 
For example, to use PPPoE, fields for login/password and parameters specific to PPPoE already appear in the window.

Connecting via a wireless network
For devices with a Wi-Fi module, you will also need to set up a wireless connection. This can be done during quick setup (the penultimate paragraph involves the introduction of all important parameters).

Let's see what Wi-Fi settings on the TP-Link router should be changed. Broadcast should be set to "on". The SSID or network name is what will be displayed on other devices when searching. Specify your region, mixed mode. Leave the channel and its width automatically. Advanced users can choose it themselves, taking into account the busy channels of neighboring routers. If you want to put a password on the access point, select the WPA2-PSK security type. In conclusion, it remains to enter only the password from the wireless network point. Click the "Next" button and complete the process.
Similar settings are located in the "Wireless Mode" section. To change the SSID or channel settings, select the "Wireless Settings" sub-item. You can change the password in the "Wireless Security" section. For any changes, do not forget to click the "Save" button. If the selected options have not changed, reboot the machine.

Through these menu items, TP-Link routers are configured.
Changing the password for logging into the web interface
All owners are advised to change the standard password and login from the router. This is due to the fact that an attacker, in the absence of a Wi-Fi password or hacking it, will be able to enter the modem parameters and “have fun”. Eliminating the created problems is not difficult, but it is better to avoid this. The interface allows you to quickly and conveniently change the input data:

If you have forgotten your login information, perform a factory reset.
Advanced Settings
The router has a lot of additional features that expand its capabilities. Consider some of the advanced settings:
- Guest network. Allows you to configure a public guest network, limit incoming / outgoing traffic or work time.
- Address change. It allows you to set static IP addresses or use DHCP.
- Forwarding - setting up virtual addresses, web telephony, conferences and the like.
- Parental control features. Limit Internet access time or specific resources.
- Setting the routing table manually (for specialists).
- Binding MAC addresses to specific IPs.
You can learn more about how to configure the specific functions of the TP-Link router in the user manual.
VPN
This technology allows you to hide information from prying eyes. Encryption is performed, so even the provider will not be able to track your visits. However, only those models on which a VPN server is preinstalled can use VPN. You can perform setup by the following steps (for English firmware).
TP-Link is one of the most famous manufacturers of routers, and the products of this company are distinguished by quality, reliability and fairly affordable prices. But, having purchased one of these devices, users often cannot set it up on their own. Moreover, some of them do not even know how to log into the TP-LINK router and get into its main menu.
In fact, setting up a router is not such a difficult task, and once you have done it, you yourself will understand how simple it is. This article will help you understand everything and not make one of the common mistakes.
Preparation
Before you start connecting a TP-Link router, you need to do a little preparation. It consists in determining the network parameters of the provider and writing them down (or remembering them).
The first thing to deal with is the type of Internet connection. If you use a login and password to connect, then the connection is carried out via the PPPoE protocol and you can immediately connect a TP-Link router, the configuration of which will be discussed below.
If the login and password are not used for the connection, you must do the following:
- Open the "Control Panel" and go to the "Network Management" tab.
- Now pay attention to the sidebar (on the left). Here you need to select the line "Change adapter settings".
- Before you is a list of connections (usually it is one). Right-click on the one that is currently active and select "Properties".
You just have to select "TCP / IPv4 protocol" and click "Properties".
Determining the type of connection
The window that opens will allow you to determine the type of connection, which (not counting PPPoE) can be of two types:
- If you have the “Use IP address” line selected and filled in, then your connection type is called “Static IP”. In this case, you need to overwrite all the settings, and then select the "Obtain an IP address" option and click "OK".
- If the line "Obtain an IP address" is active immediately, then you have a connection of the "Dynamic IP" type. This means that you do not need to rewrite anything and you can start connecting the TP-Link router.

In any case, you can now close all unnecessary windows and prepare for further actions.
Connecting a router
Now it's time to take the device out of the box and connect it to your computer. For this:
- Connect the power supply to the device.
- Connect the internet cable to the blue port.
- Connect the device to the computer with a network cable. Any of the yellow ports will work for this.

- Launch your browser. It is best if it is Internet Explorer or Edge (for Windows 10).
- Enter the address of the TP-Link router. Usually this is a combination of numbers "192.168.1.1", but sometimes there are other options (they are written on the bottom panel of the device).
- A window will appear in which you should enter the login and password of the TP-Link router. By default, you need to enter the word admin in both these lines.
- From the menu (on the left), select Quick Setup.
After completing the above steps, you will find yourself in the main settings menu. Here you need to specify the connection type that you defined before accessing the TP-Link router.
Setting for PPPoE
If your connection is via PPPoE protocol, you need to select it in the main menu, click "Next" and enter the settings:
- User Name - provider login.
- Password - password for connecting to the Internet.
- Confirm Password - password again.
Now click Next and enter:
- In the SSID field - the name of the access point (of your choice).
- PSK Password - think up and enter a password.
- Wireless Security - Specify WPA-PSK/WPA2-PSK.
After that, you just have to click Next and reboot the router (Reboot).
Setting for static IP
Select the Static IP line in the main menu if your connection is made using this protocol. Before you is a window with several lines that you need to fill in manually. These are the same parameters that you rewrote from the Windows network settings before going to the TP-Link router.
After filling in all the lines, check them carefully again, and then click Next. In the next window, you need to enter the name of the access point (of your choice), password (create it yourself), click Next and reboot the router.
Setting for dynamic IP
If you have a dynamic IP and use a TP-Link router, the setup will be very simple. In the menu, you need to select Dynamic IP, click Next and enter the name of the access point, as well as the password for it.

After that, you just have to click Next, and then Finish. A reboot is not required in this case.
Setup using a dedicated disc
To facilitate the process of setting up a TP-Link router, a special disk can be used. It does not come with all device models, but if you have it, you can simply insert it into the CD-Rom and, following the prompts on the screen, complete the setup procedure in a few clicks.
Possible problems
Sometimes it happens that the provider blocks the connection by MAC address. In this case, you need to do the following:
- Go to your router settings.
- Go to the Network section, and then select the MAC Clone sub-item.
- Here you need to click Clone MAC Address, and then save the changes (Save).
By the way, it’s best to contact your provider’s support service before going to the TP-Link router and clarify this issue with them.
Password reset
If you do not remember the password to enter the device settings, then you can reset it. To do this, press the Reset button, which you will find on the back panel, and hold it for a few seconds. This will reset all settings to factory defaults and you will be able to enter the settings using the default password (admin).

In some cases, the password initially differs from the standard one. If so, you can find it on the bottom of the router. The login is also usually written there, as well as other data necessary to enter the device settings.
Today we will talk about how to enter the router settings. Sometimes you need to enter the settings, but many people forget how to do this after connecting and configuring the router. In this article I will tell you how to enter various models. If you find out how to enter the settings of your router but cannot do it, here is an article that describes. This article is designed for the fact that your router is already connected to the computer (if the router is not connected to the computer, read the article ""). Let's get to the instructions.
General instructions for entry.
The settings can be accessed using any browser. You need to drive the address of the router into the address bar and enter the username and password.
First, let's figure out where to get the address of the router. On many models, the address is written on the labels at the bottom, as well as the username and password.
If you do not have a label or do not have access to it, you can also look in the network card settings.
On Windows XP here>>
On Windows 7 here>>
You can learn more about how to determine the address of the router.
Having determined the address of your router, enter the address in the address bar in your browser and press "Enter". An Authorization window will appear in front of you, it will ask for a Login (Username) and a Password. On many models, the following settings are set by default: Login - admin, password - admin. Also, take a close look at the authorization window, they sometimes write the default login and password, for example, the Zyxel company (below I will show how it looks). After entering the data, press "Enter" and go to the settings of your router.
Let's apply this scheme on some models. The main thing that you should understand is that we will further consider the case when the router is already connected and it has standard login settings. If this is not the case, then the scheme is simple: we determine the address of the router, if we changed the password and login, we remember and enter it. Also, if you couldn’t remember the changes, reset to standard settings (how to do this is described in the article “How to connect a router”), and then just reconfigure it.
Entrance to the router d link dir 300
This login method is also suitable for models d link dir 615, d link dir 320, d link dir 620. Enter 192.168.0.1 in the address bar of the browser (you can go to the settings of the d link dsl 2640u router at 192.168.1.1). Enter your username and password in the window that appears. If the window looks like the picture below, enter only the login-admin, leave the password blank. :
Then click on the button. That's it, login completed.
If, after entering the address, any of these windows will open in front of you:
in this case Username is admin, password is admin. Click on the "Login" button. And you will immediately enter the Dlink setting interface. If you are interested in setting up a Dlink router, then on the left of the page in the menu, select the d link heading. In it you will find a description of the configuration of any model of Dlink companies.
We use this method for asus rt n10
This option is also suitable for asus rt n12, asus rt g32, asus rt n10p, asus dsl n10 routers. Open a browser and enter 192.168.1.1 in the address bar. The name, as well as on other routers, is admin by default, the password is the same. See the picture below:
Once all fields are filled in, click the "Submit" button. And you will be taken to the router settings. By selecting the ASUS heading in the left column, you will find a description of the settings for various Asus models.
Also just log into the router tp link tl wr741nd
Also suitable for tp link tl wr841nd, tp link tl wr740n. We will carry out the same steps as described above. Open a browser and enter 192.168.0.1. In the authorization window, specify the Login and password admin and admin.
Outcome
This scheme for entering the router settings is suitable for all models, the most important thing is to find out the login and password that you specified when setting up the router. If you haven't changed anything, then everything stays the same. Also on our site you will find many instructions and settings for various models of routers.
Video: What to do if you can't access 192.168.1.1, 192.168.0.1
.
From the home network, etc. In order to enter the router settings, you must first find out the IP address of the router, which will also be discussed. Also, this guide will help you log into the web interface of a modem, access point, and other similar network equipment from such popular manufacturers as D-Link, TP-Link, Asus, ZyXEL.
Are drivers needed?
No. Neither to configure nor use the router, you do not need to install any drivers anywhere. If there is a disc in the kit, then there will be only documentation. Drivers may be required for modems that connect to USB ports, but we are not talking about them now.
Default IP address, username and password
Now directly about how to "go into the router" (as modern users like to say). If the router is new, then it has factory settings. These settings are called "default" or default settings.Most manufacturers indicate the details directly on the router itself and designate them as Default settings: IP, username and password. Look for a sticker with this information on the bottom or back of the device:
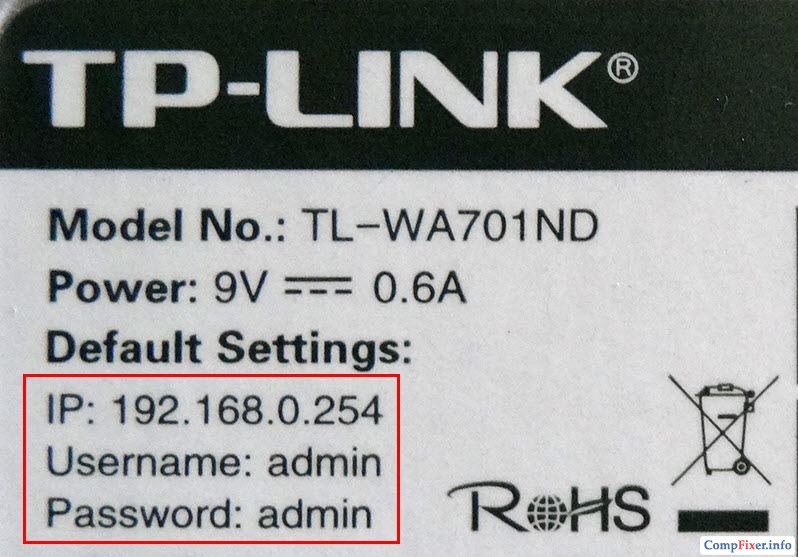
If suddenly the sticker is missing or damaged for some reason, open the instructions and it will indicate what IP address, login and password your router has by default. Instructions are always included. It can be either on disk, or in the form of a paper brochure, or both.
Usually, by default, modern routers have the following settings:
IP address: 192.168.1.1 or 192.168.0.1
Username (username): In most cases admin
Password (password): admin either empty
To enter the router settings, you need to type in the address bar of the browser http://<ай-пи адрес>. For example:
http://192.168.1.1
Enter the IP address in the address bar to enter the router settings
If the address is correct, you will see a page asking you to enter your username and password.

D-Link DIR-300 router web interface login page
And this is how the authorization page of routers from TP-Link, the most popular in our latitudes, looks like: 
Instead of an IP address, the sticker may contain a host (site name) for logging into the web interface. For example, http://tplinkwifi.net or my.keenetic.net. Enter it into any of your browsers and you will be automatically redirected to the configuration page.
How to find out the IP address of the router if the standard one does not fit
1. View the IP address in the properties of the network connection
Open "Network and Sharing Center"

Find your connection and click on the appropriate link

Click the "Details" button

In the window that opens, you will see the line:
IPv4 default gateway: 192.168.1.1
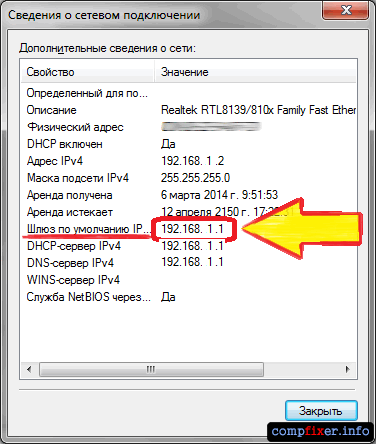
router IP address
The address specified in this line is the IP address of the router through which your computer accesses the Internet. Now you can write http://192.168.1.1 in the browser address bar, then enter your login and password and get into the router settings.
If you can't connect to the router (it doesn't give you an IP address over the cable, or you don't know the wireless security key), then all you have to do is reset the router and configure it again: i.e. set your passwords and settings.
Read about how to reset your router.
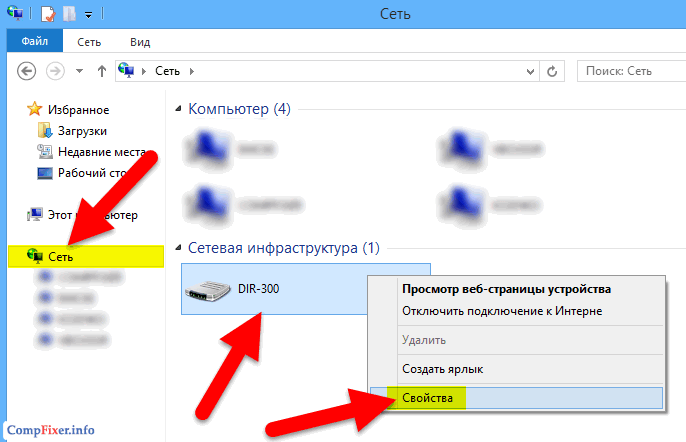
2. View the IP address of the router in the network environment
Go to section Net.
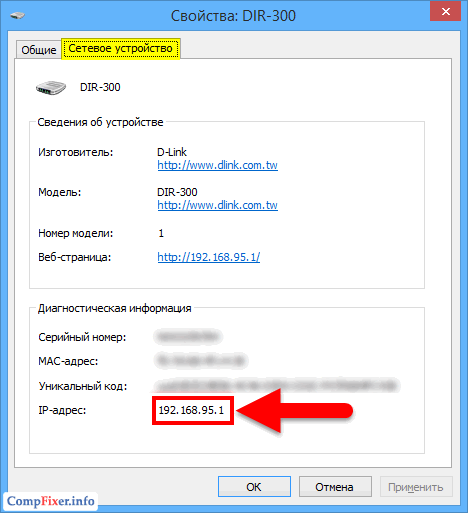
In chapter Network infrastructure find your router. Select Properties:
On the tab network device the IP address of the device will be displayed, through which you can access its settings:
3. How to find out the IP address of the router using the command line
Enter command ipconfig and press Enter:

In the graph Main gate the IP address of the router, which you need, will be indicated. Now copy it, paste it into the address bar of your browser and press Enter. After that, you should see your router's settings web interface.
Most Common IP Addresses and Default Router Passwords
So, in this article, we have described in detail all the steps for setting up and now you can correctly connect the equipment, find the address of its web interface and go to the router settings. If you have any questions, ask them in the comments.
 Data Validity Check
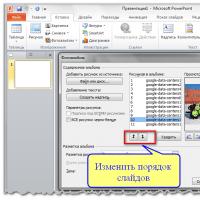 Deleting, rearranging, and adding slides
 What to do if there is no sound on the computer
 FAT32 or NTFS: which file system to choose for a USB flash drive or external hard drive
 DVR with radar detector Highscreen Black Box Radar-HD: (not) exceed
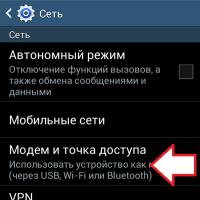 How to distribute mobile Internet from a smartphone via Wi-Fi?
 Power, mute, volume button not working