Phased assembly of the system unit. DIY construction set for adults: how to assemble a gaming computer without being a specialist. How to choose a case for a computer
Probably every more, less advanced user wondered how to assemble a computer by himself. And it comes out cheaper at a price, and it turns out more reliably. And every second person drove this thought away from himself, because he thought that the process of self-assembly of a computer was very complicated. But do not be afraid of difficulties, especially the step-by-step instructions described in the article will help to overcome fear. Moreover, modern computer components are equipped with a security system. Each component can be installed in the only correct way, otherwise it will not work. As the saying goes: "Fear has big eyes." So let the eyes be afraid and the hands do.
First, let's talk about the benefits of building a computer yourself. The most important thing is that you will know for sure that your computer has completely new, high-quality components, you will know everything about the characteristics of your computer and at any time you can increase the memory or performance of your computer. Not all sellers are clean on hand, there are also those who are ready to pass off a single-core computer for a dual-core one, to hide some computer flaws. Moreover, when buying a ready-made computer, you agree that you will not open it yourself (for the duration of the warranty period). This means that you will not be able to make any transformations. Otherwise, you will lose your warranty. Also, in the event of a breakdown of a self-assembled computer, you can identify and replace the weak link yourself. While the store purchase will need to be taken to the service and first wait for the diagnostic results, then while they will be repaired.
We hope that all of the above has overcome your fears, and now you can get down to business. To assemble a computer yourself, you must have:
- CPU;
- Motherboard;
- Case with power supply;
- Cooler for the processor;
- Video card;
- HDD;
- RAM;
- Drive.
- Phillips screwdriver.
And not just have all of the above in stock, but also try to ensure that all the components fit together.
So, the first question that needs to be solved right now is: "What do you need a computer for?"
For all users, a computer performs different tasks: someone plays for days on end, someone works on the Internet, someone, according to the specifics of their specialty, works with 3D programs, etc. Naturally, they all need computers with different capabilities. Let's try to figure it out.
To solve simple tasks, the following computer components are suitable: a 512 MB video card, two 2 GB DDR-1333 RAM modules, a 512 GB hard drive (7200 rpm, 16 MB cache buffer), an Intel Pentium G620 or AMD processor Athlon II x3 440, H61 Express motherboard for Intel or AMD 770 processor for Athlon, 400W power supply. The price is about $ 400.
Components for a mid-range computer: two 2GB DDR 1600 memory modules, 512 MB video card (for example, GeForce GTS 450 512Mb), 1TB hard drive (7200 rpm, 16 MB cache buffer), Intel Core processor i3 2100 or AMD Phenom II х4 955, Z68 motherboard for Intel or AMD 870 processor for Phenom, 450W PSU. The price is about $ 600. The result is a computer capable of performing many tasks, including supporting a bunch of modern games.
To solve tasks that require huge resources, the following components are required: two 4GB DDR-1866 RAM modules, 1GB video card (for example, GeForce GTX 560Ti), 60GB SSD hard drive + 2TB 7200 rpm, 16MB cache buffer , Intel Core i5 2500K or AMD Phenom II x4 965 processor, Z68 motherboard for Intel or AMD 990FX processor for Phenom, 550W power supply. The price is about $ 1200.
Have you decided on the purpose of your computer? It's time to pick up a case with a power supply.
The case can be selected according to several parameters: size, material, ease of installation.
It is recommended to purchase aluminum cases, which are distinguished by their lightness and thermal conductivity. In addition, steel cases have appeared, the advantages of which over aluminum cases are in resistance to deformation.
The range of cases on the market is very wide. There are the surprisingly compact Barebone cases, the mid-sized MiniTower, MidiTower, and the huge BigTower.
The surprisingly compact Barebone cases are perfect for those who love minimalism. The Barebones also have the advantage that they come with a motherboard, video card and processor. All you have to do is install the RAM and the hard drive. It is important that the assembled computer in the Barebone case works almost silently.
It is not recommended to buy MiniTower cases of medium size, as the ventilation system in them leaves much to be desired. And some components are generally difficult to pick up, since they simply do not fit into the case. But, for example, MiniTower is perfect for office use.
MidiTower cases are the most common. They have a good ventilation system and ease of installation.
The largest BigTower enclosures for the most powerful computers.
It so happens that the cases are not equipped with a power supply and you need to select and install it yourself.
Choosing and installing a power supply
It is not worth saving on the power supply. Since the stability of your finished computer depends on it. It is recommended to buy a power supply unit at an average price of 1,500 rubles. When buying, pay attention to the weight of the device. The power supply must be heavy. If it's lightweight, it probably has a poor cooling system. Next, you should decide on the power of the power supply.
Computers designed for games and working with 3D graphics require a power supply unit of 500,550,600 watts. A case with a similar power supply will cost you $ 50 or more.
Computers designed to work with office applications do not require as much power to work on the Internet. You can get by with a 400.450 W power supply. A case with this PSU will set you back $ 30 and up.
The required power of the power supply can also be calculated. Link to the calculator for calculating the power of the power supply
To do this, simply follow the link, select the components of your computer and their quantity from the drop-down lists. Then click the "Calculate" button. The calculator will give the power value with a small margin (30%). All that remains is to choose a power supply with a power close to the calculated one.
For the power supply, there is usually a space in the case in the upper rear corner. To install it, you just need to screw the unit with screws to the back of the case.
Here is the case with the power supply unit selected and now it is worth choosing and installing
A processor, RAM, I / O controllers are installed on the motherboard. The motherboard coordinates the work of these components.

The figure shows the motherboard. 1-power supply for the processor, 2- socket for the processor, 3-north bridge, 4-PCI-EXPRESS slot for the video card, 5- PCI slot for expansion cards, 6-slots for RAM, 7- power connector, 8- IDE connectors for hard drives and optical drives, 9 - south bridge, 10 - SATA connectors for hard drives and optical drives, 11 - USB connectors.
- The southbridge is responsible for supporting the optical drive, hard disk, audio adapter, etc.
- The north bridge is needed to control the video card, RAM.
When choosing a motherboard, you should take into account the number of memory slots for the possibility of a subsequent upgrade.
Let's start installing the motherboard:
- We unscrew the front cover of the system unit, take a closer look at where to put the motherboard;
- We get rid of the plug on the case. We replace it with a plug that comes with the motherboard;
- We screw the bolts into the system unit, in the places where the motherboard is supposed to be attached (the bolts usually come with the case);

- We insert the motherboard, fasten the screws;

- We connect power to the motherboard. We connect the four-pin power connector from the system unit to the ATX_12V connector on the motherboard. The 24-pin power connector from the system unit is connected to the ATX motherboard connector.

- We connect the wires of the case PWR -LED, PWR-SW, RESET-SW, SPEAKER, HDD -LED to the F_PANEL connector to turn on, reboot, diagnose a computer malfunction, respectively.
- HDD-LED- a red diode on the front side of the case (the color scheme of the wires is mainly used, red-white)
- PWR-LED- green diode, network indicator (green-white)
- PWR-SW- on / off button (orange-white)
- RESET-SW- PC restart button (black-white) has reverse polarity.
- SPEAKER- system speaker (red-white, often yellow-white)


We connect the white wire to the minus, the colored wire to the plus. Check your motherboard manual. The boards are different - the connection of these wires is also different.
If you still do not understand what is at stake and think that you simply cannot cope with these tasks, then I would recommend that you call a computer repair technician at home.
With the motherboard installed, it's time to move on to installing the processor.
Installing the processor
The processor performs all the basic calculations in the computer and processes information.
Decide which processor you will install from Intel, AMD and others.
You should also decide on the number of cores. For a home computer, a medium-power dual-core processor is suitable. An engineer or designer processor needs a four-core processor.
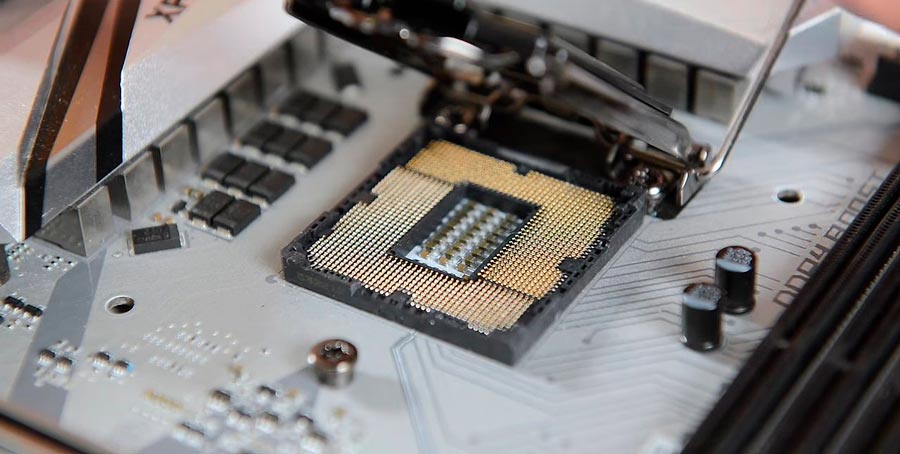
Whichever processor you choose, make sure it is compatible with the socket on your motherboard. Socket is the place for installing the processor on the motherboard. This information can be found on the motherboard box.
For example, Intel processors are compatible with the following sockets: Socket LGA775, Socket LGA1156, Socket LGA1155, Socket LGA1366.
AMD processors are compatible with the following sockets: Socket939, SocketAM3, SocketFM1, SocketAM3 plus, SocketG34.
Almost all modern processors from this company are based on socket 755 (Socket LGA775). The advantage is noticeable already in the absence of processor legs. Therefore, the risk of breakage and careless installation of the processor on the motherboard is minimal.
Let's take the installation. To do this, open and raise the slot lever - a metal rod parallel to the slot. Remove the processor from its packaging without touching the bottom of the processor. Remove the black protective plate. Install it on a socket. For convenience, there are arrows on the motherboard and on the processor itself, they indicate which side of the processor should be placed into the socket. Make sure the directions of the arrows match.

Close the mounting plate, lower the socket locking lever.
Installing AMD processors
The installation principle is the same. The only difference is that the processor has legs. The yellow arrow on the processor and on the motherboard, again, simplifies the installation process.

The processor is installed.
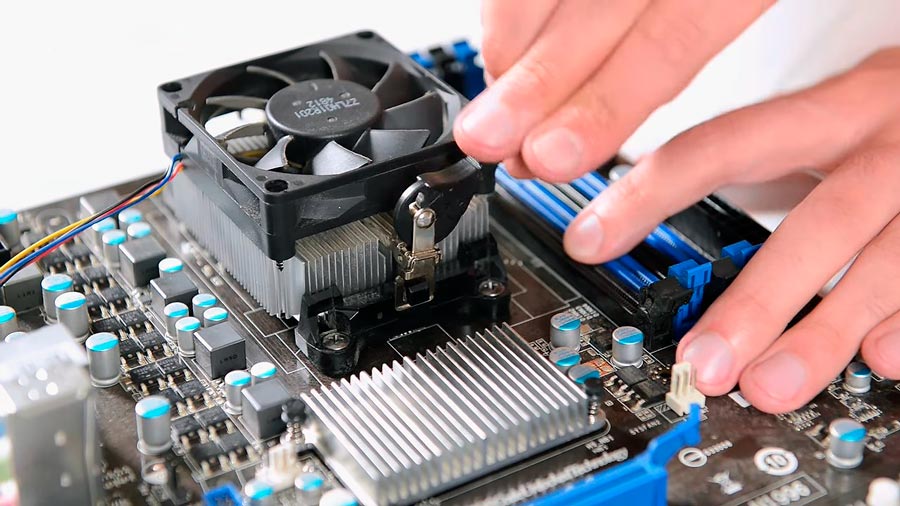
Installing a cooler for the processor
A cooler is required to cool the processor during operation. It is important that the cooler makes as little noise as possible when working. The operating noise of the fan of a good cooler should fall within the range of (20-40) dB. Moreover, in the specification it is necessary to look at the processor of what power it is capable of cooling.
Before proceeding directly to the installation, make sure that the cooler is compatible with the motherboard socket. Some processors are sold with a cooler (cooling system).
There are four holes for the cooler feet in the corners of the socket on the motherboard.

But before installing it, make sure there is thermal paste on the cooler (in the picture - a white spot in the center). The cooler consists of a radiator and a fan. The heatsink touches the processor directly and draws heat, while the fan drives heat away from the heatsink itself. This cooling scheme requires fast heat transfer from the processor to the heatsink. For this purpose, thermal paste is applied to the radiator. It provides a tight connection between the heatsink and the processor and has good thermal conductivity. If there is no thermal paste, apply in the thinnest layer of 1mm.

Install the four cooler feet into the holes on the motherboard. We press on the legs one by one, until a characteristic click. Make sure the cooler is securely fastened. This will be indicated by a switch. If the switch is in the closed position, the leg is securely fixed, in the open position it is not fixed. Connect the wire to the CPU_FAN connector.
This completes the installation of the cooler.
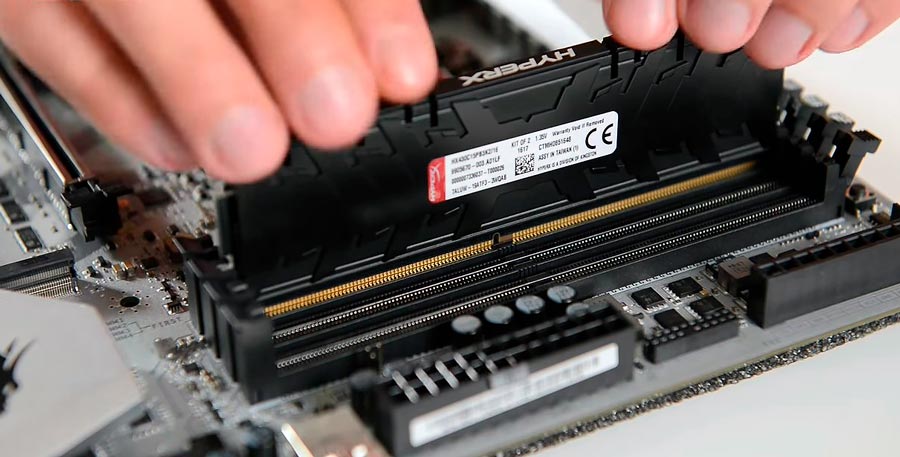
Moving on to installing RAM
Random access memory is rewritable memory. The data of programs and applications is temporarily stored there.
The slot of the socket on the motherboard must match the type of RAM module (DDR, DDR2, DDR3). To increase the performance and speed of the computer, it is recommended to install two RAM modules. It is worth remembering that in this case the manufacturer of the modules must be the same. And in terms of characteristics, they should be the same. The bandwidth of the motherboard, processor and memory module must match.
The value of the clock frequency of the RAM module should be commensurate with the frequency of the system bus of the motherboard. Even if the module frequency is higher than the bus frequency, the real memory frequency will still be equal to the bus frequency.
Let's go directly to the installation. Slide the latches to the sides on the motherboard slot:

Place the memory in the slot. Press lightly around the edges until the latches snap into place.
The slot on the motherboard has a divider, which corresponds to a notch on the memory module. It is impossible to make a mistake with the installation.
Installing a graphics card
A video card is required to convert a data array into an image displayed on the screen. Moreover, modern video cards are also needed for processing and storing graphic data. The speed and quality of the displayed image depends on the parameters of the video card. This is very important during gameplay or video editing.
The power of the video card must be the same or slightly less than the power of the power supply.
The video card is inserted into the PCI Express 16x slot (under the processor). Install and press until you hear a click.
The "skeleton" of the computer is assembled.
Installing the hard drive
The hard disk stores the operating system, user information, and programs.
The connectors of the hard drive and the motherboard must match. For example, Serial SATA 6Gb / s. The throughput of a hard drive with a Serial SATA 6Gb / s connector is 6Gb / s.
- We connect the SerialATA cable to the motherboard SATA connector.
- We connect the SATA adapter to the hard drive, then connect the Molex power cable from the power supply to the adapter.

The hard drive installation is complete. Moving on to installing the optical drive.
An optical drive is a device for reading information from discs or writing information to discs. The following types of drives are currently on the market: CD-ROM, CD-RW, DVD-ROM, DVD-RW, and Blu-Ray.
- The CD-ROM drive is intended for reading CDs only.
- A CD-RW drive allows you to both read and write to CDs.
- The DVD-ROM drive is intended for reading CDs, DVDs.
- The DVD-RW drive allows you to read information from CDs, DVDs and write information to CDs, DVDs.
- Blu-ray drives are designed for high-volume discs. Such discs, and the drives themselves, cost a lot of money.
It is preferable to choose a DVD-RW drive, so as not to limit yourself in actions.
The drive is necessary in the computer, even if you have already switched to flash media a long time ago. After all, the installation of WINDOWS occurs from the disk. In addition, you can free up computer memory by dropping the necessary files to disk, for the time being. Download distributions for games. And you can just watch a movie.
When choosing an optical drive, pay attention to its read and write speed. For the drive to be able to read and write to all disks, a speed of 48x is required.
We put the floppy drive in the space provided for it in the power supply case. We fix it with screws to reduce the influence of vibration and noise. We connect the power supply to the optical drive. Next, we connect the floppy drive directly to the motherboard with a ribbon cable.
Close the case cover
All that remains is to connect the monitor, mouse, keyboard, speakers to the system unit, connect the power cords to the monitor and the system unit.
At the first connection of the computer to the network, a squeak should be heard, symbolizing the correct connection of all components. The screen will display information about the processor clock speed, the amount of RAM, operating modes and storage capacities. Nothing else can appear, because the WINDOWS operating system has not yet been installed.
If, after reading the article, you still have questions about how to assemble a computer yourself, the video will explain everything to you in detail:
Now we are assembling the computer ourselves, having overcome all fears and doubts and figured out why it is more profitable to assemble the computer ourselves. Having previously figured out what each of us needs a computer for. We learned how to select components, calculate the required power of the power supply. We figured out the purpose of the components of the computer. We have chosen the optimal components in each price category. And let a self-assembled computer be a useful assistant at work or at home.
Updated 06.02.2015. The article is relevant for the entire 2015.
How to choose a computer so as not to regret it. Choosing a good and inexpensive computer!
If you have never been interested in the parameters of certain computer components, then it will be quite difficult for you to choose it. But luckily, you can read my article and your solution will be easy and correct. The most important thing to remember is that the dearest is not always the best. And also do not trust consultants in stores, since their main task is to sell stale goods that no one is buying. Therefore, they will persuade you in every possible way, but you must insist on your own. And to make your choice of a computer conscious, read the article to the end!
So, the first thing we need to do is decide what we need a computer for. There are three different options:
- office solutions;
- home options;
- and gaming systems.
Office computers these are not necessarily machines that are in offices, but simply such a generalized name for budget solutions. They are only capable of working with documents and working on the Internet. Even watching movies can be difficult because of the lack of a full-fledged video card, games will slow down terribly or won't start at all. After all, office solutions usually use weak components, for example, an integrated video card instead of a normal one.
Home computer this is the middle level. Here you can already watch movies, even play some games, but not at the maximum graphic settings. Such a computer is quite suitable for most users and will not eat up most of the family budget. It is advisable to assemble the configuration yourself, and not to take ready-made solutions, because usually their price includes assembly, various licensed software, which may not be useful, and so on. It is always better to assemble everything yourself, especially since by 2015 a home computer had become a simple constructor, where it is simply unrealistic to assemble something incorrectly.
And finally gaming computers... Again, this is a generic name, it does not mean at all that the computer will be used only for games. It just tells us that the hardware of such a machine is very serious and powerful. It will allow us to process huge graphic images, for example, in PhotoShop or 3D Max. Cut and convert videos at a decent speed, perform complex calculations. Such computers are assembled by the users themselves, often not immediately, since they are quite expensive.
For example, first, a good motherboard is bought with a reserve for the future, and then an expensive video card, processor, and RAM are "hung" on it. First one video card, then the second for SLI mode or CrossFire. First, 8GB of RAM, then another 8 to work in Double-Channel or even Triple-channel mode, depending on the configuration.
So, if you need more than just a computer for checking mail in and typing in, but you do not play the latest innovations in the gaming industry and do not process Gigabytes of video, then the home version of the computer will suit you.
Now we will go through all the components and talk about them a little. For each point, I will select examples of components that, in my opinion, are successful specifically for a home computer. As a result, at the end of the article, ideally, I will have a system unit that will delight its owner with speed and potential.
Choosing a computer monitor
 We will start not with the system unit, but with the monitor, because this is actually the first thing that the user sees and if the image on it is bad and of poor quality, then what is the point in powerful hardware? If you agree with this, then continue, and if not, then go directly to the paragraph on system blocks.
So, how to choose a monitor so that it delights you with a juicy and clear picture? It's easier than it sounds. Monitors have only a few important characteristics. Well, I hope everyone has long understood that there can be no question of any CRT monitors. This is a relic of the past, I do not know if they are on sale anywhere now or not, but, in any case, forget about them as a nightmare!
Naturally, this will be an LCD monitor, which should have an acceptable response time of 2-8 milliseconds, and it will most likely be widescreen, this is also almost the standard. A resolution of 1920 × 1080 for watching movies and games in Full HD, you can, of course, take more, for example, 3840 × 2160.
Viewing angles are actually not as critical as many people write and say about them. An angle of 170 horizontally and 160 vertically is a common option, because you are not going to look at the monitor by placing it in front of you on the couch or bed, right? Everyone is sitting and looking at the monitor at a right angle, and even with minor deviations, the picture will not lose brightness.
The matrix will most likely be either TFT PLS or TFT IPS. And this is no longer a toy for true aesthetes or photographers, as it was before, now these technologies are already used in almost all modern models. It is used everywhere (to replace the fluorescent one), which consumes little electricity and improves color rendering. I also highly recommend purchasing monitors with a matte screen!
We will give examples in each section so that you roughly understand what it is about. Here monitors DELL U2414H and ASUS VX239H may well serve as examples, each in their field. They have different formats, different matrices, different response times, but each has its own strengths and weaknesses. Read descriptions, reviews and understand.
That's all for monitors, now let's move on to the periphery, without which normal work at a computer is impossible.
Peripherals (select mouse and keyboard)
As already mentioned, the periphery is a very important thing on which you do not need to economize too much. Of course, I do not urge you to buy a wireless gyroscopic mouse for 10 thousand, but you should not take a mouse for 100 rubles either. Either she scratches the table, or the cursor starts twitching. And many cheap mice also have low dpi, which, if you have a large widescreen monitor, will cause you a lot of inconvenience. 
General advice for both mouse and keyboard: don't buy cheap wireless devices. If there is no money for expensive models, then take them with a wire, otherwise then, in the vast majority of cases, problems with the signal will appear. These are not only my thoughts - it really is. No money - we choose wires and no problems with the signal. There is money and desire - we take quality products.
Let's start with mouse selection... It should be comfortable and fit well in the palm of your hand. Do not buy mice from laptops for use on a desktop computer, really. Hands when working with such a mouse quickly get tired, since it is inconvenient to hold it. The palm should rest completely on the body of the mouse, and not lie on the table. Also, I do not advise chasing the number of additional buttons on the mouse, most of them do not use them at all. But 2, maximum 4 additional keys on the side of the mouse can be allowed, the main thing is that they do not interfere with work. DPI is the resolution of the image, and in simple terms, as applied to the mouse, it is the speed at which the cursor moves on the screen. Rather, the ratio of the distance that you physically moved the mouse to the distance on the screen by which the cursor moved.
The larger the monitor and its resolution, the more DPI you need for comfortable work. If you purchased a Full HD monitor with a resolution of 1920 × 1080 (I recommend choosing this one), then you need at least 800 dpi, and preferably 1200. Then you do not have to make unnecessary movements to move the cursor to the desired place. An example of a good mouse is A4Tech XL-750BK and in general the x7 series from A4tecs is very successful.
Keyboard should be standard, so that there are as few additional and, moreover, useless keys as possible, then it will last longer, and it will be more comfortable to type on it. Choose a device with a short key travel, that is, these are small in height, thin keys. If you can type blindly, then getting used to such a keyboard will not be difficult for you, it will take a maximum of 1 - 2 days. It may also have headphone, microphone and USB outputs. It all depends on your preferences, if necessary, choose a model with outputs. An example of a successful model that fits into the budget of your home computer is the Logitech K200.
With the periphery sorted out. Now you have everything except the most important thing - the system unit! And we will start with the case for it, since very often people neglect the "box", but in vain, but here's why, read on.
How important is the case of the system unit
The bottom line is this. Many people think that there is no point in buying a good case. I screwed all the hardware, even to the cardboard box, the main thing is not to fall off. But the fact is that powerful hardware, especially a video card and processor, gets very hot. The temperature of a video card without a cooling system can soar over 150 degrees in a few seconds. Accordingly, when there is a cooling system on it, it removes heat from the video card itself and gives it to the surrounding air layers. This is where you need a well-designed case so that air can freely enter and exit the box, otherwise the cooling system will become ineffective. Then the computer will shutdown abnormally. 
If you do not want to keep the case open all the time, make sure that inside it there are coolers (fans) for blowing and blowing. Again, a rather subtle point: if there is no balance between the amount of incoming and outgoing air, then dust will begin to accumulate inside the case, it will need to be constantly cleaned.
Size matters too. For example, most modern video cards have impressive volumes. CPU coolers can be big too. All this will lead to the fact that the components will simply interfere with each other and it will be impossible to install them. Make sure the cabinet is large enough to accommodate all the parts you purchased. Example - Thermaltake Chaser A31 VP300A1W2N Black.
A few words about power supplies, an easy choice
Recently, power supplies have ceased to be installed in cases, and they have to be purchased separately. In fact, this is correct, because the standard blocks that came with the case were almost always weak, and they still had to be changed, and the cost was included in the price of the box. Accordingly, now we buy only the case, and we select the power supply to suit our needs on our own. It is worth noting that it does not grow in proportion to the increase in productivity. 
Yes, it is growing, but mainly due to video cards, since processors and hard drives somehow restrain their appetites in this regard. Reducing the CPU technology process often leads to a decrease in power consumption. The so-called "green" models (Green) appear at hard drives, which also operate on lower power consumption and generate less heat. But video cards constantly require more and more watts. Actually because of this, we need a 600-800 Watt power supply. In this case, it is desirable that the wires can be disconnected from the unit itself. This will save a lot of space in the case, everything will be neat, beautiful and practical. Thus, you can focus on such models as Thermaltake TR2 RX 650W (detachable wires) and Thermaltake TR2 600W (not detachable).
Now, finally, on to the accessories. This will be the most interesting part, especially for those who just haven't read the text up to this point. The first thing we need is a motherboard, since it will depend on it which processor, video card, RAM and hard drive we install.
The motherboard is the heart of your computer
Now I will explain everything briefly so as not to boggle your head with unnecessary information. Of all the parameters of the motherboard, the most basic ones can be distinguished. For example, we will not consider the form factor, since for a home computer you will buy a motherboard of either a standard ATX size (305x244 mm) or microATX (244x244 mm), which is more preferable, since this particular format is not overloaded with unnecessary slots. So let's take a look at the options that will really come in handy when choosing:
- socket (the type of processor depends on it);
- memory slots (quantity, type);
- video card slots (quantity, type).
As for, for example, IDE or PCI connectors, then forget about them, this is a relic of the past. Another way to justify the presence of PCI-E 1x, 2x and so on, but they are also not the parameter that you should pay attention to when buying a motherboard. 
The socket can be for either Intel or AMD processors. Moreover, each of them can also be different. For example, LGA1150 is currently relevant for Intel. AMD has sockets FM2 + and AM3 +. But soon the situation will change again, I am sure of this. The RAM must be DDR3, 2 or 4 slots. Of course, there are two slots for a PCI-E 16x video card, if you plan or you can limit yourself to one slot, support for PCI-E version 3.0 is mandatory. An example is the ASUS B85M-G, which has everything you need for a home system.
RAM, nothing complicated
After we have chosen a motherboard, nothing will stop us - we have entered the home stretch for assembling our system unit and the computer as a whole. There is nothing difficult in choosing RAM. It should only be noted that it will be DDR3, the total volume is no less than 8GB, the frequency is 1600-2800 MHz. 
This volume can be achieved in various ways. For example, buy one 8GB bracket, but it would be better to put 2 pieces of 4GB each. And in terms of price and performance, it will come out much better. Here, as an example, let's take the usual, or preferably 2 things, in total we get 16 GB and excellent performance for a small price. Perhaps you have heard about the timings of RAM, but I do not advise you to change them (overclock the system) without knowledge in this area. The default factory settings are fine.
Graphics card: one, two or zero?
Since we are talking about a budget home computer, and not about a powerful gaming solution, there will be one video card. But you can spend a little more money on it, instead of buying two cheap ones just for the sake of SLI or CrossFire. As a result, one good graphics card is capable of meeting the requirements of even modern games at ultra settings.
The connector, of course, will be PCI-E 16x, there can be no other option. Regarding the choice of a specific model, it is worth referring to the same overclockers and their reviews. You should focus on 2 - 3 GB of memory, you don't need more. After all, we, I repeat, are assembling a budget home computer. So, after reading dozens of reviews, I settled on two models, you can buy the one that will be in your store. Also, personal preferences can play here, so choose for yourself: MSI GeForce GTX 970 and MSI Radeon R9 290. They both show good overclocking potential if anyone is interested. But even at the nominal frequencies, their power will be enough for all everyday tasks and for a pleasant rest while watching movies in Full HD, playing tanks, battlefield 4 and GTA 5 at ultra settings. 
We should also talk about built-in video cards separately. No, no, these are not those useless video cards built into the motherboard, which, even when working in Word, slowed down and could not draw the picture normally. This is a completely new technology for building a system, when there is both a processor and a graphics core on a single die. These models include the A-Series from AMD, while most modern Intel models have such a graphics core. As for their performance, judging by the tests, it is enough even for some games, but this is purely individual for each processor, you need to read the tests. It is worth noting only that if you want to save money on a video card, now you can do it easily and simply. An example of a typical solution from AMD: AMD A10-7850K Kaveri, when you get an excellent processor and good graphics for quite reasonable money. At Intel, see the Core i3 - Core i7 line, but the integrated AMD graphics cores are much better, I warn you right away!
Choosing a good processor - the heart of our system unit

Almost all computer performance depends on the processor. The fact is that it is the processor that is responsible for all the calculations, so its power should be sufficient and even a little in excess, with a reserve for the future. It is also worth noting that many processors are easily overclocked, that is, you can increase their performance without overpaying. But this is a separate topic, but for now let's dwell on the characteristics of the processors.
- Socket.
- Frequency.
- Number of Cores.
- Cache volumes at different levels.
We will not dwell on the first parameter - socket, we will not dwell in detail, because we have already selected the motherboard, respectively, we are looking at what socket is there. In our case, this is LGA 1150. Therefore, the entire Intel Core line from i3 to i7 is suitable for us, but the price fork is too big here. For our budget solution, you can take a modern version of the Core i5. You can look, for example, at. Its power is enough for you to solve everyday tasks and all modern games.
The number of cores in our case is 4, the processor frequency is 3500MHz, the cache of the 3rd level is 6MB. You can be guided by these numbers when choosing.
Hard drive or clouds?
Recently, there has been a trend towards storing information on the Internet. These technologies are called cloud technologies. The most striking and well-known examples are cloud storage services: Yandex.Disk, Google Drive, DropBox. You can listen to music on Vkontakte, Odnoklassniki, on Yandex.Music and the like. Watch movies in online cinemas, in general, you understand me. Thus, many can get by with a 200GB hard drive and will not feel discomfort and lack of memory.
However, if you still want to keep on your computer a collection of music, movies in good quality, photos of good resolution and much more, then you just need a large hard drive. I think 1TB is enough for a huge collection of anything. 
As for the rest of the parameters, the form factor for a home computer is one - 3.5 inches. The speed of rotation of the disk is 7200 rpm. The connection interface is SATA 6Gb / s, the buffer size is proportional to the volume of the disk itself. So, for a volume of 500GB, the buffer will be 16-32MB, and for 1TB it's already about 64MB. Here I would recommend for example Western Digital WD10EFRX. This is the WD Red server series, which is distinguished by its survivability and reliability.
In general, the advantages of SSD include high speed. But besides this, they are silent, since they have no moving parts, are more reliable and consume less energy.
Now you can assemble the computer yourself, without any help. Choose all the accessories for both the budget version and the quite powerful machine. I still advise you to assemble a home computer if you do not need a gaming option. Since the prices for components are falling very quickly, accordingly, chasing new products, you can overpay very much! Also, it is most profitable to buy from online stores.
Do-it-yourself computer assembly- each of us at least once faced a situation when, trusting a sales assistant, he chose a ready-made personal computer. But after a few months I realized that for the same money I could get a much more productive version. So that such a story does not happen to any of our readers in the future, we have prepared instructions on how to assemble a computer yourself.
This process, in fact, turns out to be much simpler than many users who are far from technology assume, but still has a number of nuances, which we want to dwell on in detail in our material. And we will start with a brief reminder of what a computer consists of and how not to make a mistake in choosing components.
System unit - how to choose accessories?
When a customer walks into a computer store and sees the breadth of choice of motherboards, processors, video cards and other components, it seems to him that to connect all these devices together, you need to have at least a doctorate in technical sciences. But not everything is so bad, the manufacturers of computer hardware took care of us and many years ago adopted a single standard - Advanced Technology Extended, which unifies the entire hardware of a computer. Therefore, we are now free.
The choice of components is the most difficult task when assembling a PC, much more laborious than connecting them together, but this material is devoted to just the last task, and you can find a comparison of the characteristics of video cards and processors in our other publications.
The basis of our entire future system is the motherboard, as its name implies. It practically does not affect performance, but it is responsible for the proper operation of all components of our computer.
The whole process of assembling a PC essentially consists in connecting components using connectors and wires to the board, and therefore it is worthwhile to first evaluate what kind of computer you would like to have at the output and, based on this, choose a motherboard with one or another number of cells for RAM, suitable for the desired processor socket, and so on.
Another important characteristic of a motherboard is the form factor - it determines what dimensions you need a case, so be careful right away and when purchasing a large E-ATX motherboard do not expect to fit it into a compact case. The main thing is not to worry and do-it-yourself computer assembly- everything should work out.
Installing the processor, RAM and cooling system.
To assemble a computer at home, we suggest starting by working on an “open stand”, rather than immediately installing your components in the case, not knowing if the system is working or not. The process is as follows: we connect all our parts to the motherboard, update the board firmware, install the operating system and test the resulting assembly for errors and conflicts. If they are not identified, then we are happy to install all this in the case.
Let's start the process by installing the heart of our future PC - the processor. It should be remembered that two market leaders in the production of processors - AMD and Intel, fundamentally use different socket designs, the former have contact pins on the processor, while the latter prefer to place them in the socket.
To install an AMD processor, you need to lift the metal lever, insert the legs into the holes provided for them, and then return the lever to its original position. Thus, we will close the contacts of the processor with the contacts of the socket and reliably fix this position.
When installing Intel, lift the lever and hold-down cover, and after installing the processor, follow these steps in reverse order. Both the one and the other type of processors should be installed in a strictly defined position, which is shown by arrows on the processor itself and on the motherboard socket.
As for cooling the processor, you need to remember that they are all installed in different ways and the only reasonable action would be to strictly follow the instructions. For example, AMD has a passion for fasteners with plastic lugs, and Intel basically doesn't use such a design solution. In general, most processor coolers are quite universal, and therefore can work with chipsets from both companies, but be careful when choosing - there are also models that are loyal to only one brand.
Do not forget that many coolers can be installed in two positions, which determines through which wall the heated air will come out - back or top. Therefore, before installing, weigh the potency of both options and your case and choose the most productive one.
After we secured the heatsink and installed a fan on it, all that remains is to connect the power connector to the corresponding connector on the board called CPU_FAN. More expensive motherboards can provide two similar connectors intended for two coolers at once.
So, to complete the initial work, we just need to install the RAM modules in the DIMM slots. Each bracket has a security key that makes it impossible for you to insert it in the wrong direction, and you will also not be able to insert memory of the same type, for example, DDR3, into a socket on the motherboard that is not provided for it. Thus, installing RAM is the simplest process in the algorithm for assembling a personal computer.
Most processors have a dual-channel set of RAM, and therefore it is recommended to insert an even number of strips. It should be remembered that a sufficiently large processor cooler can overlap the RAM slots on some motherboards, and therefore it is worthwhile to thoroughly study their compatibility before purchasing.
Applying thermal paste to the processor
Many beginners make a common mistake and think that assembly is solely about assembling parts a la constructor. Thermal grease is no less important for the performance of the processor than itself and the cooling system, which helps their tandem to demonstrate maximum performance. As a rule, a small layer has already been applied to the fan sole, so this does not have to be done during the first assembly.
However, if it is not available, just add a couple of drops of the composition and spread them evenly over the CPU heat-distribution cover. Excess, on the contrary, will reduce the thermal conductivity between the processor and the cooler, which will negatively affect the performance of the computer. If you have already decided to assemble a computer with your own hands, then at least do not harm it.
Installing the motherboard into the case
The main line when choosing a case for you should be the one that is responsible for the supported form factors of motherboards. The following are the maximum possible sizes of the installed components - believe me, when it comes time to wire the wires, you will say thank you to yourself for choosing the most comfortable case in which you can install all the desired hardware without unnecessary manipulations.
To install the motherboard, you first need to screw the fastening nuts with external and internal threads. As a rule, all bolts and nuts are included with the body, they are standardized, so you hardly need to look for something unique to install your assembly. By fixing the plugs and screwing the nuts, you can move on.
Connecting Chassis Controls to the Motherboard
The panel of a standard case is usually equipped with on / off buttons, as well as USB ports and a headphone jack. As a rule, these interfaces are located at the bottom of the motherboard, and therefore we find them and connect them to the case.
The set of wires is quite standard:
- PWR_SW is responsible for the on / off button;
- RESET_SW activates the restart key;
- HDD_LED ("plus" and "minus") activates the drive activity indicator;
- PWR_LED ("plus" and "minus") is responsible for the operation of the computer status indicator.
Installing the power supply
It's time to install the power supply and connect the cables to the motherboard. All connectors have keys that prevent incorrect connection, so an inexperienced user can handle it. Each connector speaks for itself, and if it says SATA, then it is probably intended for a device with the same interface.
Recently, the compartment for the power supply has been located at the bottom of the case for better ventilation, so make sure that the length of the wires is sufficient for components located in the part of the video card remote from the block. After installing the unit, we stretch two main cables - 24-pin to the motherboard itself and 8-pin to the processor. When purchasing a PSU, we advise you to immediately purchase a bundle of nylon ties so that your bundle does not get confused between the PC parts.
Installing drives
There are several drive form factors: 2.5 ", 3.5", and M2 SSDs. The latter are installed on the motherboard itself, but the first two must first be installed in the case.
Installing a drive into a slot with a slide is as simple as installing RAM, and therefore we will not dwell on this point in detail. It remains only to bring cables to them from the motherboard and power supply unit, which have a SATA connector.
If you want to install an optical drive, then the algorithm is the same - we fix it in the 5.25-inch compartment, remove the front cover and turn on the power.
Installing a graphics card
Since we have set ourselves the goal of assembling a PC correctly, then we cannot do without an item dedicated to the video card. It is installed last and power cables are pre-installed for it. The graphics accelerator needs to be installed in the very first PCI Express x16 port, but modern video cards take up two or even three slots, so access to the downstream port will be blocked.
After these procedures, it remains only to remove two plugs to which the radiator will be brought out, and also to tightly screw the video card to the motherboard and the back cover of the case. The number of power cables will depend on the power of the video card and in extreme cases you will have to get cables to the power supply unit or use adapters.
Cable routing and completion
The entire list of components is combined into a single system, and therefore it is time to put the finishing touches on it. If the assembly is standard, then you just need to choose what to connect the coolers to: motherboard, reobass or power supply unit. After that, you just need to carefully lay the remaining cables and tighten them with nylon ties, and then close the case cover.
After that, we connect the monitor and other peripherals to the system unit, install the operating system and use a brand new assembled computer.
How to assemble a computer yourself. Instructions
We hope that our material on how to assemble a computer yourself will help you save money and choose the most successful combination of elements, regardless of the tricks of computer equipment sellers!
Even a beginner can build a gaming PC in the HYPERPC online configurator. Specify a gaming platform, and the service will offer components for stable collaboration, drives, cooling systems and peripherals. And our engineers can professionally assemble a computer to order in Moscow. When assembling a computer in the configurator of the HYPERPC system unit, the requirements of heavy games are taken into account - this is an excellent assistant for creating a powerful platform with the best components of 2020. The compatibility analysis takes into account the manufacturer's recommendations, the results of stress tests and the experience of e-sportsmen.

Pick up the configuration
The system unit constructor with compatibility check evaluates not only the type of slots, buses, ports and connectors. All components are tested to work in harmony with each other, so even with a limited budget, you can build a good computer with high performance. Start by defining your platform, and the configurator will suggest the available components for building a custom gaming PC.
Online assembly of the system unit
You build your computer online - HYPERPC brings your project to life! Specify the video card, processor, motherboard and other system parameters. The calculator will show the cost of the configuration, taking into account the assembly and setup. There are hints for each component, they will help you make a decision. You can immediately order peripherals, installation of an operating system and other software, modding and safe overclocking of your computer. You can create several configurations and compare them with each other.

PC configurator
Components with different characteristics are offered for each gaming platform - from the entry level in its segment to the top-end hardware. The system unit constructor with compatibility check contains components from different manufacturers, so the choice of a gaming computer is not limited. The order will go into production immediately after your confirmation. If in doubt, the expert assistance of HYPERPC employees is at your service to help you assemble a 2020 gaming computer for confident conquest of gaming peaks.
Assembling a computer is not difficult. Assembling a computer as a designer - all the details fall into place and knowing the theoretical part, in principle, there should be no problems with the assembly. All that is required of you is time and accuracy, since this constructor is often expensive and does not forgive mistakes.
In this article, we will cover the most important aspects and questions that can arise when assembling a PC. How to assemble a computer without breaking anything?
Before assembling a computer, you must be sure that all components are compatible with each other. It is not difficult to check the components for their compatibility. If you are not sure yourself, then use the special assembly configurators that are available in many stores. For example, one of these configurators is www.regard.ru/cfg.
By the way, you can choose the most suitable assembly for you on our channel in Yandex.
CPU
The contact pad on desktop processors comes in two types: PGA (pins) and LGA, where they have been replaced with contact surfaces.

PGA is used in AMD and older Intel processors. After socket 775 (the place where the processor is installed), Intel switched to the LGA socket. It is extremely difficult to bend or break anything in such a processor, which cannot be said about motherboards for this connector. Manufacturers of motherboards for the Intel socket put a special plug for a reason.

There are a lot of contacts under it, which are called “legs”. Neatness is needed here. If you get dust or dirt, you probably won't get it. The legs are very flimsy. If you bend one of the legs, then it is quite possible a checkmate. the board will become defective. It is also not worth aligning them yourself. If this does happen, it would be wiser to contact the service center.
The socket must be removed immediately before installing the processor. Check if all the legs are intact, if nothing is bent, and only then proceed to install the processor into the socket.
By the way, you don't have to remove the plug on the latest motherboards for Intel processors.
The locking mechanism is opened using a special lever. The checkbox on the processor and socket must point in the same direction.

He and a pair of keys on the socket and the processor are your main reference points. Make sure the processor is properly seated on the contacts, and only then close the locking mechanism.
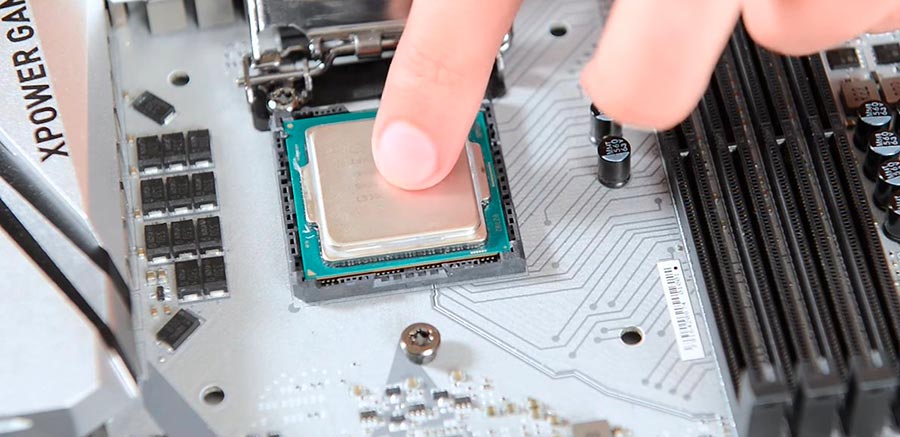
He will resist a little, but don't be intimidated. This is normal, the processor frame just presses the processor quite tightly to all legs.

This is not the case with AMD processors. They have "legs" located directly on the processor, and the motherboard connector is made in the form of special niches for these "legs". Make sure that all the feet on the processor are in place and that nothing is bent, and only then proceed to install the processor into the socket. When installing, again, you should be guided by the special markup (checkbox).
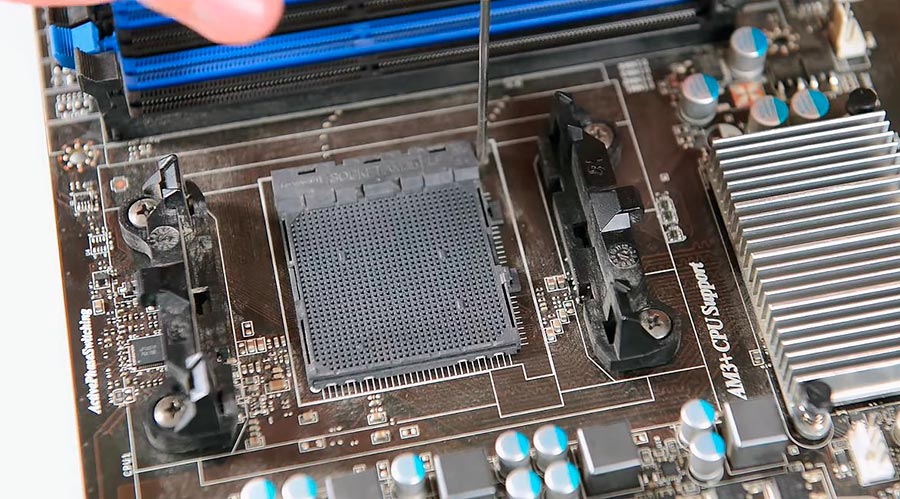
Installing AMD processors is easier. Carefully open the socket and place the processor. It should be fully seated in the connector.

Cooling system
Perhaps installing a cooler is a more complex task (relative to installing other components). They often have thermal paste already applied to them. Should it be replaced with something more worthwhile? If it is a budget cooler or a boxed cooler (included) - yes, it is desirable, but not critical. On top-end cooling systems, this will be superfluous.
Before installing the cooler, wipe the surface of the processor. This can be done with alcohol or degreaser.

Read the instructions, do not ignore this step. Install and check that the cooler is secure and not loose. You can grasp it with your hand and lift it up with the motherboard.
With cooling for AMD processes, everything is easier, but we also definitely read the instructions. Install the cooler and fix it with a lever.
The cooling system purchased separately, as a rule, also has thermal paste already applied, but the fixing methods may be different. For tower coolers, for example, you need a special substrate for the processor (backplate), and in the case of AMD processors, it may be necessary to dismantle the native retainers on the board

Tower coolers are usually fastened with screws; the mounting wrench is usually included in the kit. The most important thing when installing such a cooler is not to over-tighten the screws. It should fit snugly against the processor and not wobble, but this does not mean that the screws need to be tightened like a car wheel.

Don't be too zealous. After installing the cooling system, connect it to the motherboard - CPU FAN connector.
Thermal paste
It so happens that the paste is not applied to the cooler, but lies separately with it in the box. Then you will have to apply it yourself. The paste is applied only to the metal cover of the processor. The thinner the layer, the better.
The paste can be applied well, for example with a plastic card. It is not desirable that the paste gets on the processor substrate. Some thermal pastes conduct electricity and this can cause short circuits.

Just apply some paste to the center of the processor and install the cooler. Under pressure, it is evenly distributed over the processor cover. Sometimes the edges are not smeared, but they do not play a significant role in the heat dissipation process. Read on which thermal paste to choose and how to change it.
RAM
The simplest thing is to install RAM. However, in slots with one-way commit, memory is more difficult to insert. Sometimes normal effort is required.
There is a key in the socket of the socket, there is a notch on the memory card. Open the latch on the slot, insert the model as far as it will go, close the latch. Make sure the memory is flat, especially with one-sided slots.
It often happens that on the side of the lever, the module is not fully inserted. This can lead to the fact that after turning on the PC, the system will not start.
Usually, before installing the motherboard in the case, I check the system performance on an open bench. You may not do this, but it may be useful to someone.
After installing the processor, cooling system, hard disk and RAM, I power the motherboard, processor from the power supply and connect the HDD. Next, I close the connectors with a screwdriver, to which the power buttons from the case are connected. They are usually found on the lower right side of the mat. fees:


Gigabyte

Having checked the system performance, and sometimes having installed Windows at this stage, I proceed to the assembly already in the case
Frame
Now it's time to put the motherboard into the case, but before that it is advisable to install the power supply, otherwise in the future there may be a problem with the neat laying of the wires. Plan in advance what will stand and route the appropriate wires there.

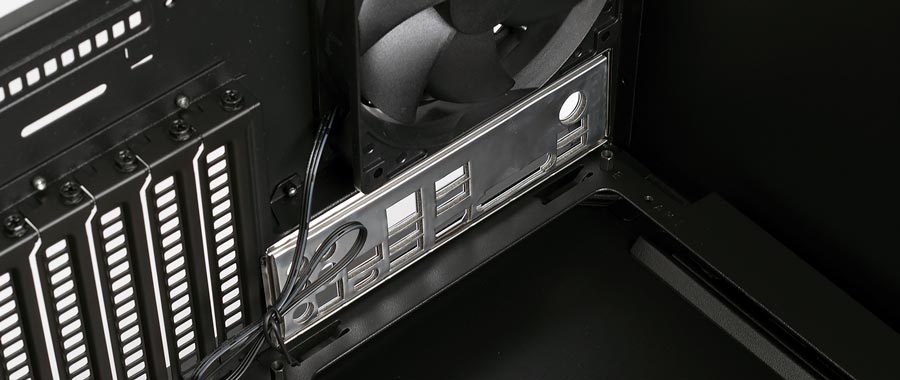
Also, before installing the motherboard, do not forget to install the special socket panel that came with the motherboard on the back of the case. It starts up from the inside of the case and is installed, as it were, by pressing it outward.
The board should stand in the case on special racks (hemp), there are from 4 to 15. Don't miss this moment! Matching the motherboard with its approximate location in the case, screw the rack into these holes in the case.

They must be the same height. Check if all the "stumps" are screwed into the body to the same height (to the end). In cheap cases, this can be a problem and often you cannot do without the help of a tool. The motherboard should not touch the case; it should lie evenly on the racks.

The uprights are part of the body kit. It so happens that there are more holes on the board than on the pallet. It doesn't matter, you don't have to use everything. The main thing is to fix the edges of the board and the middle of the board in at least one place.
Storage devices
Connecting the drive is as easy as shelling pears. In the case of a regular SSD (2.5 inches) or hard drive, you only have two wires: the power supply and the data transfer (SATA) wire that comes with the motherboard.

Check the location of the key, if nothing is interfering with their normal connection. It's the same with the SATA cable. In most cases, the cord has a lock with a lever at the top of the connector. If you need to get the cable out, just clamp it down, otherwise you might break the connector on the mat-board.

In modern cases, drives are fixed in special sleds. It is very convenient and does not require special screws, unlike budget cases.
Laying wires
Do not allow situations when the power wires or the connector are kinked to the device, you are guaranteed to break the block or the connector on the device itself, especially for drives.

You can not give a damn about the accuracy and stuff all the wires with a lump. Of course, the system will work, but unfortunately. The wires will interfere with normal air circulation in the case, the system will become dusty faster and overheat. Plus, there is a possibility that one of the wires can get into the processor fan cavity.
Lead the wires behind the back wall and fix them with cable ties through special lugs.
Case fans
There are usually two of them in front and one for blowing. Attached to the body with self-tapping screws. Pay attention to the airflow indicators before installing into the housing. If it is the back wall (or the upper part of the case) - the arrow for blowing out of the case, the front one - the air intake into the case.

The fan can be connected both to the motherboard and to the power supply (via an adapter). If the fan has a 4-pin connector, then it must be connected to the corresponding connector on the mat. board, which is designated as SYS FAN. The advantage of the 4-pin connector is that it becomes possible to automatically control the fan speed depending on the processor load.
Make sure there is nothing in the way of air circulation. The top of the hard drive must be purged to prolong its life.
Connecting the Power Supply
First of all, we connect the most important cables. There are two of them - a 24 pin (or 20 + 4) power cable for the motherboard and a power cable for the CPU 8 pin (or 4 pin). We insert them to the limit, you will hear a characteristic click (not always). Do not confuse 4 pin CPU and PCI-E power supply wires.
Sometimes it happens that the processor power connector on the motherboard has an 8-pin connector, and the power supply cable for the CPU has only a 4-pin connector.
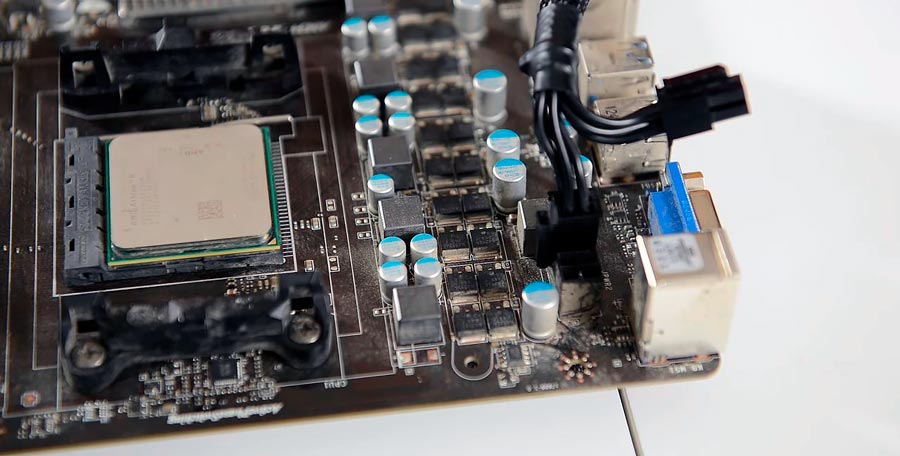
You can connect half of it and it will work, but it is not advisable to do this. It is not a fact that your motherboard will survive this.
By the way, this does not apply to video cards, and later we will analyze why. If the power supply for the CPU 4 + 4pin is indicated in the characteristics of the power supply, this means that the connector is type-setting, suitable for both 8-pin and 4-pin connectors.
It's the same with the power supply of the board. Power supply 20 + 4 means that your block is suitable for motherboards with a 20-pin slot, as well as for a standard 24-pin one.

The situation with the video card is different. Here, too, there is a type-setting connector for 6 + 2 pins or only 6. In fact, there is only a 6-pin connector. It can be one, two or three, depending on the coolness of your PSU. And it differs from the 8-pin only in the jumper.
Additional 2 contacts do not create a potential difference, these are two zeros. They serve as a marker for the card that your PSU is powerful enough for the card and will provide the required amperage.

Connect the additional ports on the chassis carefully. Do not hurry. There is a key on the connector - be guided by it, make sure that the legs of the connector are even, do not bend them. This is especially true for the USB 3.0 connector. Cases are not uncommon when, due to carelessness, the user bends the leg on the connector or tears it off when he abruptly pulls out the connector. How to connect the front panel of the computer to the motherboard is described in more detail here.
Video adapter
Typically, the video adapter is installed last. Everything is simple here. Insert the video card into the graphics slot and fix it with a screw on the expansion card frame. If the card is wide, it is best to secure it with two screws.

Do not forget about the retainer on the slot. It's not for beauty. Before installation, it must be open and only then we insert the video card until it clicks. Remove the card only with the release lever. Click on it, and the card will rise in the slot, after which it can already be removed.
Static electricity and methods of dealing with it
Do not collect your PC in synthetic socks while standing on a woolen carpet. Simple cotton gloves can be used, especially when working with RAM modules without heatsinks. Perhaps this is the only detail that is afraid of static. Common sense and compulsory reading of the instructions are your best assistants.
If the computer does not start after assembly, check how you installed the components. It starts, but rather stops working - more likely a problem with the RAM or its incorrect installation.
If it comes to BIOS already well, you can find a possible reason. If the lights on the motherboard light up, the coolers are spinning, but there is nothing on the monitor - check the installation of the video card. Resetting the BIOS or updating it can help.
As you can see, it is not so difficult to assemble a computer from the components yourself. The main thing is to know the theoretical part. We have covered the main points that may come in handy. Naturally, this is not all. There are so many variations of the component and there are so many possible problems. The components should not be mechanically damaged. Before you decide to assemble your computer, carefully check the components for external defects. Good luck with your assembly.
 Skype free download Russian version Install Skype application
 How to recover a photo on Android after deleting it?
 Original hosts for Windows operating systems What should be in a Windows 7 host
 An authentication error has occurred
 Open the following ports at the client's workstation
 How to hide all VKontakte friends in the new version?
 Hide friends on VKontakte