Windows 10 virtual machine image. Some Hyper-V virtual machine options
To have several operating systems at once with a separate workspace and applications, you do not need to buy a second (third, fourth, etc.) computer. Because it all fits into your only PC. How? Thanks to virtual machines (VM) - special programs that create (emulate) imaginary (virtual) computers inside the main operating system.
The virtual PC is almost like a real one. It has its own processor, memory, hard drive, network adapter and everything else. Of course, these are not physical devices, but they are made in such a way that operating systems consider them just like that - real.
Several virtual ones can run on one physical computer at the same time. How much depends on hardware resources: the faster the processor, the larger the RAM, the more spacious the drive, the more. A typical mid-range home PC running Windows 10 can handle three to five lightweight operating systems (such as Windows XP, Android, and Lubuntu + base system) running concurrently. Or two or three relatively heavyweight ones (for example, basic Windows 10 + virtual Windows 7 and Mac OS X). As you already understood, virtual computer emulator applications allow you to install and run a wide variety of operating systems on them.
General purpose virtual machines (as opposed to specialized ones such as, for example, VM Java) use:
- To run applications that the main system does not support.
- To protect the system from the potential harm of unverified programs.
- As an additional barrier against viruses when visiting questionable web resources.
- To create an isolated environment for studying malware activity.
- As a testing ground for debugging your own developments.
- To master the technologies of building networks.
- For double authorization on some game portals and much more.
And of course, virtual machines are widely used to distribute server working resources.
Today we will not touch upon the industrial application of VM, but consider only what can be useful for home users of Windows.
Oracle Virtualbox
Let's take a look at the process of creating a new virtual machine and starting the installation of Windows 10 into it.
- Click the "Create" button in the top panel.

- In the first window of the VM creation wizard, we will indicate the OS name (it will be displayed in the list of guest systems), its type (Windows, Linux, etc.) and version. In our example, this is Windows 10 32 bit (you can also install 64 bit, but it will require more resources). Click Next to proceed to the next step.

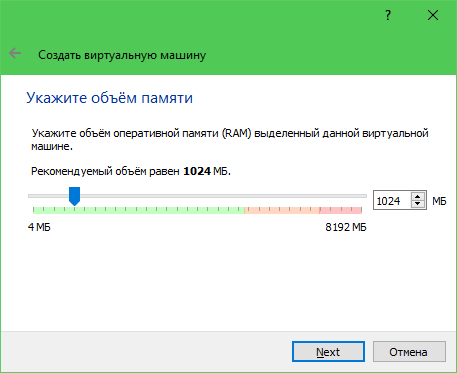
- Next, we will indicate the size of the VM's RAM. By default, Windows 10 x86 is allocated 1 GB, but you can increase this amount by moving the slider to the right. If your PC does not have a lot of RAM, do not give the VM more than 2-3 GB, otherwise the main system will slow down due to lack of memory.
- Next, we create a virtual hard disk. If you are installing the system for the first time, select the "Create new" option.

- Leave the default virtual disk type.

- A storage format is an area on your computer's physical storage that is assigned to a VM. It can have a constant or dynamically expanding volume within the limits that you define further. To save space, we will choose a dynamic format.

- Next, we will indicate the name of the volume (virtual disk C) and its size. The default is 32 GB.

- After clicking the "Create" button in the last window, a new virtual machine will appear in the list. Its parameters are shown in the frame on the right.
- To proceed to the Windows installation, click the "Run" button in the top panel.

- In the window that will open after that, the window "Select a boot disk" will appear. Click on the folder icon and specify the path to the system distribution kit. It can be an image in .iso format or physical media (DVD, flash drive). After selecting the distribution, click "Continue".

- The further course of OS installation into a virtual machine does not differ from its installation on a physical computer.

Some VM and guest settings
Clicking in the virtual machine window captures the mouse cursor (that is, it will only move within the virtual screen). Press Ctrl + Alt to return the cursor to the main OS.
To access the entire set of functions of the guest OS, you need to install special add-ons. Go to the "Devices" menu, click "Mount Guest OS Additions Disk Image" and follow the further instructions.

To connect a folder to the guest system for sharing files with the main one, click on the "Devices" menu item "Shared folders". Click on the "folder +" icon in the window that opens and through the "path to folder" field specify it in the explorer (it shows the directories of the main system).
If you want the setting to work all the time, check Auto Connect and Create Permanent Folder. The shared folder will be accessible from the virtual machine explorer as a network folder.


To change the order of polling boot devices (for example, to boot a virtual machine from DVD), shut down the guest OS, open its settings (in the main Virtualbox window) and go to the first tab of the "System" section. In the Boot Order list, mark the media you want and use the arrow buttons to move it up.

VMware Workstation Pro
Some options for Hyper-V virtual machines
To take a snapshot of a running guest OS, open the top menu of its Action window and click Checkpoint. Or press the combination Ctrl + N.
Access to the settings of an individual virtual machine is opened from its context menu in the list of the main manager window and is hidden behind the "Settings" button.
Other features of the program are also very straightforward and are mastered without much difficulty.
We will add components Hyper-V in Windows 10, consider the option of creating a virtual machine using Hyper-V, and also consider its parameters.
Add Hyper-V components.
Launch "Run" in either of two ways:
- Right click on the menu "Start" and choose "Run". (Fig. 1)
- Press the keyboard shortcut "Win"+"R".
Introduce appwiz.cpl(Fig. 2)
 Fig. 2 - Enter appwiz.cpl
 A window will open "Programs and Features"... Left click Turn Windows features on or off. (Fig. 3)
 Fig. 3 - Programs and components.
 A window will open Windows Components... We select everything that is in the section Hyper-V. (Fig. 4)
We press "OK".
 Fig. 4 - Selecting Hyper-V components.
 We are waiting for the installation of components - Applying changes, and press "Restart now". (Fig. 5)
 Fig. 5 - Application of components, system reboot.
 On this Adding components it's finished. Getting Started with Hyper-V
Running Hyper-V.
On the menu "Start" -> "Windows Administration Tools" there was a shortcut Hyper-V Manager... We launch it. (Fig. 6)
 Fig. 6 - Launching Hyper-V Manager.
 Before us is the starting window Hyper-V Manager. (Fig. 7)
 Fig. 7 - Start window of the Hyper-V Manager.
We select our computer on the left, I have it - DESKTOP-9PLBR7Q, a menu appears on the right "Actions", Click on the item "Virtual Switch Manager". (Fig. 8)
 Fig. 8 - Go to the Virtual Switch Manager.
 V "Virtual Switch Manager" click "Create virtual switch". (Fig. 9)
 Fig. 9 - Create a virtual switch.
 Enter Name, I have it - Hypernet and note, I have this - Hyper-V network. (Fig. 10)
Also choose Connection type... I chose to connect to External network through my network card - "Realtek PCIe GBE Family Controller"... And also checked the checkbox "Allow the managing operating system to share this network adapter".
We press "Apply".
 Fig. 10 - Properties of the virtual switch.
 Pops up a warning "Pending changes may disrupt network connectivity"(Fig. 11) I assume that this article will be read by beginners, which means they are unlikely to repeat after me step by step, using the server involved, of their enterprise 😀 ... Therefore, it's okay that we can lose network connection for a while. We press "Yes" and we are waiting "Applying changes".
 Fig. 11 - Warning about possible network connection failure.
 Now going into "Network connections" -> "Configure adapter parameters"... We can see our newly created vEthernet (Hypernet), also adjacent to it is not connected vEthernet (Default Switch) - " Standard Networking "automatically gives virtual machines access to the computer's network using network address translation ( NAT). NAT at the moment we are not interested. And we will not touch this switch. (Fig. 12)
 Fig. 12 - Network connections -> Configuring adapter parameters.
 This completes the network setup. Let's move on to the most important thing, for which the virtualization system was created Hyper-V- WITH creating a virtual machine.
Creation of a virtual machine.
Right-click on our computer -> "Create" -> "Virtual Machine"... (Fig. 13)
 Figure 13 - Creating a Hyper-V virtual machine.
 The "New Virtual Machine Wizard" will open (Figure 14)
- Click the button "Ready" to create a virtual machine with default settings.
- Click the button "Further" to create a virtual machine with specific configuration options.
 Fig. 14 - Virtual Machine Creation Wizard.
 Specify the Name of the virtual machine and its location (Fig. 15)
I decided to test with Ubuntu Server 18.04.
Therefore, I have it like this:
- Name: ubuntuserver 18.04.
- Location: E: \ hyper-v ubuntu server 18.04 \.
 Fig. 15 - Specify the Name of the virtual machine and its location.
 Select the generation of the virtual machine (Fig. 16)
In most cases it is worth choosing the second generation, but if you are installing something 32-bit it is worth choosing - Generation -1.
Personally, I have Ubuntu Server 18.04 64-bit with the support UEFI hence I choose - Generation 2.
 Fig. 16 - Selecting the generation of the virtual machine.
 We allocate the amount of RAM. (Fig. 17)
Enough for my operating system 1Gb RAM=> I leave the default ones written 1024 Mb... Come on "Further".
 Fig. 17 - Allocating the amount of RAM.
 Choose which switch our network interface will be connected to. (Fig. 18)
We choose our "Hypernet", let's go "Further".
 Fig. 18 - Network configuration.
 Create a virtual hard disk (Fig. 19)
We indicate Name,Location and maximum The size file virtual HDD.
I have so:
- Name: ubuntu server 18.04.vhdx.
- Location: E: \ hyper-v ubuntu server 1804 \.
- The size: 10 GB.
 Fig. 19 - Create a virtual hard disk.
 We choose ISO image from which we will install the operating system. (Fig. 20)
Selecting an item "Install operating system from boot image file"-> Click "Overview"-> Choose iso image... -> We press "Further".
 Fig. 20 - Selecting an OS image.
 Completion of the virtual machine creation wizard (Fig. 21)
We press "Ready".
 Fig. 21 Completing the virtual machine creation wizard.
 Now in Hyper-V Manager we see the newly created virtual machine - ubuntu server 1804... (Fig. 22)
Click on it with the right mouse button -> "To plug".
 Figure 22 - Hyper-V Manager, New Virtual Machine.
 A window will appear (Fig. 23)
If you want to install the system Windows then when you press the button "Start" you should have started the installation, without any errors.
But in order to start Ubuntu Server 18.04 I had to "File" - > "Options"->"Security" disable "Safe Boot". (Fig. 24)
 Fig. 23 - Connecting to a virtual machine.
  Fig. 24 - Disable Secure Boot.
 Turn on the virtual machine (Fig. 25)
 Fig. 25 - Turn on the virtual machine.
 Everything is fine, the virtual machine started up. The installer meets us Ubuntu Server 18.04.(Fig. 26)
 Fig. 26 - A running virtual machine. Ubuntu Server 18.04 Installer.
 Changing the parameters of the virtual machine.
Let's make a small overview of the parameters of the virtual machine so that you can see the main functions before deciding to use the virtualization system Hyper-V.
"File" - > "Options".(Fig.27) Fig.27 - Go to "File" -> "Parameters"Equipment.
"Firmware"- you can change the boot priority of devices in the virtual machine (Fig. 28)
 Fig. 28 - Selecting the boot priority.
 "Security"- can "Enable / Disable Secure Boot", "Enable / Disable Encryption Support ". (Fig. 29)
Fig. 29 - Virtual machine security settings."Memory"- you can edit the amount of allocated RAM, Enable / Disable function Dynamic memory.(Fig. 30)
 Fig. 30 - RAM parameters.
 "CPU"- you can edit the number of virtual processors in accordance with the number of processors on the physical computer. (Fig. 31)
You can also distribute the load in "Resource management".

"SCSI controller" can add HDD,DVD drive or Shared disk. (Fig. 32)
 Fig. 32 - SCSI controller parameters.
 You can also change parameters of connected media, for example, here we can change the inserted into the virtual DVD drive ISO Image (Fig. 33)
 Fig. 33 - Media parameters.
 "Network adapter" you can change the configuration network adapter: Select Virtual switch, register VLAN ID, customize Bandwidth. (Fig. 34)
 Fig. 34 - Network parameters.
 Control.
"Name"- you can easily change the virtual machine for a more convenient one for your use (Fig. 35)
 Fig. 35 - Name change.
 "Integration Services"- Select the services you want to make available to the virtual machine. . (Fig. 36)
 Fig. 36 - Integration services.
 "Checkpoints"- Here you can customize Control points ( snapshot, restore points), enable the automatic mode of their creation and designate their storage location (Fig. 37)
 Fig. 37 - Control points.
 "Smart Padding File Location"- You can specify the path to the swap file. (Fig. 38)
Smart Padding- a function that makes it possible to use the paging file on the host if there is not enough memory to boot a virtual machine.
 Fig. 38 - Location of the Smart Padding file.
 "Automatic startup actions"- You can select the operation that you want to perform with this virtual machine when the physical computer starts up (Fig. 39)
Virtual machines allow users to run different versions of operating systems. This is useful if you need to test applications that are in development and do not want to install a separate system for each platform you want to test. For those looking for added security, a virtual machine is often cited as a good way to keep you anonymous online if a VPN isn't right for your needs.
Working with a virtual machine is simple. Free apps like Oracle's VirtualBox and commercial apps like VMware make it pretty easy to start a virtual machine. The only tricky part is getting the virtual machine image. If you need to get a Windows 10 virtual machine image, you always have one of two options.
Windows 10 VM image from Microsoft.
Getting an image of a Windows 10 virtual machine is actually not difficult. Microsoft has VM images available for developers who want to test applications or extensions in Internet Explorer or Microsoft Edge.
You can download virtual machine images. VM images are available for Windows 7, Windows 8 / 8.1 and Windows 10. You cannot choose whether you want to get a virtual machine image for Windows 10 Home or Windows 10 Pro. Instead, you must choose which version of Microsoft Edge you want to test and download the virtual machine image accordingly.
Then you need to select the VM platform you are going to use. Microsoft supports VirtualBox, Vagrant, VMware, and Parallels.

The VM image is downloaded as a password protected zip file. The password is listed on the download page. The VM will be valid for 90 days as it is intended for testing and not long term use.
If the above option does not work for you and you want a VM image running Windows 10 for long-term use, you will need access to the Windows 10 computer for which you want to create a VM image. Then use the remedy Disk2vhd from Microsoft to create a Windows 10 virtual machine image.
Run the tool, select the drive where Windows 10 is installed (usually drive C), and choose where you want to save it. If you are capturing a Windows 10 virtual machine image from your system, you will need more space to create the virtual machine image.

The file created by Disk2vhd has the file extension VHD and can be loaded directly into VirtualBox and VMware.
Many have heard about virtual machines, but not everyone knows what virtual machines for Windows 10 or any other operating system are, how they work and what they are for. Next, we will consider several popular clients that allow you to configure any configuration in the tenth version of Windows, as well as in any other OS.
Virtual machines for Windows 10 or other operating systems: general concepts
The virtual machine (VM) itself is a kind of a kind of real computer with the only difference that it functions exclusively in the software environment of another system.
In the simplest definition, a virtual machine for Windows 10 x64 or x32 can be regarded as a kind of constructor with details, from which the desired configuration is assembled. In such a really non-existent computer, you yourself can set the volume of the hard drive and RAM, install a virtual video card, floppy drives, select an operating system, and even use an Internet connection or a local network. That is, all this virtual configuration in the form of a software shell will work in exactly the same way as a real-life system.
What is this software environment used for?
Virtual machines for Windows 10 or other environments have several top priorities to use. So, for example, installing a second operating system on a hard drive very often seems completely inappropriate, since errors and malfunctions can appear in it.

In addition, it is not always possible to install Linux in parallel with Windows. And the "apple" operating systems in PC configurations do not work at all and function exclusively on Intel platforms (not to be confused with processors).
If you are installing virtual machines for Windows 10, you can emulate the operation of the above systems and test software developed exclusively for installation and use in these operating systems. But software products for Windows environment, when tested in a virtual machine, have no effect on the main system. You can easily emulate the damage of a child OS by a virus, but this will in no way affect the main system.
How to install a virtual machine on Windows 10 using Hyper-V as an example: initial steps
Starting with the seventh modification, Windows systems have their own tool for creating and running VMs called Hyper-V.

Installing a virtual machine on Windows 10 at the first stage involves activating this module in the system. This is done from the section of programs and components, called from the standard "Control Panel", where in the presented list a selection is set on the square opposite the name of the module and its components.

After activation, a reboot will follow, and upon restart, the "Hyper-V Manager" icon will appear in the administration menu.

The created VM may not work if you do not use the BIOS settings, where the Advanced settings menu is selected in the general settings section and the use of Virtualization Technology is activated by setting the Enabled parameter. For Intel and AMD processors, as well as for different BIOS or UEFI versions, the names may vary.
Creating a virtual network adapter
The second step is to create a so-called virtual switch to use your internet connection.

This is done in the manager, where the name of the computer is selected, and from the right-click menu, the action line is used with the transition to the "Manager of virtual switches". When creating a network and connecting, it is better to select the "External" parameter, so as not to complicate your work, set the desired network name and press the "OK" button. The created adapter will use a network card or a Wi-Fi wireless module when connected.
VM creation process and launch
The VM is created from the dispatcher with the selection of the appropriate command, after which its name and the location of the machine files on the hard disk or in the logical partition are indicated.

Then you will be prompted to select the VM generation. It is better to use the first one, since the second generation will create a VM with UEFI, and booting from images is not always supported.

The next step is to choose the amount of RAM. The default value can be increased, since the main system practically does not use memory while the VM is running.

In the network settings, a previously created adapter is selected, after which the parameters of the virtual hard disk are set (name, location of files on the hard drive and size).

How do I run a virtual machine on Windows 10? Yes, just double-click on it in the dispatcher's list and click the "Enable" button. After that, the OS will be installed (if it has not been done before).
Best third party software
There are a lot of programs that allow using virtual emulators of real computer systems today. However, by right the most powerful and advanced packages are VirtualBox from developers from Oracle and VMWare Workstation.
Let's take a quick look at each of them. The processes for creating a VM in them are very similar to those with the Hyper-V module, but there are some differences.
VirtualBox
During the initial installation of this program, you should pay attention to several points with additional components, among which it is desirable to install support for connecting any devices via USB (VirtualBox USB Support) and network adapters for local networks and Internet connections (VirtualBox Networking). Programmers and developers can use the support of programming languages (the average user does not need this).

The process of creating a VM in this shell is practically no different from the above (unless a switch is needed). Only at the stage of choosing the type of virtual disk can you install a dynamic (expandable as it becomes full) or a fixed size disk.
Once the machine is created, it can be configured in terms of the amount of video memory used, the load on the processor, etc. After that, the start button is used to start, and the program asks for the path to the OS image. Then the installation starts, which is no different from the usual installation. If you are prompted to boot from CD / DVD-ROM, you will need to unmount the image file from the drive (use eject disc in the media section).
VMWare Workstation Pro
Creation of a VM using this software environment is performed using a special "Wizard", in which it is better to choose the usual (recommended) configuration.

When creating a virtual disk to increase performance in the save type, it is better to use one file rather than splitting into several.
Hardware configuration is performed from the section of the same name, but to improve device support, you should agree with the installation of the VMWare Tools driver package when the guest OS is fully functional. By the way, even in the guest system, you can take a snapshot of the state at a certain moment, and, if necessary, return it to the rollback point.
Which one to prefer?
What's the best virtual machine for Windows 10 is hard to say. Some people like VirtualBox despite having its own tool on the system. This is confirmed by many reviews. The program is easier to use and configure in comparison with the same Hyper-V module and VMWare workstation. But by and large, all programs are good, and the Hyper-V module can be used without the need to install additional software. But in any program of this type, a VM is created, started and configured very simply. If you look at the example with the Hyper-V module and master the basics, there will be no problems with other emulator shells.
Among the three leaders in the software market for virtualization of operating systems - VMware, VirtualBox and Hyper-V - the latter hypervisor takes a special place. This special place is due to the fact that Hyper-V is a standard component of Windows server systems and some versions of Windows for desktop PCs. Lagging behind VMware Workstation and VirtualBox in functionality, cross-platform and partly in ease of use, Hyper-V, nevertheless, is not without its advantages. And the main one is the higher performance of the guest OS.
Below we will talk about activating Hyper-V in Windows 10 and creating a virtual machine using this hypervisor.
1. Hyper-V - standard hypervisor from Microsoft
Windows 10 inherited the standard Hyper-V component from versions of Windows 8 and 8.1, and in them the hypervisor migrated from Windows Server. Both Windows 8.1 and Windows 10 offer optional Hyper-V Pro and Enterprise editions. The hypervisor works only in 64-bit systems.
For a long time, Hyper-V did not support any other guest OS other than Windows. However, relatively recently, Microsoft took care of the hypervisor to support the Linux guest OS. And today, using Hyper-V, you can test some Linux distributions, in particular the popular Ubuntu.
2. Requirements for Hyper-V operation
The minimum amount of RAM for a physical computer to run Hyper-V is 4 GB.
The computer processor must support SLAT technology (Intel EPT or AMD RVI). Almost all modern processors meet this requirement.
Another requirement for the processor, also provided by many modern models, is support for hardware virtualization technology and, accordingly, its active state in the BIOS. In the BIOS of motherboards for Intel processors, this technology (depending on the version) may be called differently - Intel-VT, Intel Virtualization Technology, Intel VT-x, Vanderpool, or Virtualization Extensions. AMD calls its hardware virtualization technology AMD-V or SVM (Secure Virtual Machines). For example, in AMI BIOS version 17.9, the AMD processor hardware virtualization feature can be found under Cell Menu - CPU Feature - SVM Support.

AMD processors usually have hardware virtualization enabled by default. Whether a particular processor model supports hardware virtualization, this point can be found on the websites of Intel and AMD.
3. Activating and starting Hyper-V
Hyper-V bundled with Windows 10 Pro and Enterprise is optional. Initially, the standard hypervisor is disabled. It is included in the "Programs and Features" section of the Control Panel. The fastest way to get there is through an in-system search.

We start "Enabling and disabling system components."

In the small window that appears, tick off all the sub-items of the Hyper-V item. Click "Ok".

The system will apply the changes for a couple of seconds and ask for a reboot. After rebooting, we are looking for a shortcut to launch the Hyper-V Manager. You can immediately pin the Hyper-V Manager shortcut to the Windows 10 Start screen by finding it in the Start Menu Administration Tools.

You can also access the Hyper-V Manager shortcut using an in-system search.

Launch Hyper-V Manager.
4. Configuring network access
In Hyper-V Manager, the network is configured in a separate step, and first you need to create a virtual switch - an option that provides access to the network. We click on the name of the physical computer, and on the right side of the window, select "Virtual switch manager ...".

The wizard for creating a virtual switch will start, where the first step is to select the type of network. There are three of them:
- External - This type uses the network card or Wi-Fi adapter of the physical computer and connects the virtual machine to the same network as the physical computer. Accordingly, it is a type of network that allows a virtual machine to access the Internet;
- Internal - This type provides a network between the physical computer and Hyper-V virtual machines, but does not provide for their access to the Internet;
- Private - this type allows you to create a network between Hyper-V virtual machines, but this network will not have a physical computer, nor will there be an Internet connection.
In our case, the virtual machine needs access to the Internet, so we will choose the first type - an external network. Click "Create a virtual switch".

In the properties window of the virtual switch, give it a name, it can be any name, for example, "Network card 1". You can add a note to the virtual switch if needed. If the physical computer has both a network card and a Wi-Fi adapter on board, the specific device through which the virtual machine will connect to the network can be selected from the drop-down list in the "Connection Type" column. After making the settings, click "Apply" at the bottom of the window.

5. Creating a virtual machine
Now you can start directly creating a virtual machine. On the left side of the Hyper-V window, the selection should still be on the name of the physical computer. In the upper right corner, click "Create", then - respectively, "Virtual Machine".

In the welcome window of the launched wizard, click "Next".

Give the virtual machine a name; you can also change its location on the physical computer disk by specifying the desired disk partition and the desired folder using the browse button. Click "Next".

One of the relatively new features of Hyper-V is virtual machine generation selection. In our case, generation 2 is selected.

What does it mean? Generation 1 are virtual machines that support 32-bit and 64-bit Windows systems. Generation 1 is backward compatible with Hyper-V.
Generation 2 - new format virtual machines with UEFI-based firmware. These virtual machines support a number of new features and can provide small performance gains. On virtual machines of generation 2, only 64-bit versions of Windows 8.1 and 10, as well as server Windows Server 2012, Server 2012 R2 and Server 2016 are installed as guest OS.
The UEFI platform provides another requirement for using generation 2 virtual machines - UEFI bootable media. This point needs to be clarified by downloading the ISO image with the Windows distribution from third-party sources on the Internet. But it is still better to download Windows distributions from the official sources of Microsoft. So, the Media Creation Tool utility, which downloads Windows 8.1 distributions from the Microsoft website and creates a bootable ISO image that supports the UEFI environment.
In the case of installing Windows 10 as a guest OS, this is the way to obtain an ISO image of the system and is recommended. Windows 10 provides an installation process with lazy input. In our case, Windows 8.1 will be installed as a guest OS, and its official distribution, obtained using the Media Creation Tool utility, requires entering the product key during the installation process. The TechNet Trial Center site will help provide support for the UEFI environment and take advantage of the free opportunity to test Windows 8.1. On this site you can download the English edition of 64-bit Windows 8.1 Enterprise and test the system for free for 3 months. The problem with the lack of support for the Russian language after the installation of the system can be solved separately by installing the language pack and setting Russian as the main language of the system.

We return to the wizard for creating a virtual machine. In the memory allocation window, we leave the preset parameters if the physical computer has no more than 4 GB of RAM. If it is more than 4 GB, you can increase the amount allocated when the virtual machine starts. For a guest Windows XP, the RAM indicator can, on the contrary, be reduced to 512 MB. Click "Next".

In the network settings window, select the previously created virtual switch from the drop-down list. Click "Next".

In the window for connecting the virtual hard disk, we give the virtual machine a name, specify the location on the disk of the physical computer, and specify the size. These are the options for creating a new hard drive. The second item of this step of the wizard is used when the computer already has a virtual hard disk, in particular, with the installed guest OS. When selecting a generation 2 VM, the VHD file must be in VHDX format (not VHD) and the guest OS must support the UEFI boot environment. Click "Next".

If in the previous step of the wizard you selected the item to create a new virtual hard disk, the next step is to specify the path to the Windows distribution kit. Generation 2 virtual machines no longer support booting from a physical CD / DVD drive. The sources for downloading the distribution of the guest OS can only be the network and the ISO image. In our case, this is an ISO image. Click "Next".

The final stage of the wizard - click "Finish".

6. Connecting a virtual machine
After creating the virtual machine, return to the Hyper-V Manager window. Now you need to connect it. To do this, there is the "Connect" command, among other commands of the context menu invoked on the virtual machine. The Connect command is also present on the right side of the Hyper-V Manager window. To connect, you can also double-click the left mouse button on the preview window of the selected virtual machine.

In the connection window that opens, click the green start button.


The usual Windows 8.1 installation process will follow, as it would on a physical computer.

As soon as copying the installation files starts, you can close the window for connecting to the virtual machine and do other things.

Closing the connection window will free up some resources of the physical computer to perform other tasks, while the virtual machine will continue to run in the background. Its performance will be displayed in Hyper-V Manager.

You can connect to a virtual machine as needed to perform actions in it.
That's it - Windows 8.1 is installed. You can turn off, pause, save the virtual machine, or reset its state using commands in the Hyper-V manager and the buttons on the top panel of the connection window.

7. Boot priority
In order not to waste time on the boot from CD / DVD window when starting the virtual machine in the future, you need to open the parameters window in its off state and remove the path to the ISO file with the distribution kit. This is done in the DVD drive's hardware settings tab of the virtual machine.

An alternative is to raise the hard drive in boot priority above the DVD drive (but not higher than the "bootmgfw.efi" file). This is done in the "Firmware" tab of the hardware settings.

In both cases, the changes made are saved with the "Apply" button below.
8. Bypassing Hyper-V connection window restrictions
Virtual machine performance is at the heart of the Hyper-V hypervisor, not functionality. Unlike their competitors - VMware and VirtualBox - Hyper-V virtual machines do not work with connected flash drives, do not play sound, and interaction with a physical computer is carried out only by pasting text copied into the main OS inside the guest OS. This is the price of performance for Hyper-V virtual machines. But this is if you work with the usual Hyper-V connection window.
Full integration of a physical computer and a virtual machine can be obtained using the standard Remote Desktop Connection utility.

This utility allows you to flexibly configure connection settings, in particular, to make available inside the virtual machine not only USB drives connected to the physical computer, but also individual hard disk partitions.

Connecting to a virtual machine in this way will provide audio playback and two-way file transfer in the guest OS.
Have a great day!
 How to make money in Minecraft: creating maps, hosting a server and selling resources Creating a Minecraft server
 How to set up Skype on Android How to use the mobile version of Skype
 The basics of programming for beginners - where to start learning, the best courses and lessons What you need to study as a programmer
 Skilled sailor Able Seaman What is 1 point in degrees
 How to change a cartridge in a printer: step by step instructions
 About microcontrollers for beginners - the history of creation, the main types and differences What is the difference between a microprocessor and a microcontroller
 Personal information space of the teacher (from work experience) IV