How to transfer an operating system to another hard drive. Transferring Windows to another empty hard drive using AOMEI Partition Assistant Windows 7 to another hardware
It happens that it is necessary to replace an old computer or laptop, or to replace the motherboard. Then you would have to reinstall the operating system. Yes, this process is not complicated, but you can transfer the operating system using the utility Sysprep. This utility is from Microsoft, which allows users to transfer the OS to new hardware while preserving all data.
As soon as you run the sysprep utility, all information about drivers and the operating system will be cleared. The main thing is that all installed programs will not be touched. There will be no need to make all sorts of backups, reinstall programs, etc. Another nuance is that information about the activation of Windows 7 is also lost, so you will have to re-activate it. This does not apply to the version, since activation is tied to the hardware and it occurs automatically.
To migrate Windows 7 using the sysprep utility, you need to open a command prompt. To do this, click Win+R and enter cmd. Now enter the following command on the command line:
%windir%\system32\sysprep\sysprep
A system preparation window will open where you need to make some settings.
Where it is written System cleaning action, you need to select the item Go to the system welcome window (OOBE) and be sure to check the box Preparation for use.
In parameters shutdown You can select shutdown, or you can select reboot the system.
After running Sysprep, in order to avoid going through this procedure again when transferring to a new computer, it is not recommended to boot on the same computer.
So, click OK We are waiting for the work to finish. After everything, the computer will turn off and now you can change the motherboard, or transfer the hard drive to a new computer.
When you turn on a new computer, or a PC with a new motherboard, Windows 7 will be installed, checked and detected. The system may be rebooted. We don’t touch anything and wait. Afterwards, a window will appear with a choice of regional parameters: country, language, etc.

Having done everything necessary, you can now log in using your account that you had on your old computer. Don't forget to install the necessary drivers before. Now you can work as usual.
As you can see, the procedure is not complicated, and it is better to use the Sysprep utility and do everything quickly than to reinstall Windows again.
Microsoft does not guarantee 100% that all data will be saved during the transfer, and there may be some failures, but this depends on what hardware you are transferring to. Mostly everything goes smoothly.
Let's imagine a situation where we needed to transfer a hard drive with Windows 7 installed to another computer. In this case, there is a high probability that the OS will refuse to boot on the new hardware. Another typical example of such a problem is a computer upgrade, for example, when the motherboard is replaced.
If you encounter a similar problem, do not rush to reinstall the system, but try using the method of preparing the OS for transfer using the utility sysprep. The sysper utility is included with Windows Vista and Windows 7. Sysprep provides the following benefits:
Removing system data from Windows. Sysprep can remove all operating system-related information from an installed Windows image, including the computer's security identifier (SID). The Windows installation can then be imaged and installed throughout the organization.
Configuring Windows to boot in audit mode. Audit mode allows you to install third-party applications and device drivers, and check the health of your computer.
Setting the Windows Welcome screen to load. Sysprep configures your Windows installation to boot with a welcome screen the next time you start your computer. Typically, the system should be configured to boot with a welcome screen before the computer is shipped to the customer.
Reset Windows activation. Sysprep can reset Windows activation up to three times.
Note: owners of computers with a pre-installed OEM version of Windows 7, after transferring the hard drive to another computer using this tool, will have to reactivate the OS over the phone, because activation information is strictly tied to a specific hardware, for example a motherboard.
Stage 1. Prepare the system disk for transfer to another PC.
The sysper utility can be run either in the graphical interface or from the command line as an administrator with various parameters, depending on the task at hand. For example the command
c:\windows\system32\sysper\sysper.exe /oobe /generalize /shutdawn
removes data related to the operating system from the Windows installation and turns off the computer. Information related to the operating system includes event logs, unique security identifiers (SIDs), and other data. After removing unique system information, the computer shuts down. After you shut down your computer, you can boot your computer to Windows PE or another operating system, and then use the program to record your Windows installation. ImageX, creating a source image that will be used on computers with similar equipment. You can find out more about the syntax of the sysper utility launched from the command line.
A few things that are useful to know about how the sysprep utility works:
The configuration of the computers on which the system is planned to be deployed should be approximately the same. For example, if you created an image of a single-processor system, you cannot use it to deploy to a dual-processor machine;
The target computers must have the same BIOS types. For example, an image of a source computer with an ACPI BIOS will not be suitable for a computer with an AWS BIOS;
The target computer's system disk size must be the same or larger than that of the source computer;
sysprep does not create a disk image, but only prepares the system for cloning.
So, to prepare to transfer a hard drive with Windows 7 installed to another computer, you need to run the following command in the command line as an administrator:
%windir%\system32\sysprep\sysprep
The utility window will open in the graphical interface (this is the method we will consider further):

Pay attention to the settings that need to be specified:
in “Actions to clean up the system”, select the option “Go to the system welcome window (OOBE)” and check the “Prepare for use” option;
in “Shutdown Options” select "Shutdown." Selecting the “Reboot” option will allow you to immediately remove an image of an already prepared system disk by booting from a Windows PE USB drive. If you boot from a prepared system disk, you will have to start the entire process of preparing to transfer the system to the disk over again.
After clicking the OK button, the system cleaning process starts, and after it is completed, the computer turns off. Now you can transfer the hard drive to a new system, change the motherboard, and so on.
At the beginning of the download, you will see the message “Preparing the system for use”, then “Installing devices”:

The system may reboot and continue installation - this is normal.
Finally, you should see the regional settings window (the appearance of this window already indicates that the transfer was successful):

Enter the name of the new user. In order not to confuse the settings of existing users, enter a name that has not been used before (for example, Test). This user can then be deleted.

Next, standard settings for date and time, automatic updates, etc. are performed. As a result, you will be taken to the Test user's desktop. Now you can log out and log in with your regular account. The last step is to update device drivers.
As mentioned above, Microsoft advises doing this operation only for computers with the same configuration (AMD-AMD, Intel-Intel). Otherwise, various glitches are very likely to occur.
Good afternoon, please tell mehow to transfer Windows to another hard drivewithout reinstalling the operating system. I’ll explain my situation: My Windows 8 is located on an old “badass” hard drive with a capacity of 250 GB, divided into 2 partitions. Is it possible to move the system with all installed programs to a new hard drive with a capacity of 400 GB, but unfortunately it is not empty, there is already one on it a partition with 100 GB of data and nothing should happen to it. Alexander.

Hello friends. Let's help our reader and me at the same time! I also have an old hard drive Maxstor 250 GB with Windows 8.1 installed and I have long wanted to transfer it to another hard drive Samsung (400 GB capacity), this hard drive also has files. By the way, if you transfer the operating system, it’s better to transfer it to , that’s where everything will work faster for you.
We will work with you using Acronis True Image programs and we will also need Acronis Disk Director. The operating system in our case can be any, for example Windows 7, 8, 8.1, 10. The entire transfer process is described in our article step by step and I think you will succeed.
You may also find our other articles on this topic useful:
- A similar article, only the tool used is Cloning. .
- A very simple article where we do the same thing using the free AOMEI Partition Assistant program, I recommend it to all novice users -
- If you have a laptop, then perhaps these articles will be useful to you .
- If you are interested in the article, visit the special section where you can find from one storage device to another.
Disk Management window
So, we have two hard drives:
Disk 0. Samsung hard drive(volume 400 GB) with one partition. Everything is clear with this disk, there is one partition on it and there are 100 GB of data, with which nothing should happen. We will transfer the operating system to it from the Maxstor hard drive or Disk 1.
Disc 1. Maxstor hard drive 250 GB with three partitions.
The first partition is hidden and does not have a letter, it is called System Reserved, the volume is 350 MB, the main purpose of the hidden partition is to store Windows 7 or Windows 8 download files. We will move it. When transferring operating systems, this section with Windows boot files must be included in the backup.
The second partition under the letter (C:) has a capacity of 105.00 GB and has the Windows 8.1 operating system installed on it. We will also reschedule.
The third partition under the letter (D:) has a capacity of 127.00 GB with user data. We won't reschedule.

Acronis Disk Director
First of all, let's boot from a boot disk or bootable flash driveAcronis Disk Director and separate it from the hard drive Samsung (volume 400 GB) 130 GB space specifically forWindows 8.1, which we will transfer to it from Maxstor.
Select with the left mouse the space of the Samsung hard drive (volume 400 GB) and select Resize volume
We grab the delimiter with the mouse and drag it from left to right, thereby “biting off” 130 GB of space from the Samsung hard drive for the future operating system. free up unallocated space 130 GB required at the beginning volumes . At the bottom of the window we see the future state of the partitions on the hard drive. Click OK.
Program Acronis Disk Director works in deferred operation mode. For our plans to come true, we need to press a button Apply


Continue


The first task is completed. On the Samsung disk, using Acronis Disk Director, we created 130 GB of unallocated space for the future Windows 8.1.

Acronis True Image
Creating a backup
Now we are working with the Acronis True Image program. In this program, we need to create a backup of the Windows 8.1 operating system located on the Maxtor hard drive and deploy this backup to unallocated Samsung disk space.
We also boot the computer from the boot disk Acronis True Image. In the initial window of the program, select
Backup. Disks.

Window Archived sections.
In this window we need to select Disc 1 sections for archiving.
In the window that appears, we see three disks:
Disc 1. Bootable USB flash drive with Acronis True Image program.
Disc 2. Samsung hard drive 400 GB , to which we will transfer Windows 8.1.
Disc 3. Maxtor hard drive250 GB(from which we are transferring Windows 8.1). To include it in the backup, check the hidden partition System Reserved, volume 350 MB, the main purpose of the hidden partition is to store Windows 7 or Windows 8 download files. When transferring operating systems, this partition with Windows download files must be included in the backup. Acronis assigned it a drive (G:), this partition does not have a letter in the operating system itself and can only be seen in Disk Management.
We also note the section with the Windows 8.1 operating system itself, here it has the letter (C:). You may have a different letter. We focus on the volume volume. Further.

Review

Here we select a Samsung disk under the letter (F:) for storing the future backup with a capacity of 400 GB on the left side of the window, the files on it are displayed on the right side.


Get started

A backup of Windows 8.1 is being created on the only existing partition of the Samsung hard drive.


Turn off the computer and disconnect the old hard drive Maxstor 250 GB and leave one hard drive in the system Samsung, you definitely need to do this! After transferring the operating system, the Maxstor hard drive can be connected back.
Acronis True Image
Deploying a Windows 8.1 backup to your hard drive Samsung
Now in the system unit there is one Samsung hard drive (400 GB capacity), on this hard drive there is one partition with data and it is on this partition that there is a backup with Windows 8.1, also at the beginning of this partition an unallocated space has been created, it is to this space that we will expand backup with operating system.
Again, boot from the Acronis True Image boot disk and select Recovery. Disks. Files and folders.


We find our backup on the partition (C:) of the Samsung hard drive. Select it with the left mouse once and click OK


Click on the button New storage

Celebrating Unallocated space on our Samsung hard drive and click on the Accept button

Click on the button again New storage

Click on again Unallocated spaceAnd Accept
Selecting the target disk for MBR recovery. We mark Disk 2 Samsung (capacity 400 GB). Check the box Recover disk signature And Further. Get started Program Acronis True Image deploys a backup of the Windows 8.1 operating system to the unallocated space of the Samsung hard drive that we created in advance. Essentially, the operating system is transferred to another hard drive.


OK and reboot the computer.

Friends, if you still have hard drives connected to your system unit, you need to go to the boot menu of your computer and select the hard drive to which you transferred Windows, in my case, it is a Samsung hard drive.

After loading, go to Disk Management and see this picture.
1. A hidden partition without the letter System Reserved, volume 350 MB with Windows 8.1 download files, was transferred to the Samsung hard drive.
2. Windows 8.1 itself has also been transferred and is located under the letter (C:).
3. Nothing bad happened to the 100 GB files, only from this partition.
4. There is still an unallocated area and we will attach it to the drive (C:).

That's all

Now you can connect your old hard drive to your computer Maxstor and you will find our article useful -
How to correctly transfer Windows 7 from an old hard drive to a new one and then completely remove the old one? The fact is that I purchased a hard drive with a capacity of 1 TB, and my old one is only 120 GB, Windows 7 is installed on it on the system partition (C:), with all the programs I need, which I installed for many days. The system works well and I have no desire to reinstall it. I talked to repairmen, the answer is the same, it’s easier to reinstall, is that true? Vitaly.
Windows 7 Transfer
Hello friends, we have several articles on this topic:
- Secondly, someone asked on the website.
- If you have a laptop, then perhaps the articles will be useful to you.
- If you are interested in the article, visit the special section where you can find from one storage device to another.
Well, in this article I will show you how to transfer Windows 7 using a boot disk, which can be done in the program itself in 5 minutes.
Vitaly has one hard drive on his computer, on it there is a system partition (C:), with Windows 7 installed, but even if there were several more local drives, for example with your data, we could also implement Windows 7 transfer to a new hard drive, with all additional volumes, using the method below.

You should also know that after the operation has been completed, Windows 7 will ask you to re-activate it. I have used the described method many times and always successfully, but just in case, create a recovery disk, you may need it, it can be written to a simple CD in two minutes, if you don’t know how, read: .
To make it easier for you to understand how Windows 7 is transferred to another drive, I’ll show everything to my computer. I specifically left two hard drives in my system unit, one 120 GB and Windows 7 installed on it, the other a blank hard drive for 500 GB
You need to start with whether you can connect your new hard drive to the system unit yourself or not. To help you, our article is on your computer, and if you have successfully completed this, read on. We turn on the computer, the new hard drive is successfully detected in the system.

If your hard drive contains unallocated space, then the transfer will also take place. It is not necessary to create a volume. Start -> Computer, right-click on it and open Management, then Disk Management.

Well, now let’s reboot, the computer should boot from the bootable media, if you have difficulty changing the boot priority in the BIOS, read.
Main program window Tools and Utilities->Disk cloning

Auto

Select with your left mouse the Source hard drive from which you want to transfer all the information to another hard drive. In our case, Disk 1 should be selected for 120 GB, click next.
Hello friends! All topics that relate to personal data, files and settings are always very relevant. Just as relevant are the methods of preserving, transferring and restoring them. Therefore, today I want to write about how to transfer settings, accounts, program settings and files from one computer to another running the Windows operating system, in this article we will look at an example on Windows 7.
To transfer data, we will use the standard utility. In Windows Vista and Windows 7 operating systems this utility is already built-in, and for Windows XP it can be downloaded from the Microsoft website http://www.microsoft.com/ru-ru/download/details.aspx?id=7349.
How to transfer data to another computer?
Well, let's get started.
We launch the utility, for this we go to “Start”, "All programs", “Standard”, “Service” and launch .
 The utility will launch, and on the main page you can read what it can transfer. To continue, click “Next”.

Now we need to choose how we will transfer and receive data to the new computer. There are three ways:
- Using a data cable. To be honest, I still don’t understand what cable we are talking about. It seems that it’s not about the network, because the next point is data transfer using the network. As far as I know, two computers cannot be connected via USB. Well, okay, let's skip this method and move on.
- Second way. This is data transfer using the network. If you have both computers connected to the network, you can try this method.
- Well, for example, we will use the third method. It seems to me the simplest and accessible to everyone. It consists of saving files and settings in one archive, with the ability to restore data from this archive on a new computer.
Therefore we choose “External drive or USB flash drive”.

Then we need to select on which computer you ran the Data Transfer Wizard. In order to create a file of all settings and files, you need to select “This is my original computer”. We will choose the first option when we restore data on a new computer.

Now you need to wait while the program checks the possibility of transferring.

After verification, we will most likely have the opportunity to transfer general and specific account data. You can cancel some items (by clicking on “Settings”) that you do not want to transfer, such as videos or music, they take up a lot of space. Just uncheck unnecessary items and click “Next”. Make sure that the transfer file is not very large.

If you want to protect the data recovery file, then specify a password, if not, just click “Save”.

Now we just need to specify the location where we will save our file with a copy of the data. If it will be restored on another computer, then save it to a flash drive or external hard drive. And if you just want to restore it later on the same computer, you can save it to your hard drive.
Just do not save to the partition where the operating system is installed, most likely it is the local drive C. Because when you reinstall Windows, this partition will be formatted. Save it to local drive D, or E. In any case, this file can then be copied and moved wherever needed.

You need to wait until the file is saved. After saving the file, you can begin restoring data on a new computer. Or after reinstalling the operating system.

Recovering data from a file
After the file has been saved and transferred if necessary, we need to recover the data from it. There is nothing complicated here, let's run it again. Click “Next”.

We choose the third option.

We choose.

Click “Yes”.

Select the file that we saved. Click “Open”.

We can configure the elements to be transferred and click “Transfer”.

That's all, now our files and settings have been transferred to the new computer.
When and where to use data transfer?
Perhaps this should have been written at the beginning of the article. I also wanted to say a few words about when data transfer may come in handy. In the article I wrote that we are transferring data to a new computer. And this is probably the most common option; when buying a new computer, you can transfer all the data in a few clicks, and this is very convenient.
But not only buying a new computer can cause data transfer. This feature can be used, for example, when replacing a hard drive, or when reinstalling the operating system. Good luck friends!
Also on the site:
Windows 7: how to transfer files and settings to a new computer? updated: January 12, 2015 by: admin
 From Sandy Bridge to Coffee Lake: comparing seven generations of Intel Core i7
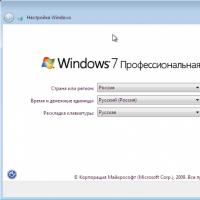 Transferring Windows to another empty hard drive using AOMEI Partition Assistant Windows 7 to another hardware
 Why Wi-Fi may not work on a laptop and how to fix it
 How to add a number to the blacklist on Sony Xperia
 How to save jpeg from coral
 Where to get VKontakte accounts
 How to delete correspondence in mail agent