How to establish a wireless network connection. Ways to solve problems connecting to a Wi-Fi network (Internet). Try to get closer to the router or access point to eliminate interference
A fairly common problem, especially common after some changes: reinstalling the operating system, replacing a router, updating firmware, etc. Sometimes, finding the cause is quite difficult, even for an experienced technician.
In this short article I would like to dwell on a couple of cases due to which, most often, a laptop does not connect via Wi-Fi. I recommend that you familiarize yourself with them and try to restore the network on your own before turning to outside help. By the way, if it says “without access to the Internet” (and the yellow sign is on), then you better look.
1. Reason No. 1 - incorrect/missing drivers
A very common reason why a laptop does not connect via Wi-Fi. Most often, you will see the following picture (if you look in the lower right corner):
No connections available. The network is crossed out with a red cross.
After all, as it happens: the user downloaded a new Windows OS, burned it to disk, copied all his important data, reinstalled the OS, and installed the drivers that were installed before...
The fact is that drivers that worked in Windows XP may not work in Windows 7, those that worked in Windows 7 may refuse to work in Windows 8.
Therefore, if you are updating the OS, and in general, if Wi-Fi does not work, first of all check whether you have the correct drivers and whether they were downloaded from the official website. And in general, I recommend reinstalling them and watching the laptop’s reaction.
How can I check if the driver is in the system?
Very simple. Go to “my computer”, then right-click anywhere in the window and select “properties” in the pop-up window. Next, on the left, there will be a “device manager” link. By the way, you can open it from the control panel, through the built-in search.
Here we are most interested in the network adapters tab. Look carefully to see if you have a wireless network adapter, as in the picture below (naturally, you will have your own adapter model).
It is also worth paying attention to the fact that there should not be any exclamation marks or red crosses - which indicates problems with the driver, that it may not work correctly. If everything is good, it should be displayed as in the picture above.
Where is the best place to get a driver?
It is best to download it from the manufacturer’s official website. Also, usually the laptop comes with native drivers instead, you can use them too.
Even if you have native drivers installed, but the Wi-Fi network does not work, I recommend trying to reinstall them by downloading them from the official website of the laptop manufacturer.
Important notes when choosing a driver for a laptop
1) Their name, most likely (99.8%), should contain the word “ wireless«.
2) Correctly determine the type of network adapter, there are several of them: Broadcom, Intel, Atheros. Usually, on the manufacturer's website, even for a specific laptop model, there may be several versions of drivers. To know exactly which one you need, use the utility.
The utility perfectly determined what hardware was installed in the laptop. You don’t need to install any settings, you just need to run it.
Several websites of popular manufacturers:
Acer: http://www.acer.ru/ac/ru/RU/content/home
HP: http://www8.hp.com/ru/ru/home.html
Asus: http://www.asus.com/ru/
One more thing! The driver can be found and installed automatically. This is described in the article. I recommend checking it out.
2. Reason #2 - is Wi-Fi turned on?
Very often you have to watch how the user tries to look for the causes of breakdowns where there are none...
Most laptop models have an LED indicator on the case that signals Wi-Fi operation. So, it should burn. To turn it on, there are special functional buttons, the purpose of which is indicated in the product passport.
For example, on Acer laptops, Wi-Fi is turned on using the “Fn+F3” button combination.
You can do it differently.
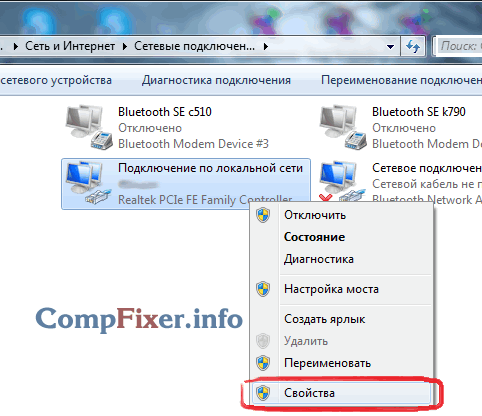
Go to "control Panel" your Windows OS, then the “network and internet” tab, then “ network and sharing center", and finally - " Change adapter settings«.
Here we are interested in the wireless connection icon. It should not be gray and colorless, as in the picture below. If the wireless network icon is colorless, then right-click on it and click “enable“.
You will immediately notice that even if it does not connect to the Internet, it will become colored (see below). This indicates that the laptop adapter is working and it can connect via Wi-Fi.
3. Reason No. 3 - incorrect settings
It often happens that a laptop cannot connect to the network due to a changed password or router settings. This can happen through no fault of the user. For example, the router settings may be lost if the power is turned off during intensive operation.
1) Checking settings in Windows
First, pay attention to the tray icon. If there is no red cross on it, it means there are available connections and you can try to join them.
We click on the icon and a window should appear in front of us with all the Wi-Fi networks that the laptop has found. Select your network and click “connect”. We will be asked to enter a password, if it is correct, then the laptop should connect via Wi-Fi.
2) Checking the router settings
If you cannot connect to a Wi-Fi network and Windows reports an incorrect password, go to the router settings and change the default settings.
To enter the router settings, go to " http://192.168.1.1/"(Without quotes). Typically, this address is used by default. The default password and login are most often “ admin"(in small letters without quotation marks).
Next, change the settings in accordance with your provider settings and router model (if they are lost). It is difficult to give any advice in this part; there is a more extensive article on creating a local Wi-Fi network at home.
Important! It happens that the router does not connect to the Internet automatically. Go into its settings and check if it is trying to connect, and if not, try connecting to the network manually. This error often happens on TrendNet brand routers (at least it used to be on some models, which I personally encountered).
4. If all else fails...
If you've tried everything and nothing helps...
I will give two pieces of advice that help me personally.
1) From time to time, for reasons unknown to me, the Wi-Fi network disconnects. The symptoms are different each time: sometimes it says no connection, sometimes the icon lights up in the tray as expected, but there is still no network...
A 2-step recipe helps to quickly restore a Wi-Fi network:
1. Disconnect the router’s power supply from the network for 10-15 seconds. Then I turn it on again.
2. I reboot the computer.
After this, oddly enough, the Wi-Fi network, and with it the Internet, work as expected. I don’t know why and why this happens, I don’t want to dig into it either, because... This happens quite rarely. If you can guess why, share it in the comments.
2) There was once such a thing that it was generally not clear how to turn on Wi-Fi - the laptop did not respond to the function keys (Fn + F3) - the LED did not light up, and the tray icon wrote that “there are no available connections” (and it does not find Not one). What to do?
I tried a bunch of methods, I wanted to reinstall the system with all the drivers. But I tried to diagnose the wireless adapter. And guess what - he diagnosed the problem and recommended fixing it by “resetting settings and turning on the network,” which I agreed with. After a few seconds the network started working... I recommend trying it.
That's all. Good luck with your settings...
When all the components for connecting to the Internet have already been purchased, you can begin connecting. So, setting up a wireless wi-fi network depends on the main device, represented by a personal computer or laptop. Setting up the World Wide Web directly depends on the operating system of the personal computer.
Any wi-fi camera for Windows also starts working, after taking into account the features of the provided equipment. The system selected by the user must have a window in which a special network connection management item is displayed.
If you need to establish a wireless connection in Windows xp, then you should take into account the difference between the current product of computer companies and previous versions.
Setting up a wireless wi-fi network in Windows xp is considered more complex than in windows 7.
Windows xp. First, the user must select the "Network Connections" option from the Control Panel's Start menu. Then find “wireless connection” and click on it. After enabling this command, communication is established, but you should view the available wireless networks by selecting the appropriate item.
In order for the main device to work in a given direction, “Change the order of network preference” is required. When a new window appears, you can already put a checkmark next to “Use Windows to configure the network” and click on “Advanced”. Next, you will again have to return to “Change the order of network preferences” and remove the checkbox from “The key is provided automatically.” The network details are then entered and OK is pressed to confirm.
Wireless network access for Windows 7
Setting up a wireless wi-fi network in Windows 7 begins with the “Control Panel”, in which you select “Advanced system settings”.
Then go to the “Computer Name” tab and click the “Change” option.
After this action, a window appears on the monitor with the names of the computer or domain. The personal work device itself must have a unique name. If this name had to be changed, a computer restart is required.

Setting parameters for Internet connection in Windows 7
Next, click on the wired connection icon, which is located in the lower right side of the monitor. This is where the “Network and Sharing Center” appears. It must be selected by pressing the confirmation key. From the list that appears, select the “Add” option and create a “Computer-to-computer” network. To continue click “Next”.
In the fields with names and network parameters, enter data as necessary. Then they confirm the actions and enable Internet connection sharing. The Windows 7 wi-fi wireless network will start working immediately after clicking “Close”.
Connecting Windows 8 to wi-fi
The initially installed settings on personal computers or laptops do not always allow you to connect to a wireless network without problems. After all, the Windows 8 operating system may not see the wireless adapter, although it is definitely present.
Setting up a wireless wi-fi network in Windows 8 usually starts by clicking the star icon. After this, a list of proposed wireless networks appears on the monitor. One of them must be selected by typing the required security code. Confirm the above action with the “Next” button.
When it comes to your home network, it is better to choose shared access. When the connection is normal, the asterisk next to the division icon disappears and the signal reception level begins to be displayed.
Implementation of wireless communication reception by the tenth version
Operating system Windows 10 differs from previous versions in additional settings that provide for the use of touch screens. The necessary drivers are also automatically updated here. Because of this additional feature, setting up a wireless wi-fi network in Windows 10 is not particularly difficult. The user just needs to click on the icon in the lower right corner of the monitor and determine the available network.

Connecting wi-fi on Windows 10
It is also possible to automatically select a connection by checking the box next to the appropriate item. If the wi-fi adapter is not connected, then on the marker in question with divisions there is a cross instead of an asterisk. This can be easily fixed by pressing a specific button.
Most often, the wireless network is protected by a password, which must be entered into the window that appears when connecting and confirmed.
Modern computers and laptops already have a built-in special radio receiver that is responsible for sending and receiving information at a distance without the use of wires. For this reason, setting up a wi-fi connection occurs without much difficulty.
In this article I will tell you how to set up wi-fi from scratch. First you need to set up a wireless network on your router, and then on your laptop. With the help of simple step-by-step instructions, even a beginner can set up the Internet on TP-Link and D-Link routers, which are most common in the CIS.
Setting up a wi-fi router
Step 1. We connect the router to the network using a power supply. Turn on the power with the ON button, if the router has such a button.
Step 2. We connect the router to a laptop or computer using an ethernet cable (patch cord), which comes with the router. You need to connect the cable to the port of the computer’s network card and to the LAN1 port of the router. (In no case to the WAN port - you won’t be able to configure it through it)
Step 3. We check that on the computer in the properties of the network card we have selected automatic acquisition of an IP address. To do this, go here: “Start” -> “ Control Panel» -> « Network and Sharing Center» -> «» -> « LAN connection»
Attention! In chapter " Changing adapter settings» You may have multiple connections displayed. For example, Local Area Connection, Local Area Connection 2, Wireless Network Connection, Bluetooth Network Connection 2 etc. How to find the right one among these connections?
Firstly, By default, a wired connection in Windows 7 and 8 is called "Local Area Connection". If no one managed to rename it manually, then it will be called that way. Unless there may be a number at the end - most often “2”. This is the case if the computer has several network cards installed (relevant for desktop computers, because in 99% of cases a laptop comes from the factory with only one wired network adapter)
Secondly, the connection we need should be active, since you connected the computer and the switched-on router using a cable: the connection icon should glow bright (usually blue if your Windows uses a standard icon pack), i.e. the icon should not be grayed out. See picture:

Here, we have found the desired active wired network connection.
Step 3.1. Right-click on the active wired connection we need and select “Properties":
Step 3.2. In the window that opens, click the “Properties” button:

Step 3.3. Select with the left mouse button “ Internet Protocol Version 4 (TCP/IPv4) « and click the next “Properties” button at the bottom:

Step 3.4. We set both switches to the upper positions so that it is “ … … … automatically»:

Step 3.5. Click the “OK” button to save the settings.
Step 4. Open the connection window again:
Step 4.1. Click the “Details” button:

Step 4.2. In the window that opens, we find out the IP address of the default gateway:

In most cases it is 192.168.1.1
Step 5. Open the browser to go to the router’s web interface.
Step 5.1. In the address bar, enter the gateway address and press Enter:
Step 5.2. Enter your login and password:

Attention! You can find out the login details in the instructions for your device. The router may include instructions on paper or in PDF document format on the included disk.
If the instructions are lost, you can try to download it from the manufacturer’s website. For example, http://dlink.ru, http://asus.com, http://tplink.com.
Often in a new device the default login = admin and password = admin. It also happens that login = admin and the password is empty.
Step 5.3. After you have logged into the router’s web interface, open the wireless network (wi-fi) settings:
(illustrated using the example of TP-Link TL-WR841ND and D-Link DIR-300 NRU)

Step 6. The actual setup of the wireless connection.
Step 6.1. We disable WI-FI protected setup, because This feature is a serious security hole and could allow an attacker to hack your Wi-Fi network and gain access to your information.
Step 6.2. We check that the Wi-Fi network is enabled: the “Enable wireless” checkbox is checked if it is D-Link.
Step 6.3. Let's set a name for our wireless network.
If the default is dlink or home, then it is recommended to specify some original name to avoid confusion with neighboring networks of the same name.
Step 6.4. Set security parameters. We strongly recommend using the following options:
- security mode WPA2 ;
- encryption type AES;
- key type PSK(aka Personal Key).
After specifying all the parameters, do not forget to click the save settings button!
On a TP-Link router:
 in D-Link:

Setting up Wi-Fi on a computer (laptop)
In this section we will show you how to set up Wi-Fi on a laptop with Windows 7.
Step 1. Find it on the taskbar near the clock network connections icon and click on it with the left mouse button once. A list of available wireless networks will open:

Step 2. Find your wireless network in the list (it will have the name you specified in the previous paragraph) and left-click on this network.
Step 3. Leave the “Connect automatically” checkbox checked and click the “Connect" button:

Step 4. Enter the Wi-Fi network security key. This is the character set that you specified in the “Network Key” field. After entering the key, click "OK":

After clicking “OK”, the connection to your wireless network occurs.

After a few seconds, the previous window will disappear, and the network connections icon near the clock will change its appearance.
Now, when you click on the network connections icon, you will see that the computer is connected to your wi-fi network, but at the top you can see the inscription “ Without Internet access", because We have not yet configured the Internet on the router:

Setting up the Internet on the router
We set up a wi-fi network on the router and connected to it from a computer. All we have to do is help the router see the Internet so that the router can distribute the Internet to any devices that connect to it via wi-fi or cable.
Step 1. In order for the Internet to appear on computers, you need to set up a connection with the provider on the router. We show the example of the same D-Link
Step 1.1. Type the IP address of the router in the address bar
Step 1.2. Enter your login and password and click “Log in”:
Step 2. Go to the Internet settings section. Different router manufacturers may call it differently: WAN Setup, Internet settings, etc. In our D-Link this section is called “Internet Setup”:

Step 3. We get to the WAN port settings section.
Step 3.1. Uncheck “Enable Access Point Mode”.
Attention! For other manufacturers, this option may be called “Disable NAT”. The bottom line is that the “Access Point” mode disables NAT and turns the router into an access point. This option will be useful if this router is connected not to the provider, but to another of your routers.

Step 3.2. Select the type of connection with the provider.
To find out what settings you need to select to connect specifically to your provider, you can:
- in the contract;
- on the provider's website;
- by calling your provider's hotline
The most commonly used type these days is Dynamic IP.
Step 3.3. If your provider allows connections only from a registered MAC address, you have 2 ways to resolve the issue.
- Go to the provider’s office with your passport and register a new MAC address;
- Enter in the MAC address field the MAC address of the network card of the device from which you successfully accessed the Internet before purchasing the router. Typically, this is the MAC address of the computer's wired network card.
Step 3.4. We specify the DNS server if the instructions from the provider require it.
Step 3.5. Select the MTU value. If the provider does not require you to change this value, we recommend leaving it as it is: 1500.
Step 3.6. Saving the settings
Attention! If you have lost the agreement document with your provider, which contains the details, then, as a last resort, you can always go to the office of your provider with your passport and find out all the comprehensive information: connection type, MAC address, login, password, MTU, etc.
Connecting to a wireless network is the most convenient way to access the Internet at good speed without unnecessary wires. However, to enjoy all the benefits of a wireless connection, you must first understand how to set up Wi-Fi on a laptop.
Enabling the adapter
Before you start creating a new connection, you need to check if the Wi-FI adapter is turned on.
Each laptop model has its own function key to turn the adapter on/off. For example, ASUS laptops use the combination Fn+F2, and Acer laptops use Fn+F3. On some Lenovo models, adapter status is controlled using a hardware switch located on the front panel. 
To determine which key you have installed, look at the F1-F12 row. One of the buttons should have an icon - an antenna that distributes a signal. Press this button in combination with the Fn key and check that the Wi-Fi adapter indicator light changes from red to blue or green.
What to do if the Wi-Fi adapter does not turn on?
There are situations when, after pressing a function key, the adapter does not turn on. Typically this problem occurs due to one of the following reasons:
- Incorrectly installed drivers.
- Incorrect operation of the system.
- Virus infection of laptop.
Until you eliminate the cause, the question of how to set up Wi-Fi in a laptop will not receive a positive resolution. Most often, the problem lies in incorrectly installed drivers, but it would also be a good idea to check the system for viruses. If no malicious applications are found, reinstall the Wi-Fi module drivers and try turning it on again.
How to set up Wi-Fi on a laptop
Setting up on Windows XP
To configure, you just need to correctly specify some parameters of the wireless connection:

If you have set a password for your wireless connection, you will be required to provide a security key, after which the connection will be established.
Setting up on Windows 7
We've sorted out XP, now let's see how to set up a wireless network on a laptop with Windows 7 installed. There are practically no fundamental differences:

This completes the wifi setup on a Windows 7 laptop. When connected, you enter the security key and gain access to the Internet.
For Windows 8.1 or Windows 10 there are no differences in settings from the seventh version. The list of networks available for connection can be called up directly from the notification panel - there is a special Wi-Fi icon in the tray.
Video of Wi-Fi settings on a laptop
Windows 7 has many ways to create and configure a wireless network connection, called wireless profiles:
- The network connections icon in the notification area -########## is the primary way for users to connect to available wireless networks.
- The Set up a connection or network dialog box is a way for users to manually create wireless network profiles.
- The Manage Wireless Networks dialog box is another way to manually configure wireless networks and specify their exact settings.
- Group Policies - Network administrators can use Group Policy settings in an Active Directory Domain Services (AD DS) environment to centrally configure and automatically deploy wireless network settings to domain member computers. (See Wireless Group Policy Settings in Windows Vista, in the April 2007 Cable Guy section.)
- Command Line - Network administrators can use the netsh wlan context of the Netsh.exe utility to manually configure wireless networks and their settings. There are Netsh commands to export existing wireless network profiles to an XML file and then import the wireless network profile from that file to another computer.
The following sections detail how to connect to a wireless network using the network connections icon in the notification area and the Set up a connection or network dialog box in Windows 7, how to manage wireless networks, and how to connect to non-broadcast wireless networks.
Using the network connections icon in the notification area
To connect to an available wireless network, click the network connections icon in the desktop notification area. The panel that opens will display a list of detected wireless networks, and on computers that are members of the domain, the names of wireless networks configured using Group Policy (Fig. 1)
Rice. 1 List of available networks
From this panel, you can connect to a wireless network from the list by double-clicking, or by selecting the network and then clicking the Connect icon, or by right-clicking the network name and selecting Connect from the context menu.
To view information about wireless networks in the list, hover your mouse over the network name. You will see the wireless network name, signal strength, security type, connection type (802.11b/g/n) and network ID (SSID). The status of the connected network and its properties or the network configured using Group Policy can be seen by selecting the display wireless network properties command in the context menu (Fig. 2).
To refresh the list of wireless networks, click the up or down arrow in the upper right corner of the panel. To disconnect from a wireless network, right-click the network icon and select Disconnect.

Rice. 2 Wireless network connection status dialog box.
You can open this dialog box in Windows 7 (Fig. 3) by selecting the “Set Up a New Connection or Network” link in the “Network and Sharing Center” window.

Rice. 3 Dialog box for setting up a connection or network.
To manually create a wireless network profile, select Manually connect to a wireless network, and then click Next. You should see what is shown in Figure 4.

Rice. 4 Page for entering information about the wireless network to be added.
Enter information about the wireless network you are adding:
Network name – enter the name of the wireless network;
Security type—Select the method used to authenticate your wireless network connection from the following options:
- No authentication (Open) – open authentication system without encryption;
- WEP – open authentication system using the Wired Equivalent Privacy (WEP) protocol;
- WPA2 – Wi-Fi Protected Access 2 (WPA2) personal access with a shared key (also known as a passphrase);
- WPA – personal access via Wi-Fi Protected Access (WPA) with a shared key;
- WPA2 – enterprise access via WPA2 protocol with authentication according to the IEEE 802.1X standard;
- WPA – enterprise access via WPA protocol with authentication according to the IEEE 802.1X standard;
- 802.1x – IEEE 802.1X authentication with WEP (also known as dynamic WEP).
The choice depends on the capabilities of the wireless adapter known to Windows. If an authentication type does not appear in the list, you need to check whether your wireless adapter supports that type and whether you have the latest driver installed that is compatible with Windows 7.
Shared key authentication is not listed. Microsoft strongly discourages its use as it provides a low level of wireless network security. To set up shared key authentication, select "No Authentication" in this panel (Open), and then select "Shared" from the "Security" tab of the wireless network properties (as described later in this article).
Encryption type - Select the method used to encrypt data when transmitted over the wireless network. The choice depends on the selected security type.
- If you select the security type "No Authentication" (Open), nothing will be selected;
- When you select the WEP security type, the WEP encryption type will be selected;
- when selecting 802.1x security type, WEP encryption type will be selected;
- When you select the security type "WPA2-Personal", "WPA2-Enterprise", "WPA-Personal" or "WPA-Enterprise", you can select the encryption type - AES or TKIP.
As before, the list of encryption options depends on the capabilities of the wireless network adapter you are using, registered with Windows.
- Security Key - Enter the WEP key (if the security type is WEP), the WPA shared key (if the security type is WPA-Personal), or the WPA2 shared key (if the security type is WPA2-Personal). For WPA2-Enterprise, WPA-Enterprise, and 802.1x security types, Windows 7 automatically detects the security key when performing 802.1X authentication.
- Hide characters - Select whether you want to view the entered security key values.
- Start this connection automatically - Specify whether Windows 7 will automatically connect to this wireless network. If you clear this check box, you must manually connect to a wireless network from the list of available networks displayed when you click the network notification area icon.
- Connect even if the network is not broadcasting - Determine whether Windows should try to connect even if the wireless network does not announce its name. This will force Windows to send a probe frame to discover the wireless network. These probe requests can be used by attackers to determine the name of the non-broadcast network.

Rice. 5 Successfully added page.
You can select Change connection settings to access the wireless network properties page, as described later in this article, or click the Close button.
 Working with Yandex Wordstat Yandex wordstat helper Yandex browser add-on
 The processor is heating up, what is the reason?
 Windows network sniffer. Sniffers. Good intentions and malicious purposes
 How to add a contact to the blacklist
 How documents from Rosreestr are opened
 Receiving Windows XP updates after support ends
 Phone wiretapping - the best spy software